Las tarjetas de transmisiones en vivo aparecen en la sección actual del cronograma y mostrar información que sea relevante en el momento actual.
Las tarjetas en tiempo real son ideales cuando los usuarios usan activamente participa en una tarea, pero quiere revisar Glass periódicamente para obtener información complementaria. Por ejemplo, revisar la hora correr cada pocos minutos o controlar un reproductor de música cuando desean omitir o pausar una canción.
Si es la primera vez que desarrollas para Glass, lee la guía de tareas en curso antes de empezar. En ese documento, repasamos cómo crear un Cristalería con una tarjeta en vivo, según nuestras prácticas recomendadas de diseño.
Cómo funcionan
Las tarjetas en tiempo real permiten que las tarjetas persistan en el presente del cronograma durante el tiempo que sea relevante. A diferencia de las tarjetas estáticas, las tarjetas en vivo no persisten en el cronograma, y los usuarios explícitamente quitarlos cuando hayan terminado con ellos.
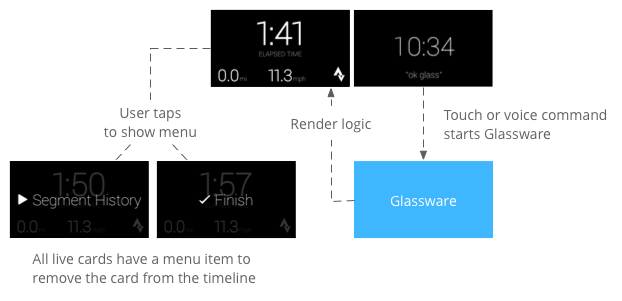
Para iniciar las tarjetas en vivo, los usuarios suelen decir un comando por voz en el menú principal, que inicia un servicio en segundo plano que renderiza la tarjeta. Luego, pueden presionar la tarjeta para mostrar elementos del menú que pueden actuar. en la tarjeta, por ejemplo, descartarla del cronograma.
Cuándo usarlos
Las tarjetas en tiempo real están diseñadas para tareas continuas en las que los usuarios pueden realizar acciones y con frecuencia, como una pantalla que muestra el estado de ejecución de una acción, un mapa animado durante la navegación o un reproductor de música.
Otro beneficio de las tarjetas en tiempo real es que son adecuadas para IU que requieren interacción en tiempo real con los usuarios y actualizaciones en tiempo real de la IU.
Cuando se usan tarjetas en tiempo real, el cronograma sigue teniendo control sobre el usuario del usuario, por lo que debes deslizarte hacia adelante o hacia atrás en una tarjeta en vivo y navega por la línea de tiempo en lugar de actuar sobre la propia tarjeta en tiempo real. Además, la pantalla se enciende y se apaga según cómo se comporte el sistema (después de 5 segundos sin interacción del usuario o durante un aviso).
Sin embargo, las tarjetas en vivo tienen acceso a muchas de las mismas funciones que inmersión, como sensor o Datos de GPS. Esto te permitirá seguir creando experiencias atractivas y, al mismo tiempo, permitir que los usuarios permanezcan en la experiencia de línea de tiempo para hacer otras como revisar los mensajes.
Arquitectura
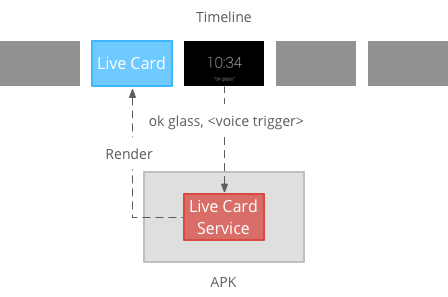
Las tarjetas en tiempo real requieren un contexto de larga duración para poseerlas durante todo el tiempo que son visibles, por lo que debes administrarlas en un servicio en segundo plano.
Luego, puedes publicar y renderizar una tarjeta publicada tan pronto como el servicio o en respuesta a otros eventos que supervisa el servicio. Puedes renderizar tarjetas en vivo con baja frecuencia (una vez cada pocos segundos). o de alta frecuencia (hasta cuantas veces se pueda actualizar el sistema).
Cuando la tarjeta activa ya no sea relevante, destruye el servicio para detener la renderización.
Renderización de baja frecuencia
La renderización de baja frecuencia se limita a un pequeño conjunto de dispositivos Android vistas y solo puede actualizar la pantalla una vez cada unos pocos segundos.
Es una manera sencilla de crear tarjetas en vivo con simple que no requiere renderización constante o actualizaciones frecuentes.
Renderización de alta frecuencia
La renderización de alta frecuencia te permite usar más opciones disponibles en el framework de gráficos de Android.
El sistema te proporciona la superficie real de respaldo de la tarjeta en vivo que dibujas directamente en 2D vistas y diseños o, incluso, gráficos 3D complejos con OpenGL.

Cómo crear tarjetas en vivo de baja frecuencia
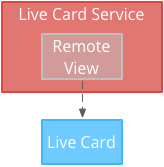
La renderización de baja frecuencia requiere una IU provista por un RemoteViews que admite el siguiente subconjunto de diseños y vistas de Android:
Usa la renderización de baja frecuencia en los siguientes casos:
- Solo necesitas las APIs de View estándar de Android que se mencionaron anteriormente.
- Solo necesitas actualizaciones relativamente poco frecuentes (unos pocos segundos entre actualizaciones).
Ten en cuenta lo siguiente:
- Las tarjetas en vivo siempre deben tener
PendingIntentse declaró consetAction()el cronograma para publicar la tarjeta. - Para hacer cambios en una tarjeta después de publicarla, llama
setViews()en la tarjeta con el recurso RemoteViews actualizado antes de volver a publicarlo.
Para crear tarjetas en vivo de baja frecuencia, haz lo siguiente:
Crea el diseño o la vista que quieras renderizar. El siguiente ejemplo muestra un diseño para un juego de baloncesto imaginario:
 <TextView
     android:id="@+id/home_team_name_text_view"
     android:layout_width="249px"
     android:layout_height="wrap_content"
     android:layout_alignParentRight="true"
     android:gravity="center"
     android:textSize="40px" />

 <TextView
     android:id="@+id/away_team_name_text_view"
     android:layout_width="249px"
     android:layout_height="wrap_content"
     android:layout_alignParentLeft="true"
     android:gravity="center"
     android:textSize="40px" />

 <TextView
     android:id="@+id/away_score_text_view"
     android:layout_width="249px"
     android:layout_height="wrap_content"
     android:layout_alignLeft="@+id/away_team_name_text_view"
     android:layout_below="@+id/away_team_name_text_view"
     android:gravity="center"
     android:textSize="70px" />

 <TextView
     android:id="@+id/home_score_text_view"
     android:layout_width="249px"
     android:layout_height="wrap_content"
     android:layout_alignLeft="@+id/home_team_name_text_view"
     android:layout_below="@+id/home_team_name_text_view"
     android:gravity="center"
     android:textSize="70px" />

 <TextView
     android:id="@+id/footer_text"
     android:layout_width="wrap_content"
     android:layout_height="wrap_content"
     android:layout_alignParentBottom="true"
     android:layout_alignParentLeft="true"
     android:layout_marginBottom="33px"
     android:textSize="26px" />
Crea un servicio que administre la tarjeta publicada y renderice tu diseño o vista. Este servicio de ejemplo actualiza la puntuación de un partido de básquetbol imaginario cada 30 segundos.
import java.util.Random;

import com.google.android.glass.timeline.LiveCard;
import com.google.android.glass.timeline.LiveCard.PublishMode;

import android.app.PendingIntent;
import android.app.Service;
import android.content.Intent;
import android.os.Handler;
import android.os.IBinder;
import android.widget.RemoteViews;

public class LiveCardService extends Service {

    private static final String LIVE_CARD_TAG = "LiveCardDemo";

    private LiveCard mLiveCard;
    private RemoteViews mLiveCardView;

    private int homeScore, awayScore;
    private Random mPointsGenerator;

    private final Handler mHandler = new Handler();
    private final UpdateLiveCardRunnable mUpdateLiveCardRunnable =
        new UpdateLiveCardRunnable();
    private static final long DELAY_MILLIS = 30000;

    @Override
    public void onCreate() {
        super.onCreate();
        mPointsGenerator = new Random();
    }

    @Override
    public int onStartCommand(Intent intent, int flags, int startId) {
        if (mLiveCard == null) {

            // Get an instance of a live card
            mLiveCard = new LiveCard(this, LIVE_CARD_TAG);

            // Inflate a layout into a remote view
            mLiveCardView = new RemoteViews(getPackageName(),
                    R.layout.main_layout);

            // Set up initial RemoteViews values
            homeScore = 0;
            awayScore = 0;
            mLiveCardView.setTextViewText(R.id.home_team_name_text_view,
                    getString(R.string.home_team));
            mLiveCardView.setTextViewText(R.id.away_team_name_text_view,
                    getString(R.string.away_team));
            mLiveCardView.setTextViewText(R.id.footer_text,
                    getString(R.string.game_quarter));

            // Set up the live card's action with a pending intent
            // to show a menu when tapped
            Intent menuIntent = new Intent(this, MenuActivity.class);
            menuIntent.addFlags(Intent.FLAG_ACTIVITY_NEW_TASK |
                    Intent.FLAG_ACTIVITY_CLEAR_TASK);
            mLiveCard.setAction(PendingIntent.getActivity(
                    this, 0, menuIntent, 0));

            // Publish the live card
            mLiveCard.publish(PublishMode.REVEAL);

            // Queue the update text runnable
            mHandler.post(mUpdateLiveCardRunnable);
        }
        return START_STICKY;
    }

    @Override
    public void onDestroy() {
        if (mLiveCard != null && mLiveCard.isPublished()) {
            //Stop the handler from queuing more Runnable jobs
            mUpdateLiveCardRunnable.setStop(true);

            mLiveCard.unpublish();
            mLiveCard = null;
        }
        super.onDestroy();
    }

    /**
     * Runnable that updates live card contents
     */
    private class UpdateLiveCardRunnable implements Runnable{

        private boolean mIsStopped = false;

        /*
         * Updates the card with a fake score every 30 seconds as a demonstration.
         * You also probably want to display something useful in your live card.
         *
         * If you are executing a long running task to get data to update a
         * live card(e.g, making a web call), do this in another thread or
         * AsyncTask.
         */
        public void run(){
            if(!isStopped()){
                // Generate fake points.
                homeScore += mPointsGenerator.nextInt(3);
                awayScore += mPointsGenerator.nextInt(3);

                // Update the remote view with the new scores.
                mLiveCardView.setTextViewText(R.id.home_score_text_view,
                        String.valueOf(homeScore));
                mLiveCardView.setTextViewText(R.id.away_score_text_view,
                        String.valueOf(awayScore));

                // Always call setViews() to update the live card's RemoteViews.
                mLiveCard.setViews(mLiveCardView);

                // Queue another score update in 30 seconds.
                mHandler.postDelayed(mUpdateLiveCardRunnable, DELAY_MILLIS);
            }
        }

        public boolean isStopped() {
            return mIsStopped;
        }

        public void setStop(boolean isStopped) {
            this.mIsStopped = isStopped;
        }
    }

    @Override
    public IBinder onBind(Intent intent) {
      /*
       * If you need to set up interprocess communication
       * (activity to a service, for instance), return a binder object
       * so that the client can receive and modify data in this service.
       *
       * A typical use is to give a menu activity access to a binder object
       * if it is trying to change a setting that is managed by the live card
       * service. The menu activity in this sample does not require any
       * of these capabilities, so this just returns null.
       */
       return null;
    }
}
Cómo crear tarjetas en vivo de alta frecuencia
La renderización de alta frecuencia te permite dibujar en la Surface de respaldo de la tarjeta publicada.
Usa la renderización de alta frecuencia en las siguientes situaciones:
- Debes actualizar la tarjeta activa con frecuencia (varias veces por segundo).
- Necesitas flexibilidad en lo que puedes renderizar. La renderización de alta frecuencia te permite Usarás vistas y diseños de Android para gráficos complejos de OpenGL.
Ten en cuenta lo siguiente:
- Siempre debes crear un servicio en segundo plano para renderizar en la superficie de la tarjeta publicada.
- Las tarjetas en vivo siempre deben tener
PendingIntentse declaró consetAction() - Usa
GLRenderersi eres cómo representar OpenGL yDirectRenderingCallbackpara todos los demás casos.
Cómo usar DirectRenderingCallback
Para crear tarjetas en vivo con vistas estándar de Android y lógica de dibujo, haz lo siguiente:
Crea una clase que implemente
DirectRenderingCallback: Implementar las devoluciones de llamada en estas interfaces te permite realizar acciones durante eventos importantes del ciclo de vida de la superficie de la tarjeta publicada.En el siguiente ejemplo, se crea un subproceso en segundo plano para renderizarlo periódicamente, pero puede actualizar la tarjeta en respuesta a eventos externos (por ejemplo, del sensor o de la ubicación).
public class LiveCardRenderer implements DirectRenderingCallback {

    // About 30 FPS.
    private static final long FRAME_TIME_MILLIS = 33;

    private SurfaceHolder mHolder;
    private boolean mPaused;
    private RenderThread mRenderThread;

    @Override
    public void surfaceChanged(SurfaceHolder holder, int format,
            int width, int height) {
        // Update your views accordingly.
    }

    @Override
    public void surfaceCreated(SurfaceHolder holder) {
        mPaused = false;
        mHolder = holder;
        updateRendering();
    }

    @Override
    public void surfaceDestroyed(SurfaceHolder holder) {
        mHolder = null;
        updateRendering();
    }

    @Override
    public void renderingPaused(SurfaceHolder holder, boolean paused) {
        mPaused = paused;
        updateRendering();
    }

    /**
     * Start or stop rendering according to the timeline state.
     */
    private void updateRendering() {
        boolean shouldRender = (mHolder != null) && !mPaused;
        boolean rendering = mRenderThread != null;

        if (shouldRender != rendering) {
            if (shouldRender) {
                mRenderThread = new RenderThread();
                mRenderThread.start();
            } else {
                mRenderThread.quit();
                mRenderThread = null;
            }
        }
    }

    /**
     * Draws the view in the SurfaceHolder's canvas.
     */
    private void draw() {
        Canvas canvas;
        try {
            canvas = mHolder.lockCanvas();
        } catch (Exception e) {
            return;
        }
        if (canvas != null) {
            // Draw on the canvas.
            mHolder.unlockCanvasAndPost(canvas);
        }
    }

    /**
     * Redraws in the background.
     */
    private class RenderThread extends Thread {
        private boolean mShouldRun;

        /**
         * Initializes the background rendering thread.
         */
        public RenderThread() {
            mShouldRun = true;
        }

        /**
         * Returns true if the rendering thread should continue to run.
         *
         * @return true if the rendering thread should continue to run
         */
        private synchronized boolean shouldRun() {
            return mShouldRun;
        }

        /**
         * Requests that the rendering thread exit at the next
         opportunity.
         */
        public synchronized void quit() {
            mShouldRun = false;
        }

        @Override
        public void run() {
            while (shouldRun()) {
                draw();
                SystemClock.sleep(FRAME_TIME_MILLIS);
            }
        }
    }
}
Configura una instancia de tu
DirectRenderingCallback. que elLiveCardDevolución de llamada deSurfaceHolder. Esta permite que la tarjeta publicada sepa qué lógica usar para renderizarse.// Tag used to identify the LiveCard in debugging logs. private static final String LIVE_CARD_TAG = "my_card"; // Cached instance of the LiveCard created by the publishCard() method. private LiveCard mLiveCard; private void publishCard(Context context) { if (mLiveCard == null) { mLiveCard = new LiveCard(this, LIVE_CARD_TAG); // Enable direct rendering. mLiveCard.setDirectRenderingEnabled(true); mLiveCard.getSurfaceHolder().addCallback( new LiveCardRenderer()); Intent intent = new Intent(context, MenuActivity.class); mLiveCard.setAction(PendingIntent.getActivity(context, 0, intent, 0)); mLiveCard.publish(LiveCard.PublishMode.SILENT); } else { // Card is already published. return; } } private void unpublishCard(Context context) { if (mLiveCard != null) { mLiveCard.unpublish(); mLiveCard = null; } }
Cómo usar OpenGL
Crea una clase que implemente
GlRendererLa implementación de devoluciones de llamada en esta interfaz te permite realizar acciones durante eventos importantes del ciclo de vida de la superficie de la tarjeta en vivo. En este ejemplo, se dibuja un cubo de color que rota.import com.google.android.glass.timeline.GlRenderer; import android.opengl.GLES20; import android.opengl.Matrix; import android.os.SystemClock; import java.util.concurrent.TimeUnit; import javax.microedition.khronos.egl.EGLConfig; /** * Renders a 3D OpenGL Cube on a {@link LiveCard}. */ public class CubeRenderer implements GlRenderer { /** Rotation increment per frame. */ private static final float CUBE_ROTATION_INCREMENT = 0.6f; /** The refresh rate, in frames per second. */ private static final int REFRESH_RATE_FPS = 60; /** The duration, in milliseconds, of one frame. */ private static final float FRAME_TIME_MILLIS = TimeUnit.SECONDS.toMillis(1) / REFRESH_RATE_FPS; private final float[] mMVPMatrix; private final float[] mProjectionMatrix; private final float[] mViewMatrix; private final float[] mRotationMatrix; private final float[] mFinalMVPMatrix; private Cube mCube; private float mCubeRotation; private long mLastUpdateMillis; public CubeRenderer() { mMVPMatrix = new float[16]; mProjectionMatrix = new float[16]; mViewMatrix = new float[16]; mRotationMatrix = new float[16]; mFinalMVPMatrix = new float[16]; // Set the fixed camera position (View matrix). Matrix.setLookAtM(mViewMatrix, 0, 0.0f, 0.0f, -4.0f, 0.0f, 0.0f, 0.0f, 0.0f, 1.0f, 0.0f); } @Override public void onSurfaceCreated(EGLConfig config) { // Set the background frame color GLES20.glClearColor(0.0f, 0.0f, 0.0f, 1.0f); GLES20.glClearDepthf(1.0f); GLES20.glEnable(GLES20.GL_DEPTH_TEST); GLES20.glDepthFunc(GLES20.GL_LEQUAL); mCube = new Cube(); } @Override public void onSurfaceChanged(int width, int height) { float ratio = (float) width / height; GLES20.glViewport(0, 0, width, height); // This projection matrix is applied to object coordinates in the onDrawFrame() method. Matrix.frustumM(mProjectionMatrix, 0, -ratio, ratio, -1.0f, 1.0f, 3.0f, 7.0f); // modelView = projection x view Matrix.multiplyMM(mMVPMatrix, 0, mProjectionMatrix, 0, mViewMatrix, 0); } @Override public void onDrawFrame() { GLES20.glClear(GLES20.GL_COLOR_BUFFER_BIT | GLES20.GL_DEPTH_BUFFER_BIT); // Apply the rotation. Matrix.setRotateM(mRotationMatrix, 0, mCubeRotation, 1.0f, 1.0f, 1.0f); // Combine the rotation matrix with the projection and camera view Matrix.multiplyMM(mFinalMVPMatrix, 0, mMVPMatrix, 0, mRotationMatrix, 0); // Draw cube. mCube.draw(mFinalMVPMatrix); updateCubeRotation(); } /** Updates the cube rotation. */ private void updateCubeRotation() { if (mLastUpdateMillis != 0) { float factor = (SystemClock.elapsedRealtime() - mLastUpdateMillis) / FRAME_TIME_MILLIS; mCubeRotation += CUBE_ROTATION_INCREMENT * factor; } mLastUpdateMillis = SystemClock.elapsedRealtime(); } }Crea un servicio que administre la tarjeta activa y establezca la clase
CubeRenderercomo procesador de la tarjeta publicadaimport com.google.android.glass.timeline.LiveCard; import com.google.android.glass.timeline.LiveCard.PublishMode; import android.app.PendingIntent; import android.app.Service; import android.content.Intent; import android.os.IBinder; /** * Creates a {@link LiveCard} rendering a rotating 3D cube with OpenGL. */ public class OpenGlService extends Service { private static final String LIVE_CARD_TAG = "opengl"; private LiveCard mLiveCard; @Override public IBinder onBind(Intent intent) { return null; } @Override public int onStartCommand(Intent intent, int flags, int startId) { if (mLiveCard == null) { mLiveCard = new LiveCard(this, LIVE_CARD_TAG); mLiveCard.setRenderer(new CubeRenderer()); mLiveCard.setAction( PendingIntent.getActivity(this, 0, new Intent(this, MenuActivity.class), 0)); mLiveCard.publish(PublishMode.REVEAL); } else { mLiveCard.navigate(); } return START_STICKY; } @Override public void onDestroy() { if (mLiveCard != null && mLiveCard.isPublished()) { mLiveCard.unpublish(); mLiveCard = null; } super.onDestroy(); } }
import android.opengl.GLES20;

import java.nio.ByteBuffer;
import java.nio.ByteOrder;
import java.nio.FloatBuffer;

/**
 * Renders a 3D Cube using OpenGL ES 2.0.
 *
 * For more information on how to use OpenGL ES 2.0 on Android, see the
 * <a href="//developer.android.com/training/graphics/opengl/index.html">
 * Displaying Graphics with OpenGL ES</a> developer guide.
 */
public class Cube {

    /** Cube vertices */
    private static final float VERTICES[] = {
        -0.5f, -0.5f, -0.5f,
        0.5f, -0.5f, -0.5f,
        0.5f, 0.5f, -0.5f,
        -0.5f, 0.5f, -0.5f,
        -0.5f, -0.5f, 0.5f,
        0.5f, -0.5f, 0.5f,
        0.5f, 0.5f, 0.5f,
        -0.5f, 0.5f, 0.5f
    };

    /** Vertex colors. */
    private static final float COLORS[] = {
        0.0f, 1.0f, 1.0f, 1.0f,
        1.0f, 0.0f, 0.0f, 1.0f,
        1.0f, 1.0f, 0.0f, 1.0f,
        0.0f, 1.0f, 0.0f, 1.0f,
        0.0f, 0.0f, 1.0f, 1.0f,
        1.0f, 0.0f, 1.0f, 1.0f,
        1.0f, 1.0f, 1.0f, 1.0f,
        0.0f, 1.0f, 1.0f, 1.0f,
    };


    /** Order to draw vertices as triangles. */
    private static final byte INDICES[] = {
        0, 1, 3, 3, 1, 2, // Front face.
        0, 1, 4, 4, 5, 1, // Bottom face.
        1, 2, 5, 5, 6, 2, // Right face.
        2, 3, 6, 6, 7, 3, // Top face.
        3, 7, 4, 4, 3, 0, // Left face.
        4, 5, 7, 7, 6, 5, // Rear face.
    };

    /** Number of coordinates per vertex in {@link VERTICES}. */
    private static final int COORDS_PER_VERTEX = 3;

    /** Number of values per colors in {@link COLORS}. */
    private static final int VALUES_PER_COLOR = 4;

    /** Vertex size in bytes. */
    private final int VERTEX_STRIDE = COORDS_PER_VERTEX * 4;

    /** Color size in bytes. */
    private final int COLOR_STRIDE = VALUES_PER_COLOR * 4;

    /** Shader code for the vertex. */
    private static final String VERTEX_SHADER_CODE =
            "uniform mat4 uMVPMatrix;" +
            "attribute vec4 vPosition;" +
            "attribute vec4 vColor;" +
            "varying vec4 _vColor;" +
            "void main() {" +
            "  _vColor = vColor;" +
            "  gl_Position = uMVPMatrix * vPosition;" +
            "}";

    /** Shader code for the fragment. */
    private static final String FRAGMENT_SHADER_CODE =
            "precision mediump float;" +
            "varying vec4 _vColor;" +
            "void main() {" +
            "  gl_FragColor = _vColor;" +
            "}";


    private final FloatBuffer mVertexBuffer;
    private final FloatBuffer mColorBuffer;
    private final ByteBuffer mIndexBuffer;
    private final int mProgram;
    private final int mPositionHandle;
    private final int mColorHandle;
    private final int mMVPMatrixHandle;

    public Cube() {
        ByteBuffer byteBuffer = ByteBuffer.allocateDirect(VERTICES.length * 4);

        byteBuffer.order(ByteOrder.nativeOrder());
        mVertexBuffer = byteBuffer.asFloatBuffer();
        mVertexBuffer.put(VERTICES);
        mVertexBuffer.position(0);

        byteBuffer = ByteBuffer.allocateDirect(COLORS.length * 4);
        byteBuffer.order(ByteOrder.nativeOrder());
        mColorBuffer = byteBuffer.asFloatBuffer();
        mColorBuffer.put(COLORS);
        mColorBuffer.position(0);

        mIndexBuffer = ByteBuffer.allocateDirect(INDICES.length);
        mIndexBuffer.put(INDICES);
        mIndexBuffer.position(0);

        mProgram = GLES20.glCreateProgram();
        GLES20.glAttachShader(mProgram, loadShader(GLES20.GL_VERTEX_SHADER, VERTEX_SHADER_CODE));
        GLES20.glAttachShader(
                mProgram, loadShader(GLES20.GL_FRAGMENT_SHADER, FRAGMENT_SHADER_CODE));
        GLES20.glLinkProgram(mProgram);

        mPositionHandle = GLES20.glGetAttribLocation(mProgram, "vPosition");
        mColorHandle = GLES20.glGetAttribLocation(mProgram, "vColor");
        mMVPMatrixHandle = GLES20.glGetUniformLocation(mProgram, "uMVPMatrix");
    }

    /**
     * Encapsulates the OpenGL ES instructions for drawing this shape.
     *
     * @param mvpMatrix The Model View Project matrix in which to draw this shape
     */
    public void draw(float[] mvpMatrix) {
        // Add program to OpenGL environment.
        GLES20.glUseProgram(mProgram);

        // Prepare the cube coordinate data.
        GLES20.glEnableVertexAttribArray(mPositionHandle);
        GLES20.glVertexAttribPointer(
                mPositionHandle, 3, GLES20.GL_FLOAT, false, VERTEX_STRIDE, mVertexBuffer);

        // Prepare the cube color data.
        GLES20.glEnableVertexAttribArray(mColorHandle);
        GLES20.glVertexAttribPointer(
                mColorHandle, 4, GLES20.GL_FLOAT, false, COLOR_STRIDE, mColorBuffer);

        // Apply the projection and view transformation.
        GLES20.glUniformMatrix4fv(mMVPMatrixHandle, 1, false, mvpMatrix, 0);

        // Draw the cube.
        GLES20.glDrawElements(
                GLES20.GL_TRIANGLES, INDICES.length, GLES20.GL_UNSIGNED_BYTE, mIndexBuffer);

        // Disable vertex arrays.
        GLES20.glDisableVertexAttribArray(mPositionHandle);
        GLES20.glDisableVertexAttribArray(mColorHandle);
    }

    /** Loads the provided shader in the program. */
    private static int loadShader(int type, String shaderCode){
        int shader = GLES20.glCreateShader(type);

        GLES20.glShaderSource(shader, shaderCode);
        GLES20.glCompileShader(shader);

        return shader;
    }
}
Mostrar un enfoque de tarjeta en vivo
Cuando publicas una tarjeta publicada con LiveCard.publish(), le pasas un parámetro
para controlar el foco de inmediato o no.
Para que la línea de tiempo salte a la tarjeta inmediatamente después de publicarla, usa
LiveCard.PublishMode.REVEAL
Para publicar la tarjeta de forma silenciosa y hacer que los usuarios naveguen a ella por su cuenta, usa
LiveCard.PublishMode.SILENT
Además, el elemento LiveCard.navigate()
te permite pasar a la tarjeta después de publicarla. Por ejemplo, si los usuarios intentan iniciar tu
en vivo desde el menú principal de voz y ya se inició, puedes pasar a la
con este método.
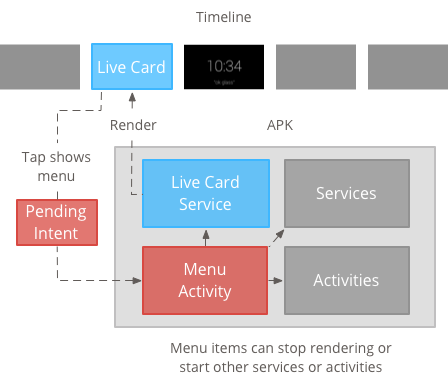
Crea y muestra un menú
Las tarjetas en vivo no pueden mostrar su propio sistema de menú, por lo que debes crear una actividad para mostrarlo para la tarjeta de transmisión en vivo.
La actividad del menú puede entonces tener elementos para detener la tarjeta activa, e iniciar una inmersión o cualquier otra acción que desees realizar. También puedes agregar actividades de configuración del sistema, por ejemplo, el control de volumen, como un elemento de menú. Para ver más información, consulta Iniciando configuración.
Cómo crear recursos de menú
La creación de recursos de menú es lo mismo que en la plataforma de Android, pero sigue estos lineamientos para Glass:
- Para cada elemento de menú, proporciona un ícono de elemento de menú de 50 × 50 píxeles. El menú el icono debe ser de color blanco sobre un fondo transparente. Consulta la Íconos de elementos de menú de Glass para un ejemplo o para descargarlos para tu propio uso.
- Usa un nombre corto que describa la acción y que esté escrito con mayúsculas de título. Los verbos imperativos funcionan (por ejemplo, Compartir o Responder a todos).
- Glass no muestra tarjetas en vivo sin un elemento del menú. Como mínimo, proporcionan un elemento de menú Detener para que los usuarios puedan quitar la tarjeta publicada de la en el cronograma.
El Widget CheckBox no es compatible.
<menu xmlns:android="http://schemas.android.com/apk/res/android">
    <item
        android:id="@+id/menu_item_1"
        android:title="@string/Menu_Item_1"       <!-- must have "Stop" menu item -->
        android:icon="@drawable/menu_item_1_icon" />   <!-- white on transparent icon -->
</menu>
Cómo crear una actividad para manejar devoluciones de llamada del menú
Debes definir una actividad de menú que invocará tu tarjeta activa cuando los usuarios la presionen.
Anula lo siguiente
Métodos de devolución de llamada Activity
para crear, mostrar e ignorar correctamente los menús en la actividad del menú:
onCreateOptionsMenu()aumenta el recurso de menú XML.onAttachedToWindow()muestra el menú cuando la actividad está en foco.onPrepareOptionsMenu()muestra u oculta los elementos del menú si es necesario. Por ejemplo, puedes mostrar diferentes elementos del menú según lo que hacen los usuarios. Por ejemplo, puedes mostrar diferentes elementos del menú según en algunos datos contextuales.onOptionsItemSelected()controla la selección del usuario.onOptionsMenuClosed()para finalizar la actividad, de modo que ya no aparezca sobre la tarjeta publicada.
Debes finalizar la actividad aquí para que termine correctamente cuando se cierre el menú mediante una selección o deslizando el dedo hacia abajo.
/**
 * Activity showing the options menu.
 */
public class MenuActivity extends Activity {

    @Override
    public void onAttachedToWindow() {
        super.onAttachedToWindow();
        openOptionsMenu();
    }

    @Override
    public boolean onCreateOptionsMenu(Menu menu) {
        MenuInflater inflater = getMenuInflater();
        inflater.inflate(R.menu.stopwatch, menu);
        return true;
    }

    @Override
    public boolean onOptionsItemSelected(MenuItem item) {
        // Handle item selection.
        switch (item.getItemId()) {
            case R.id.stop:
                stopService(new Intent(this, StopwatchService.class));
                return true;
            default:
                return super.onOptionsItemSelected(item);
        }
    }

    @Override
    public void onOptionsMenuClosed(Menu menu) {
        // Nothing else to do, closing the activity.
        finish();
    }
}
Cómo hacer que la actividad del menú sea transparente
Para mantener la coherencia con el estilo de Glass, haz que la actividad del menú translúcida, de modo que la tarjeta publicada siga visible debajo el menú:
Crea un archivo
res/values/styles.xmly declara un estilo que haga que el fondo de la actividad sea transparente:<resources> <style name="MenuTheme" parent="@android:style/Theme.DeviceDefault"> <item name="android:windowBackground">@android:color/transparent</item> <item name="android:colorBackgroundCacheHint">@null</item> <item name="android:windowIsTranslucent">true</item> <item name="android:windowAnimationStyle">@null</item> </style> </resources>En tu archivo
AndroidManifest.xml, asigna el tema a la actividad del menú:<?xml version="1.0" encoding="utf-8"?> <manifest ... > ... <application ... > ... <activity android:name=".MenuActivity" android:theme="@style/MenuTheme" ...> </activity> </application> </manifest>
Visualización del menú
Proporciona un
PendingIntent
para la acción de la tarjeta con setAction(). El intent pendiente se usa para iniciar
la actividad del menú cuando los usuarios presionan la tarjeta:
Intent menuIntent = new Intent(this, MenuActivity.class);
mLiveCard.setAction(PendingIntent.getActivity(this, 0, menuIntent, 0));
mLiveCard.publish(LiveCard.PublishMode.REVEAL); // or SILENT
Compatibilidad con comandos por voz contextuales
Indica si tu
MenuActivityadmite comandos por voz contextuales:// Initialize your LiveCard as usual. mLiveCard.setVoiceActionEnabled(true); mLiveCard.publish(LiveCard.PublishMode.REVEAL); // or SILENTModifica tu
MenuActivitypara que admita la invocación a través del flujo de voz:/** * Activity showing the options menu. */ public class MenuActivity extends Activity { private boolean mFromLiveCardVoice; private boolean mIsFinishing; @Override protected void onCreate(Bundle savedInstanceState) { super.onCreate(savedInstanceState); mFromLiveCardVoice = getIntent().getBooleanExtra(LiveCard.EXTRA_FROM_LIVECARD_VOICE, false); if (mFromLiveCardVoice) { // When activated by voice from a live card, enable voice commands. The menu // will automatically "jump" ahead to the items (skipping the guard phrase // that was already said at the live card). getWindow().requestFeature(WindowUtils.FEATURE_VOICE_COMMANDS); } } @Override public void onAttachedToWindow() { super.onAttachedToWindow(); if (!mFromLiveCardVoice) { openOptionsMenu(); } } @Override public boolean onCreatePanelMenu(int featureId, Menu menu) { if (isMyMenu(featureId)) { getMenuInflater().inflate(R.menu.stopwatch, menu); return true; } return super.onCreatePanelMenu(featureId, menu); } @Override public boolean onPreparePanel(int featureId, View view, Menu menu) { if (isMyMenu(featureId)) { // Don't reopen menu once we are finishing. This is necessary // since voice menus reopen themselves while in focus. return !mIsFinishing; } return super.onPreparePanel(featureId, view, menu); } @Override public boolean onMenuItemSelected(int featureId, MenuItem item) { if (isMyMenu(featureId)) { // Handle item selection. switch (item.getItemId()) { case R.id.stop_this: stopService(new Intent(this, StopwatchService.class)); return true; } } return super.onMenuItemSelected(featureId, item); } @Override public void onPanelClosed(int featureId, Menu menu) { super.onPanelClosed(featureId, menu); if (isMyMenu(featureId)) { // When the menu panel closes, either an item is selected from the menu or the // menu is dismissed by swiping down. Either way, we end the activity. isFinishing = true; finish(); } } /** * Returns {@code true} when the {@code featureId} belongs to the options menu or voice * menu that are controlled by this menu activity. */ private boolean isMyMenu(int featureId) { return featureId == Window.FEATURE_OPTIONS_PANEL || featureId == WindowUtils.FEATURE_VOICE_COMMANDS; } }
Consulta la comandos por voz contextuales para obtener más información.
Utilidades de menú
Hay algunos métodos auxiliares disponibles para modificar el aspecto y el comportamiento de los menús. Consulta MenuUtils para obtener más información.