הכרטיסים הפעילים מופיעים בקטע הנוכחי של ציר הזמן. להציג מידע שרלוונטי כרגע.
כרטיסים פעילים הם דרך מצוינת למשתמשים פעילים אם הם מעורבים במשימה, אבל רוצים לבדוק מדי פעם את Glass לקבלת מידע משלים. לדוגמה, בדיקת הזמן לפעול כל כמה דקות או לשלוט בנגן מוזיקה כאשר הם רוצים לדלג על שיר או להשהות אותו.
אם זו הפעם הראשונה שאתם מפתחים עבור Glass, לקרוא את מדריך המשימות לפעילות מתמשכת קודם. המסמך הזה מסביר איך לבנות כלי זכוכית עם כרטיס פעיל, בהתאם לשיטות המומלצות שלנו לעיצוב.
איך זה עובד
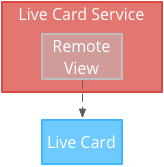
כרטיסים פעילים עוזרים לשמור על יציבות כרטיסים בהווה של ציר הזמן כל עוד הם רלוונטיים. בניגוד לכרטיסים סטטיים, הכרטיסים הפעילים לא נשארים בציר הזמן, והמשתמשים להסיר אותן אחרי שנסיים איתם.

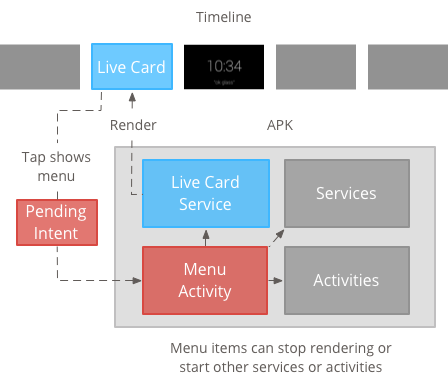
בדרך כלל משתמשים מפעילים כרטיסים פעילים על ידי אמירת פקודה קולית בתפריט הראשי, שמתחיל שירות רקע לעיבוד הכרטיס. לאחר מכן, הוא יכול להקיש על הכרטיס כדי להציג אפשרויות בתפריט שניתן לבצע בהן פעולות בכרטיס, למשל לסגור אותו בציר הזמן.
מתי כדאי להשתמש בנכסים לחיפוש מפיצים
כרטיסים פעילים מיועדים למשימות מתמשכות שהמשתמשים יכולים להיכנס אליהן ולא לעיתים קרובות, כמו מסך שמציג את מצב הפעילות של פעולה, מפה מונפשת במהלך הניווט או נגן מוזיקה.
יתרון נוסף של כרטיסים פעילים הוא שהם מתאימים מאוד ממשקי משתמש שמחייבים אינטראקציה בזמן אמת עם המשתמשים ועדכונים בזמן אמת לממשק המשתמש.
כשמשתמשים בכרטיסים פעילים, ציר הזמן עדיין יכול לשלוט במשתמש לכן, מחליקים קדימה או אחורה בכרטיס פעיל מנווט בציר הזמן במקום לפעול על הכרטיס הפעיל עצמו. בנוסף, המסך נדלק ונכבה בהתאם להתנהגות המערכת (לאחר 5 שניות ללא אינטראקציה עם המשתמש, או במהלך הסטת הראש כלפי מעלה).
עם זאת, לכרטיסים פעילים יש גישה לתכונות רבות של להיות עמוקות, כמו חיישן נתוני GPS. כך עדיין אפשר ליצור חוויות שימוש מעניינות ולאפשר למשתמשים להישאר בציר הזמן כדי לבצע דברים, כמו בדיקת הודעות.
ארכיטקטורה

לכרטיסים פעילים נדרש הקשר ארוך כדי שיוכלו להיות הבעלים שלהם לכל משך הזמן. שהן גלויות, לכן נהלו אותן בשירות רקע.
לאחר מכן אפשר לפרסם ולעבד כרטיס פעיל ברגע שהשירות מתחיל או בתגובה לאירועים אחרים שהשירות עוקב אחריהם. ניתן לעבד כרטיסים פעילים בתדירות נמוכה (פעם אחת בכל כמה שניות), או בתדירות גבוהה (עד מספר הפעמים שהמערכת יכולה לרענן).
כשהכרטיס הפעיל כבר לא רלוונטי, אפשר להשמיד את השירות הפסקת הרינדור.
רינדור בתדירות נמוכה
רינדור בתדירות נמוכה מוגבל לקבוצה קטנה של Android ויכול לעדכן את התצוגה רק פעם אחת כמה שניות.
זוהי דרך פשוטה ליצור כרטיסים בשידור חי עם תוכן פשוט שאינו דורש עיבוד קבוע או עדכונים תכופים.
רינדור בתדירות גבוהה
רינדור בתדירות גבוהה מאפשר לכם להשתמש באפשרויות נוספות הזמינות במסגרת הגרפיקה של Android.
המערכת מספקת את משטח הגיבוי האמיתי של כרטיס פעיל שציירתם עליו ישירות בדו-ממד תצוגות ופריסות או אפילו גרפיקה תלת-ממדית מורכבת באמצעות OpenGL.

יצירת כרטיסים פעילים בתדירות נמוכה
רינדור בתדירות נמוכה דורש ממשק משתמש שמסופק על-ידי RemoteViews שתומך בקבוצות המשנה הבאות של פריסות ותצוגות של Android:
כדאי להשתמש ברינדור בתדירות נמוכה כאשר:
- יש צורך רק בממשקי ה-API הרגילים של Android View שצוינו למעלה.
- נדרשים עדכונים בתדירות נמוכה יחסית (תוך כמה שניות בין התחנות מתבצע רענון).
חשוב לזכור:
- לכרטיסים חיים תמיד חייב להיות
PendingIntentהוצהר באמצעותsetAction()לציר הזמן לפרסום הכרטיס. - כדי לבצע שינויים בכרטיס לאחר הפרסום, צריך להתקשר
setViews()בכרטיס עם RemoteViews לפני שמפרסמים שוב.
כדי ליצור כרטיסים פעילים בתדירות נמוכה:
יוצרים את הפריסה או התצוגה שרוצים לעבד. הדוגמה הבאה מראה פריסה של משחק כדורסל דמיוני:
 <TextView
     android:id="@+id/home_team_name_text_view"
     android:layout_width="249px"
     android:layout_height="wrap_content"
     android:layout_alignParentRight="true"
     android:gravity="center"
     android:textSize="40px" />

 <TextView
     android:id="@+id/away_team_name_text_view"
     android:layout_width="249px"
     android:layout_height="wrap_content"
     android:layout_alignParentLeft="true"
     android:gravity="center"
     android:textSize="40px" />

 <TextView
     android:id="@+id/away_score_text_view"
     android:layout_width="249px"
     android:layout_height="wrap_content"
     android:layout_alignLeft="@+id/away_team_name_text_view"
     android:layout_below="@+id/away_team_name_text_view"
     android:gravity="center"
     android:textSize="70px" />

 <TextView
     android:id="@+id/home_score_text_view"
     android:layout_width="249px"
     android:layout_height="wrap_content"
     android:layout_alignLeft="@+id/home_team_name_text_view"
     android:layout_below="@+id/home_team_name_text_view"
     android:gravity="center"
     android:textSize="70px" />

 <TextView
     android:id="@+id/footer_text"
     android:layout_width="wrap_content"
     android:layout_height="wrap_content"
     android:layout_alignParentBottom="true"
     android:layout_alignParentLeft="true"
     android:layout_marginBottom="33px"
     android:textSize="26px" />
יוצרים שירות שמנהל את הכרטיס הפעיל ומעבד את הפריסה או את התצוגה. השירות לדוגמה הזה מעדכן את התוצאה של משחק כדורסל דמיוני בכל 30 שניות.
import java.util.Random;

import com.google.android.glass.timeline.LiveCard;
import com.google.android.glass.timeline.LiveCard.PublishMode;

import android.app.PendingIntent;
import android.app.Service;
import android.content.Intent;
import android.os.Handler;
import android.os.IBinder;
import android.widget.RemoteViews;

public class LiveCardService extends Service {

    private static final String LIVE_CARD_TAG = "LiveCardDemo";

    private LiveCard mLiveCard;
    private RemoteViews mLiveCardView;

    private int homeScore, awayScore;
    private Random mPointsGenerator;

    private final Handler mHandler = new Handler();
    private final UpdateLiveCardRunnable mUpdateLiveCardRunnable =
        new UpdateLiveCardRunnable();
    private static final long DELAY_MILLIS = 30000;

    @Override
    public void onCreate() {
        super.onCreate();
        mPointsGenerator = new Random();
    }

    @Override
    public int onStartCommand(Intent intent, int flags, int startId) {
        if (mLiveCard == null) {

            // Get an instance of a live card
            mLiveCard = new LiveCard(this, LIVE_CARD_TAG);

            // Inflate a layout into a remote view
            mLiveCardView = new RemoteViews(getPackageName(),
                    R.layout.main_layout);

            // Set up initial RemoteViews values
            homeScore = 0;
            awayScore = 0;
            mLiveCardView.setTextViewText(R.id.home_team_name_text_view,
                    getString(R.string.home_team));
            mLiveCardView.setTextViewText(R.id.away_team_name_text_view,
                    getString(R.string.away_team));
            mLiveCardView.setTextViewText(R.id.footer_text,
                    getString(R.string.game_quarter));

            // Set up the live card's action with a pending intent
            // to show a menu when tapped
            Intent menuIntent = new Intent(this, MenuActivity.class);
            menuIntent.addFlags(Intent.FLAG_ACTIVITY_NEW_TASK |
                    Intent.FLAG_ACTIVITY_CLEAR_TASK);
            mLiveCard.setAction(PendingIntent.getActivity(
                    this, 0, menuIntent, 0));

            // Publish the live card
            mLiveCard.publish(PublishMode.REVEAL);

            // Queue the update text runnable
            mHandler.post(mUpdateLiveCardRunnable);
        }
        return START_STICKY;
    }

    @Override
    public void onDestroy() {
        if (mLiveCard != null && mLiveCard.isPublished()) {
            //Stop the handler from queuing more Runnable jobs
            mUpdateLiveCardRunnable.setStop(true);

            mLiveCard.unpublish();
            mLiveCard = null;
        }
        super.onDestroy();
    }

    /**
     * Runnable that updates live card contents
     */
    private class UpdateLiveCardRunnable implements Runnable{

        private boolean mIsStopped = false;

        /*
         * Updates the card with a fake score every 30 seconds as a demonstration.
         * You also probably want to display something useful in your live card.
         *
         * If you are executing a long running task to get data to update a
         * live card(e.g, making a web call), do this in another thread or
         * AsyncTask.
         */
        public void run(){
            if(!isStopped()){
                // Generate fake points.
                homeScore += mPointsGenerator.nextInt(3);
                awayScore += mPointsGenerator.nextInt(3);

                // Update the remote view with the new scores.
                mLiveCardView.setTextViewText(R.id.home_score_text_view,
                        String.valueOf(homeScore));
                mLiveCardView.setTextViewText(R.id.away_score_text_view,
                        String.valueOf(awayScore));

                // Always call setViews() to update the live card's RemoteViews.
                mLiveCard.setViews(mLiveCardView);

                // Queue another score update in 30 seconds.
                mHandler.postDelayed(mUpdateLiveCardRunnable, DELAY_MILLIS);
            }
        }

        public boolean isStopped() {
            return mIsStopped;
        }

        public void setStop(boolean isStopped) {
            this.mIsStopped = isStopped;
        }
    }

    @Override
    public IBinder onBind(Intent intent) {
      /*
       * If you need to set up interprocess communication
       * (activity to a service, for instance), return a binder object
       * so that the client can receive and modify data in this service.
       *
       * A typical use is to give a menu activity access to a binder object
       * if it is trying to change a setting that is managed by the live card
       * service. The menu activity in this sample does not require any
       * of these capabilities, so this just returns null.
       */
       return null;
    }
}
יצירת כרטיסים פעילים בתדירות גבוהה
רינדור בתדירות גבוהה מאפשר לצייר ישירות בגיבוי Surface של הכרטיס הפעיל.
כדאי להשתמש ברינדור בתדירות גבוהה כאשר:
- צריך לעדכן את הכרטיס הפעיל לעיתים קרובות (הרבה פעמים).
- צריכה להיות לכם גמישות לגבי מה שתוכלו לעבד. רינדור בתדירות גבוהה מאפשר לכם להשתמש בתצוגות ובפריסות של Android כדי ליצור גרפיקה מורכבת של OpenGL.
חשוב לזכור:
- תמיד צריך ליצור שירות רקע כדי לעבד את הכרטיס הפעיל.
- לכרטיסים חיים תמיד חייב להיות
PendingIntentהוצהר באמצעותsetAction() - השתמשו ב-
GLRendererאם אתם רינדור OpenGL וDirectRenderingCallbackבכל שאר המקרים.
שימוש ב-DirectRenderingCallback
כדי ליצור כרטיסים פעילים עם תצוגות רגילות של Android ולוגיקת שרטוט:
יצירת מחלקה שמממשת
DirectRenderingCallbackהטמעה של הקריאות החוזרות (callback) בממשקים האלה מאפשרת לבצע פעולות במהלך אירועים חשובים במחזור החיים של פני השטח של הכרטיס הפעיל.בדוגמה הבאה נוצר שרשור ברקע המיועד לעיבוד מדי פעם, אבל יכול לעדכן את הכרטיס בתגובה לאירועים חיצוניים (לדוגמה, חיישן או עדכוני מיקום).
public class LiveCardRenderer implements DirectRenderingCallback {

    // About 30 FPS.
    private static final long FRAME_TIME_MILLIS = 33;

    private SurfaceHolder mHolder;
    private boolean mPaused;
    private RenderThread mRenderThread;

    @Override
    public void surfaceChanged(SurfaceHolder holder, int format,
            int width, int height) {
        // Update your views accordingly.
    }

    @Override
    public void surfaceCreated(SurfaceHolder holder) {
        mPaused = false;
        mHolder = holder;
        updateRendering();
    }

    @Override
    public void surfaceDestroyed(SurfaceHolder holder) {
        mHolder = null;
        updateRendering();
    }

    @Override
    public void renderingPaused(SurfaceHolder holder, boolean paused) {
        mPaused = paused;
        updateRendering();
    }

    /**
     * Start or stop rendering according to the timeline state.
     */
    private void updateRendering() {
        boolean shouldRender = (mHolder != null) && !mPaused;
        boolean rendering = mRenderThread != null;

        if (shouldRender != rendering) {
            if (shouldRender) {
                mRenderThread = new RenderThread();
                mRenderThread.start();
            } else {
                mRenderThread.quit();
                mRenderThread = null;
            }
        }
    }

    /**
     * Draws the view in the SurfaceHolder's canvas.
     */
    private void draw() {
        Canvas canvas;
        try {
            canvas = mHolder.lockCanvas();
        } catch (Exception e) {
            return;
        }
        if (canvas != null) {
            // Draw on the canvas.
            mHolder.unlockCanvasAndPost(canvas);
        }
    }

    /**
     * Redraws in the background.
     */
    private class RenderThread extends Thread {
        private boolean mShouldRun;

        /**
         * Initializes the background rendering thread.
         */
        public RenderThread() {
            mShouldRun = true;
        }

        /**
         * Returns true if the rendering thread should continue to run.
         *
         * @return true if the rendering thread should continue to run
         */
        private synchronized boolean shouldRun() {
            return mShouldRun;
        }

        /**
         * Requests that the rendering thread exit at the next
         opportunity.
         */
        public synchronized void quit() {
            mShouldRun = false;
        }

        @Override
        public void run() {
            while (shouldRun()) {
                draw();
                SystemClock.sleep(FRAME_TIME_MILLIS);
            }
        }
    }
}
הגדרת מופע של
DirectRenderingCallbackבתורLiveCardהקריאה החוזרת שלSurfaceHolder(callback). הזה מאפשר לכרטיס הפעיל לדעת באיזו לוגיקה להשתמש כדי לעבד את עצמו.// Tag used to identify the LiveCard in debugging logs. private static final String LIVE_CARD_TAG = "my_card"; // Cached instance of the LiveCard created by the publishCard() method. private LiveCard mLiveCard; private void publishCard(Context context) { if (mLiveCard == null) { mLiveCard = new LiveCard(this, LIVE_CARD_TAG); // Enable direct rendering. mLiveCard.setDirectRenderingEnabled(true); mLiveCard.getSurfaceHolder().addCallback( new LiveCardRenderer()); Intent intent = new Intent(context, MenuActivity.class); mLiveCard.setAction(PendingIntent.getActivity(context, 0, intent, 0)); mLiveCard.publish(LiveCard.PublishMode.SILENT); } else { // Card is already published. return; } } private void unpublishCard(Context context) { if (mLiveCard != null) { mLiveCard.unpublish(); mLiveCard = null; } }
שימוש ב-OpenGL
יצירת מחלקה שמממשת
GlRendererהטמעת הקריאות החוזרות (callback) בממשק הזה מאפשרת לבצע פעולות במהלך אירועים חשובים של מחזור החיים של פני השטח של הכרטיס הפעיל. בדוגמה הזו משרטטים קובייה צבעונית מסתובבת.import com.google.android.glass.timeline.GlRenderer; import android.opengl.GLES20; import android.opengl.Matrix; import android.os.SystemClock; import java.util.concurrent.TimeUnit; import javax.microedition.khronos.egl.EGLConfig; /** * Renders a 3D OpenGL Cube on a {@link LiveCard}. */ public class CubeRenderer implements GlRenderer { /** Rotation increment per frame. */ private static final float CUBE_ROTATION_INCREMENT = 0.6f; /** The refresh rate, in frames per second. */ private static final int REFRESH_RATE_FPS = 60; /** The duration, in milliseconds, of one frame. */ private static final float FRAME_TIME_MILLIS = TimeUnit.SECONDS.toMillis(1) / REFRESH_RATE_FPS; private final float[] mMVPMatrix; private final float[] mProjectionMatrix; private final float[] mViewMatrix; private final float[] mRotationMatrix; private final float[] mFinalMVPMatrix; private Cube mCube; private float mCubeRotation; private long mLastUpdateMillis; public CubeRenderer() { mMVPMatrix = new float[16]; mProjectionMatrix = new float[16]; mViewMatrix = new float[16]; mRotationMatrix = new float[16]; mFinalMVPMatrix = new float[16]; // Set the fixed camera position (View matrix). Matrix.setLookAtM(mViewMatrix, 0, 0.0f, 0.0f, -4.0f, 0.0f, 0.0f, 0.0f, 0.0f, 1.0f, 0.0f); } @Override public void onSurfaceCreated(EGLConfig config) { // Set the background frame color GLES20.glClearColor(0.0f, 0.0f, 0.0f, 1.0f); GLES20.glClearDepthf(1.0f); GLES20.glEnable(GLES20.GL_DEPTH_TEST); GLES20.glDepthFunc(GLES20.GL_LEQUAL); mCube = new Cube(); } @Override public void onSurfaceChanged(int width, int height) { float ratio = (float) width / height; GLES20.glViewport(0, 0, width, height); // This projection matrix is applied to object coordinates in the onDrawFrame() method. Matrix.frustumM(mProjectionMatrix, 0, -ratio, ratio, -1.0f, 1.0f, 3.0f, 7.0f); // modelView = projection x view Matrix.multiplyMM(mMVPMatrix, 0, mProjectionMatrix, 0, mViewMatrix, 0); } @Override public void onDrawFrame() { GLES20.glClear(GLES20.GL_COLOR_BUFFER_BIT | GLES20.GL_DEPTH_BUFFER_BIT); // Apply the rotation. Matrix.setRotateM(mRotationMatrix, 0, mCubeRotation, 1.0f, 1.0f, 1.0f); // Combine the rotation matrix with the projection and camera view Matrix.multiplyMM(mFinalMVPMatrix, 0, mMVPMatrix, 0, mRotationMatrix, 0); // Draw cube. mCube.draw(mFinalMVPMatrix); updateCubeRotation(); } /** Updates the cube rotation. */ private void updateCubeRotation() { if (mLastUpdateMillis != 0) { float factor = (SystemClock.elapsedRealtime() - mLastUpdateMillis) / FRAME_TIME_MILLIS; mCubeRotation += CUBE_ROTATION_INCREMENT * factor; } mLastUpdateMillis = SystemClock.elapsedRealtime(); } }יצירת שירות שמנהל את הכרטיס הפעיל ואת הסט הכיתה
CubeRendererבתור כלי הרינדור של הכרטיס הפעיל.import com.google.android.glass.timeline.LiveCard; import com.google.android.glass.timeline.LiveCard.PublishMode; import android.app.PendingIntent; import android.app.Service; import android.content.Intent; import android.os.IBinder; /** * Creates a {@link LiveCard} rendering a rotating 3D cube with OpenGL. */ public class OpenGlService extends Service { private static final String LIVE_CARD_TAG = "opengl"; private LiveCard mLiveCard; @Override public IBinder onBind(Intent intent) { return null; } @Override public int onStartCommand(Intent intent, int flags, int startId) { if (mLiveCard == null) { mLiveCard = new LiveCard(this, LIVE_CARD_TAG); mLiveCard.setRenderer(new CubeRenderer()); mLiveCard.setAction( PendingIntent.getActivity(this, 0, new Intent(this, MenuActivity.class), 0)); mLiveCard.publish(PublishMode.REVEAL); } else { mLiveCard.navigate(); } return START_STICKY; } @Override public void onDestroy() { if (mLiveCard != null && mLiveCard.isPublished()) { mLiveCard.unpublish(); mLiveCard = null; } super.onDestroy(); } }
import android.opengl.GLES20;

import java.nio.ByteBuffer;
import java.nio.ByteOrder;
import java.nio.FloatBuffer;

/**
 * Renders a 3D Cube using OpenGL ES 2.0.
 *
 * For more information on how to use OpenGL ES 2.0 on Android, see the
 * <a href="//developer.android.com/training/graphics/opengl/index.html">
 * Displaying Graphics with OpenGL ES</a> developer guide.
 */
public class Cube {

    /** Cube vertices */
    private static final float VERTICES[] = {
        -0.5f, -0.5f, -0.5f,
        0.5f, -0.5f, -0.5f,
        0.5f, 0.5f, -0.5f,
        -0.5f, 0.5f, -0.5f,
        -0.5f, -0.5f, 0.5f,
        0.5f, -0.5f, 0.5f,
        0.5f, 0.5f, 0.5f,
        -0.5f, 0.5f, 0.5f
    };

    /** Vertex colors. */
    private static final float COLORS[] = {
        0.0f, 1.0f, 1.0f, 1.0f,
        1.0f, 0.0f, 0.0f, 1.0f,
        1.0f, 1.0f, 0.0f, 1.0f,
        0.0f, 1.0f, 0.0f, 1.0f,
        0.0f, 0.0f, 1.0f, 1.0f,
        1.0f, 0.0f, 1.0f, 1.0f,
        1.0f, 1.0f, 1.0f, 1.0f,
        0.0f, 1.0f, 1.0f, 1.0f,
    };


    /** Order to draw vertices as triangles. */
    private static final byte INDICES[] = {
        0, 1, 3, 3, 1, 2, // Front face.
        0, 1, 4, 4, 5, 1, // Bottom face.
        1, 2, 5, 5, 6, 2, // Right face.
        2, 3, 6, 6, 7, 3, // Top face.
        3, 7, 4, 4, 3, 0, // Left face.
        4, 5, 7, 7, 6, 5, // Rear face.
    };

    /** Number of coordinates per vertex in {@link VERTICES}. */
    private static final int COORDS_PER_VERTEX = 3;

    /** Number of values per colors in {@link COLORS}. */
    private static final int VALUES_PER_COLOR = 4;

    /** Vertex size in bytes. */
    private final int VERTEX_STRIDE = COORDS_PER_VERTEX * 4;

    /** Color size in bytes. */
    private final int COLOR_STRIDE = VALUES_PER_COLOR * 4;

    /** Shader code for the vertex. */
    private static final String VERTEX_SHADER_CODE =
            "uniform mat4 uMVPMatrix;" +
            "attribute vec4 vPosition;" +
            "attribute vec4 vColor;" +
            "varying vec4 _vColor;" +
            "void main() {" +
            "  _vColor = vColor;" +
            "  gl_Position = uMVPMatrix * vPosition;" +
            "}";

    /** Shader code for the fragment. */
    private static final String FRAGMENT_SHADER_CODE =
            "precision mediump float;" +
            "varying vec4 _vColor;" +
            "void main() {" +
            "  gl_FragColor = _vColor;" +
            "}";


    private final FloatBuffer mVertexBuffer;
    private final FloatBuffer mColorBuffer;
    private final ByteBuffer mIndexBuffer;
    private final int mProgram;
    private final int mPositionHandle;
    private final int mColorHandle;
    private final int mMVPMatrixHandle;

    public Cube() {
        ByteBuffer byteBuffer = ByteBuffer.allocateDirect(VERTICES.length * 4);

        byteBuffer.order(ByteOrder.nativeOrder());
        mVertexBuffer = byteBuffer.asFloatBuffer();
        mVertexBuffer.put(VERTICES);
        mVertexBuffer.position(0);

        byteBuffer = ByteBuffer.allocateDirect(COLORS.length * 4);
        byteBuffer.order(ByteOrder.nativeOrder());
        mColorBuffer = byteBuffer.asFloatBuffer();
        mColorBuffer.put(COLORS);
        mColorBuffer.position(0);

        mIndexBuffer = ByteBuffer.allocateDirect(INDICES.length);
        mIndexBuffer.put(INDICES);
        mIndexBuffer.position(0);

        mProgram = GLES20.glCreateProgram();
        GLES20.glAttachShader(mProgram, loadShader(GLES20.GL_VERTEX_SHADER, VERTEX_SHADER_CODE));
        GLES20.glAttachShader(
                mProgram, loadShader(GLES20.GL_FRAGMENT_SHADER, FRAGMENT_SHADER_CODE));
        GLES20.glLinkProgram(mProgram);

        mPositionHandle = GLES20.glGetAttribLocation(mProgram, "vPosition");
        mColorHandle = GLES20.glGetAttribLocation(mProgram, "vColor");
        mMVPMatrixHandle = GLES20.glGetUniformLocation(mProgram, "uMVPMatrix");
    }

    /**
     * Encapsulates the OpenGL ES instructions for drawing this shape.
     *
     * @param mvpMatrix The Model View Project matrix in which to draw this shape
     */
    public void draw(float[] mvpMatrix) {
        // Add program to OpenGL environment.
        GLES20.glUseProgram(mProgram);

        // Prepare the cube coordinate data.
        GLES20.glEnableVertexAttribArray(mPositionHandle);
        GLES20.glVertexAttribPointer(
                mPositionHandle, 3, GLES20.GL_FLOAT, false, VERTEX_STRIDE, mVertexBuffer);

        // Prepare the cube color data.
        GLES20.glEnableVertexAttribArray(mColorHandle);
        GLES20.glVertexAttribPointer(
                mColorHandle, 4, GLES20.GL_FLOAT, false, COLOR_STRIDE, mColorBuffer);

        // Apply the projection and view transformation.
        GLES20.glUniformMatrix4fv(mMVPMatrixHandle, 1, false, mvpMatrix, 0);

        // Draw the cube.
        GLES20.glDrawElements(
                GLES20.GL_TRIANGLES, INDICES.length, GLES20.GL_UNSIGNED_BYTE, mIndexBuffer);

        // Disable vertex arrays.
        GLES20.glDisableVertexAttribArray(mPositionHandle);
        GLES20.glDisableVertexAttribArray(mColorHandle);
    }

    /** Loads the provided shader in the program. */
    private static int loadShader(int type, String shaderCode){
        int shader = GLES20.glCreateShader(type);

        GLES20.glShaderSource(shader, shaderCode);
        GLES20.glCompileShader(shader);

        return shader;
    }
}
התמקדות בכרטיסים בשידור חי
כשמפרסמים כרטיס פעיל באמצעות LiveCard.publish(), מעבירים אותו פרמטר
כדי לקבוע אם מתמקדים באופן מיידי.
כדי שציר הזמן יוכל לעבור לכרטיס מיד לאחר הפרסום, צריך להשתמש
LiveCard.PublishMode.REVEAL
כדי לפרסם את הכרטיס באופן שקט ולאפשר למשתמשים לנווט לכרטיס בעצמם, צריך להשתמש ב-
LiveCard.PublishMode.SILENT
בנוסף, LiveCard.navigate()
מאפשרת לעבור אל הכרטיס לאחר הפרסום שלו. לדוגמה, אם משתמשים מנסים להפעיל את
שידור חי מתפריט הקול הראשי והוא כבר התחיל. אפשר לעבור אל השידור החי
בכרטיס בשיטה הזו.
יצירה והצגה של תפריט
כדי לראות תפריט, לא ניתן להציג כרטיסים פעילים לכרטיס החי.
פעילות התפריט כוללת פריטים להפסקת הכרטיס הפעיל, החל נסחפים עמוקים, או כל פעולה אחרת שרוצים לבצע. אפשר גם להוסיף פעילויות בהגדרות המערכת, כמו בקרת עוצמת קול, כאפשרות בתפריט. לקבלת מידע נוסף מידע נוסף, ראה הגדרות הפעלה.
יצירת משאבי תפריט
יצירת משאבי תפריט זהה לזו שבפלטפורמת Android, אבל צריך לפעול לפי השלבים הבאים הנחיות ל-Glass:
- לכל אפשרות בתפריט, יש לספק סמל בתפריט בגודל 50 × 50 פיקסלים. התפריט הסמל צריך להיות בצבע לבן על רקע שקוף. לצפייה סמלים של אפשרויות בתפריט זכוכית עבור דוגמה או כדי להוריד אותם לשימוש אישי.
- צריך להשתמש בשם קצר שמתאר את הפעולה, תוך שימוש באותיות רישיות בתחילת כל מילה. פועל ציווי (לדוגמה, שיתוף או תשובה לכולם).
- לא מוצגים כרטיסים פעילים ב-Glass ללא אפשרות בתפריט. לכל הפחות, לספק אפשרות בתפריט הפסקה, כדי שהמשתמשים יוכלו להסיר את הכרטיס הפעיל בציר הזמן.
הווידג'ט CheckBox אין תמיכה.
<menu xmlns:android="http://schemas.android.com/apk/res/android">
    <item
        android:id="@+id/menu_item_1"
        android:title="@string/Menu_Item_1"       <!-- must have "Stop" menu item -->
        android:icon="@drawable/menu_item_1_icon" />   <!-- white on transparent icon -->
</menu>
יצירת פעילות כדי לטפל בקריאות חוזרות (callback) בתפריט
עליכם להגדיר פעילות בתפריט שתופיע בכרטיס הפעיל כשמשתמשים מקישים עליה.
שינוי ההגדרות הבאות
Activity שיטות להתקשרות חזרה
כדי ליצור, להציג ולסגור תפריטים באופן תקין בפעילות התפריט:
onCreateOptionsMenu()מגדיל את המשאב של תפריט ה-XML.onAttachedToWindow()מציג את התפריט כשהפעילות מתמקדת.onPrepareOptionsMenu()מציגה או מסתירה את האפשרויות בתפריט, אם יש צורך. לדוגמה, אפשר להציג אפשרויות שונות בתפריט בהתאם לפעולות של המשתמשים. לדוגמה, אפשר להציג אפשרויות שונות בתפריט בהתאם לפי נתונים הקשריים מסוימים.onOptionsItemSelected()מטפל בבחירת המשתמשים.onOptionsMenuClosed()כדי לסיים את הפעילות, כך שלא יופיע יותר מעל הכרטיס הפעיל.
צריך לסיים כאן את הפעילות כדי שהיא תסתיים כמו שצריך כשהתפריט ייסגר על ידי בחירה או על ידי החלקה למטה.
/**
 * Activity showing the options menu.
 */
public class MenuActivity extends Activity {

    @Override
    public void onAttachedToWindow() {
        super.onAttachedToWindow();
        openOptionsMenu();
    }

    @Override
    public boolean onCreateOptionsMenu(Menu menu) {
        MenuInflater inflater = getMenuInflater();
        inflater.inflate(R.menu.stopwatch, menu);
        return true;
    }

    @Override
    public boolean onOptionsItemSelected(MenuItem item) {
        // Handle item selection.
        switch (item.getItemId()) {
            case R.id.stop:
                stopService(new Intent(this, StopwatchService.class));
                return true;
            default:
                return super.onOptionsItemSelected(item);
        }
    }

    @Override
    public void onOptionsMenuClosed(Menu menu) {
        // Nothing else to do, closing the activity.
        finish();
    }
}
הפעילות בתפריט תהיה שקופה
כדי לשמור על עקביות לסגנון של Glass, יש לקבוע את הפעילות בתפריט שקוף, כך שהכרטיס החי עדיין ניתן לראות למטה התפריט:
יצירת קובץ
res/values/styles.xmlוהצהרה על סגנון שהופך את הרקע של הפעילות לגלוי:<resources> <style name="MenuTheme" parent="@android:style/Theme.DeviceDefault"> <item name="android:windowBackground">@android:color/transparent</item> <item name="android:colorBackgroundCacheHint">@null</item> <item name="android:windowIsTranslucent">true</item> <item name="android:windowAnimationStyle">@null</item> </style> </resources>בקובץ
AndroidManifest.xml, מקצים את העיצוב לפעילות בתפריט:<?xml version="1.0" encoding="utf-8"?> <manifest ... > ... <application ... > ... <activity android:name=".MenuActivity" android:theme="@style/MenuTheme" ...> </activity> </application> </manifest>
הצגת התפריט
עליך לציין
PendingIntent
עבור פעולת הכרטיס באמצעות setAction(). כוונת הרכישה בהמתנה משמשת כדי להפעיל את
פעילות התפריט כשמשתמשים מקישים על הכרטיס:
Intent menuIntent = new Intent(this, MenuActivity.class);
mLiveCard.setAction(PendingIntent.getActivity(this, 0, menuIntent, 0));
mLiveCard.publish(LiveCard.PublishMode.REVEAL); // or SILENT
תמיכה בפקודות קוליות לפי הקשר
חשוב לציין שבמכשיר
MenuActivityיש תמיכה פקודות קוליות לפי הקשר:// Initialize your LiveCard as usual. mLiveCard.setVoiceActionEnabled(true); mLiveCard.publish(LiveCard.PublishMode.REVEAL); // or SILENTצריך לשנות את
MenuActivityכך שיתמוך בהפעלה באמצעות התהליך הקולי:/** * Activity showing the options menu. */ public class MenuActivity extends Activity { private boolean mFromLiveCardVoice; private boolean mIsFinishing; @Override protected void onCreate(Bundle savedInstanceState) { super.onCreate(savedInstanceState); mFromLiveCardVoice = getIntent().getBooleanExtra(LiveCard.EXTRA_FROM_LIVECARD_VOICE, false); if (mFromLiveCardVoice) { // When activated by voice from a live card, enable voice commands. The menu // will automatically "jump" ahead to the items (skipping the guard phrase // that was already said at the live card). getWindow().requestFeature(WindowUtils.FEATURE_VOICE_COMMANDS); } } @Override public void onAttachedToWindow() { super.onAttachedToWindow(); if (!mFromLiveCardVoice) { openOptionsMenu(); } } @Override public boolean onCreatePanelMenu(int featureId, Menu menu) { if (isMyMenu(featureId)) { getMenuInflater().inflate(R.menu.stopwatch, menu); return true; } return super.onCreatePanelMenu(featureId, menu); } @Override public boolean onPreparePanel(int featureId, View view, Menu menu) { if (isMyMenu(featureId)) { // Don't reopen menu once we are finishing. This is necessary // since voice menus reopen themselves while in focus. return !mIsFinishing; } return super.onPreparePanel(featureId, view, menu); } @Override public boolean onMenuItemSelected(int featureId, MenuItem item) { if (isMyMenu(featureId)) { // Handle item selection. switch (item.getItemId()) { case R.id.stop_this: stopService(new Intent(this, StopwatchService.class)); return true; } } return super.onMenuItemSelected(featureId, item); } @Override public void onPanelClosed(int featureId, Menu menu) { super.onPanelClosed(featureId, menu); if (isMyMenu(featureId)) { // When the menu panel closes, either an item is selected from the menu or the // menu is dismissed by swiping down. Either way, we end the activity. isFinishing = true; finish(); } } /** * Returns {@code true} when the {@code featureId} belongs to the options menu or voice * menu that are controlled by this menu activity. */ private boolean isMyMenu(int featureId) { return featureId == Window.FEATURE_OPTIONS_PANEL || featureId == WindowUtils.FEATURE_VOICE_COMMANDS; } }
כדאי לעיין פקודות קוליות לפי הקשר לקבלת מידע נוסף.
כלי עזר לתפריט
יש כמה שיטות מסייעות לשינוי המראה וההתנהגות של תפריטים. צפייה
MenuUtils
אפשר לקבל מידע נוסף.