ライブカードがタイムラインの現在のセクションに表示され、 現在の時刻に関連する情報を表示します。
ライブカードは、ユーザーが積極的に活動している場合に便利です。 タスクに関与しているが、定期的に Glass をチェックしたいと考えている を参照してください。たとえば ユーザーの時間の確認や 音楽プレーヤーを操作しているときなどに、 曲をスキップまたは一時停止したいとき。
Glass の開発が初めての場合は 進行中のタスクのガイドを確認する 見てみましょう。このドキュメントでは、Terraform で完全な デザインのベスト プラクティスに沿った、ライブカード付きのガラス製品。
仕組み
ライブカードにより、現在もカードが維持される セクションがあります。静的カードとは異なり ライブカードはタイムラインに保持されず、ユーザーが明示的に 削除することもできます。
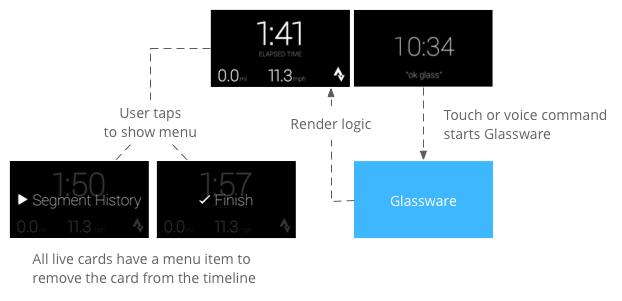
通常は音声コマンドでライブカードを開始します。 をクリックすると、カードをレンダリングするバックグラウンド サービスが開始されます。 カードをタップすると、操作できるメニュー項目が表示されます。 タイムラインで閉じるなどの操作ができます。
アフィリエイト住所表示オプションの目的
ライブカードは進行中のタスク用に設計されており、ユーザーはすぐにタスクを開始できます。 実行状況を示す画面などで、実行状況を示す ナビゲーション中のアニメーション マップ、または音楽プレーヤー。
ライブカードのもう一つのメリットは、 ユーザーとのリアルタイムなやり取りが必要な UI UI のリアルタイム更新などです
ライブカードを使用する場合も、タイムラインでユーザーを制御できる ライブカードを前後にスワイプすると ライブカード自体を操作するのではなく、タイムライン上を移動します。 また、画面のオンとオフは、システムの動作に基づいて( 5 秒間、ユーザー操作がない、または頭を上に動かしている最中)。
ただし、ライブカードでは、 浸水の場合はセンサーや GPS データ。魅力的なエクスペリエンスを構築できます タイムラインから移動して他の操作を メールの確認などです。
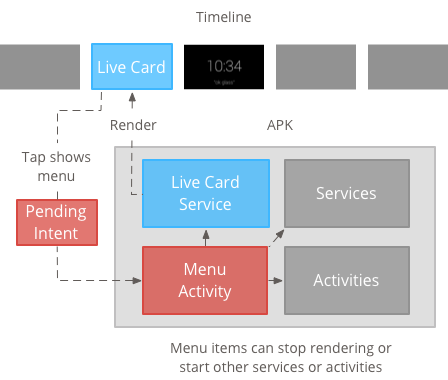
アーキテクチャ

ライブカードが保持される期間全体にわたって保持されるには、長時間にわたるコンテキストが必要です。 バックグラウンド サービスで管理します。
サービスが利用されるとすぐに、ライブカードを公開してレンダリングできます。 モニタリングしている他のイベントに応答して開始されます。 低い頻度(数秒に 1 回)でライブカードをレンダリングできます。 または高頻度(システムで更新できる回数まで)です。
有効なカードが不要になったら、サービスを破棄して レンダリングを停止します。
低周波数レンダリング
低周波数レンダリングは少数の Android セットに限定される 更新できるのは 1 回限りです。 表示されます。
動画付きでライブカードを簡単に作成できる 単純なコンテンツで、継続的なレンダリングや 頻繁に更新されます。
高頻度レンダリング
高頻度レンダリングではより多くのオプションを使用できます Android グラフィック フレームワークで利用できます。
システムは、インフラストラクチャの実際のバッキング サーフェスを 2D で直接描画できるライブカード OpenGL を使用して複雑な 3D グラフィックスをレンダリングできます。
使用頻度の低いライブカードの作成
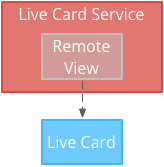
低頻度レンダリングには、UDM イベントによって RemoteViews このオブジェクトは、Android のレイアウトとビューの次のサブセットをサポートしています。
低頻度レンダリングを使用するケース:
- 前述した標準の Android View API のみが必要です。
- 比較的低い頻度で更新するだけで済みます(更新間隔は数秒、 です。
留意点:
- ライブカードには、常に
PendingIntentで宣言setAction()カードを公開します - 公開後にカードに変更を加えるには、
setViews()更新済みの RemoteViews を持つカード 再公開する必要があります。
使用頻度の低いライブカードを作成するには:
レンダリングするレイアウトまたはビューを作成します。次の例をご覧ください。 は、架空のバスケットボール ゲームのレイアウトを示しています。
 <TextView
     android:id="@+id/home_team_name_text_view"
     android:layout_width="249px"
     android:layout_height="wrap_content"
     android:layout_alignParentRight="true"
     android:gravity="center"
     android:textSize="40px" />

 <TextView
     android:id="@+id/away_team_name_text_view"
     android:layout_width="249px"
     android:layout_height="wrap_content"
     android:layout_alignParentLeft="true"
     android:gravity="center"
     android:textSize="40px" />

 <TextView
     android:id="@+id/away_score_text_view"
     android:layout_width="249px"
     android:layout_height="wrap_content"
     android:layout_alignLeft="@+id/away_team_name_text_view"
     android:layout_below="@+id/away_team_name_text_view"
     android:gravity="center"
     android:textSize="70px" />

 <TextView
     android:id="@+id/home_score_text_view"
     android:layout_width="249px"
     android:layout_height="wrap_content"
     android:layout_alignLeft="@+id/home_team_name_text_view"
     android:layout_below="@+id/home_team_name_text_view"
     android:gravity="center"
     android:textSize="70px" />

 <TextView
     android:id="@+id/footer_text"
     android:layout_width="wrap_content"
     android:layout_height="wrap_content"
     android:layout_alignParentBottom="true"
     android:layout_alignParentLeft="true"
     android:layout_marginBottom="33px"
     android:textSize="26px" />
ライブカードを管理し、レイアウトまたはビューをレンダリングするサービスを作成します。 このサンプル サービスは、バスケットボールの架空の試合のスコアを 30 秒。
import java.util.Random;

import com.google.android.glass.timeline.LiveCard;
import com.google.android.glass.timeline.LiveCard.PublishMode;

import android.app.PendingIntent;
import android.app.Service;
import android.content.Intent;
import android.os.Handler;
import android.os.IBinder;
import android.widget.RemoteViews;

public class LiveCardService extends Service {

    private static final String LIVE_CARD_TAG = "LiveCardDemo";

    private LiveCard mLiveCard;
    private RemoteViews mLiveCardView;

    private int homeScore, awayScore;
    private Random mPointsGenerator;

    private final Handler mHandler = new Handler();
    private final UpdateLiveCardRunnable mUpdateLiveCardRunnable =
        new UpdateLiveCardRunnable();
    private static final long DELAY_MILLIS = 30000;

    @Override
    public void onCreate() {
        super.onCreate();
        mPointsGenerator = new Random();
    }

    @Override
    public int onStartCommand(Intent intent, int flags, int startId) {
        if (mLiveCard == null) {

            // Get an instance of a live card
            mLiveCard = new LiveCard(this, LIVE_CARD_TAG);

            // Inflate a layout into a remote view
            mLiveCardView = new RemoteViews(getPackageName(),
                    R.layout.main_layout);

            // Set up initial RemoteViews values
            homeScore = 0;
            awayScore = 0;
            mLiveCardView.setTextViewText(R.id.home_team_name_text_view,
                    getString(R.string.home_team));
            mLiveCardView.setTextViewText(R.id.away_team_name_text_view,
                    getString(R.string.away_team));
            mLiveCardView.setTextViewText(R.id.footer_text,
                    getString(R.string.game_quarter));

            // Set up the live card's action with a pending intent
            // to show a menu when tapped
            Intent menuIntent = new Intent(this, MenuActivity.class);
            menuIntent.addFlags(Intent.FLAG_ACTIVITY_NEW_TASK |
                    Intent.FLAG_ACTIVITY_CLEAR_TASK);
            mLiveCard.setAction(PendingIntent.getActivity(
                    this, 0, menuIntent, 0));

            // Publish the live card
            mLiveCard.publish(PublishMode.REVEAL);

            // Queue the update text runnable
            mHandler.post(mUpdateLiveCardRunnable);
        }
        return START_STICKY;
    }

    @Override
    public void onDestroy() {
        if (mLiveCard != null && mLiveCard.isPublished()) {
            //Stop the handler from queuing more Runnable jobs
            mUpdateLiveCardRunnable.setStop(true);

            mLiveCard.unpublish();
            mLiveCard = null;
        }
        super.onDestroy();
    }

    /**
     * Runnable that updates live card contents
     */
    private class UpdateLiveCardRunnable implements Runnable{

        private boolean mIsStopped = false;

        /*
         * Updates the card with a fake score every 30 seconds as a demonstration.
         * You also probably want to display something useful in your live card.
         *
         * If you are executing a long running task to get data to update a
         * live card(e.g, making a web call), do this in another thread or
         * AsyncTask.
         */
        public void run(){
            if(!isStopped()){
                // Generate fake points.
                homeScore += mPointsGenerator.nextInt(3);
                awayScore += mPointsGenerator.nextInt(3);

                // Update the remote view with the new scores.
                mLiveCardView.setTextViewText(R.id.home_score_text_view,
                        String.valueOf(homeScore));
                mLiveCardView.setTextViewText(R.id.away_score_text_view,
                        String.valueOf(awayScore));

                // Always call setViews() to update the live card's RemoteViews.
                mLiveCard.setViews(mLiveCardView);

                // Queue another score update in 30 seconds.
                mHandler.postDelayed(mUpdateLiveCardRunnable, DELAY_MILLIS);
            }
        }

        public boolean isStopped() {
            return mIsStopped;
        }

        public void setStop(boolean isStopped) {
            this.mIsStopped = isStopped;
        }
    }

    @Override
    public IBinder onBind(Intent intent) {
      /*
       * If you need to set up interprocess communication
       * (activity to a service, for instance), return a binder object
       * so that the client can receive and modify data in this service.
       *
       * A typical use is to give a menu activity access to a binder object
       * if it is trying to change a setting that is managed by the live card
       * service. The menu activity in this sample does not require any
       * of these capabilities, so this just returns null.
       */
       return null;
    }
}
表示頻度の高いライブカードの作成
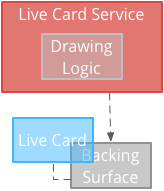
高周波レンダリングでは、画像を直接描画できます。 バッキング Surface 表示されます。
高頻度レンダリングを使用するケース:
- ライブカードを頻繁に(1 秒に数回)更新する必要がある場合。
- レンダリングできる内容に柔軟性が必要です。高頻度レンダリングを使用すると 複雑な OpenGL グラフィックに Android のビューとレイアウトを使用します。
留意点:
- ライブカードのサーフェスにレンダリングするバックグラウンド サービスを常に作成する必要があります。
- ライブカードには、常に
PendingIntentで宣言setAction()。 - 次の場合は
GLRendererを使用してください。 OpenGL のレンダリングとDirectRenderingCallback適用されます
DirectRenderingCallback を使用する
標準の Android ビューと描画ロジックでライブカードを作成するには:
実装するクラスを作成する
DirectRenderingCallbackこれらのインターフェースにコールバックを実装すると、ライブカード サーフェスのライフサイクルに関する重要なイベント中にアクションを実行できます。次の例では、定期的にレンダリングするバックグラウンド スレッドを作成しますが、 外部イベント( センサーや位置情報の更新など)。
public class LiveCardRenderer implements DirectRenderingCallback { // About 30 FPS. private static final long FRAME_TIME_MILLIS = 33; private SurfaceHolder mHolder; private boolean mPaused; private RenderThread mRenderThread; @Override public void surfaceChanged(SurfaceHolder holder, int format, int width, int height) { // Update your views accordingly. } @Override public void surfaceCreated(SurfaceHolder holder) { mPaused = false; mHolder = holder; updateRendering(); } @Override public void surfaceDestroyed(SurfaceHolder holder) { mHolder = null; updateRendering(); } @Override public void renderingPaused(SurfaceHolder holder, boolean paused) { mPaused = paused; updateRendering(); } /** * Start or stop rendering according to the timeline state. */ private void updateRendering() { boolean shouldRender = (mHolder != null) && !mPaused; boolean rendering = mRenderThread != null; if (shouldRender != rendering) { if (shouldRender) { mRenderThread = new RenderThread(); mRenderThread.start(); } else { mRenderThread.quit(); mRenderThread = null; } } } /** * Draws the view in the SurfaceHolder's canvas. */ private void draw() { Canvas canvas; try { canvas = mHolder.lockCanvas(); } catch (Exception e) { return; } if (canvas != null) { // Draw on the canvas. mHolder.unlockCanvasAndPost(canvas); } } /** * Redraws in the background. */ private class RenderThread extends Thread { private boolean mShouldRun; /** * Initializes the background rendering thread. */ public RenderThread() { mShouldRun = true; } /** * Returns true if the rendering thread should continue to run. * * @return true if the rendering thread should continue to run */ private synchronized boolean shouldRun() { return mShouldRun; } /** * Requests that the rendering thread exit at the next opportunity. */ public synchronized void quit() { mShouldRun = false; } @Override public void run() { while (shouldRun()) { draw(); SystemClock.sleep(FRAME_TIME_MILLIS); } } } }DirectRenderingCallbackのインスタンスを設定する 形式:LiveCardSurfaceHolderのコールバック。この を使用すると、ライブカード自体をレンダリングするために使用するロジックをライブカードに伝えることができます。// Tag used to identify the LiveCard in debugging logs. private static final String LIVE_CARD_TAG = "my_card"; // Cached instance of the LiveCard created by the publishCard() method. private LiveCard mLiveCard; private void publishCard(Context context) { if (mLiveCard == null) { mLiveCard = new LiveCard(this, LIVE_CARD_TAG); // Enable direct rendering. mLiveCard.setDirectRenderingEnabled(true); mLiveCard.getSurfaceHolder().addCallback( new LiveCardRenderer()); Intent intent = new Intent(context, MenuActivity.class); mLiveCard.setAction(PendingIntent.getActivity(context, 0, intent, 0)); mLiveCard.publish(LiveCard.PublishMode.SILENT); } else { // Card is already published. return; } } private void unpublishCard(Context context) { if (mLiveCard != null) { mLiveCard.unpublish(); mLiveCard = null; } }
OpenGL の使用
実装するクラスを作成する
GlRenderer。 このインターフェースにコールバックを実装すると、重要なイベント中にアクションを実行できます。 ライブカードのサーフェスのライフサイクルこの例では、色付きの回転する立方体を描画します。import com.google.android.glass.timeline.GlRenderer; import android.opengl.GLES20; import android.opengl.Matrix; import android.os.SystemClock; import java.util.concurrent.TimeUnit; import javax.microedition.khronos.egl.EGLConfig; /** * Renders a 3D OpenGL Cube on a {@link LiveCard}. */ public class CubeRenderer implements GlRenderer { /** Rotation increment per frame. */ private static final float CUBE_ROTATION_INCREMENT = 0.6f; /** The refresh rate, in frames per second. */ private static final int REFRESH_RATE_FPS = 60; /** The duration, in milliseconds, of one frame. */ private static final float FRAME_TIME_MILLIS = TimeUnit.SECONDS.toMillis(1) / REFRESH_RATE_FPS; private final float[] mMVPMatrix; private final float[] mProjectionMatrix; private final float[] mViewMatrix; private final float[] mRotationMatrix; private final float[] mFinalMVPMatrix; private Cube mCube; private float mCubeRotation; private long mLastUpdateMillis; public CubeRenderer() { mMVPMatrix = new float[16]; mProjectionMatrix = new float[16]; mViewMatrix = new float[16]; mRotationMatrix = new float[16]; mFinalMVPMatrix = new float[16]; // Set the fixed camera position (View matrix). Matrix.setLookAtM(mViewMatrix, 0, 0.0f, 0.0f, -4.0f, 0.0f, 0.0f, 0.0f, 0.0f, 1.0f, 0.0f); } @Override public void onSurfaceCreated(EGLConfig config) { // Set the background frame color GLES20.glClearColor(0.0f, 0.0f, 0.0f, 1.0f); GLES20.glClearDepthf(1.0f); GLES20.glEnable(GLES20.GL_DEPTH_TEST); GLES20.glDepthFunc(GLES20.GL_LEQUAL); mCube = new Cube(); } @Override public void onSurfaceChanged(int width, int height) { float ratio = (float) width / height; GLES20.glViewport(0, 0, width, height); // This projection matrix is applied to object coordinates in the onDrawFrame() method. Matrix.frustumM(mProjectionMatrix, 0, -ratio, ratio, -1.0f, 1.0f, 3.0f, 7.0f); // modelView = projection x view Matrix.multiplyMM(mMVPMatrix, 0, mProjectionMatrix, 0, mViewMatrix, 0); } @Override public void onDrawFrame() { GLES20.glClear(GLES20.GL_COLOR_BUFFER_BIT | GLES20.GL_DEPTH_BUFFER_BIT); // Apply the rotation. Matrix.setRotateM(mRotationMatrix, 0, mCubeRotation, 1.0f, 1.0f, 1.0f); // Combine the rotation matrix with the projection and camera view Matrix.multiplyMM(mFinalMVPMatrix, 0, mMVPMatrix, 0, mRotationMatrix, 0); // Draw cube. mCube.draw(mFinalMVPMatrix); updateCubeRotation(); } /** Updates the cube rotation. */ private void updateCubeRotation() { if (mLastUpdateMillis != 0) { float factor = (SystemClock.elapsedRealtime() - mLastUpdateMillis) / FRAME_TIME_MILLIS; mCubeRotation += CUBE_ROTATION_INCREMENT * factor; } mLastUpdateMillis = SystemClock.elapsedRealtime(); } }ライブカードを管理し、 ライブカードのレンダラとして
CubeRendererクラス。import com.google.android.glass.timeline.LiveCard; import com.google.android.glass.timeline.LiveCard.PublishMode; import android.app.PendingIntent; import android.app.Service; import android.content.Intent; import android.os.IBinder; /** * Creates a {@link LiveCard} rendering a rotating 3D cube with OpenGL. */ public class OpenGlService extends Service { private static final String LIVE_CARD_TAG = "opengl"; private LiveCard mLiveCard; @Override public IBinder onBind(Intent intent) { return null; } @Override public int onStartCommand(Intent intent, int flags, int startId) { if (mLiveCard == null) { mLiveCard = new LiveCard(this, LIVE_CARD_TAG); mLiveCard.setRenderer(new CubeRenderer()); mLiveCard.setAction( PendingIntent.getActivity(this, 0, new Intent(this, MenuActivity.class), 0)); mLiveCard.publish(PublishMode.REVEAL); } else { mLiveCard.navigate(); } return START_STICKY; } @Override public void onDestroy() { if (mLiveCard != null && mLiveCard.isPublished()) { mLiveCard.unpublish(); mLiveCard = null; } super.onDestroy(); } }
import android.opengl.GLES20;

import java.nio.ByteBuffer;
import java.nio.ByteOrder;
import java.nio.FloatBuffer;

/**
 * Renders a 3D Cube using OpenGL ES 2.0.
 *
 * For more information on how to use OpenGL ES 2.0 on Android, see the
 * <a href="//developer.android.com/training/graphics/opengl/index.html">
 * Displaying Graphics with OpenGL ES</a> developer guide.
 */
public class Cube {

    /** Cube vertices */
    private static final float VERTICES[] = {
        -0.5f, -0.5f, -0.5f,
        0.5f, -0.5f, -0.5f,
        0.5f, 0.5f, -0.5f,
        -0.5f, 0.5f, -0.5f,
        -0.5f, -0.5f, 0.5f,
        0.5f, -0.5f, 0.5f,
        0.5f, 0.5f, 0.5f,
        -0.5f, 0.5f, 0.5f
    };

    /** Vertex colors. */
    private static final float COLORS[] = {
        0.0f, 1.0f, 1.0f, 1.0f,
        1.0f, 0.0f, 0.0f, 1.0f,
        1.0f, 1.0f, 0.0f, 1.0f,
        0.0f, 1.0f, 0.0f, 1.0f,
        0.0f, 0.0f, 1.0f, 1.0f,
        1.0f, 0.0f, 1.0f, 1.0f,
        1.0f, 1.0f, 1.0f, 1.0f,
        0.0f, 1.0f, 1.0f, 1.0f,
    };


    /** Order to draw vertices as triangles. */
    private static final byte INDICES[] = {
        0, 1, 3, 3, 1, 2, // Front face.
        0, 1, 4, 4, 5, 1, // Bottom face.
        1, 2, 5, 5, 6, 2, // Right face.
        2, 3, 6, 6, 7, 3, // Top face.
        3, 7, 4, 4, 3, 0, // Left face.
        4, 5, 7, 7, 6, 5, // Rear face.
    };

    /** Number of coordinates per vertex in {@link VERTICES}. */
    private static final int COORDS_PER_VERTEX = 3;

    /** Number of values per colors in {@link COLORS}. */
    private static final int VALUES_PER_COLOR = 4;

    /** Vertex size in bytes. */
    private final int VERTEX_STRIDE = COORDS_PER_VERTEX * 4;

    /** Color size in bytes. */
    private final int COLOR_STRIDE = VALUES_PER_COLOR * 4;

    /** Shader code for the vertex. */
    private static final String VERTEX_SHADER_CODE =
            "uniform mat4 uMVPMatrix;" +
            "attribute vec4 vPosition;" +
            "attribute vec4 vColor;" +
            "varying vec4 _vColor;" +
            "void main() {" +
            "  _vColor = vColor;" +
            "  gl_Position = uMVPMatrix * vPosition;" +
            "}";

    /** Shader code for the fragment. */
    private static final String FRAGMENT_SHADER_CODE =
            "precision mediump float;" +
            "varying vec4 _vColor;" +
            "void main() {" +
            "  gl_FragColor = _vColor;" +
            "}";


    private final FloatBuffer mVertexBuffer;
    private final FloatBuffer mColorBuffer;
    private final ByteBuffer mIndexBuffer;
    private final int mProgram;
    private final int mPositionHandle;
    private final int mColorHandle;
    private final int mMVPMatrixHandle;

    public Cube() {
        ByteBuffer byteBuffer = ByteBuffer.allocateDirect(VERTICES.length * 4);

        byteBuffer.order(ByteOrder.nativeOrder());
        mVertexBuffer = byteBuffer.asFloatBuffer();
        mVertexBuffer.put(VERTICES);
        mVertexBuffer.position(0);

        byteBuffer = ByteBuffer.allocateDirect(COLORS.length * 4);
        byteBuffer.order(ByteOrder.nativeOrder());
        mColorBuffer = byteBuffer.asFloatBuffer();
        mColorBuffer.put(COLORS);
        mColorBuffer.position(0);

        mIndexBuffer = ByteBuffer.allocateDirect(INDICES.length);
        mIndexBuffer.put(INDICES);
        mIndexBuffer.position(0);

        mProgram = GLES20.glCreateProgram();
        GLES20.glAttachShader(mProgram, loadShader(GLES20.GL_VERTEX_SHADER, VERTEX_SHADER_CODE));
        GLES20.glAttachShader(
                mProgram, loadShader(GLES20.GL_FRAGMENT_SHADER, FRAGMENT_SHADER_CODE));
        GLES20.glLinkProgram(mProgram);

        mPositionHandle = GLES20.glGetAttribLocation(mProgram, "vPosition");
        mColorHandle = GLES20.glGetAttribLocation(mProgram, "vColor");
        mMVPMatrixHandle = GLES20.glGetUniformLocation(mProgram, "uMVPMatrix");
    }

    /**
     * Encapsulates the OpenGL ES instructions for drawing this shape.
     *
     * @param mvpMatrix The Model View Project matrix in which to draw this shape
     */
    public void draw(float[] mvpMatrix) {
        // Add program to OpenGL environment.
        GLES20.glUseProgram(mProgram);

        // Prepare the cube coordinate data.
        GLES20.glEnableVertexAttribArray(mPositionHandle);
        GLES20.glVertexAttribPointer(
                mPositionHandle, 3, GLES20.GL_FLOAT, false, VERTEX_STRIDE, mVertexBuffer);

        // Prepare the cube color data.
        GLES20.glEnableVertexAttribArray(mColorHandle);
        GLES20.glVertexAttribPointer(
                mColorHandle, 4, GLES20.GL_FLOAT, false, COLOR_STRIDE, mColorBuffer);

        // Apply the projection and view transformation.
        GLES20.glUniformMatrix4fv(mMVPMatrixHandle, 1, false, mvpMatrix, 0);

        // Draw the cube.
        GLES20.glDrawElements(
                GLES20.GL_TRIANGLES, INDICES.length, GLES20.GL_UNSIGNED_BYTE, mIndexBuffer);

        // Disable vertex arrays.
        GLES20.glDisableVertexAttribArray(mPositionHandle);
        GLES20.glDisableVertexAttribArray(mColorHandle);
    }

    /** Loads the provided shader in the program. */
    private static int loadShader(int type, String shaderCode){
        int shader = GLES20.glCreateShader(type);

        GLES20.glShaderSource(shader, shaderCode);
        GLES20.glCompileShader(shader);

        return shader;
    }
}
ライブカードのフォーカス
LiveCard.publish() でライブカードを公開する場合は、そのカードにパラメータを渡します。
すぐにフォーカスするかどうかをコントロールできます。
公開後すぐにタイムラインをカードに移動するには、次のコマンドを使用します。
LiveCard.PublishMode.REVEAL。
カードを通知なしで公開し、ユーザーが各自でカードに移動できるようにするには、次のコマンドを使用します。
LiveCard.PublishMode.SILENT。
また、LiveCard.navigate()
メソッドを使用すると、公開後にカードに移動できます。たとえば、ユーザーがウェブ管理画面から
ライブカードがすでに開始されている場合は、ライブカードに
表示されます。
メニューの作成と表示
ライブカードでは独自のメニュー システムを表示できないため、メニューを表示するにはアクティビティを作成する必要があります 確認できます。
メニュー アクティビティでは、ライブカードを停止するための項目を設定できます。 その他の必要なアクションも指定できます。また、 音量調節などのシステム設定アクティビティをメニュー項目として表示できます。詳細 詳しくは、 開始時の設定。
メニュー リソースの作成
メニュー リソースの作成は Android プラットフォームの場合と同じですが、 Glass に関するガイドライン:
- 各メニュー項目に、50 × 50 ピクセルのメニュー項目アイコンを提供する。メニュー アイコンは透明な背景上の白色にする必要があります。詳しくは、 Glass メニュー項目アイコン: サンプルを使用するか、ご自身でダウンロードしてください。
- アクションを説明する短い名前(語頭を大文字にしたもの)を使用します。命令型動詞は機能する ([共有] や [全員に返信] など)をタップします。
- Glass には、メニュー項目がないライブカードは表示されません。少なくとも [停止] メニュー項目を表示して、ユーザーがライブカードを タイムラインが表示されます。
「 CheckBox ウィジェット はサポートされていません。
<menu xmlns:android="http://schemas.android.com/apk/res/android">
    <item
        android:id="@+id/menu_item_1"
        android:title="@string/Menu_Item_1"       <!-- must have "Stop" menu item -->
        android:icon="@drawable/menu_item_1_icon" />   <!-- white on transparent icon -->
</menu>
メニュー コールバックを処理するアクティビティを作成する
ユーザーがライブカードをタップしたときに呼び出すメニュー アクティビティを定義する必要があります。
以下をオーバーライドする
Activity コールバック メソッド
メニュー アクティビティのメニューを適切に作成、表示、閉じるには:
onCreateOptionsMenu()XML メニュー リソースをインフレートします。onAttachedToWindow()アクティビティにフォーカスがあるときにメニューを表示します。onPrepareOptionsMenu()必要に応じてメニュー項目を表示または非表示にします。たとえば、さまざまなメニュー項目を 自動的に最適化されます。たとえば、ユーザーに応じて異なるメニュー項目を表示し、 いくつかのコンテキストデータに 基づいて行いますonOptionsItemSelected()はユーザー選択を処理します。onOptionsMenuClosed()アクティビティを終了させ、ライブカードの上に表示されないようにします。
メニューが選択または下にスワイプして閉じられたときに適切に終了するように、ここでアクティビティを終了する必要があります。
/**
 * Activity showing the options menu.
 */
public class MenuActivity extends Activity {

    @Override
    public void onAttachedToWindow() {
        super.onAttachedToWindow();
        openOptionsMenu();
    }

    @Override
    public boolean onCreateOptionsMenu(Menu menu) {
        MenuInflater inflater = getMenuInflater();
        inflater.inflate(R.menu.stopwatch, menu);
        return true;
    }

    @Override
    public boolean onOptionsItemSelected(MenuItem item) {
        // Handle item selection.
        switch (item.getItemId()) {
            case R.id.stop:
                stopService(new Intent(this, StopwatchService.class));
                return true;
            default:
                return super.onOptionsItemSelected(item);
        }
    }

    @Override
    public void onOptionsMenuClosed(Menu menu) {
        // Nothing else to do, closing the activity.
        finish();
    }
}
メニュー アクティビティを透明にする
Glass のスタイルに合わせるために、メニュー アクティビティを作成します。 ライブカードが下に見えるように半透明 アクセスできます。
res/values/styles.xmlファイルを作成してスタイルを宣言する 次のようにして、アクティビティの背景を透明にします。<resources> <style name="MenuTheme" parent="@android:style/Theme.DeviceDefault"> <item name="android:windowBackground">@android:color/transparent</item> <item name="android:colorBackgroundCacheHint">@null</item> <item name="android:windowIsTranslucent">true</item> <item name="android:windowAnimationStyle">@null</item> </style> </resources>AndroidManifest.xmlファイルで、テーマをメニュー アクティビティに割り当てます。<?xml version="1.0" encoding="utf-8"?> <manifest ... > ... <application ... > ... <activity android:name=".MenuActivity" android:theme="@style/MenuTheme" ...> </activity> </application> </manifest>
メニューの表示
以下の情報を
PendingIntent
(setAction() を使用してカードのアクション)ペンディング インテントを使用して
ユーザーがカードをタップしたときに表示されるメニュー アクティビティです。
Intent menuIntent = new Intent(this, MenuActivity.class);
mLiveCard.setAction(PendingIntent.getActivity(this, 0, menuIntent, 0));
mLiveCard.publish(LiveCard.PublishMode.REVEAL); // or SILENT
コンテキストに基づく音声コマンドのサポート
MenuActivityが対応していることを示します コンテキスト対応の音声コマンド:// Initialize your LiveCard as usual. mLiveCard.setVoiceActionEnabled(true); mLiveCard.publish(LiveCard.PublishMode.REVEAL); // or SILENT音声フローからの呼び出しをサポートするように
MenuActivityを変更します。/** * Activity showing the options menu. */ public class MenuActivity extends Activity { private boolean mFromLiveCardVoice; private boolean mIsFinishing; @Override protected void onCreate(Bundle savedInstanceState) { super.onCreate(savedInstanceState); mFromLiveCardVoice = getIntent().getBooleanExtra(LiveCard.EXTRA_FROM_LIVECARD_VOICE, false); if (mFromLiveCardVoice) { // When activated by voice from a live card, enable voice commands. The menu // will automatically "jump" ahead to the items (skipping the guard phrase // that was already said at the live card). getWindow().requestFeature(WindowUtils.FEATURE_VOICE_COMMANDS); } } @Override public void onAttachedToWindow() { super.onAttachedToWindow(); if (!mFromLiveCardVoice) { openOptionsMenu(); } } @Override public boolean onCreatePanelMenu(int featureId, Menu menu) { if (isMyMenu(featureId)) { getMenuInflater().inflate(R.menu.stopwatch, menu); return true; } return super.onCreatePanelMenu(featureId, menu); } @Override public boolean onPreparePanel(int featureId, View view, Menu menu) { if (isMyMenu(featureId)) { // Don't reopen menu once we are finishing. This is necessary // since voice menus reopen themselves while in focus. return !mIsFinishing; } return super.onPreparePanel(featureId, view, menu); } @Override public boolean onMenuItemSelected(int featureId, MenuItem item) { if (isMyMenu(featureId)) { // Handle item selection. switch (item.getItemId()) { case R.id.stop_this: stopService(new Intent(this, StopwatchService.class)); return true; } } return super.onMenuItemSelected(featureId, item); } @Override public void onPanelClosed(int featureId, Menu menu) { super.onPanelClosed(featureId, menu); if (isMyMenu(featureId)) { // When the menu panel closes, either an item is selected from the menu or the // menu is dismissed by swiping down. Either way, we end the activity. isFinishing = true; finish(); } } /** * Returns {@code true} when the {@code featureId} belongs to the options menu or voice * menu that are controlled by this menu activity. */ private boolean isMyMenu(int featureId) { return featureId == Window.FEATURE_OPTIONS_PANEL || featureId == WindowUtils.FEATURE_VOICE_COMMANDS; } }
詳しくは、 コンテキスト対応の音声コマンド ガイドをご覧ください。
メニュー ユーティリティ
メニューの外観と動作を変更するためのヘルパー メソッドがいくつかあります。詳しくは、MenuUtils をご覧ください。