上次更新时间:2025 年 3 月 28 日
- 被测设备(以下简称“DUT”)必须是恢复出厂设置的设备(即 DUT 不得是个人设备或包含任何个人信息的设备)。
- 此处提供的测试材料(例如流程、准则和其他信息)是 Google 服务的一部分,受 Google 的知识产权保护,并受位于 http://www.google.com/accounts/TOS 的 Google 服务条款的约束,如同这些材料是“软件”一样。## 1. 认证准备
本部分介绍了开始认证流程之前需要做的准备工作。本文档概述了关键定义、要求和设置步骤,可帮助您顺利完成认证。
1.1 定义
初始配对是指用户首次将设备与手机上登录的 Google 账号配对时发生的一系列事件。在此序列中,手机检测到设备发出的广告,并显示一条通知,提示用户连接并保存设备。(在本指南中,“设备”是指蓝牙耳机或音箱,而不是参考手机)。
后续配对是指当用户在新手机上登录 Google 账号并尝试配对已保存到其 Google 账号的设备时发生的一系列事件。在此序列中,新手机会识别出已将广播的型号 ID 保存到用户的 Google 账号中,并提供通知以加快将设备与此手机配对的速度。
1.2 要求
- 所有手机都应连接到互联网,并且在“设置”中开启蓝牙和位置信息服务。
- 所有手机都应登录同一 Google 账号。
- 参考手机应是目前市场上在售的手机,并且覆盖了相当多的用户。
- 实现要认证的快速配对版本及相关扩展程序的蓝牙设备。
经典模式,支持 A2DP+HPF
- 三 (3) 部搭载三 (3) 个不同 Android 版本的参考手机。Android OS 版本必须至少为 11。
- 建议使用以下参考手机来涵盖所有 Android OS 版本:
- Google Pixel 8 (Android 15)
- 搭载 Android 14 的 Samsung S23 或更高版本
- Google Pixel 7 (Android 13)
- Google Pixel 6 (Android 12)
- Google Pixel 5 (Android 11)
- Samsung S20 或更高型号的手机,搭载 Android 12 或 13
仅限数据流量的 BLE
- 五 (5) 部参考手机,搭载三 (3) 个不同的 Android 版本。Android OS 版本必须至少为 11。
- 建议使用以下参考手机来涵盖所有 Android OS 版本:
- Google Pixel 8 (Android 15)
- 搭载 Android 14 的 Samsung S23 或更高版本
- Google Pixel 7 (Android 13)
- Google Pixel 6 (Android 12)
- Google Pixel 5 (Android 11)
- Samsung S20 或更高型号的手机,搭载 Android 12 或 13
支持 LE 音频的 BLE
- 五 (5) 部参考手机,搭载三 (3) 个不同的 Android 版本。Android OS 版本必须至少为 11。
- 建议使用以下参考手机来涵盖所有 Android OS 版本:
- Google Pixel 8 (Android 15)
- 搭载 Android 14 的 Samsung S23 或更高版本
- Google Pixel 7 (Android 13)
- Google Pixel 6 (Android 12)
- Google Pixel 5 (Android 11)
- Samsung S20 或更高型号的手机,搭载 Android 12 或 13
1.3 检查 Google Play 服务版本
用途:确认用于测试的 GMS Core 版本是否正确。
依次前往“设置”>“Google”> 右上角的问号 > 右上角的三点状图标 >“版本信息”,然后检查 Google Play 服务版本(应为
22.XX.XX或更高版本)。

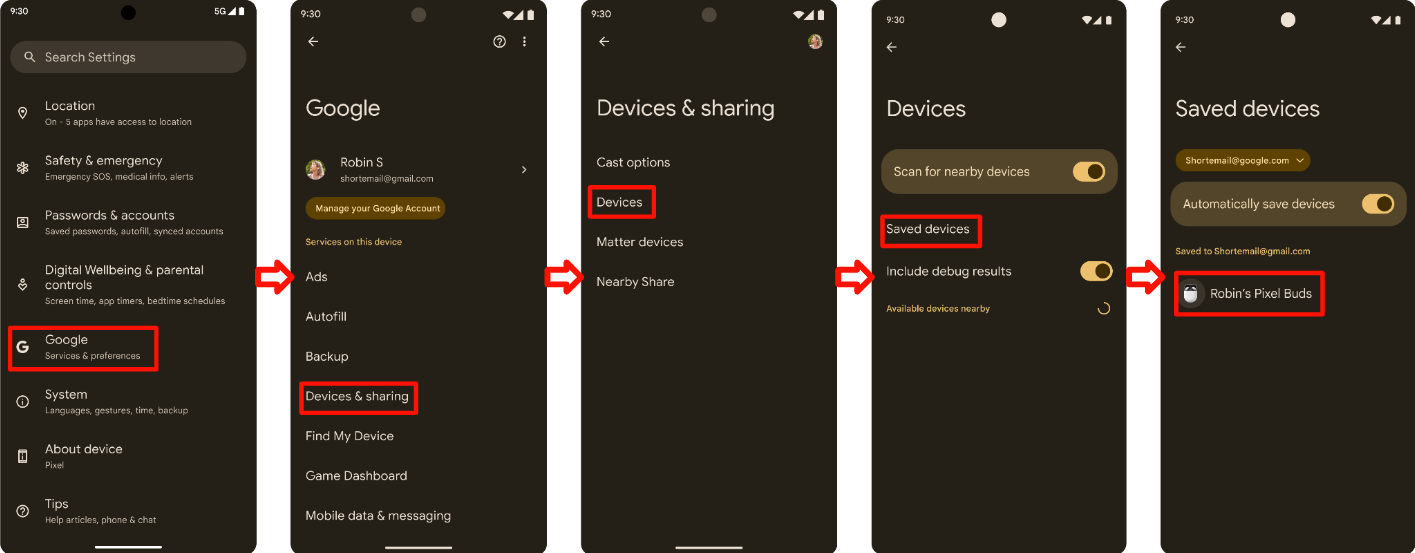
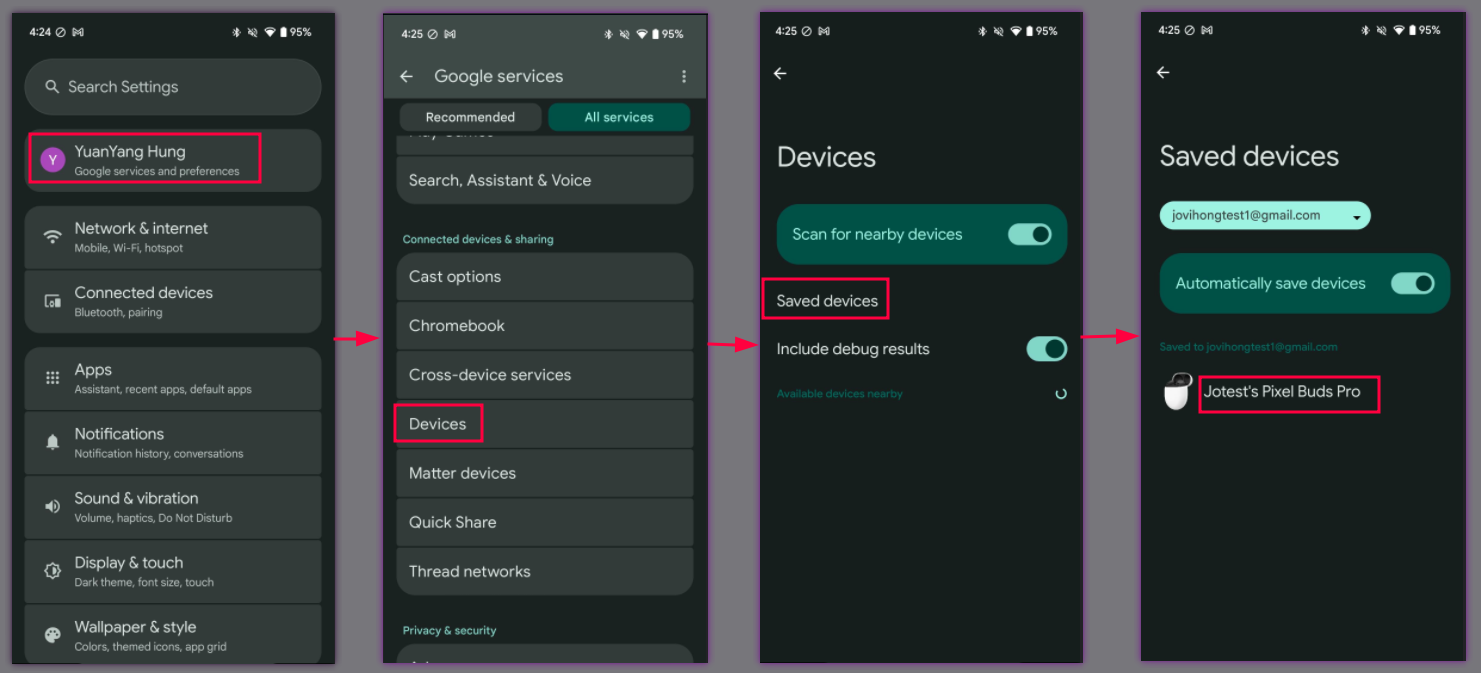
1.4 启用调试模式 ID
- 您收到的模型 ID 是调试模式 ID。如需启用此功能,请依次前往“设置”>“Google”>“设备和分享”>“设备”,然后启用“包含调试结果”。如果此页面中缺少“Include debug results”(包含调试结果)选项,请验证 Seeker 中的“开发者选项”是否已启用。

1.5 启用 Google Play 服务通知
- 依次前往设置 > 通知 > 应用设置 > Google Play 服务,然后验证“通知”开关是否处于开启状态。

1.6 验证您是否可以访问测试结果服务器
部分测试数据会直接上传到 Google 服务器。在开始实验室认证之前,需要提供此数据才能完成自测。验证您的测试手机是否具备以下条件:
- 已登录且已加入 FP 测试组的测试账号。
- 在运行初始配对测试和后续配对测试期间及之后,能够保持供电并连接到互联网 25 小时。手机将在此期间尝试上传测试数据和结果。
- 与 BT Classic 或 BT LE 音频 自检报告中提供的值相匹配的测试周期和测试型号 ID。
- 测试设备上已启用“使用情况和诊断信息”设置。如需验证此设置,请依次前往:设置 > Google > 右上角的三点状图标 > 使用情况和诊断信息 > 开启“使用情况和诊断信息”。
2. 认证标准
本部分详细介绍了设备必须满足的特定认证条件。这些标准涵盖了快速配对性能的各个方面,包括配对成功率、配对时间以及基于距离的通知行为。
2.1 定义
- “所有手机”是指操作系统版本符合要求部分中定义的最低版本的所有参考手机。
- “平均配对时间”是指(所有成功配对时间的总和)/(10 - 失败的配对次数)。配对时间计算从用户点按快速配对通知时开始,到手机向用户显示“连接成功”通知时结束。
- 距离测试的“成功率”为(1 分钟内弹出通知的次数 / 10)。
2.2 初始配对的通知对话框
- 通知应会在 5 秒内显示。
2.3 配对的认证规范
- 每部参考手机将分别进行 100 次初始配对和后续配对测试。
将设备放置在距离参考手机 0.3 米的位置,以衡量初始配对和后续配对的成功率。
- 当配对固件仅支持一个组件(例如头戴式耳机或单个扬声器)时,平均配对时间必须在 12 秒内。
- 配对固件支持协调集成员(例如左右耳塞)时,平均配对时间必须在 14 秒内。
经典模式,支持 A2DP+HPF
- 初始通过率和后续通过率必须至少为 95%。
仅限数据流量的 BLE
- 初始通过率和后续通过率必须至少为 90%。
支持 LE 音频的 BLE
- 初始通过率和后续通过率必须至少为 90%。
所有参考手机的初始配对时间和后续配对时间中,必须有 80% 满足相应条件。
2.4 距离认证规范
在按规定的 3 个距离(0.3 米、1.2 米和 2 米)进行测试时,所有参考手机中必须至少有 80% 满足本部分中的条件。
- 在 0.3 米处的成功率必须为 100%。换句话说,每部参考手机必须运行 10 次 0.3 米测试,并且每次都显示通知。
- 在 1.2 米处发送到参考手机的配对通知显示率必须小于或等于 20%(10 次)。
- 在 2 米距离处进行的每次测试都必须确保在至少 1 分钟内不会在参考手机上显示通知。
- 对于每部参考手机,每个距离将测试 10 次。
2.5 [可选] 应用发布认证规范
此规范详细说明了应用启动的标准,包括:
- 当参考手机上未安装配套应用时,重定向到 Play 商店以供下载。
- 当配套应用已安装在参考手机上时,直接启动该应用。
- 每个场景都必须通过 3 次重复验证,以确保性能稳定。
如需了解详细的测试程序,请参阅第 4.6 部分“应用启动”。
3. 快速配对 2.0 测试指南
本部分详细介绍了如何测试快速配对 2.0,包括界面验证、测试用例程序和预期行为。
3.1 界面
以下图片介绍了 4 种不同的配对流程:
- 在未下载设备的配套应用的情况下进行初始配对。

- 已下载设备的配套应用,并已完成初始配对。

- 后续与已下载的设备配套应用配对。
在未下载设备配套应用的情况下进行后续配对。
情形 3 和 4 使用相同的流程。

- 错误状态

只有当 DUT 的型号 ID 与配套应用链接相关联时,才会显示下载配套应用的通知。相反,如果不存在配套应用关联,测试人员将仅在“设备已连接”通知下看到设备名称,就像他们看到后续配对一样。
3.2 测试用例 1:初始配对
本部分概述了测试初始配对流程的步骤,以验证设备是否可以首次成功配对。
3.2.1 设置和测试
- 验证 DUT 是否未在任何手机上显示为已保存的设备。在保存了 DUT 并登录到测试 Google 账号的每部手机上:前往蓝牙设置,选择“忘记设备”,然后切换到飞行模式,确保忘记 DUT。
确认“自动保存设备”处于开启状态。此开关默认处于关闭状态。 您可以在手机 A 的设置 > Google > 设备 > 已保存的设备中找到此选项。
经典模式,支持 A2DP+HPF
无需执行其他步骤。
仅限数据流量的 BLE
无需执行其他步骤。
支持 LE 音频的 BLE
- 依次前往设置 > 已连接的设备 > 设备详情
- 验证 LE 音频开关是否已设置为“停用”。
- 仅支持传统蓝牙的手机(例如 Pixel 6 及更旧的型号)的菜单设置中不会显示此切换开关。
- 对于测试中使用的支持 LE 音频的手机:
- 依次前往设置 > 已连接的设备 > 设备详情
- 验证 LE 音频切换开关是否已设置为“已启用”。
让蓝牙设备进入配对模式。
将蓝牙设备放在距离手机 A 0.3 米的位置。
等待参考手机 A 中的通知对话框。通知应在 5 秒内显示。
从点按初始通知开始计时,直到在手机 A 中看到“设备已连接”通知对话框为止。
在测试报告的“初始配对”部分记录时间。
3.2.2 预期行为
- 系统会显示初始配对半页:

- 点按通知即可开始快速配对。通知会显示进度:

- 快速配对成功后,手机会显示通知。如果设备制造商发布了配套应用,手机还会提示用户从 Google Play 商店下载该配套应用。

- 如果快速配对失败,手机会显示错误:
3.3 测试用例 2:将此设备与两部登录了同一 Google 账号的参考手机配对(后续配对)
本部分概述了测试后续配对流程的步骤,验证设备在已保存到 Google 账号的情况下能否成功与新手机配对。
3.3.1 设置和测试
验证 DUT 之前是否已与登录了同一 Google 账号的另一部手机(手机 A)配对。
如需验证蓝牙设备是否已与手机 A 配对,请执行以下操作:
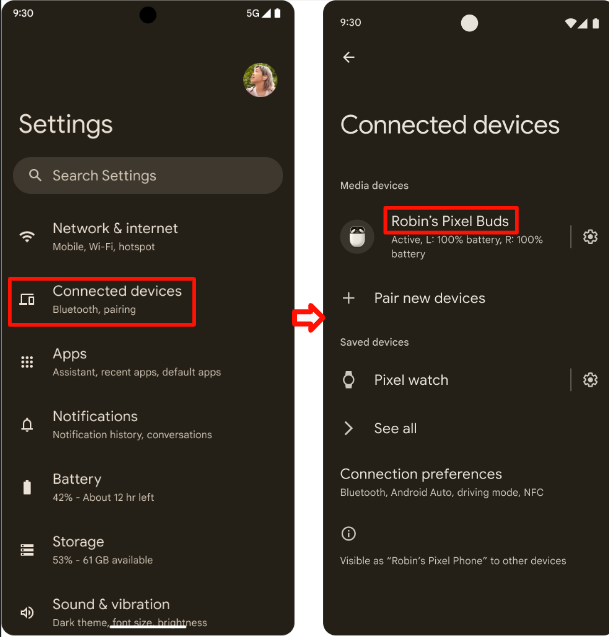
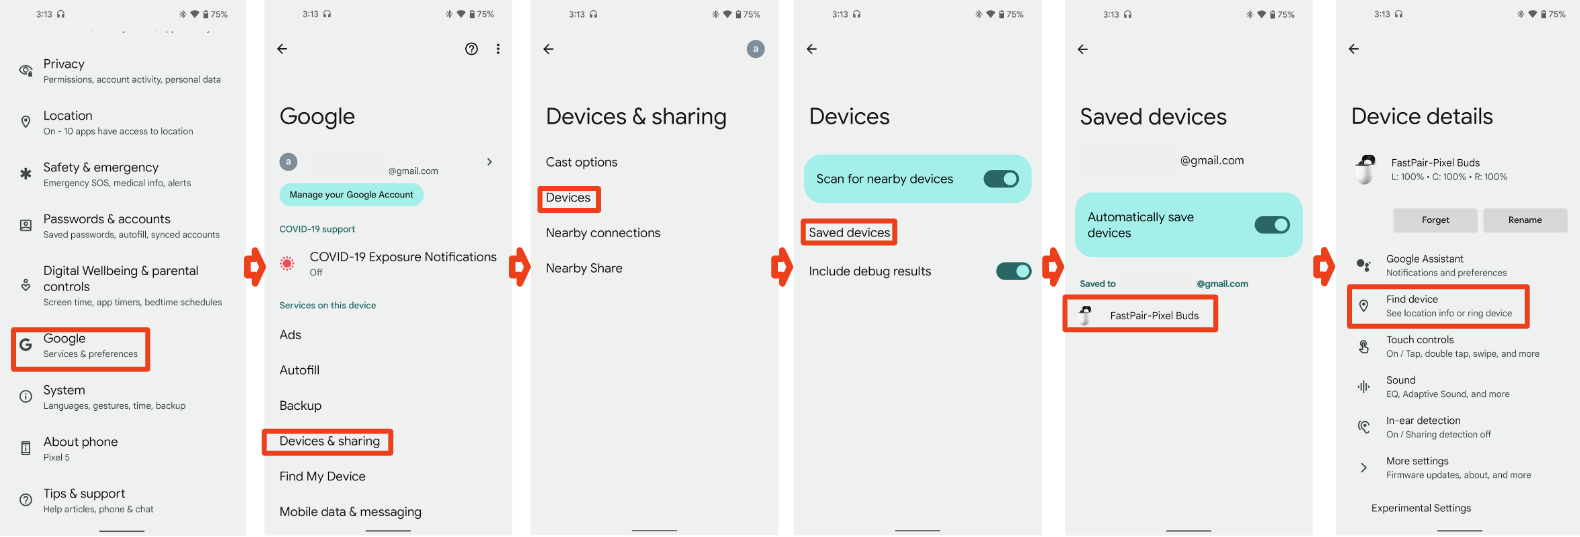
- 首先,在执行初始配对的手机(手机 A)上,依次前往设置 > Google > 设备和分享(或设备连接)> 设备 > 已保存的设备。DUT 应显示在手机的已保存设备列表中,如下所示:

- 其次,在未与 DUT(手机 B)配对的设备上,依次前往设置 > Google > 设备和分享(或设备连接)> 设备 > 已保存的设备。只有当 DUT 也显示在手机 B 的已保存设备列表中时,手机 B 才能显示后续的配对通知。
基本上,在手机 A 上运行测试用例 1(初始配对)后,您可以使用另一部参考手机 B(使用同一账号)来验证测试用例 2(后续配对)。
经典模式,支持 A2DP+HPF
无需执行其他步骤。
仅限数据流量的 BLE
无需执行其他步骤。
支持 LE 音频的 BLE
- 在支持 LE 音频的设备上测试扩展功能时,必须在参考手机上将 LE 音频切换开关设置为开启和关闭,然后运行测试。
- 此测试可验证设备是否可以使用 L2CAP(当 LE 音频开启时)和 RFCOMM(当 LE 音频关闭时)连接到参考手机。
- 测试支持 LE 音频 的设备时,手机需要按以下配置排列:
- 手机 A 支持 LE 音频。
- 手机 B 不支持 LE 音频。
- 手机 C 不支持 LE 音频。
- 手机 D 支持 LE 音频。
- 在测试支持 LE 音频 的设备的后续配对时,必须针对以下测试设备组合运行测试:
- 后续配对通知必须在支持 LE 音频的手机和不支持 LE 音频的手机之间正确显示。
- 例如:确认当手机 A 执行初始配对时,手机 B 可以执行后续配对。另请确认手机 B 可以执行初始配对,而手机 A 可以执行后续配对。
- 后续配对通知必须在不支持 LE 音频的手机之间正确显示。
- 例如:确认当手机 B 执行初始配对时,手机 C 可以执行后续配对。另请确认手机 C 可以执行初始配对,而手机 B 可以执行后续配对。
- 在支持 LE Audio 的手机和支持多个并发 LE Audio 连接的手机之间,后续配对通知必须正确显示。
- 例如:确认当手机 A 执行初始配对时,手机 D 可以执行后续配对。另请确认手机 D 可以执行初始配对,而手机 A 可以执行后续配对。
- 后续配对通知必须在支持 LE 音频的手机和不支持 LE 音频的手机之间正确显示。
将蓝牙设备放在距离手机 0.3 米的位置。
等待设备名称同步到账号:前往设置 > Google > 设备和分享(或设备连接)> 设备 > 已保存的设备,查看设备名称是否显示。当 DUT 出现在手机的设备列表中时,返回到主屏幕。
等待后续通知对话框。
测量从在第二部手机上点按后续通知到看到“设备已连接”通知对话框的时间。
在“后续”部分中记录第二个手机的时间。
按照以下步骤清除保存的记录,这是进行下一个测试的前提条件。
- 从蓝牙设置列表中移除已连接的设备,以取消配对。
依次前往设置 > Google > 设备和分享(或设备连接)> 设备 > 已保存的设备。
- 关闭“自动保存设备”
- 返回上一页
- 开启“自动保存设备”
- 验证设备列表中是否显示“无设备”,如图所示:

开启设备,使其进入配对模式。
3.3.2 预期行为
- 系统会弹出之前关联的设备的配对通知

- 点按通知即可开始后续配对。通知会显示进度:

- 快速配对完成后,您会看到以下通知:

- 如果快速配对失败,手机会显示错误:

3.4 测试用例 3:检查 BLE 账号密钥是否仍在广播
- 确保耳机在不可被发现时(例如,在完成初始配对并连接后,除非耳机已关机)仍会广播账号数据。
- 选择一部参考手机,并对其进行一次至少 30 分钟的测试。
3.5 测试用例 4:距离条件
- 分别测试每个距离(0.3 米、1.2 米和 2 米)10 次。
- 记录参考手机在每个距离下显示通知的次数。
- 例如,“0.3 米 - 是 (7/10)”表示“此参考手机在 0.3 米的距离处接收到配对通知 7 次(总共 10 次)”
3.6 如何捕获调试日志
本部分将引导您完成捕获调试日志的过程,这对于在认证过程中排查和分析问题至关重要。
3.6.1 如何捕获调试信息
- 如需开启日志记录并获取 bug 报告,请运行以下命令:
adb logcat -G 16M
验证您是否已开启“用于调试的蓝牙 HCI 信息收集日志”。对于 Pixel 手机,可以通过以下方式实现:
- 依次前往设置 > 系统 > 关于手机 > build 号。
- 点按“版本号”7 次以启用开发者选项。
 * 前往设置 > 系统 > 高级 > 开发者选项。
* 启用开发者选项和 HCI 信息收集日志。
* 此选项可让手机收集 HCI 数据包日志文件。
* 开启和关闭飞行模式,确保应用更改。
* 前往设置 > 系统 > 高级 > 开发者选项。
* 启用开发者选项和 HCI 信息收集日志。
* 此选项可让手机收集 HCI 数据包日志文件。
* 开启和关闭飞行模式,确保应用更改。
3.6.2 如何获取 logcat 日志文件
- 运行
adb devices以显示终端上所有设备的序列号。 - 运行
adb -s {device serial number} logcat > {logcat name}.txt(您可以随意命名 logcat 文件,并同时记录多个设备的 logcat)。 - 重现 bug。
- 运行
Ctrl+C以停止 logcat。 - 运行
adb bugreport以生成应包含所有数据的 ZIP 文件。这可能需要几分钟时间。 - 运行以下命令以获取 btsnoop_hci.log(设备需要已获得 root 权限)。
- 对于 Android O (8.0) 或更高版本:
adb pull data/misc/bluetooth/logs/btsnoop_hci.log - 对于 Android N:
adb pull sdcard/btsnoop_hci.log - 如果之前的路径不包含 hci.log:
adb shell; find hci.log获取位置。
- 对于 Android O (8.0) 或更高版本:
4. 功能认证标准:
需要通过所有测试用例,电池通知仅对真无线耳机是强制性的。
4.1 电池通知
4.1.1 显示左侧耳机、右侧耳机和充电盒的电池电量通知。
步骤:
- 将测试手机与真无线耳机配对。
- 关闭案例
- 打开支持请求并进行验证。
验证:
- 电池通知显示了左侧耳机、充电盒、右侧耳机的 3 张图片,电池电量正确。(左侧和右侧耳机上均显示充电图标)

4.1.2 电池信息应在电池电量发生变化后更新。
步骤:
- 将测试手机与真无线耳机配对。
- 使用真无线耳机播放任意视频 10 分钟。(为了降低功耗。)
- 依次前往设置 > Google > 设备和分享(或设备连接)> 设备 > 已保存的设备 > 耳机名称。
验证:
- 电池信息应在电池电量发生变化后更新。
- 电池电量应与蓝牙快捷方式(下拉快速设置栏)中报告的电池电量相同,电池电量应与其中一个耳机的电量保持一致,最好显示最低电池电量。

4.1.3 禁止显示通知,应关闭 HUN(关闭支持请求)
步骤:
- 将测试手机与真无线耳机配对。
- 打开支持请求。
- 当耳机显示 HUN 时,关闭耳机充电盒。
验证:
- 电池浮动通知在 3 秒内被关闭。

4.2 个性化名称
本部分介绍了相关程序,用于验证设备是否可以获得个性化名称,以及该名称是否在不同设备上始终保持一致。
4.2.1 耳机充电盒 1、手机 1、账号 A、初始配对
前提条件:
- 手机 1 从未与头戴式耳机配对(如果手机具有缓存的别名)
- 在测试之前,请将耳机恢复出厂设置。
步骤:
- 在手机 1 上使用 Gmail 账号 A 登录。将手机 1 与耳机配对。配对后,请勿更改设备名称。
- 选中显示的 3 个地点。
验证:
- 配对完成后,在 3 个位置,手机 1 应显示账号 A 用户的名字 + 头戴式耳机信息。格式为“[用户的名字]的 [设备名称]”。
在 3 个位置检查名称
设置 > Google > 设备和分享 > 保存的设备:
快捷设置蓝牙图标文字(下拉快捷设置栏):
蓝牙设置:
4.2.2 耳机底座测试用例 2、手机 2、账号 B、初始配对 > 修改设备名称
步骤:
- 继续执行基于头戴式耳机的支持请求(第 1 步,共 3 步)。
- 手机 2、账号 B,初始配对成功。
- 检查 3 个地点。
- 依次前往蓝牙设置 > 齿轮图标 > 铅笔图标 > 更改设备名称。

验证:
配对后,应在以下位置显示账号 A 用户的名字 + 头戴式耳机信息:
设置 > Google > 设备和分享 > 保存的设备:
快捷设置蓝牙图标文字(下拉快捷设置栏):

蓝牙设置:

更改设备名称后,新名称应会显示在以下位置:
设置 > Google > 设备和分享 > 保存的设备:

快捷设置蓝牙图标文字(下拉快捷设置栏):

蓝牙设置:

4.2.3 耳机基本情形 3:手机 3、账号 C、初始配对
步骤:
- 继续执行耳机使用情形 2(共 3 种)。
- 手机 3,账号 C,初始配对成功。
检查列出的 3 个位置:
设置 > Google > 设备和分享 > 保存的设备:

快捷设置蓝牙图标文字(下拉快捷设置栏):
蓝牙设置:

验证:
- 手机 3 应在之前步骤中列出的 3 个位置显示手机 2 的新设备名称。
4.3 查找设备 - 让耳机响铃
本部分介绍了相关程序,用于验证设备是否可以使用“查找我的设备”功能进行定位和响铃。
4.3.1 让设备响铃的耳机功能
步骤:
- 已成功将手机与耳机配对。
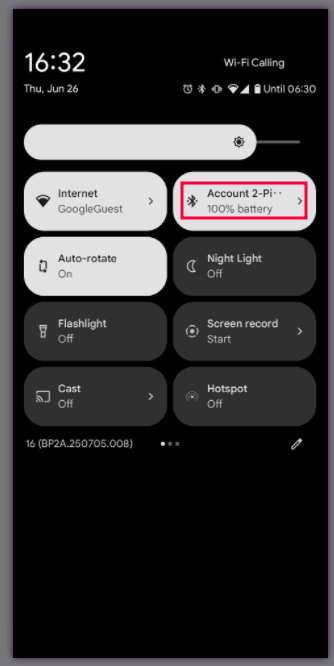
依次前往设置 > Google > 设备和分享(或设备连接)> 设备 > 已保存的设备 > 耳机名称 > 查找设备。
点按“让设备响铃”按钮。(如果测试耳机有左右两侧的入耳式耳机,则应显示两个按钮,分别对应左侧和右侧)
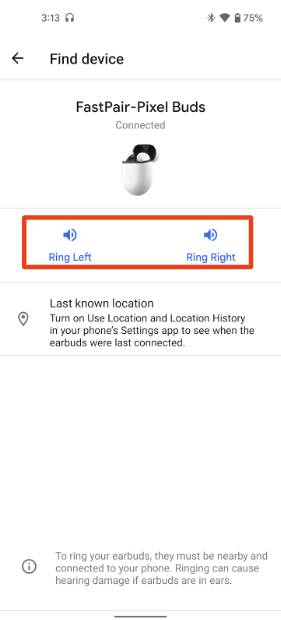
点按“将设备设为静音”按钮。

验证:
- 耳机名称下方的状态应显示“已连接”。
- 当点按此按钮时,耳机应使用自定义铃声响铃。 (真无线耳机应在相应一侧响铃)
- 耳机应立即静音,没有任何延迟。
4.4 追溯写入账号密钥
本部分概述了以下验证程序:验证设备是否可以追溯性地写入账号密钥,从而使设备能够被 Google 账号识别和管理,即使设备最初不是通过快速配对通知配对的。
4.4.1 追溯性配对和确认
步骤:
- 使支持快速配对的设备进入配对模式
- 您会看到一条浮动通知,请勿点按该通知。
- 依次前往设置 > 已连接的设备 > 与新设备配对,然后点按以进行配对

- 等待一分钟,您会看到有关追溯配对的通知。
- 点按通知,将耳机保存到您的账号。
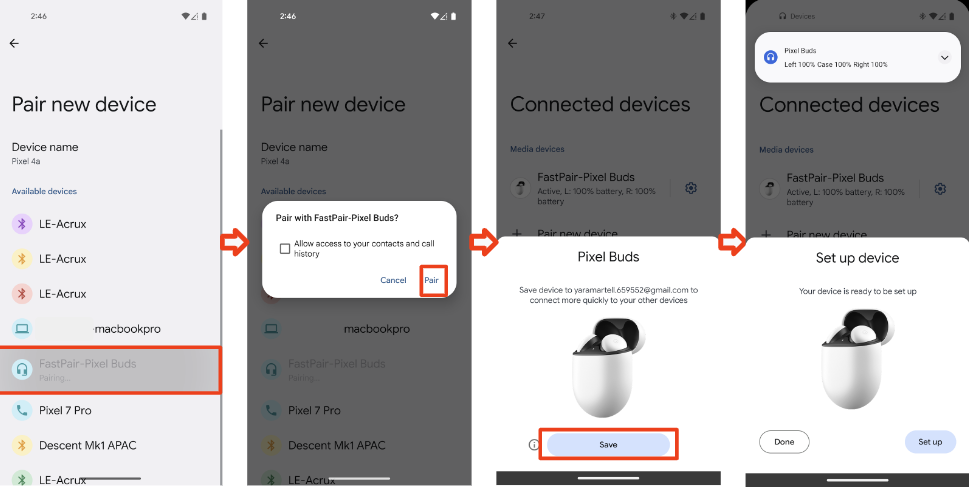
- 依次前往设置 > Google > 设备和分享(或设备连接)> 设备 > 已保存的设备
验证:
系统应会显示“追溯配对”通知。

您会看到该设备已添加到已保存的设备列表中。该设备现在完全支持快速配对。
4.5 主动降噪
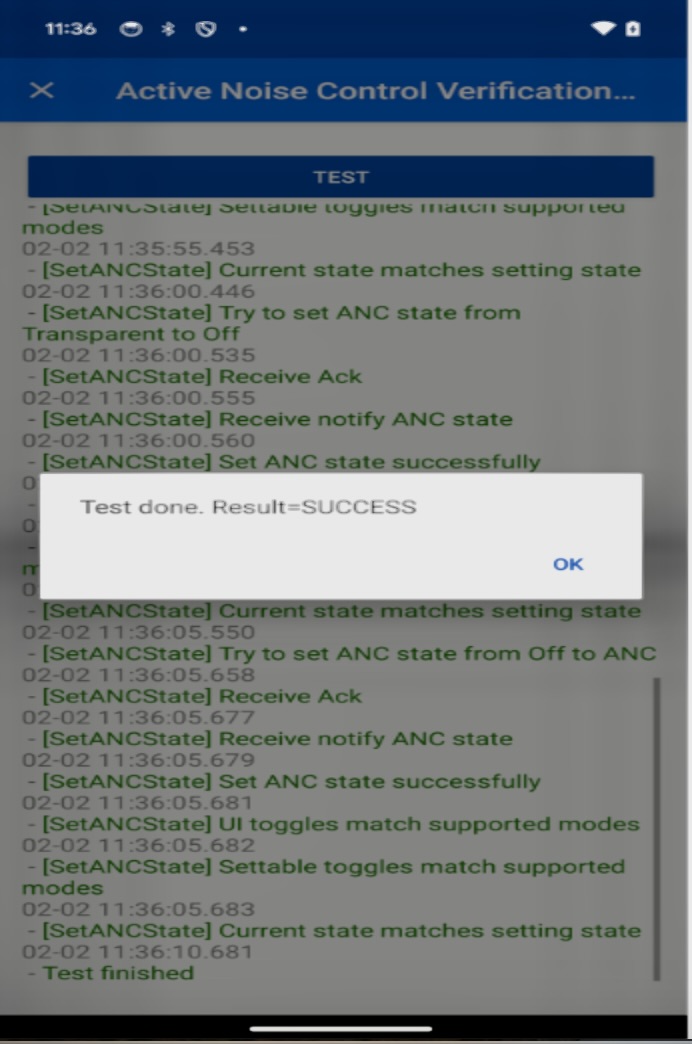
主动通知控制 (ANC) 是一项可选功能。实现 ANC 的设备必须在验证器应用中验证它,并在其自检报告中填写结果,但不需要在第三方实验室中对该功能进行认证。
4.5.1 主动降噪验证
步骤:
- 在验证器应用中,选择 DUT 支持的模式。
- 将 DUT 与 Seeker 配对。
- 从 Seeker 连接到 DUT。
验证:
- 配对后,Seeker 会向 DUT 发送 ANC 状态 (0x11)。
- DUT 在 3 秒内响应了“通知 ANC 状态”(0x13)。
- 对于每种受支持的 ANC 模式,搜索器都会发送 ANC 状态 (0x12)。
- 对于在第 3 步中发送的每条消息,DUT 都会在 5 秒内以“通知 ANC 状态”(0x13) 进行响应。
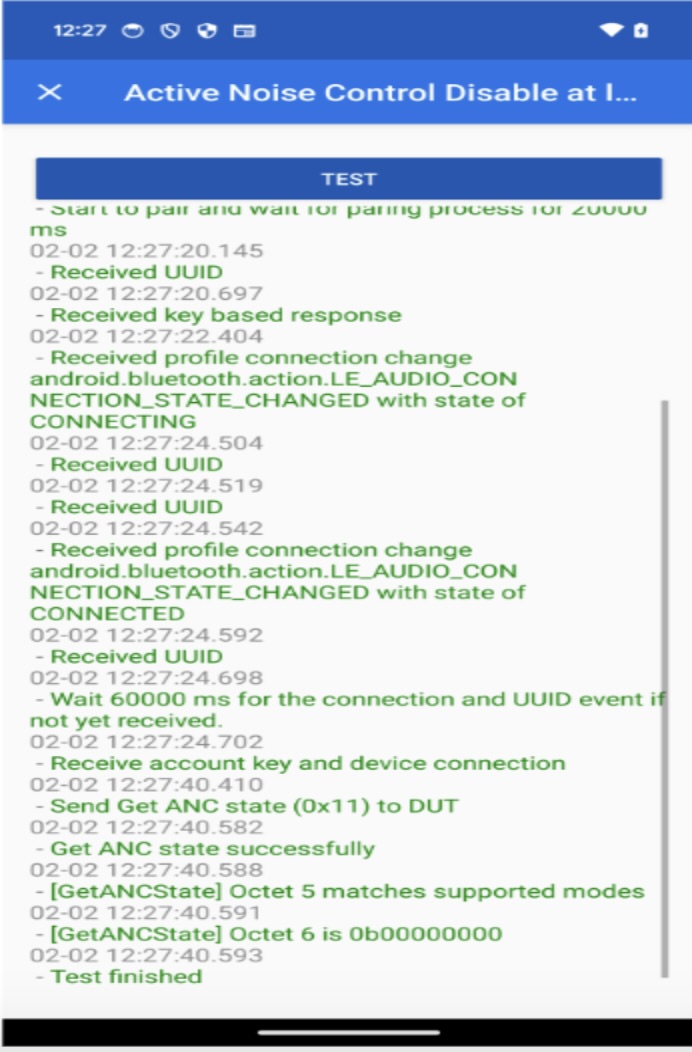
4.5.2 停用主动通知控制
步骤:
- 在验证器应用中,选择 DUT 支持的模式。
- 将 DUT 与 Seeker 配对。
- 从 Seeker 连接到 DUT。
验证:
- 配对后,Seeker 会向 DUT 发送 ANC 状态 (0x11)。
- DUT 在 3 秒内响应了“通知 ANC 状态”(0x13)。
- 确认第 5 个字节与相应 Seeker 支持的 ANC 模式相符。
- 确认八位字节 6 为 0b00000000
4.6 应用启动
本部分详细介绍了可选的应用启动功能的测试程序。如需启用此功能,设备必须成功通过以下测试用例,这些用例涵盖:
- 当配套应用未安装时,重定向到 Play 商店中的配套应用下载页面。
- 直接启动配套应用(如果已安装)。
每个场景都必须通过 3 次重复验证,以确保性能一致。
4.6.1 配套应用下载
前提条件:不得在参考手机上安装配套应用。
测试步骤:
- 让设备进入配对模式。
- 观察手机屏幕上是否显示快速配对半页通知。
- 点按快速配对半页通知中的“设置”按钮。

- 确认 Play 商店应用已启动,并专门显示配套应用的下载页面。
- 重复执行第 1 步到第 4 步 3 次,以验证行为是否一致。
预期结果:在快速配对半页通知中点按“设置”后,用户必须成功重定向到 Play 商店,以下载配套应用。
4.6.2 配套应用启动
前提条件:配套应用必须已安装在参考手机上。
测试步骤:
- 让设备进入配对模式。
- 观察手机屏幕上是否显示快速配对半页通知。
- 点按快速配对半页通知中的“设置”按钮。
- 确认配套应用能正常启动。
- 重复执行第 1 步到第 4 步 3 次,以验证行为是否一致。
预期结果:在快速配对半页通知中点按“设置”后,配套应用必须成功启动。