このページでは、Google Chat 用アプリでダイアログを開いてユーザー インターフェース(UI)を表示し、ユーザーに応答する方法について説明します。
ダイアログは、Chat スペースまたはメッセージから開くウィンドウベースのカードベースのインターフェースです。ダイアログとその内容は、開いたユーザーにのみ表示されます。
チャットアプリは、ダイアログを使用して、複数ステップのフォームなど、Chat ユーザーから情報をリクエストして収集できます。フォーム入力の作成について詳しくは、ユーザーから情報を収集して処理するをご覧ください。
前提条件
HTTP
Google Chat を拡張する Google Workspace アドオン。作成するには、HTTP クイックスタートを完了します。
Apps Script
Google Chat を拡張する Google Workspace アドオン。作成するには、Apps Script のクイックスタートを完了します。
ダイアログを開く


このセクションでは、次の手順でダイアログに応答して設定する方法について説明します。
- ユーザー操作からダイアログ リクエストをトリガーします。
- ダイアログを返して開くことで、リクエストを処理します。
- ユーザーが情報を送信したら、ダイアログを閉じるか別のダイアログを返すことで、送信を処理します。
ダイアログ リクエストをトリガーする
Chat 用アプリは、カード内のメッセージからのコマンドやボタンクリックなど、ユーザー操作に応答するダイアログのみを開くことができます。
ダイアログでユーザーに応答するには、Chat 用アプリで、次のようなダイアログ リクエストをトリガーするインタラクションを構築する必要があります。
- コマンドに応答します。コマンドからリクエストをトリガーするには、コマンドを構成するときに [ダイアログを開く] チェックボックスをオンにする必要があります。
- メッセージ内のボタンクリックに応答します。カードの一部として、またはメッセージの下部に表示されます。メッセージ内のボタンからリクエストをトリガーするには、ボタンの
onClick
アクションを構成し、そのinteraction
をOPEN_DIALOG
に設定します。

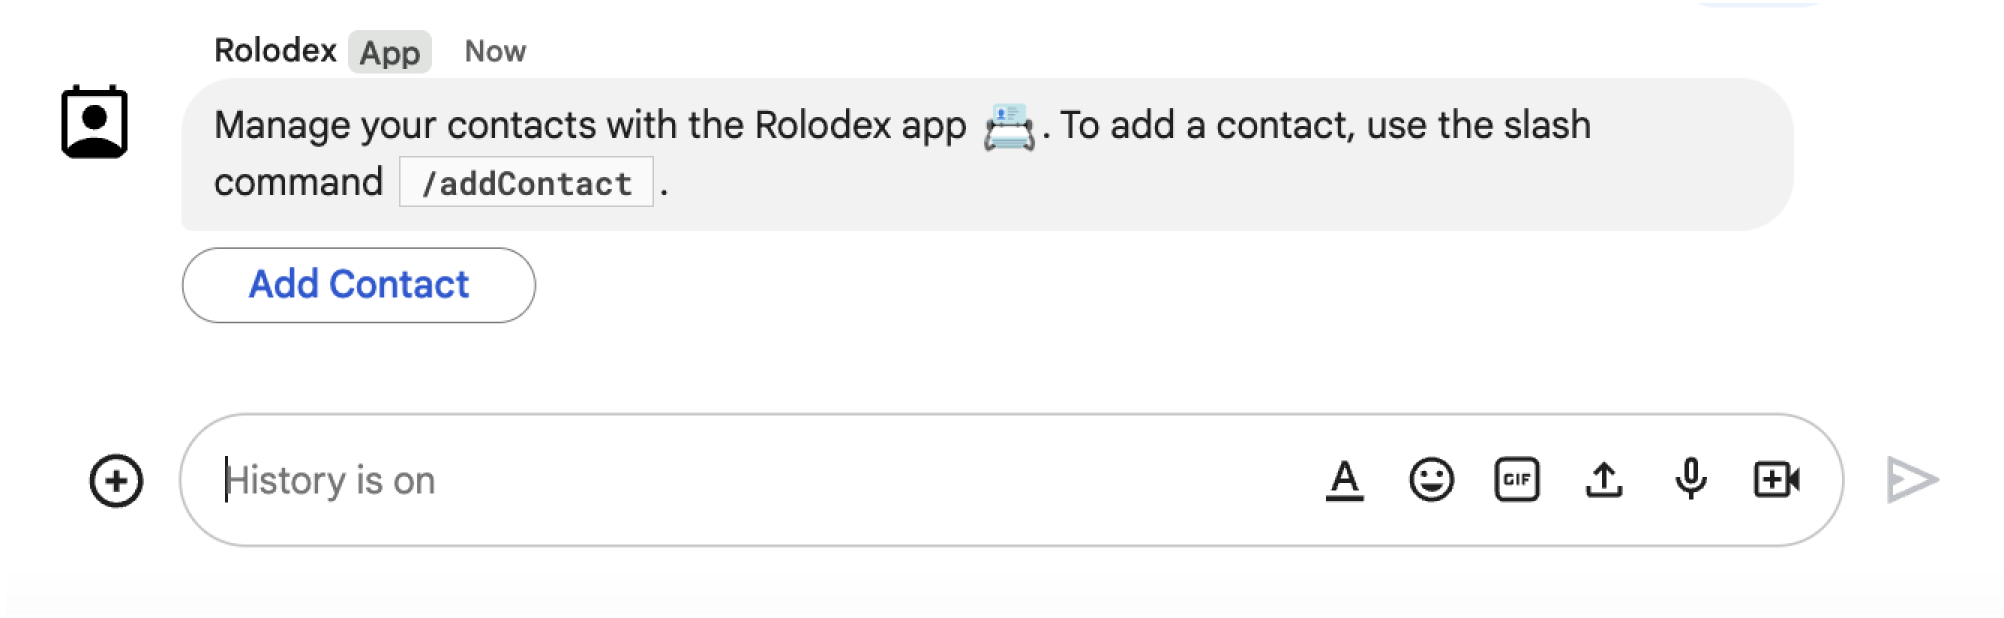
/addContact
スラッシュ コマンドを使用するようユーザーに促すメッセージを送信します。メッセージには、ユーザーがクリックしてコマンドをトリガーできるボタンも含まれています。
次の JSON は、カード メッセージのボタンからダイアログ リクエストをトリガーする方法を示しています。ダイアログを開くには、ボタンのフィールド onClick.action.interaction
を OPEN_DIALOG
に設定します。
{
"buttonList": { "buttons": [{
"text": "BUTTON_TEXT",
"onClick": { "action": {
"function": "ACTION_FUNCTION",
"interaction": "OPEN_DIALOG"
}}
}]}
}
ここで、BUTTON_TEXT はボタンに表示されるテキスト、ACTION_FUNCTION は初期ダイアログを開くために実行される関数です。
最初のダイアログを開く
ユーザーがダイアログ リクエストをトリガーすると、Chat 用アプリは、dialogEventType
オブジェクトを REQUEST_DIALOG
として指定するペイロードを含むイベント オブジェクトを受け取ります。
ダイアログを開くには、Chat 用アプリがリクエストに応答して、ナビゲーション pushCard
を含む RenderActions
オブジェクトを返し、カードを表示します。カードには、1 つ以上の sections[]
ウィジェットを含む、ユーザー インターフェース(UI)要素を含める必要があります。ユーザーから情報を収集するには、フォーム入力ウィジェットとボタン ウィジェットを指定します。フォーム入力の設計について詳しくは、ユーザーから情報を収集して処理するをご覧ください。
次の JSON は、ダイアログを開くレスポンスを Chat 用アプリが返す方法を示しています。
{
"action": { "navigations": [{ "pushCard": { "sections": [{ "widgets": [{
WIDGETS,
{ "buttonList": { "buttons": [{
"text": "BUTTON_TEXT",
"onClick": {
"action": { "function": "ACTION_FUNCTION" }
}
}]}}
}]}]}}]}
}
ここで、BUTTON_TEXT はボタンに表示されるテキスト(Next
や Submit
など)、WIDGETS は 1 つ以上のフォーム入力ウィジェット、ACTION_FUNCTION はユーザーがボタンをクリックしたときに実行されるアクションのコールバック関数です。
ダイアログの送信を処理する
ユーザーがダイアログを送信するボタンをクリックすると、Chat 用アプリは ButtonClickedPayload
オブジェクトを含むイベント オブジェクトを受け取ります。ペイロードでは、dialogEventType
が SUBMIT_DIALOG
に設定されます。ダイアログで情報を収集して処理する方法については、Google Chat ユーザーから情報を収集して処理するをご覧ください。
Chat 用アプリは、次のいずれかの方法でイベント オブジェクトに応答する必要があります。
- 別のダイアログを返すことで、別のカードまたはフォームに入力します。
- ユーザーが送信したデータを検証したら、ダイアログを閉じ、必要に応じて確認メッセージを送信します。
省略可: 別のダイアログを返す
ユーザーが最初のダイアログを送信した後、Chat 用アプリは 1 つ以上の追加のダイアログを返すことができます。これにより、ユーザーは送信前に情報を確認したり、複数ステップのフォームを完了したり、フォームのコンテンツを動的に入力したりできます。
ユーザーが入力したデータを処理するために、Chat 用アプリはイベントの commonEventObject.formInputs
オブジェクトでデータを処理します。入力ウィジェットから値を取得する方法について詳しくは、ユーザーから情報を収集して処理するをご覧ください。
ユーザーが最初のダイアログで入力したデータを追跡するには、次のダイアログを開くボタンにパラメータを追加する必要があります。詳しくは、別のカードにデータを移行するをご覧ください。
この例では、Chat 用アプリが最初のダイアログを開き、送信前に確認するための 2 つ目のダイアログが表示されます。
Node.js
/**
* Google Cloud Function that handles all Google Workspace Add On events for
* the contact manager app.
*
* @param {Object} req Request sent from Google Chat space
* @param {Object} res Response to send back
*/
exports.contactManager = function contactManager(req, res) {
const chatEvent = req.body.chat;
// Handle MESSAGE events
if(chatEvent.messagePayload) {
return res.send(handleMessage(req.body));
// Handle button clicks
} else if(chatEvent.buttonClickedPayload) {
switch(req.body.commonEventObject.parameters.actionName) {
case "openInitialDialog":
return res.send(openInitialDialog(req.body));
case "openConfirmationDialog":
return res.send(openConfirmationDialog(req.body));
case "submitDialog":
return res.send(submitDialog(req.body));
}
}
};
/**
* Responds to a message in Google Chat.
*
* @param {Object} event The event object from the Google Workspace add-on.
* @return {Object} response that handles dialogs.
*/
function handleMessage(event) {
// Reply with a message that contains a button to open the initial dialog
return { hostAppDataAction: { chatDataAction: { createMessageAction: { message: {
text: "To add a contact, use the `ADD CONTACT` button below.",
accessoryWidgets: [{ buttonList: { buttons: [{
text: "ADD CONTACT",
onClick: { action: {
// Use runtime environment variable set with self URL
function: process.env.BASE_URL,
parameters: [{ key: "actionName", value: "openInitialDialog" }],
interaction: "OPEN_DIALOG"
}}
}]}}]
}}}}};
}
/**
* Opens the initial step of the dialog that lets users add contact details.
*
* @param {Object} event The event object from the Google Workspace add-on.
* @return {Object} open the dialog.
*/
function openInitialDialog(event) {
return { action: { navigations: [{ pushCard: { sections: [{ widgets: [{
textInput: {
name: "contactName",
label: "First and last name",
type: "SINGLE_LINE"
}},
WIDGETS, {
buttonList: { buttons: [{
text: "NEXT",
onClick: { action: {
// Use runtime environment variable set with self URL
function: process.env.BASE_URL,
parameters: [{ key: "actionName", value: "openConfirmationDialog" }]
}}
}]}}
]}]}}]}};
}
/**
* Opens the second step of the dialog that lets users confirm details.
*
* @param {Object} event The event object from the Google Workspace add-on.
* @return {Object} update the dialog.
*/
function openConfirmationDialog(event) {
// Retrieve the form input values
const name = event.commonEventObject.formInputs["contactName"].stringInputs.value[0];
return { action: { navigations: [{ pushCard: { sections: [{ widgets: [{
// Display the input values for confirmation
textParagraph: { text: "<b>Name:</b> " + name }},
WIDGETS, {
buttonList: { buttons: [{
text: "SUBMIT",
onClick: { action: {
// Use runtime environment variable set with self URL
function: process.env.BASE_URL,
parameters: [{
key: "actionName", value: "submitDialog" }, {
// Pass input values as parameters for last dialog step (submission)
key: "contactName", value: name
}]
}}
}]}}]
}]}}]}};
}
Apps Script
この例では、カード JSON を返すことでカード メッセージを送信します。Apps Script カードサービスを使用することもできます。
/**
* Responds to a message in Google Chat.
*
* @param {Object} event The event object from the Google Workspace add-on.
* @return {Object} response that handles dialogs.
*/
function onMessage(event) {
// Reply with a message that contains a button to open the initial dialog
return { hostAppDataAction: { chatDataAction: { createMessageAction: { message: {
text: "To add a contact, use the `ADD CONTACT` button below.",
accessoryWidgets: [{ buttonList: { buttons: [{
text: "ADD CONTACT",
onClick: { action: {
function: "openInitialDialog",
interaction: "OPEN_DIALOG"
}}
}]}}]
}}}}};
}
/**
* Opens the initial step of the dialog that lets users add contact details.
*
* @param {Object} event The event object from the Google Workspace add-on.
* @return {Object} open the dialog.
*/
function openInitialDialog(event) {
return { action: { navigations: [{ pushCard: { sections: [{ widgets: [{
textInput: {
name: "contactName",
label: "First and last name",
type: "SINGLE_LINE"
}},
WIDGETS, {
buttonList: { buttons: [{
text: "NEXT",
onClick: { action: { function : "openConfirmationDialog" }}
}]}}
]}]}}]}};
}
/**
* Opens the second step of the dialog that lets users confirm details.
*
* @param {Object} event The event object from the Google Workspace add-on.
* @return {Object} update the dialog.
*/
function openConfirmationDialog(event) {
// Retrieve the form input values
const name = event.commonEventObject.formInputs["contactName"].stringInputs.value[0];
return { action: { navigations: [{ pushCard: { sections: [{ widgets: [{
// Display the input values for confirmation
textParagraph: { text: "<b>Name:</b> " + name }},
WIDGETS, {
buttonList: { buttons: [{
text: "SUBMIT",
onClick: { action: {
function: "submitDialog",
// Pass input values as parameters for last dialog step (submission)
parameters: [{ key: "contactName", value: name }]
}}
}]}}]
}]}}]}};
}
ここで、WIDGETS は他のフォーム入力ウィジェットを表します。
ダイアログを閉じる
ユーザーがダイアログの送信ボタンをクリックすると、Chat 用アプリは関連付けられたアクションを実行し、buttonClickedPayload
が次のように設定されたイベント オブジェクトを提供します。
isDialogEvent
がtrue
である。dialogEventType
がSUBMIT_DIALOG
である。
Chat 用アプリは、EndNavigation
が CLOSE_DIALOG
に設定された RenderActions
オブジェクトを返す必要があります。
省略可: 一時的な通知を表示する
ダイアログを閉じるときに、アプリを操作しているユーザーに一時的なテキスト通知を表示することもできます。
通知を表示するには、フィールド notification
が設定された RenderActions
オブジェクトを返します。
次の例では、パラメータが有効であることを確認し、結果に応じてテキスト通知でダイアログを閉じます。
Node.js
/**
* Handles submission and closes the dialog.
*
* @param {Object} event The event object from the Google Workspace add-on.
* @return {Object} close the dialog with a status in text notification.
*/
function submitDialog(event) {
// Validate the parameters.
if (!event.commonEventObject.parameters["contactName"]) {
return { action: {
navigations: [{ endNavigation: "CLOSE_DIALOG"}],
notification: { text: "Failure, the contact name was missing!" }
}};
}
return { action: {
navigations: [{ endNavigation: "CLOSE_DIALOG"}],
notification: { text: "Success, the contact was added!" }
}};
}
Apps Script
/**
* Handles submission and closes the dialog.
*
* @param {Object} event The event object from the Google Workspace add-on.
* @return {Object} close the dialog with a status in text notification.
*/
function submitDialog(event) {
// Validate the parameters.
if (!event.commonEventObject.parameters["contactName"]) {
return { action: {
navigations: [{ endNavigation: "CLOSE_DIALOG"}],
notification: { text: "Failure, the contact name was missing!" }
}};
}
return { action: {
navigations: [{ endNavigation: "CLOSE_DIALOG"}],
notification: { text: "Success, the contact was added!" }
}};
}
ダイアログ間でパラメータを渡す方法について詳しくは、別のカードにデータを転送するをご覧ください。
省略可: 確認のチャット メッセージを送信する
ダイアログを閉じるときに、新しい Chat メッセージを送信したり、既存のメッセージを更新したりすることもできます。
新しいメッセージを送信するには、CreateMessageAction
フィールドに新しいメッセージを設定した DataActions
オブジェクトを返します。たとえば、ダイアログを閉じてテキスト メッセージを送信するには、次を返します。
{ "hostAppDataAction": { "chatDataAction": { "createMessageAction": { "message": {
"text": "Your information has been submitted."
}}}}}
ユーザーがダイアログを送信した後にメッセージを更新するには、次のいずれかのアクションを含む DataActions
オブジェクトを返します。
UpdateMessageAction
: Chat 用アプリが送信したメッセージを更新します。たとえば、ユーザーがダイアログをリクエストしたメッセージなどです。UpdateInlinePreviewAction
: リンクのプレビューからカードを更新します。
トラブルシューティング
Google Chat 用アプリまたはカードがエラーを返すと、Chat インターフェースに「エラーが発生しました」というメッセージが表示されます。または「リクエストを処理できません。」と表示されることがあります。Chat UI にエラー メッセージが表示されない場合でも、Chat 用アプリやカードで予期しない結果が生じることがあります。たとえば、カード メッセージが表示されないことがあります。
Chat UI にエラー メッセージが表示されない場合でも、Chat 用アプリのエラー ロギングが有効になっている場合は、エラーの修正に役立つ説明的なエラー メッセージとログデータを利用できます。エラーの表示、デバッグ、修正については、Google Chat のエラーのトラブルシューティングと修正をご覧ください。