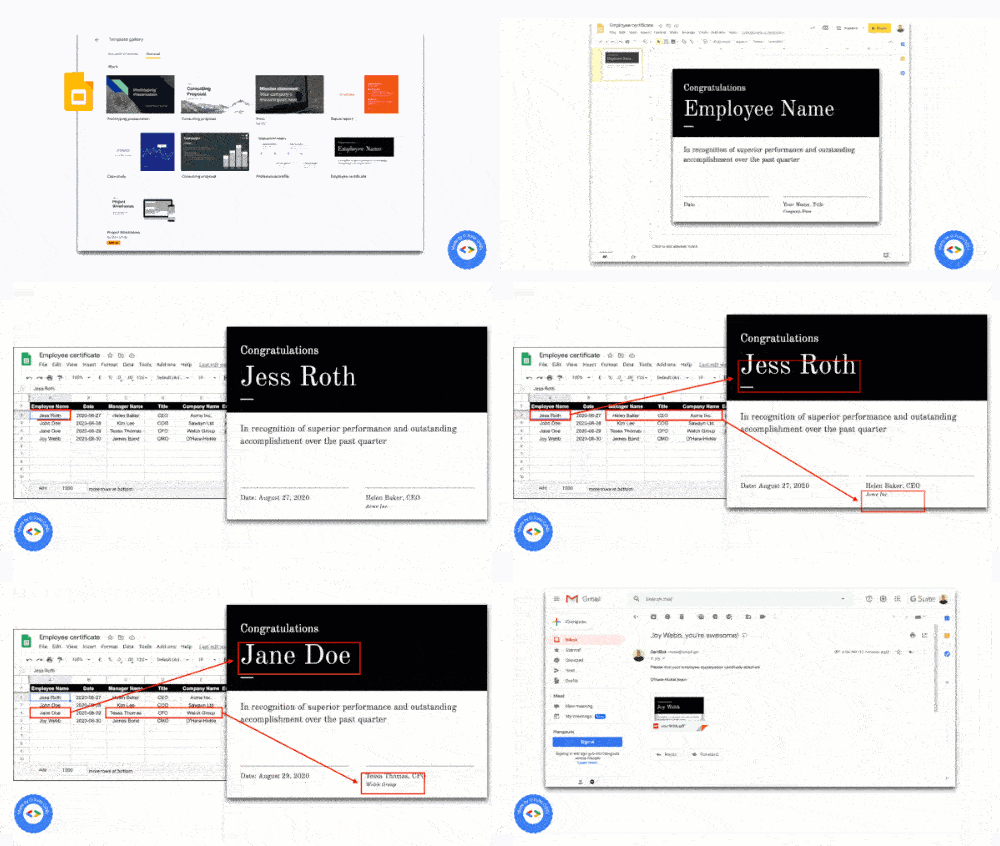
إرسال شهادات تقدير مخصّصة إلى الموظفين

مستوى الترميز:
مبتدئ المدة: 15 دقيقة
نوع المشروع: التشغيل الآلي من خلال قائمة مخصّصة

الأهداف

  • افهم ما يفعله الحل.
  • تعرّف على ما تقوم به خدمات "برمجة تطبيقات Google" ضمن الحل.
  • إعداد البيئة.
  • ابدأ إعداد النص البرمجي.
  • شغِّل النص البرمجي.

لمحة عن هذا الحلّ

تخصيص نموذج شهادة موظف العروض التقديمية من Google تلقائيًا مع بيانات الموظفين في جداول بيانات Google، ثم إرسال الشهادات باستخدام Gmail

إنشاء شهادة الموظفين

آلية العمل

يستخدم النص البرمجي قالب العرض التقديمي لشهادة الموظف من العروض التقديمية وجدول بيانات "جداول بيانات Google" مع الموظف التفاصيل. ينسخ البرنامج النصي القالب تستبدل العناصر النائبة ببيانات من جدول البيانات. بمجرد أن ينتهي النص تنشئ شريحة لكل موظف، تستخرج كل شريحة فردية كملف PDF ويرسل الشهادات إلى الموظفين.

خدمات برمجة التطبيقات

يستخدم هذا الحلّ الخدمات التالية:

المتطلبات الأساسية

لاستخدام هذا النموذج، تحتاج إلى المتطلبات الأساسية التالية:

  • حساب Google (قد يكون لدى حسابات Google Workspace طلب موافقة المشرف).
  • متصفح ويب متصل بالإنترنت.

إعداد البيئة

  1. انقر على الزر التالي لإنشاء نسخة من شهادات الموظف نموذج "العروض التقديمية من Google".
    إنشاء نسخة

  2. دوِّن معرّف العرض التقديمي لاستخدامه في خطوة لاحقة. يمكنك البحث عن المعرّف في عنوان URL:

    https://docs.google.com/presentation/d/PRESENTATION_ID/edit

  3. في Drive، أنشِئ مجلدًا جديدًا للاحتفاظ بالشهادات.

  4. دوِّن رقم تعريف المجلد لاستخدامه في خطوة لاحقة. يمكنك العثور على رقم التعريف في عنوان URL: https://drive.google.com/drive/folders/FOLDER_ID

إعداد النص البرمجي

  1. انقر على الزر أدناه لإنشاء نسخة من نموذج شهادات الموظف جدول بيانات. مشروع "برمجة تطبيقات Google" لهذا الغرض حل بجدول البيانات.
    إنشاء نسخة

  2. في جدول البيانات، افتح مشروع "برمجة تطبيقات Google" من خلال النقر على الإضافات > برمجة التطبيقات.

  3. بالنسبة إلى المتغيّر slideTemplateId، استبدِل PRESENTATION_ID برقم تعريف العرض التقديمي.

  4. بالنسبة إلى المتغيّر tempFolderId، استبدِل FOLDER_ID برقم تعريف المجلد.

  5. انقر على "حفظ" رمز الحفظ.

تشغيل النص البرمجي

  1. عُد إلى جدول البيانات وانقر على التقدير > إنشاء شهادات. قد تحتاج إلى لإعادة تحميل الصفحة لكي تظهر هذه القائمة المخصّصة.
  2. امنح الإذن للنص البرمجي عندما يُطلب منك ذلك. إذا عرضت شاشة موافقة OAuth التحذير، لم يتم التحقق من هذا التطبيق، المتابعة من خلال اختيار إعدادات متقدّمة > انتقِل إلى {Project Name} (غير آمن).

  3. انقر على التقدير >. أنشئ شهادات مرة أخرى.

  4. بعد تعديل عمود الحالة لجميع الصفوف إلى تم الإنشاء، انقر على التقدير > إرسال الشهادات

مراجعة الرمز البرمجي

لمراجعة رمز "برمجة تطبيقات Google" لهذا الحلّ، انقر على عرض رمز المصدر أدناه:

عرض رمز المصدر

Code.gs

solutions/automations/employee-certificate/Code.js
// To learn how to use this script, refer to the documentation:
// https://developers.google.com/apps-script/samples/automations/employee-certificate

/*
Copyright 2022 Google LLC

Licensed under the Apache License, Version 2.0 (the "License");
you may not use this file except in compliance with the License.
You may obtain a copy of the License at

    https://www.apache.org/licenses/LICENSE-2.0

Unless required by applicable law or agreed to in writing, software
distributed under the License is distributed on an "AS IS" BASIS,
WITHOUT WARRANTIES OR CONDITIONS OF ANY KIND, either express or implied.
See the License for the specific language governing permissions and
limitations under the License.
*/

const slideTemplateId = 'PRESENTATION_ID';
const tempFolderId = 'FOLDER_ID'; // Create an empty folder in Google Drive

/**
 * Creates a custom menu "Appreciation" in the spreadsheet
 * with drop-down options to create and send certificates
 */
function onOpen() {
  const ui = SpreadsheetApp.getUi();
  ui.createMenu('Appreciation')
      .addItem('Create certificates', 'createCertificates')
      .addSeparator()
      .addItem('Send certificates', 'sendCertificates')
      .addToUi();
}

/**
 * Creates a personalized certificate for each employee
 * and stores every individual Slides doc on Google Drive
 */
function createCertificates() {
  // Load the Google Slide template file
  const template = DriveApp.getFileById(slideTemplateId);

  // Get all employee data from the spreadsheet and identify the headers
  const sheet = SpreadsheetApp.getActiveSpreadsheet().getActiveSheet();
  const values = sheet.getDataRange().getValues();
  const headers = values[0];
  const empNameIndex = headers.indexOf('Employee Name');
  const dateIndex = headers.indexOf('Date');
  const managerNameIndex = headers.indexOf('Manager Name');
  const titleIndex = headers.indexOf('Title');
  const compNameIndex = headers.indexOf('Company Name');
  const empEmailIndex = headers.indexOf('Employee Email');
  const empSlideIndex = headers.indexOf('Employee Slide');
  const statusIndex = headers.indexOf('Status');

  // Iterate through each row to capture individual details
  for (let i = 1; i < values.length; i++) {
    const rowData = values[i];
    const empName = rowData[empNameIndex];
    const date = rowData[dateIndex];
    const managerName = rowData[managerNameIndex];
    const title = rowData[titleIndex];
    const compName = rowData[compNameIndex];

    // Make a copy of the Slide template and rename it with employee name
    const tempFolder = DriveApp.getFolderById(tempFolderId);
    const empSlideId = template.makeCopy(tempFolder).setName(empName).getId();
    const empSlide = SlidesApp.openById(empSlideId).getSlides()[0];

    // Replace placeholder values with actual employee related details
    empSlide.replaceAllText('Employee Name', empName);
    empSlide.replaceAllText('Date', 'Date: ' + Utilities.formatDate(date, Session.getScriptTimeZone(), 'MMMM dd, yyyy'));
    empSlide.replaceAllText('Your Name', managerName);
    empSlide.replaceAllText('Title', title);
    empSlide.replaceAllText('Company Name', compName);

    // Update the spreadsheet with the new Slide Id and status
    sheet.getRange(i + 1, empSlideIndex + 1).setValue(empSlideId);
    sheet.getRange(i + 1, statusIndex + 1).setValue('CREATED');
    SpreadsheetApp.flush();
  }
}

/**
 * Send an email to each individual employee
 * with a PDF attachment of their appreciation certificate
 */
function sendCertificates() {
  // Get all employee data from the spreadsheet and identify the headers
  const sheet = SpreadsheetApp.getActiveSpreadsheet().getActiveSheet();
  const values = sheet.getDataRange().getValues();
  const headers = values[0];
  const empNameIndex = headers.indexOf('Employee Name');
  const dateIndex = headers.indexOf('Date');
  const managerNameIndex = headers.indexOf('Manager Name');
  const titleIndex = headers.indexOf('Title');
  const compNameIndex = headers.indexOf('Company Name');
  const empEmailIndex = headers.indexOf('Employee Email');
  const empSlideIndex = headers.indexOf('Employee Slide');
  const statusIndex = headers.indexOf('Status');

  // Iterate through each row to capture individual details
  for (let i = 1; i < values.length; i++) {
    const rowData = values[i];
    const empName = rowData[empNameIndex];
    const date = rowData[dateIndex];
    const managerName = rowData[managerNameIndex];
    const title = rowData[titleIndex];
    const compName = rowData[compNameIndex];
    const empSlideId = rowData[empSlideIndex];
    const empEmail = rowData[empEmailIndex];

    // Load the employee's personalized Google Slide file
    const attachment = DriveApp.getFileById(empSlideId);

    // Setup the required parameters and send them the email
    const senderName = 'CertBot';
    const subject = empName + ', you\'re awesome!';
    const body = 'Please find your employee appreciation certificate attached.' +
    '\n\n' + compName + ' team';
    GmailApp.sendEmail(empEmail, subject, body, {
      attachments: [attachment.getAs(MimeType.PDF)],
      name: senderName
    });

    // Update the spreadsheet with email status
    sheet.getRange(i + 1, statusIndex + 1).setValue('SENT');
    SpreadsheetApp.flush();
  }
}

المساهمون

أنشأ هذه العيّنة "سوراب شوريا"، وهي مدوّن ومطوّر على Google. خبير.

تحتفظ Google بهذه العينة بمساعدة خبراء التطوير في Google.

الخطوات التالية