Gmail ve Google E-Tablolar ile posta birleştirme oluşturma

Kodlama seviyesi:
başlangıç düzeyi Süre: 10 dakika
Proje türü: Özel menü ile otomasyon

Video üzerinden öğrenmeyi mi tercih ediyorsunuz?
Google Workspace Developers kanalı ipuçları, püf noktaları ve en yeni özellikler hakkında videolar sunar.

Hedefler

  • Çözümün ne işe yaradığını anlayın.
  • Apps Komut Dosyası hizmetlerinin çözümüne geçelim.
  • Komut dosyasını ayarlayın.
  • Komut dosyasını çalıştırın.

Bu çözüm hakkında

Bir e-posta şablonunu Google E-Tablolar'daki verilerle otomatik olarak doldurabilirsiniz. İlgili içeriği oluşturmak için kullanılan yanıt verebilmeniz için e-postalar Gmail hesabınızdan gönderilir. alıcı yanıtları.

Önemli: Bu posta birleştirme örneği, açıklanan e-posta sınırlarına tabidir. Google hizmetleri için kotalar başlıklı bölüme bakın.
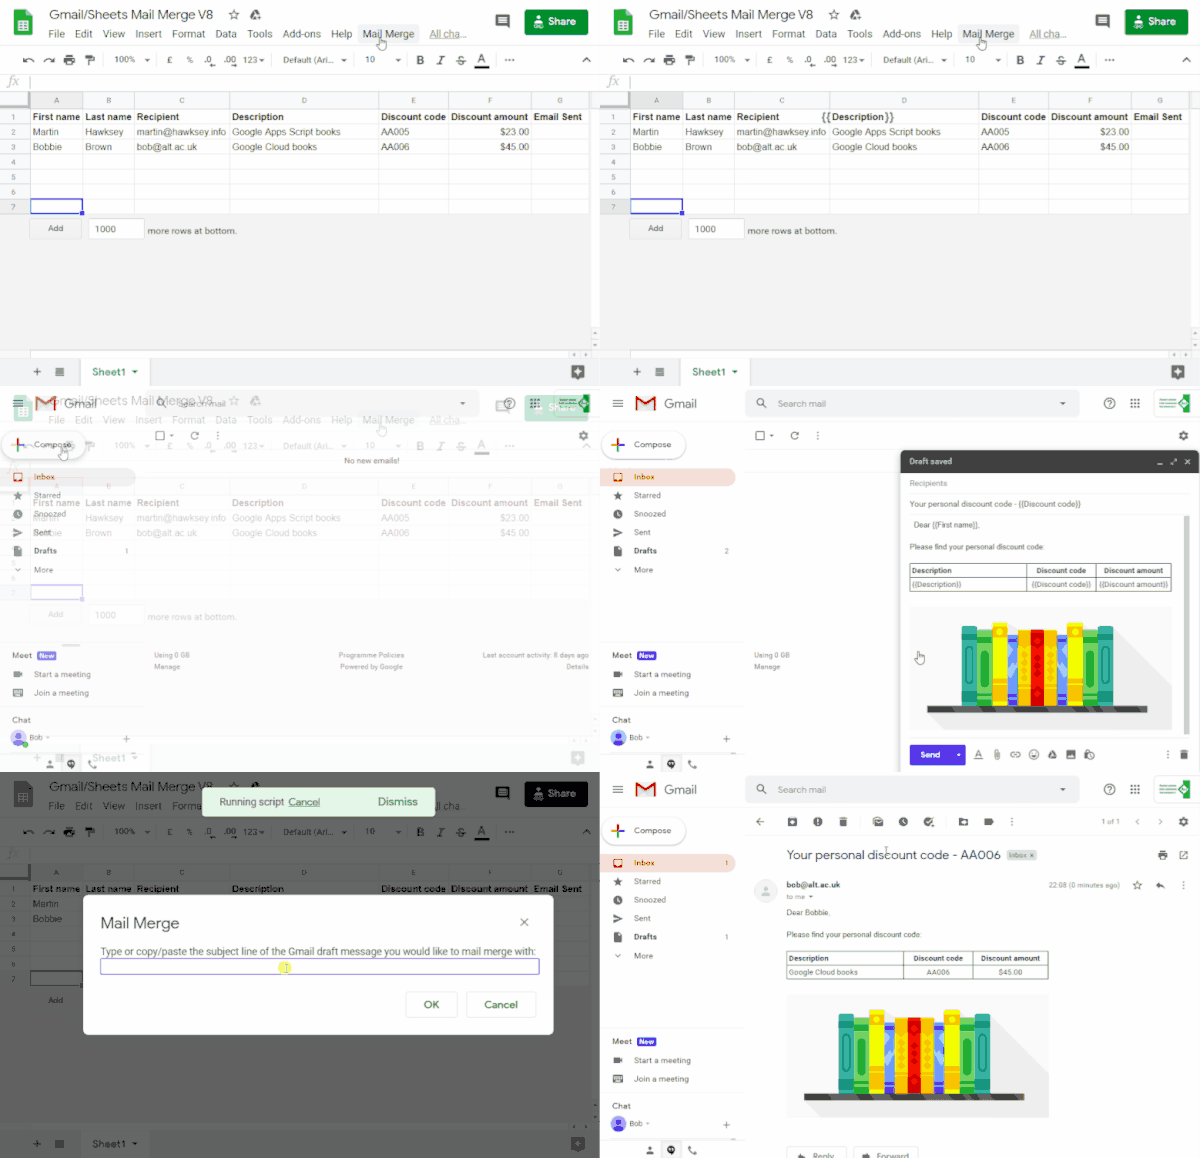
posta birleştirme örneği

İşleyiş şekli

Oluşturduğunuz Gmail taslak şablonundaki bir E-Tablolar e-tablosundaki verilere karşılık gelir. Her bir sütun başlığı içindeki işareti bir yer tutucu etiketi temsil eder. Komut dosyası, e-tablodaki her bir yer tutucunun karşılık gelen konuma yer tutucu etiketi kullanabilirsiniz.

Apps Komut Dosyası hizmetleri

Bu çözüm aşağıdaki hizmetleri kullanır:

Ön koşullar

Bu örneği kullanmak için aşağıdaki ön koşullara sahip olmanız gerekir:

  • Google Hesabı (Google Workspace hesapları (yönetici onayı gerektirir).
  • İnternete erişimi olan bir web tarayıcısı.

Komut dosyasını ayarlama

Apps Komut Dosyası projesini oluşturma

  1. Gmail/E-Tablolar Posta Birleştirme örnek e-tablosu. Bunun için Apps Komut Dosyası projesi e-tabloya eklenir.
    Kopya oluştur
  2. Kopyalanan e-tablonuzda Alıcılar sütununu e-posta adresiyle güncelleyin. posta birleştirmede kullanmak istediğiniz adrestir.
  3. (İsteğe bağlı) İstediğiniz verileri özelleştirmek için sütun ekleyin, düzenleyin veya kaldırın dahil edin.

Alıcı veya E-posta Adresini değiştirirseniz Gönderilenler sütunlarını içeriyorsa ilgili kodu Apps Komut Dosyası projesi. Apps Komut Dosyası'nı e-tablodan proje performansını Uzantılar > seçeneğini tıklayarak Apps Komut Dosyası.

E-posta şablonu oluştur

  1. Gmail hesabınızda bir e-posta taslağı oluşturun. Verileri dahil etmek için şuradan sütun adlarına karşılık gelen yer tutucular kullanın ve {{First name}} gibi süslü ayraçlarla çevrilidir.
    • E-postadaki metni biçimlendirirseniz yer tutucuyu da biçimlendirmeniz gerekir parantez.
    • Yer tutucular büyük/küçük harfe duyarlıdır ve sütun başlıklarıyla tam olarak eşleşmelidir.
  2. E-posta taslağınızın konu satırını kopyalayın.

Komut dosyasını çalıştırma

  1. E-tabloda Posta Birleştirme > seçeneğini tıklayın. E-posta Gönderin. Bu özel menü için sayfayı yenilemeniz gerekebilir görünür.
  2. İstendiğinde komut dosyasını yetkilendirin. OAuth izin ekranında Bu uygulama doğrulanmadı uyarısı gösteriliyorsa Gelişmiş'i > seçerek devam edin {Project Name} projesine (güvenli değil) gidin.

  3. Posta Birleştirme > E-posta Gönder'i tıklayın. tekrar.

  4. E-posta şablonunun konu satırını yapıştırıp Tamam'ı tıklayın.

Sayfaya filtre uyguladıysanız komut dosyası filtrelenen öğeye e-posta göndermeye devam eder ancak zaman damgası eklenmez.

Kodu inceleyin

Bu çözüm için Apps Komut Dosyası kodunu incelemek üzere Aşağıdaki kaynak kodu görüntüleyin:

Kaynak kodu göster

Code.gs

solutions/automations/mail-merge/Code.js
// To learn how to use this script, refer to the documentation:
// https://developers.google.com/apps-script/samples/automations/mail-merge

/*
Copyright 2022 Martin Hawksey

Licensed under the Apache License, Version 2.0 (the "License");
you may not use this file except in compliance with the License.
You may obtain a copy of the License at

    https://www.apache.org/licenses/LICENSE-2.0

Unless required by applicable law or agreed to in writing, software
distributed under the License is distributed on an "AS IS" BASIS,
WITHOUT WARRANTIES OR CONDITIONS OF ANY KIND, either express or implied.
See the License for the specific language governing permissions and
limitations under the License.
*/

/**
 * @OnlyCurrentDoc
*/

/**
 * Change these to match the column names you are using for email 
 * recipient addresses and email sent column.
*/
const RECIPIENT_COL  = "Recipient";
const EMAIL_SENT_COL = "Email Sent";

/** 
 * Creates the menu item "Mail Merge" for user to run scripts on drop-down.
 */
function onOpen() {
  const ui = SpreadsheetApp.getUi();
  ui.createMenu('Mail Merge')
      .addItem('Send Emails', 'sendEmails')
      .addToUi();
}

/**
 * Sends emails from sheet data.
 * @param {string} subjectLine (optional) for the email draft message
 * @param {Sheet} sheet to read data from
*/
function sendEmails(subjectLine, sheet=SpreadsheetApp.getActiveSheet()) {
  // option to skip browser prompt if you want to use this code in other projects
  if (!subjectLine){
    subjectLine = Browser.inputBox("Mail Merge", 
                                      "Type or copy/paste the subject line of the Gmail " +
                                      "draft message you would like to mail merge with:",
                                      Browser.Buttons.OK_CANCEL);

    if (subjectLine === "cancel" || subjectLine == ""){ 
    // If no subject line, finishes up
    return;
    }
  }

  // Gets the draft Gmail message to use as a template
  const emailTemplate = getGmailTemplateFromDrafts_(subjectLine);

  // Gets the data from the passed sheet
  const dataRange = sheet.getDataRange();
  // Fetches displayed values for each row in the Range HT Andrew Roberts 
  // https://mashe.hawksey.info/2020/04/a-bulk-email-mail-merge-with-gmail-and-google-sheets-solution-evolution-using-v8/#comment-187490
  // @see https://developers.google.com/apps-script/reference/spreadsheet/range#getdisplayvalues
  const data = dataRange.getDisplayValues();

  // Assumes row 1 contains our column headings
  const heads = data.shift(); 

  // Gets the index of the column named 'Email Status' (Assumes header names are unique)
  // @see http://ramblings.mcpher.com/Home/excelquirks/gooscript/arrayfunctions
  const emailSentColIdx = heads.indexOf(EMAIL_SENT_COL);

  // Converts 2d array into an object array
  // See https://stackoverflow.com/a/22917499/1027723
  // For a pretty version, see https://mashe.hawksey.info/?p=17869/#comment-184945
  const obj = data.map(r => (heads.reduce((o, k, i) => (o[k] = r[i] || '', o), {})));

  // Creates an array to record sent emails
  const out = [];

  // Loops through all the rows of data
  obj.forEach(function(row, rowIdx){
    // Only sends emails if email_sent cell is blank and not hidden by a filter
    if (row[EMAIL_SENT_COL] == ''){
      try {
        const msgObj = fillInTemplateFromObject_(emailTemplate.message, row);

        // See https://developers.google.com/apps-script/reference/gmail/gmail-app#sendEmail(String,String,String,Object)
        // If you need to send emails with unicode/emoji characters change GmailApp for MailApp
        // Uncomment advanced parameters as needed (see docs for limitations)
        GmailApp.sendEmail(row[RECIPIENT_COL], msgObj.subject, msgObj.text, {
          htmlBody: msgObj.html,
          // bcc: 'a.bcc@email.com',
          // cc: 'a.cc@email.com',
          // from: 'an.alias@email.com',
          // name: 'name of the sender',
          // replyTo: 'a.reply@email.com',
          // noReply: true, // if the email should be sent from a generic no-reply email address (not available to gmail.com users)
          attachments: emailTemplate.attachments,
          inlineImages: emailTemplate.inlineImages
        });
        // Edits cell to record email sent date
        out.push([new Date()]);
      } catch(e) {
        // modify cell to record error
        out.push([e.message]);
      }
    } else {
      out.push([row[EMAIL_SENT_COL]]);
    }
  });

  // Updates the sheet with new data
  sheet.getRange(2, emailSentColIdx+1, out.length).setValues(out);

  /**
   * Get a Gmail draft message by matching the subject line.
   * @param {string} subject_line to search for draft message
   * @return {object} containing the subject, plain and html message body and attachments
  */
  function getGmailTemplateFromDrafts_(subject_line){
    try {
      // get drafts
      const drafts = GmailApp.getDrafts();
      // filter the drafts that match subject line
      const draft = drafts.filter(subjectFilter_(subject_line))[0];
      // get the message object
      const msg = draft.getMessage();

      // Handles inline images and attachments so they can be included in the merge
      // Based on https://stackoverflow.com/a/65813881/1027723
      // Gets all attachments and inline image attachments
      const allInlineImages = draft.getMessage().getAttachments({includeInlineImages: true,includeAttachments:false});
      const attachments = draft.getMessage().getAttachments({includeInlineImages: false});
      const htmlBody = msg.getBody(); 

      // Creates an inline image object with the image name as key 
      // (can't rely on image index as array based on insert order)
      const img_obj = allInlineImages.reduce((obj, i) => (obj[i.getName()] = i, obj) ,{});

      //Regexp searches for all img string positions with cid
      const imgexp = RegExp('<img.*?src="cid:(.*?)".*?alt="(.*?)"[^\>]+>', 'g');
      const matches = [...htmlBody.matchAll(imgexp)];

      //Initiates the allInlineImages object
      const inlineImagesObj = {};
      // built an inlineImagesObj from inline image matches
      matches.forEach(match => inlineImagesObj[match[1]] = img_obj[match[2]]);

      return {message: {subject: subject_line, text: msg.getPlainBody(), html:htmlBody}, 
              attachments: attachments, inlineImages: inlineImagesObj };
    } catch(e) {
      throw new Error("Oops - can't find Gmail draft");
    }

    /**
     * Filter draft objects with the matching subject linemessage by matching the subject line.
     * @param {string} subject_line to search for draft message
     * @return {object} GmailDraft object
    */
    function subjectFilter_(subject_line){
      return function(element) {
        if (element.getMessage().getSubject() === subject_line) {
          return element;
        }
      }
    }
  }

  /**
   * Fill template string with data object
   * @see https://stackoverflow.com/a/378000/1027723
   * @param {string} template string containing {{}} markers which are replaced with data
   * @param {object} data object used to replace {{}} markers
   * @return {object} message replaced with data
  */
  function fillInTemplateFromObject_(template, data) {
    // We have two templates one for plain text and the html body
    // Stringifing the object means we can do a global replace
    let template_string = JSON.stringify(template);

    // Token replacement
    template_string = template_string.replace(/{{[^{}]+}}/g, key => {
      return escapeData_(data[key.replace(/[{}]+/g, "")] || "");
    });
    return  JSON.parse(template_string);
  }

  /**
   * Escape cell data to make JSON safe
   * @see https://stackoverflow.com/a/9204218/1027723
   * @param {string} str to escape JSON special characters from
   * @return {string} escaped string
  */
  function escapeData_(str) {
    return str
      .replace(/[\\]/g, '\\\\')
      .replace(/[\"]/g, '\\\"')
      .replace(/[\/]/g, '\\/')
      .replace(/[\b]/g, '\\b')
      .replace(/[\f]/g, '\\f')
      .replace(/[\n]/g, '\\n')
      .replace(/[\r]/g, '\\r')
      .replace(/[\t]/g, '\\t');
  };
}

Değişiklikler

Posta birleştirme otomasyonunu ihtiyaçlarınıza göre dilediğiniz kadar düzenleyebilirsiniz. Aşağıda, kaynak kodunda yapabileceğiniz isteğe bağlı birkaç değişiklik yer almaktadır.

Bcc, Cc, ReplyTo veya From e-posta parametreleri ekleyin.

Örnek kod, şu anda yalnızca kullanıcının gönderdiği e-postanın gönderildiği hesabın adını e-posta adreslerinin yanı sıra Bcc ve Cc e-posta adreslerini de yanıtlayabilirsiniz.

Eğik çizgileri kaldırarak eklemek istediğiniz parametreleri etkinleştirin. her birinin önüne // koyun.

Aşağıdaki örnekte sendEmails alanından bir alıntı gösterilmektedir e-posta parametrelerinin çoğunu etkinleştiren bir işleve sahip olmanız gerekir:

GmailApp.sendEmail(row[RECIPIENT_COL], msgObj.subject, msgObj.text, {
         htmlBody: msgObj.html,
         bcc: 'bcc@example.com',
         cc: 'cc@example.com',
         from: 'from.alias@example.com',
         name: 'name of the sender',
         replyTo: 'reply@example.com',
        // noReply: true, // if the email should be sent from a generic no-reply email address (not available to gmail.com users)

Yukarıdaki örnekte, noReply parametresine yorum yapılmamış çünkü replyTo parametresi ayarlanmış.

E-postalarınıza unicode karakterleri ekleyin

E-postalarınıza emoji gibi unicode karakterleri eklemek isterseniz Gmail hizmeti yerine Posta hizmetini kullanmak için kodu güncellemelidir.

Örnek kodda aşağıdaki satırı güncelleyin:

GmailApp.sendEmail(row[RECIPIENT_COL], msgObj.subject, msgObj.text, {

Satırı aşağıdaki kodla değiştirin:

MailApp.sendEmail(row[RECIPIENT_COL], msgObj.subject, msgObj.text, {

Katkıda bulunanlar

Bu örnek Martin Hawksey tarafından oluşturuldu. Edinburgh Futures Enstitüsü, blog yazarı ve Google Geliştirici Uzmanı.

Bu örnek, Google Geliştirici Uzmanları'nın yardımıyla Google tarafından yönetilir.

Sonraki adımlar