Sube archivos a Google Drive desde Formularios de Google

Nivel de programación: Principiante
Duración: 10 minutos
Tipo de proyecto: Automatización con un activador basado en eventos

Objetivos

  • Comprender qué hace la solución
  • Comprender qué hacen los servicios de Apps Script dentro de la solución
  • Configura la secuencia de comandos.
  • Ejecuta la secuencia de comandos.

Acerca de esta solución

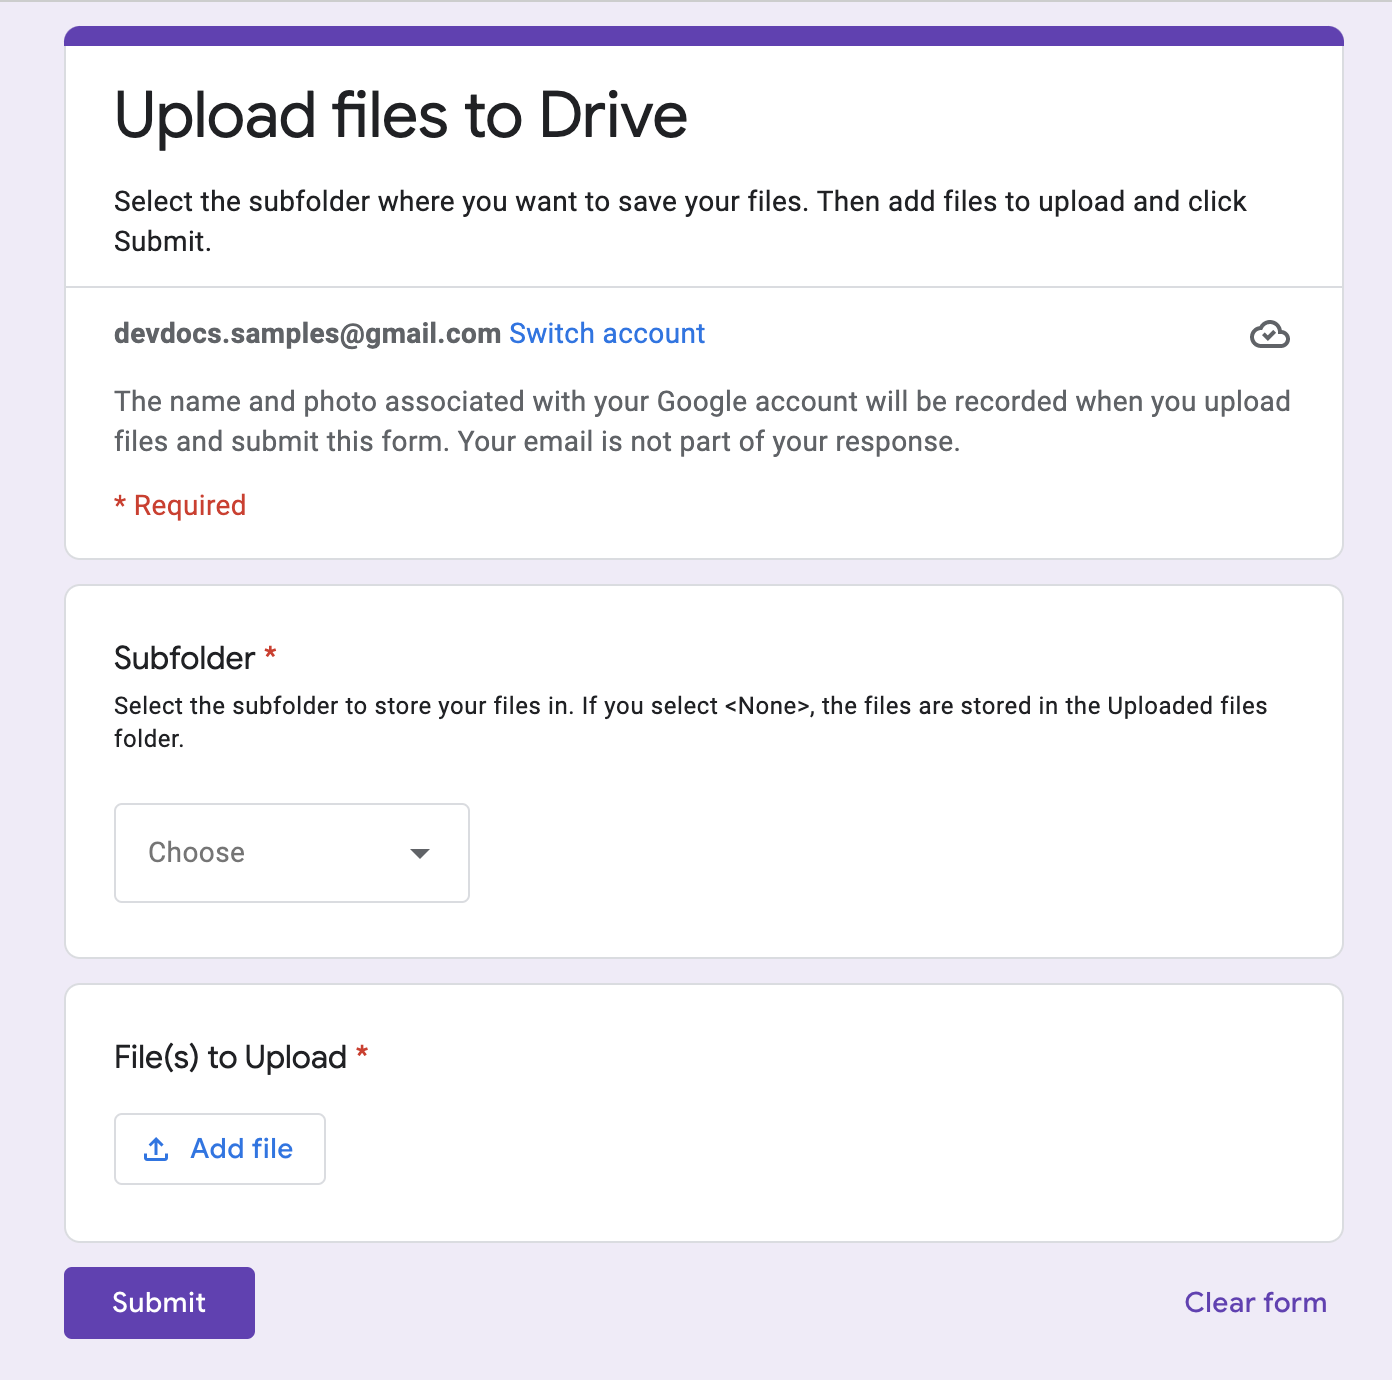
Sube y organiza archivos en Google Drive de forma simultánea con Formularios de Google. El formulario incluye entradas para los archivos que se subirán y cómo se deben organizar.

Captura de pantalla del formulario para subir archivos

Cómo funciona

Una función de configuración crea una carpeta para almacenar todos los archivos subidos y un activador que se activa cada vez que alguien envía el formulario. Cuando un usuario completa el formulario, elige los archivos que se subirán y una subcarpeta para almacenarlos. Una vez que el usuario envía el formulario, la secuencia de comandos envía los archivos a la subcarpeta correspondiente. Si aún no existe la carpeta, la secuencia de comandos la creará.

Servicios de Apps Script

En esta solución, se usan los siguientes servicios:

  • Servicio de secuencia de comandos: Crea el activador que se activa cada vez que alguien envía el formulario.
  • Servicio de propiedades: Almacena el ID del activador que crea la secuencia de comandos durante la configuración para evitar activadores duplicados.
  • Servicio de Drive: Durante la configuración, obtiene la ubicación del formulario en Drive y crea una carpeta en la misma ubicación. Cuando un usuario envía el formulario, el servicio de Drive dirige los archivos a esa carpeta y, si se selecciona, a una subcarpeta designada. Si aún no existe la subcarpeta, la secuencia de comandos la creará.
  • Servicio de formularios: Obtiene los archivos y el nombre de la carpeta que eligió el usuario después de enviar el formulario y lo envía al servicio de Drive.

Requisitos previos

Para usar esta muestra, debes cumplir con los siguientes requisitos previos:

  • Una Cuenta de Google (es posible que las cuentas de Google Workspace requieran aprobación del administrador)
  • Un navegador web con acceso a Internet

Configura la secuencia de comandos

Crea el formulario

  1. Ve a forms.google.com y haz clic en En blanco .
  2. Haz clic en Formulario sin título y cámbiale el nombre a Subir archivos a Drive.
  3. Haz clic en Pregunta sin título y cámbiale el nombre a Subfolder.
  4. En la pregunta Subfolder, haz clic en Más > Description.
  5. En Descripción, ingresa Selecciona la subcarpeta en la que deseas almacenar tus archivos. Si seleccionas <None>, los archivos se almacenarán en la carpeta Uploaded files.
  6. Agrega las siguientes opciones a la pregunta Subfolder:
    • <none>
    • Proyecto A
    • Proyecto B
    • Proyecto C
  7. Para que la pregunta sea obligatoria, haz clic en Obligatoria.
  8. Haz clic en Agregar pregunta .
  9. Haz clic en Opción múltiple y selecciona Subir archivo.
  10. Haz clic en Continuar.
  11. En Pregunta, ingresa Archivos para subir. Puedes elegir los tipos de archivos y la cantidad máxima de archivos que quieres permitir que las personas suban.
  12. Para que la pregunta sea obligatoria, haz clic en Obligatoria.

Crea el proyecto de Apps Script

  1. En el formulario, haz clic en Más > Editor de secuencia de comandos.
  2. Haz clic en Proyecto sin título y cámbiale el nombre a Subir archivos a Drive.
  3. Para crear otro archivo de secuencia de comandos, haz clic en Agregar un archivo > Secuencia de comandos. Asigna el nombre Setup al archivo.
  4. Reemplaza el contenido de ambos archivos de secuencia de comandos por el siguiente:

    Code.gs

    solutions/automations/upload-files/Code.js
    // TODO Before you start using this sample, you must run the setUp() 
    // function in the Setup.gs file.
    
    // Application constants
    const APP_TITLE = "Upload files to Drive from Forms";
    const APP_FOLDER_NAME = "Upload files to Drive (File responses)";
    
    // Identifies the subfolder form item
    const APP_SUBFOLDER_ITEM = "Subfolder";
    const APP_SUBFOLDER_NONE = "<None>";
    
    
    /**
     * Gets the file uploads from a form response and moves files to the corresponding subfolder.
     *  
     * @param {object} event - Form submit.
     */
    function onFormSubmit(e) {
      try {
        // Gets the application root folder.
        var destFolder = getFolder_(APP_FOLDER_NAME);
    
        // Gets all form responses.
        let itemResponses = e.response.getItemResponses();
    
        // Determines the subfolder to route the file to, if any.
        var subFolderName;
        let dest = itemResponses.filter((itemResponse) =>
          itemResponse.getItem().getTitle().toString() === APP_SUBFOLDER_ITEM);
    
        // Gets the destination subfolder name, but ignores if APP_SUBFOLDER_NONE was selected;
        if (dest.length > 0) {
          if (dest[0].getResponse() != APP_SUBFOLDER_NONE) {
            subFolderName = dest[0].getResponse();
          }
        }
        // Gets the subfolder or creates it if it doesn't exist.
        if (subFolderName != undefined) {
          destFolder = getSubFolder_(destFolder, subFolderName)
        }
        console.log(`Destination folder to use:
        Name: ${destFolder.getName()}
        ID: ${destFolder.getId()}
        URL: ${destFolder.getUrl()}`)
    
        // Gets the file upload response as an array to allow for multiple files.
        let fileUploads = itemResponses.filter((itemResponse) => itemResponse.getItem().getType().toString() === "FILE_UPLOAD")
          .map((itemResponse) => itemResponse.getResponse())
          .reduce((a, b) => [...a, ...b], []);
    
        // Moves the files to the destination folder.
        if (fileUploads.length > 0) {
          fileUploads.forEach((fileId) => {
            DriveApp.getFileById(fileId).moveTo(destFolder);
            console.log(`File Copied: ${fileId}`)
          });
        }
      }
      catch (err) {
        console.log(err);
      }
    }
    
    
    /**
     * Returns a Drive folder under the passed in objParentFolder parent
     * folder. Checks if folder of same name exists before creating, returning 
     * the existing folder or the newly created one if not found.
     *
     * @param {object} objParentFolder - Drive folder as an object.
     * @param {string} subFolderName - Name of subfolder to create/return.
     * @return {object} Drive folder
     */
    function getSubFolder_(objParentFolder, subFolderName) {
    
      // Iterates subfolders of parent folder to check if folder already exists.
      const subFolders = objParentFolder.getFolders();
      while (subFolders.hasNext()) {
        let folder = subFolders.next();
    
        // Returns the existing folder if found.
        if (folder.getName() === subFolderName) {
          return folder;
        }
      }
      // Creates a new folder if one doesn't already exist.
      return objParentFolder.createFolder(subFolderName)
        .setDescription(`Created by ${APP_TITLE} application to store uploaded Forms files.`);
    }

    Setup.gs

    solutions/automations/upload-files/Setup.js
    // TODO You must run the setUp() function before you start using this sample.
    
    /** 
     * The setUp() function performs the following:
     *  - Creates a Google Drive folder named by the APP_FOLDER_NAME
     *    variable in the Code.gs file.
     *  - Creates a trigger to handle onFormSubmit events.
     */
    function setUp() {
      // Ensures the root destination folder exists.
      const appFolder = getFolder_(APP_FOLDER_NAME);
      if (appFolder !== null) {
        console.log(`Application folder setup.
        Name: ${appFolder.getName()}
        ID: ${appFolder.getId()}
        URL: ${appFolder.getUrl()}`)
      }
      else {
        console.log(`Could not setup application folder.`)
      }
      // Calls the function that creates the Forms onSubmit trigger.
      installTrigger_();
    }
    
    /** 
     * Returns a folder to store uploaded files in the same location
     * in Drive where the form is located. First, it checks if the folder
     * already exists, and creates it if it doesn't.
     *
     * @param {string} folderName - Name of the Drive folder. 
     * @return {object} Google Drive Folder
     */
    function getFolder_(folderName) {
    
      // Gets the Drive folder where the form is located.
      const ssId = FormApp.getActiveForm().getId();
      const parentFolder = DriveApp.getFileById(ssId).getParents().next();
    
      // Iterates through the subfolders to check if folder already exists.
      // The script checks for the folder name specified in the APP_FOLDER_NAME variable.
      const subFolders = parentFolder.getFolders();
      while (subFolders.hasNext()) {
        let folder = subFolders.next();
    
        // Returns the existing folder if found.
        if (folder.getName() === folderName) {
          return folder;
        }
      }
      // Creates a new folder if one doesn't already exist.
      return parentFolder.createFolder(folderName)
        .setDescription(`Created by ${APP_TITLE} application to store uploaded files.`);
    }
    
    /**
     * Installs trigger to capture onFormSubmit event when a form is submitted.
     * Ensures that the trigger is only installed once.
     * Called by setup().
     */
    function installTrigger_() {
      // Ensures existing trigger doesn't already exist.
      let propTriggerId = PropertiesService.getScriptProperties().getProperty('triggerUniqueId')
      if (propTriggerId !== null) {
        const triggers = ScriptApp.getProjectTriggers();
        for (let t in triggers) {
          if (triggers[t].getUniqueId() === propTriggerId) {
            console.log(`Trigger with the following unique ID already exists: ${propTriggerId}`);
            return;
          }
        }
      }
      // Creates the trigger if one doesn't exist.
      let triggerUniqueId = ScriptApp.newTrigger('onFormSubmit')
        .forForm(FormApp.getActiveForm())
        .onFormSubmit()
        .create()
        .getUniqueId();
      PropertiesService.getScriptProperties().setProperty('triggerUniqueId', triggerUniqueId);
      console.log(`Trigger with the following unique ID was created: ${triggerUniqueId}`);
    }
    
    /**
     * Removes all script properties and triggers for the project.
     * Use primarily to test setup routines.
     */
    function removeTriggersAndScriptProperties() {
      PropertiesService.getScriptProperties().deleteAllProperties();
      // Removes all triggers associated with project.
      const triggers = ScriptApp.getProjectTriggers();
      for (let t in triggers) {
        ScriptApp.deleteTrigger(triggers[t]);
      }
    }
    
    /**
     * Removes all form responses to reset the form.
     */
    function deleteAllResponses() {
      FormApp.getActiveForm().deleteAllResponses();
    }

Ejecuta la secuencia de comandos:

  1. En el editor de Apps Script, cambia al archivo Setup.gs.
  2. En el menú desplegable de funciones, selecciona setUp.
  3. Haz clic en Ejecutar.
  4. Cuando se te solicite, autoriza la secuencia de comandos. Si la pantalla de consentimiento de OAuth muestra la advertencia Esta app no está verificada, continúa seleccionando Avanzado > Ir a {nombre del proyecto} (no seguro).

  5. Regresa al formulario y haz clic en Preview Ícono de la vista previa.

  6. En el formulario, selecciona una subcarpeta y sube un archivo.

  7. Haz clic en Enviar.

  8. Ve a Drive y abre la carpeta Subir archivos a Drive (respuestas de archivos). Los archivos que subiste se encuentran en la subcarpeta que seleccionaste en el formulario.

Colaboradores

Google mantiene este ejemplo con la ayuda de expertos en desarrollo de Google.

Próximos pasos