Google Forms का इस्तेमाल करके, Google Drive में फ़ाइलें अपलोड करना

कोडिंग लेवल: शुरुआती
अवधि: 10 मिनट
प्रोजेक्ट टाइप: इवेंट-ड्रिवन ट्रिगर वाला ऑटोमेशन

मकसद

  • यह समझना कि समाधान क्या करता है.
  • जानें कि समाधान में Apps Script की सेवाएं क्या करती हैं.
  • स्क्रिप्ट सेट अप करें.
  • स्क्रिप्ट चलाएं.

इस समाधान के बारे में जानकारी

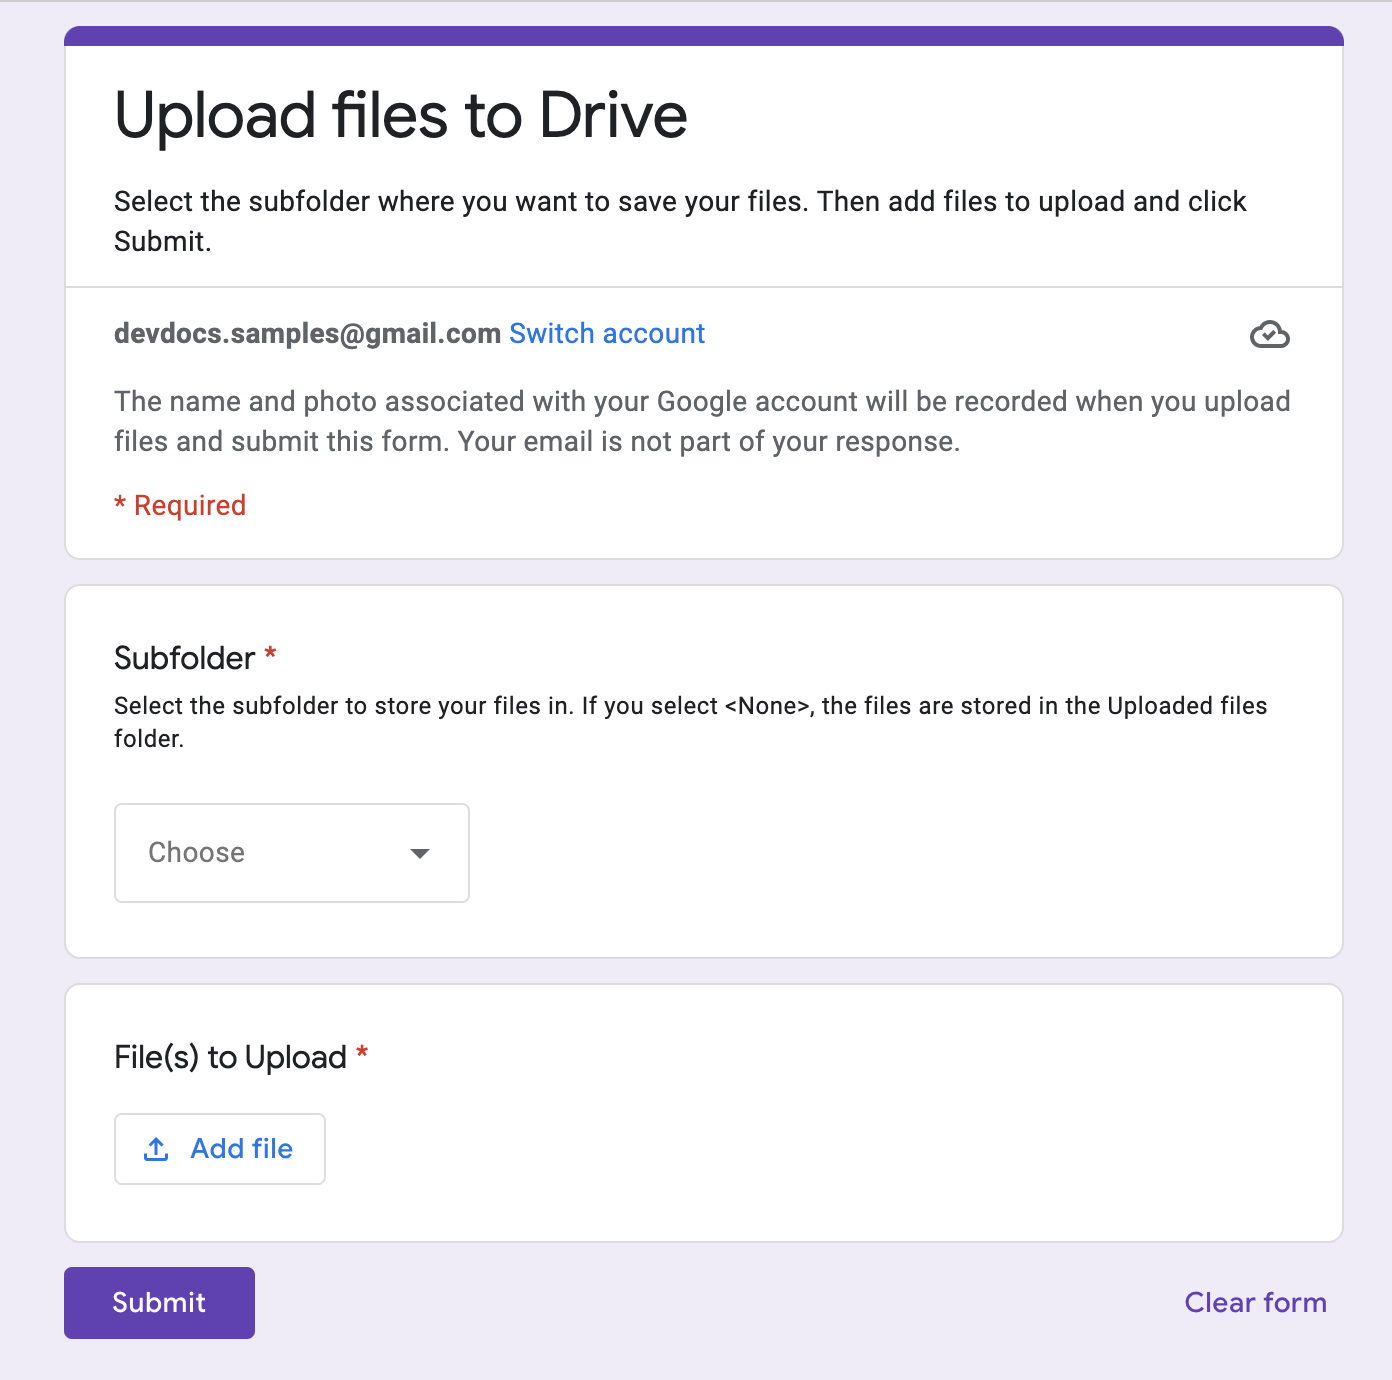
Google Forms का इस्तेमाल करके, Google Drive में एक साथ कई फ़ाइलें अपलोड और व्यवस्थित करें. इस फ़ॉर्म में, अपलोड की जाने वाली फ़ाइलों के लिए इनपुट शामिल होते हैं. साथ ही, यह भी बताया जाता है कि फ़ाइलों को कैसे व्यवस्थित किया जाना चाहिए.

फ़ाइलें अपलोड करने के लिए फ़ॉर्म का स्क्रीनशॉट

यह कैसे काम करता है

सेटअप फ़ंक्शन, अपलोड की गई सभी फ़ाइलों को सेव करने के लिए एक फ़ोल्डर बनाता है. साथ ही, एक ट्रिगर भी बनाता है, जो हर बार किसी व्यक्ति के फ़ॉर्म सबमिट करने पर ट्रिगर होता है. फ़ॉर्म भरने के बाद, उपयोगकर्ता को अपलोड करने के लिए फ़ाइलें चुननी होती हैं. साथ ही, उन्हें फ़ाइलों को सेव करने के लिए कोई सब-फ़ोल्डर भी चुनना होता है. उपयोगकर्ता के फ़ॉर्म सबमिट करने के बाद, स्क्रिप्ट फ़ाइलों को उससे जुड़े सबफ़ोल्डर में भेज देती है. अगर फ़ोल्डर अब तक मौजूद नहीं है, तो स्क्रिप्ट उसे बनाती है.

Apps Script की सेवाएं

यह समाधान इन सेवाओं का इस्तेमाल करता है:

  • स्क्रिप्ट सेवा–यह एक ऐसा ट्रिगर बनाती है जो जब भी कोई व्यक्ति फ़ॉर्म सबमिट करता है, तब ट्रिगर होता है.
  • प्रॉपर्टी सेवा–डुप्लीकेट ट्रिगर को रोकने के लिए, सेटअप के दौरान स्क्रिप्ट से बनाए गए ट्रिगर का आईडी सेव करती है.
  • Drive सेवा–सेटअप के दौरान, Drive में फ़ॉर्म की जगह का पता लगाता है और उसी जगह पर एक फ़ोल्डर बनाता है. जब कोई उपयोगकर्ता फ़ॉर्म सबमिट करता है, तो Drive की सेवा, फ़ाइलों को उस फ़ोल्डर में भेजती है. अगर कोई सब-फ़ोल्डर चुना गया है, तो फ़ाइलों को उसमें भेजा जाता है. अगर सब-फ़ोल्डर अब तक मौजूद नहीं है, तो स्क्रिप्ट उसे बना देती है.
  • फ़ॉर्म सेवा–फ़ॉर्म सबमिट करने के बाद, उपयोगकर्ता ने जो फ़ाइलें और फ़ोल्डर का नाम चुना है उसे पाता है और उसे Drive सेवा पर भेजता है.

ज़रूरी शर्तें

इस सैंपल का इस्तेमाल करने के लिए, आपको ये ज़रूरी शर्तें पूरी करनी होंगी:

  • Google खाता (Google Workspace खातों के लिए, एडमिन की अनुमति की ज़रूरत पड़ सकती है).
  • इंटरनेट का ऐक्सेस वाला वेब ब्राउज़र.

स्क्रिप्ट सेट अप करना

फ़ॉर्म बनाना

  1. forms.google.com पर जाएं और खाली फ़ॉर्म पर क्लिक करें.
  2. बिना शीर्षक वाला फ़ॉर्म पर क्लिक करें और फ़ॉर्म का नाम बदलकर Drive में फ़ाइलें अपलोड करें करें.
  3. बिना टाइटल वाला सवाल पर क्लिक करें और सवाल का नाम बदलकर सब-फ़ोल्डर करें.
  4. सब-फ़ोल्डर के सवाल पर, ज़्यादा > ब्यौरा पर क्लिक करें.
  5. जानकारी के लिए, अपनी फ़ाइलों को सेव करने के लिए कोई सब-फ़ोल्डर चुनें डालें. अगर आपने <कोई नहीं> चुना है, तो फ़ाइलें 'अपलोड की गई फ़ाइलें' फ़ोल्डर में सेव की जाएंगी.
  6. सब-फ़ोल्डर से जुड़े सवाल में ये विकल्प जोड़ें:
    • <none>
    • Project A
    • प्रोजेक्ट B
    • प्रोजेक्ट C
  7. सवाल को ज़रूरी बनाने के लिए, ज़रूरी है पर क्लिक करें.
  8. सवाल जोड़ें पर क्लिक करें.
  9. एक से ज़्यादा विकल्प वाला सवाल पर क्लिक करें और फ़ाइल अपलोड करें चुनें.
  10. जारी रखें पर क्लिक करें.
  11. सवाल के लिए, अपलोड करने के लिए फ़ाइलें डालें. आपके पास यह चुनने का विकल्प होता है कि लोग किस तरह की फ़ाइलें अपलोड कर सकते हैं और ज़्यादा से ज़्यादा कितनी फ़ाइलें अपलोड कर सकते हैं.
  12. सवाल को ज़रूरी बनाने के लिए, ज़रूरी है पर क्लिक करें.

Apps Script प्रोजेक्ट बनाना

  1. फ़ॉर्म में, ज़्यादा > स्क्रिप्ट एडिटर पर क्लिक करें.
  2. बिना शीर्षक वाला प्रोजेक्ट पर क्लिक करें और प्रोजेक्ट का नाम बदलकर Drive में फ़ाइलें अपलोड करें करें.
  3. कोई और स्क्रिप्ट फ़ाइल बनाने के लिए, फ़ाइल जोड़ें > स्क्रिप्ट पर क्लिक करें. फ़ाइल को Setup नाम दें.
  4. दोनों स्क्रिप्ट फ़ाइलों के कॉन्टेंट को, यहां दिए गए कॉन्टेंट से बदलें:

    Code.gs

    solutions/automations/upload-files/Code.js
    // TODO Before you start using this sample, you must run the setUp() 
    // function in the Setup.gs file.
    
    // Application constants
    const APP_TITLE = "Upload files to Drive from Forms";
    const APP_FOLDER_NAME = "Upload files to Drive (File responses)";
    
    // Identifies the subfolder form item
    const APP_SUBFOLDER_ITEM = "Subfolder";
    const APP_SUBFOLDER_NONE = "<None>";
    
    
    /**
     * Gets the file uploads from a form response and moves files to the corresponding subfolder.
     *  
     * @param {object} event - Form submit.
     */
    function onFormSubmit(e) {
      try {
        // Gets the application root folder.
        var destFolder = getFolder_(APP_FOLDER_NAME);
    
        // Gets all form responses.
        let itemResponses = e.response.getItemResponses();
    
        // Determines the subfolder to route the file to, if any.
        var subFolderName;
        let dest = itemResponses.filter((itemResponse) =>
          itemResponse.getItem().getTitle().toString() === APP_SUBFOLDER_ITEM);
    
        // Gets the destination subfolder name, but ignores if APP_SUBFOLDER_NONE was selected;
        if (dest.length > 0) {
          if (dest[0].getResponse() != APP_SUBFOLDER_NONE) {
            subFolderName = dest[0].getResponse();
          }
        }
        // Gets the subfolder or creates it if it doesn't exist.
        if (subFolderName != undefined) {
          destFolder = getSubFolder_(destFolder, subFolderName)
        }
        console.log(`Destination folder to use:
        Name: ${destFolder.getName()}
        ID: ${destFolder.getId()}
        URL: ${destFolder.getUrl()}`)
    
        // Gets the file upload response as an array to allow for multiple files.
        let fileUploads = itemResponses.filter((itemResponse) => itemResponse.getItem().getType().toString() === "FILE_UPLOAD")
          .map((itemResponse) => itemResponse.getResponse())
          .reduce((a, b) => [...a, ...b], []);
    
        // Moves the files to the destination folder.
        if (fileUploads.length > 0) {
          fileUploads.forEach((fileId) => {
            DriveApp.getFileById(fileId).moveTo(destFolder);
            console.log(`File Copied: ${fileId}`)
          });
        }
      }
      catch (err) {
        console.log(err);
      }
    }
    
    
    /**
     * Returns a Drive folder under the passed in objParentFolder parent
     * folder. Checks if folder of same name exists before creating, returning 
     * the existing folder or the newly created one if not found.
     *
     * @param {object} objParentFolder - Drive folder as an object.
     * @param {string} subFolderName - Name of subfolder to create/return.
     * @return {object} Drive folder
     */
    function getSubFolder_(objParentFolder, subFolderName) {
    
      // Iterates subfolders of parent folder to check if folder already exists.
      const subFolders = objParentFolder.getFolders();
      while (subFolders.hasNext()) {
        let folder = subFolders.next();
    
        // Returns the existing folder if found.
        if (folder.getName() === subFolderName) {
          return folder;
        }
      }
      // Creates a new folder if one doesn't already exist.
      return objParentFolder.createFolder(subFolderName)
        .setDescription(`Created by ${APP_TITLE} application to store uploaded Forms files.`);
    }

    Setup.gs

    solutions/automations/upload-files/Setup.js
    // TODO You must run the setUp() function before you start using this sample.
    
    /** 
     * The setUp() function performs the following:
     *  - Creates a Google Drive folder named by the APP_FOLDER_NAME
     *    variable in the Code.gs file.
     *  - Creates a trigger to handle onFormSubmit events.
     */
    function setUp() {
      // Ensures the root destination folder exists.
      const appFolder = getFolder_(APP_FOLDER_NAME);
      if (appFolder !== null) {
        console.log(`Application folder setup.
        Name: ${appFolder.getName()}
        ID: ${appFolder.getId()}
        URL: ${appFolder.getUrl()}`)
      }
      else {
        console.log(`Could not setup application folder.`)
      }
      // Calls the function that creates the Forms onSubmit trigger.
      installTrigger_();
    }
    
    /** 
     * Returns a folder to store uploaded files in the same location
     * in Drive where the form is located. First, it checks if the folder
     * already exists, and creates it if it doesn't.
     *
     * @param {string} folderName - Name of the Drive folder. 
     * @return {object} Google Drive Folder
     */
    function getFolder_(folderName) {
    
      // Gets the Drive folder where the form is located.
      const ssId = FormApp.getActiveForm().getId();
      const parentFolder = DriveApp.getFileById(ssId).getParents().next();
    
      // Iterates through the subfolders to check if folder already exists.
      // The script checks for the folder name specified in the APP_FOLDER_NAME variable.
      const subFolders = parentFolder.getFolders();
      while (subFolders.hasNext()) {
        let folder = subFolders.next();
    
        // Returns the existing folder if found.
        if (folder.getName() === folderName) {
          return folder;
        }
      }
      // Creates a new folder if one doesn't already exist.
      return parentFolder.createFolder(folderName)
        .setDescription(`Created by ${APP_TITLE} application to store uploaded files.`);
    }
    
    /**
     * Installs trigger to capture onFormSubmit event when a form is submitted.
     * Ensures that the trigger is only installed once.
     * Called by setup().
     */
    function installTrigger_() {
      // Ensures existing trigger doesn't already exist.
      let propTriggerId = PropertiesService.getScriptProperties().getProperty('triggerUniqueId')
      if (propTriggerId !== null) {
        const triggers = ScriptApp.getProjectTriggers();
        for (let t in triggers) {
          if (triggers[t].getUniqueId() === propTriggerId) {
            console.log(`Trigger with the following unique ID already exists: ${propTriggerId}`);
            return;
          }
        }
      }
      // Creates the trigger if one doesn't exist.
      let triggerUniqueId = ScriptApp.newTrigger('onFormSubmit')
        .forForm(FormApp.getActiveForm())
        .onFormSubmit()
        .create()
        .getUniqueId();
      PropertiesService.getScriptProperties().setProperty('triggerUniqueId', triggerUniqueId);
      console.log(`Trigger with the following unique ID was created: ${triggerUniqueId}`);
    }
    
    /**
     * Removes all script properties and triggers for the project.
     * Use primarily to test setup routines.
     */
    function removeTriggersAndScriptProperties() {
      PropertiesService.getScriptProperties().deleteAllProperties();
      // Removes all triggers associated with project.
      const triggers = ScriptApp.getProjectTriggers();
      for (let t in triggers) {
        ScriptApp.deleteTrigger(triggers[t]);
      }
    }
    
    /**
     * Removes all form responses to reset the form.
     */
    function deleteAllResponses() {
      FormApp.getActiveForm().deleteAllResponses();
    }

स्क्रिप्ट चलाना

  1. Apps Script एडिटर में, Setup.gs फ़ाइल पर स्विच करें.
  2. फ़ंक्शन ड्रॉपडाउन में, setUp चुनें.
  3. चलाएं पर क्लिक करें.
  4. जब आपसे कहा जाए, तब स्क्रिप्ट को अनुमति दें. अगर OAuth की सहमति वाली स्क्रीन पर चेतावनी दिखती है, इस ऐप्लिकेशन की पुष्टि नहीं की गई है, तो बेहतर > {Project Name} पर जाएं (असुरक्षित) को चुनकर जारी रखें.

  5. फ़ॉर्म पर वापस जाएं और पूर्वावलोकन आइकनझलक देखें पर क्लिक करें.

  6. फ़ॉर्म में, कोई सब-फ़ोल्डर चुनें और कोई फ़ाइल अपलोड करें.

  7. सबमिट करें पर क्लिक करें.

  8. Drive पर जाएं और Drive में फ़ाइलें अपलोड करें (फ़ाइल के जवाब) फ़ोल्डर खोलें. अपलोड की गई फ़ाइलें, फ़ॉर्म में चुने गए सब-फ़ोल्डर में मौजूद होती हैं.

योगदानकर्ता

इस सैंपल को Google, Google Developer Experts की मदद से मैनेज करता है.

अगले चरण