อัปโหลดไฟล์จาก Google ฟอร์มไปยัง Google ไดรฟ์

ระดับการเขียนโค้ด: เริ่มต้น
ระยะเวลา: 10 นาที
ประเภทโปรเจ็กต์: การทำงานอัตโนมัติที่มีทริกเกอร์ที่ทำงานตามเหตุการณ์

วัตถุประสงค์

  • ทําความเข้าใจว่าโซลูชันทํางานอย่างไร
  • ทําความเข้าใจสิ่งที่บริการ Apps Script ทําภายในโซลูชัน
  • ตั้งค่าสคริปต์
  • เรียกใช้สคริปต์

เกี่ยวกับโซลูชันนี้

อัปโหลดและจัดระเบียบไฟล์ใน Google ไดรฟ์พร้อมกันโดยใช้ Google ฟอร์ม แบบฟอร์มจะมีอินพุตสำหรับไฟล์ที่จะอัปโหลดและวิธีจัดระเบียบไฟล์
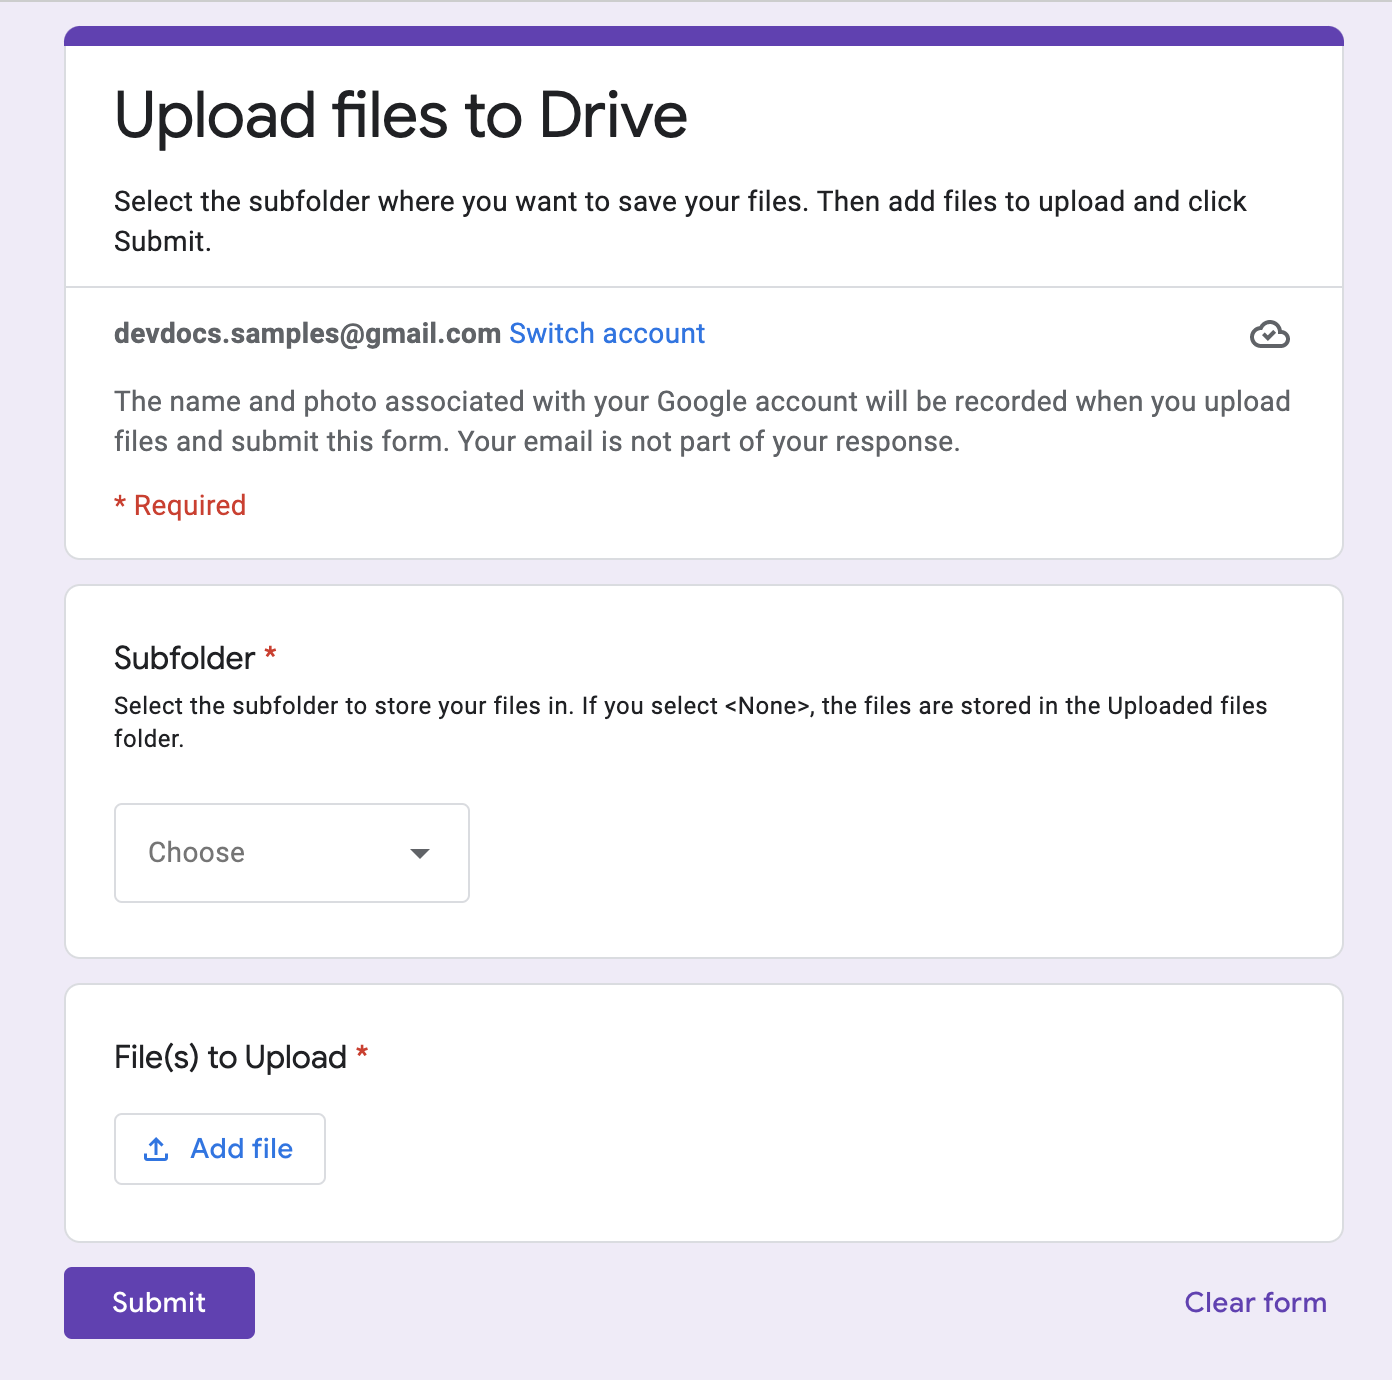
ภาพหน้าจอของแบบฟอร์มสำหรับอัปโหลดไฟล์

วิธีการทำงาน

ฟังก์ชันการตั้งค่าจะสร้างโฟลเดอร์เพื่อจัดเก็บไฟล์ที่อัปโหลดทั้งหมดและทริกเกอร์ที่จะทํางานทุกครั้งที่มีคนส่งแบบฟอร์ม เมื่อกรอกแบบฟอร์ม ผู้ใช้จะเลือกไฟล์ที่จะอัปโหลดและโฟลเดอร์ย่อยที่จะจัดเก็บไฟล์ เมื่อผู้ใช้ส่งแบบฟอร์มแล้ว สคริปต์จะส่งไฟล์ไปยังโฟลเดอร์ย่อยที่เกี่ยวข้อง หากยังไม่มีโฟลเดอร์ สคริปต์จะสร้างโฟลเดอร์ให้

บริการ Apps Script

โซลูชันนี้ใช้บริการต่อไปนี้

  • บริการสคริปต์ - สร้างทริกเกอร์ที่จะทํางานทุกครั้งที่มีผู้ส่งแบบฟอร์ม
  • บริการพร็อพเพอร์ตี้ - จัดเก็บรหัสทริกเกอร์ที่สคริปต์สร้างขึ้นระหว่างการตั้งค่าเพื่อป้องกันไม่ให้มีการทริกเกอร์ซ้ำ
  • บริการไดรฟ์ - ในระหว่างการตั้งค่า ระบบจะรับตำแหน่งของแบบฟอร์มในไดรฟ์และสร้างโฟลเดอร์ในตำแหน่งเดียวกัน เมื่อผู้ใช้ส่งแบบฟอร์ม บริการไดรฟ์จะกำหนดเส้นทางไฟล์ไปยังโฟลเดอร์นั้นและโฟลเดอร์ย่อยที่ระบุไว้ (หากเลือกไว้) หากยังไม่มีโฟลเดอร์ย่อย สคริปต์จะสร้างโฟลเดอร์ย่อยนั้น
  • บริการแบบฟอร์ม - รับไฟล์และชื่อโฟลเดอร์ที่ผู้ใช้เลือกหลังจากส่งแบบฟอร์มแล้ว และส่งไปยังบริการไดรฟ์

ข้อกำหนดเบื้องต้น

หากต้องการใช้ตัวอย่างนี้ คุณต้องมีข้อกําหนดเบื้องต้นต่อไปนี้

  • บัญชี Google (บัญชี Google Workspace อาจต้องได้รับอนุมัติจากผู้ดูแลระบบ)
  • เว็บเบราว์เซอร์ที่มีสิทธิ์เข้าถึงอินเทอร์เน็ต

ตั้งค่าสคริปต์

สร้างแบบฟอร์ม

  1. ไปที่ forms.google.com แล้วคลิก "ว่าง"
  2. คลิกแบบฟอร์มที่ไม่มีชื่อ แล้วเปลี่ยนชื่อเป็นอัปโหลดไฟล์ไปยังไดรฟ์
  3. คลิกคำถามที่ไม่มีชื่อ แล้วเปลี่ยนชื่อคำถามเป็นโฟลเดอร์ย่อย
  4. ในคำถามโฟลเดอร์ย่อย ให้คลิกเพิ่มเติม > คำอธิบาย
  5. ในส่วนคําอธิบาย ให้ป้อนเลือกโฟลเดอร์ย่อยที่จะจัดเก็บไฟล์ หากเลือก <ไม่มี> ระบบจะจัดเก็บไฟล์ไว้ในโฟลเดอร์ไฟล์ที่อัปโหลด
  6. เพิ่มตัวเลือกต่อไปนี้ลงในคำถามโฟลเดอร์ย่อย
    • <ไม่มี>
    • โปรเจ็กต์ ก
    • โปรเจ็กต์ ข
    • โปรเจ็กต์ C
  7. หากต้องการให้ตอบคำถามนี้ ให้คลิกต้องตอบ
  8. คลิกเพิ่มคำถาม
  9. คลิกหลายตัวเลือก แล้วเลือกการอัปโหลดไฟล์
  10. คลิกต่อไป
  11. สำหรับคำถาม ให้ป้อนไฟล์ที่จะอัปโหลด คุณเลือกประเภทไฟล์และจำนวนไฟล์สูงสุดที่ต้องการอนุญาตให้ผู้ใช้อัปโหลดได้
  12. หากต้องการให้ตอบคำถามนี้ ให้คลิกต้องตอบ

สร้างโปรเจ็กต์ Apps Script

  1. จากแบบฟอร์ม ให้คลิกเพิ่มเติม > เครื่องมือแก้ไขสคริปต์
  2. คลิกโปรเจ็กต์ที่ไม่มีชื่อ แล้วเปลี่ยนชื่อโปรเจ็กต์เป็นอัปโหลดไฟล์ไปยัง Google ไดรฟ์
  3. หากต้องการสร้างไฟล์สคริปต์อื่น ให้คลิกเพิ่มไฟล์ > สคริปต์ ตั้งชื่อไฟล์เป็น Setup
  4. แทนที่เนื้อหาของไฟล์สคริปต์ทั้ง 2 ไฟล์ด้วยเนื้อหาต่อไปนี้

    Code.gs

    solutions/automations/upload-files/Code.js
    // TODO Before you start using this sample, you must run the setUp() 
    // function in the Setup.gs file.
    
    // Application constants
    const APP_TITLE = "Upload files to Drive from Forms";
    const APP_FOLDER_NAME = "Upload files to Drive (File responses)";
    
    // Identifies the subfolder form item
    const APP_SUBFOLDER_ITEM = "Subfolder";
    const APP_SUBFOLDER_NONE = "<None>";
    
    
    /**
     * Gets the file uploads from a form response and moves files to the corresponding subfolder.
     *  
     * @param {object} event - Form submit.
     */
    function onFormSubmit(e) {
      try {
        // Gets the application root folder.
        var destFolder = getFolder_(APP_FOLDER_NAME);
    
        // Gets all form responses.
        let itemResponses = e.response.getItemResponses();
    
        // Determines the subfolder to route the file to, if any.
        var subFolderName;
        let dest = itemResponses.filter((itemResponse) =>
          itemResponse.getItem().getTitle().toString() === APP_SUBFOLDER_ITEM);
    
        // Gets the destination subfolder name, but ignores if APP_SUBFOLDER_NONE was selected;
        if (dest.length > 0) {
          if (dest[0].getResponse() != APP_SUBFOLDER_NONE) {
            subFolderName = dest[0].getResponse();
          }
        }
        // Gets the subfolder or creates it if it doesn't exist.
        if (subFolderName != undefined) {
          destFolder = getSubFolder_(destFolder, subFolderName)
        }
        console.log(`Destination folder to use:
        Name: ${destFolder.getName()}
        ID: ${destFolder.getId()}
        URL: ${destFolder.getUrl()}`)
    
        // Gets the file upload response as an array to allow for multiple files.
        let fileUploads = itemResponses.filter((itemResponse) => itemResponse.getItem().getType().toString() === "FILE_UPLOAD")
          .map((itemResponse) => itemResponse.getResponse())
          .reduce((a, b) => [...a, ...b], []);
    
        // Moves the files to the destination folder.
        if (fileUploads.length > 0) {
          fileUploads.forEach((fileId) => {
            DriveApp.getFileById(fileId).moveTo(destFolder);
            console.log(`File Copied: ${fileId}`)
          });
        }
      }
      catch (err) {
        console.log(err);
      }
    }
    
    
    /**
     * Returns a Drive folder under the passed in objParentFolder parent
     * folder. Checks if folder of same name exists before creating, returning 
     * the existing folder or the newly created one if not found.
     *
     * @param {object} objParentFolder - Drive folder as an object.
     * @param {string} subFolderName - Name of subfolder to create/return.
     * @return {object} Drive folder
     */
    function getSubFolder_(objParentFolder, subFolderName) {
    
      // Iterates subfolders of parent folder to check if folder already exists.
      const subFolders = objParentFolder.getFolders();
      while (subFolders.hasNext()) {
        let folder = subFolders.next();
    
        // Returns the existing folder if found.
        if (folder.getName() === subFolderName) {
          return folder;
        }
      }
      // Creates a new folder if one doesn't already exist.
      return objParentFolder.createFolder(subFolderName)
        .setDescription(`Created by ${APP_TITLE} application to store uploaded Forms files.`);
    }
    

    Setup.gs

    solutions/automations/upload-files/Setup.js
    // TODO You must run the setUp() function before you start using this sample.
    
    /** 
     * The setUp() function performs the following:
     *  - Creates a Google Drive folder named by the APP_FOLDER_NAME
     *    variable in the Code.gs file.
     *  - Creates a trigger to handle onFormSubmit events.
     */
    function setUp() {
      // Ensures the root destination folder exists.
      const appFolder = getFolder_(APP_FOLDER_NAME);
      if (appFolder !== null) {
        console.log(`Application folder setup.
        Name: ${appFolder.getName()}
        ID: ${appFolder.getId()}
        URL: ${appFolder.getUrl()}`)
      }
      else {
        console.log(`Could not setup application folder.`)
      }
      // Calls the function that creates the Forms onSubmit trigger.
      installTrigger_();
    }
    
    /** 
     * Returns a folder to store uploaded files in the same location
     * in Drive where the form is located. First, it checks if the folder
     * already exists, and creates it if it doesn't.
     *
     * @param {string} folderName - Name of the Drive folder. 
     * @return {object} Google Drive Folder
     */
    function getFolder_(folderName) {
    
      // Gets the Drive folder where the form is located.
      const ssId = FormApp.getActiveForm().getId();
      const parentFolder = DriveApp.getFileById(ssId).getParents().next();
    
      // Iterates through the subfolders to check if folder already exists.
      // The script checks for the folder name specified in the APP_FOLDER_NAME variable.
      const subFolders = parentFolder.getFolders();
      while (subFolders.hasNext()) {
        let folder = subFolders.next();
    
        // Returns the existing folder if found.
        if (folder.getName() === folderName) {
          return folder;
        }
      }
      // Creates a new folder if one doesn't already exist.
      return parentFolder.createFolder(folderName)
        .setDescription(`Created by ${APP_TITLE} application to store uploaded files.`);
    }
    
    /**
     * Installs trigger to capture onFormSubmit event when a form is submitted.
     * Ensures that the trigger is only installed once.
     * Called by setup().
     */
    function installTrigger_() {
      // Ensures existing trigger doesn't already exist.
      let propTriggerId = PropertiesService.getScriptProperties().getProperty('triggerUniqueId')
      if (propTriggerId !== null) {
        const triggers = ScriptApp.getProjectTriggers();
        for (let t in triggers) {
          if (triggers[t].getUniqueId() === propTriggerId) {
            console.log(`Trigger with the following unique ID already exists: ${propTriggerId}`);
            return;
          }
        }
      }
      // Creates the trigger if one doesn't exist.
      let triggerUniqueId = ScriptApp.newTrigger('onFormSubmit')
        .forForm(FormApp.getActiveForm())
        .onFormSubmit()
        .create()
        .getUniqueId();
      PropertiesService.getScriptProperties().setProperty('triggerUniqueId', triggerUniqueId);
      console.log(`Trigger with the following unique ID was created: ${triggerUniqueId}`);
    }
    
    /**
     * Removes all script properties and triggers for the project.
     * Use primarily to test setup routines.
     */
    function removeTriggersAndScriptProperties() {
      PropertiesService.getScriptProperties().deleteAllProperties();
      // Removes all triggers associated with project.
      const triggers = ScriptApp.getProjectTriggers();
      for (let t in triggers) {
        ScriptApp.deleteTrigger(triggers[t]);
      }
    }
    
    /**
     * Removes all form responses to reset the form.
     */
    function deleteAllResponses() {
      FormApp.getActiveForm().deleteAllResponses();
    }
    

เรียกใช้สคริปต์

  1. ในเครื่องมือแก้ไข Apps Script ให้เปลี่ยนไปใช้ไฟล์ Setup.gs
  2. เลือก setUp ในเมนูฟังก์ชันแบบเลื่อนลง
  3. คลิกเรียกใช้
  4. ให้สิทธิ์สคริปต์เมื่อได้รับข้อความแจ้ง หากหน้าจอความยินยอมของ OAuth แสดงคำเตือนว่าแอปนี้ไม่ได้รับการยืนยัน ให้ดำเนินการต่อโดยเลือกขั้นสูง > ไปที่ {ชื่อโปรเจ็กต์} (ไม่ปลอดภัย)

  5. กลับไปที่แบบฟอร์มแล้วคลิกตัวอย่าง ไอคอน &quot;แสดงตัวอย่าง&quot;

  6. ในแบบฟอร์ม ให้เลือกโฟลเดอร์ย่อยและอัปโหลดไฟล์

  7. คลิกส่ง

  8. ไปที่ไดรฟ์และเปิดโฟลเดอร์อัปโหลดไฟล์ไปยังไดรฟ์ (คำตอบที่เป็นไฟล์) ไฟล์ที่อัปโหลดจะอยู่ในโฟลเดอร์ย่อยที่คุณเลือกในแบบฟอร์ม

ผู้ร่วมให้ข้อมูล

ตัวอย่างนี้ได้รับการดูแลโดย Google ด้วยความช่วยเหลือจากผู้เชี่ยวชาญด้านการพัฒนาซอฟต์แวร์ของ Google

ขั้นตอนถัดไป