
Page Summary
-
The webpage provides an advanced guide on creating a fact-check custom function for Google Sheets using Google Apps Script, powered by a Vertex AI agent and Gemini model.
-
This solution demonstrates integrating AI agents for complex reasoning and AI models for advanced text capabilities directly into Google Sheets.
-
The custom function, named
FACT_CHECK, analyzes statements using a Vertex AI agent for reasoning and a Gemini model for output formatting. -
Implementing this solution requires setting up a Google Cloud project, enabling billing and necessary APIs, creating a service account, and deploying the Vertex AI agent.
-
The custom function can be used by entering
=FACT_CHECK("Your statement here")in a Google Sheet cell, with an optional second argument for specific output formatting.
Coding level: Advanced
Duration: 30 minutes
Project type: Custom function
Overview
A fact-check custom function for Google Sheets to be used as a bound Google Apps Script project powered by a Vertex AI agent and Gemini model.
This sample demonstrates how you can use two powerful types of AI resources directly into your Sheets spreadsheets:
- AI agents for sophisticated, multi-tool, multi-step reasoning capabilities using ADK agents deployed in the Vertex AI Agent Engine.
- AI models for advanced understanding, generative, and summarization capabilities using Gemini models from Vertex AI.
Objectives
- Understand what the solution does.
- Understand how the solution is implemented.
- Deploy the Vertex AI agent.
- Set up the script.
- Run the script.
About this solution
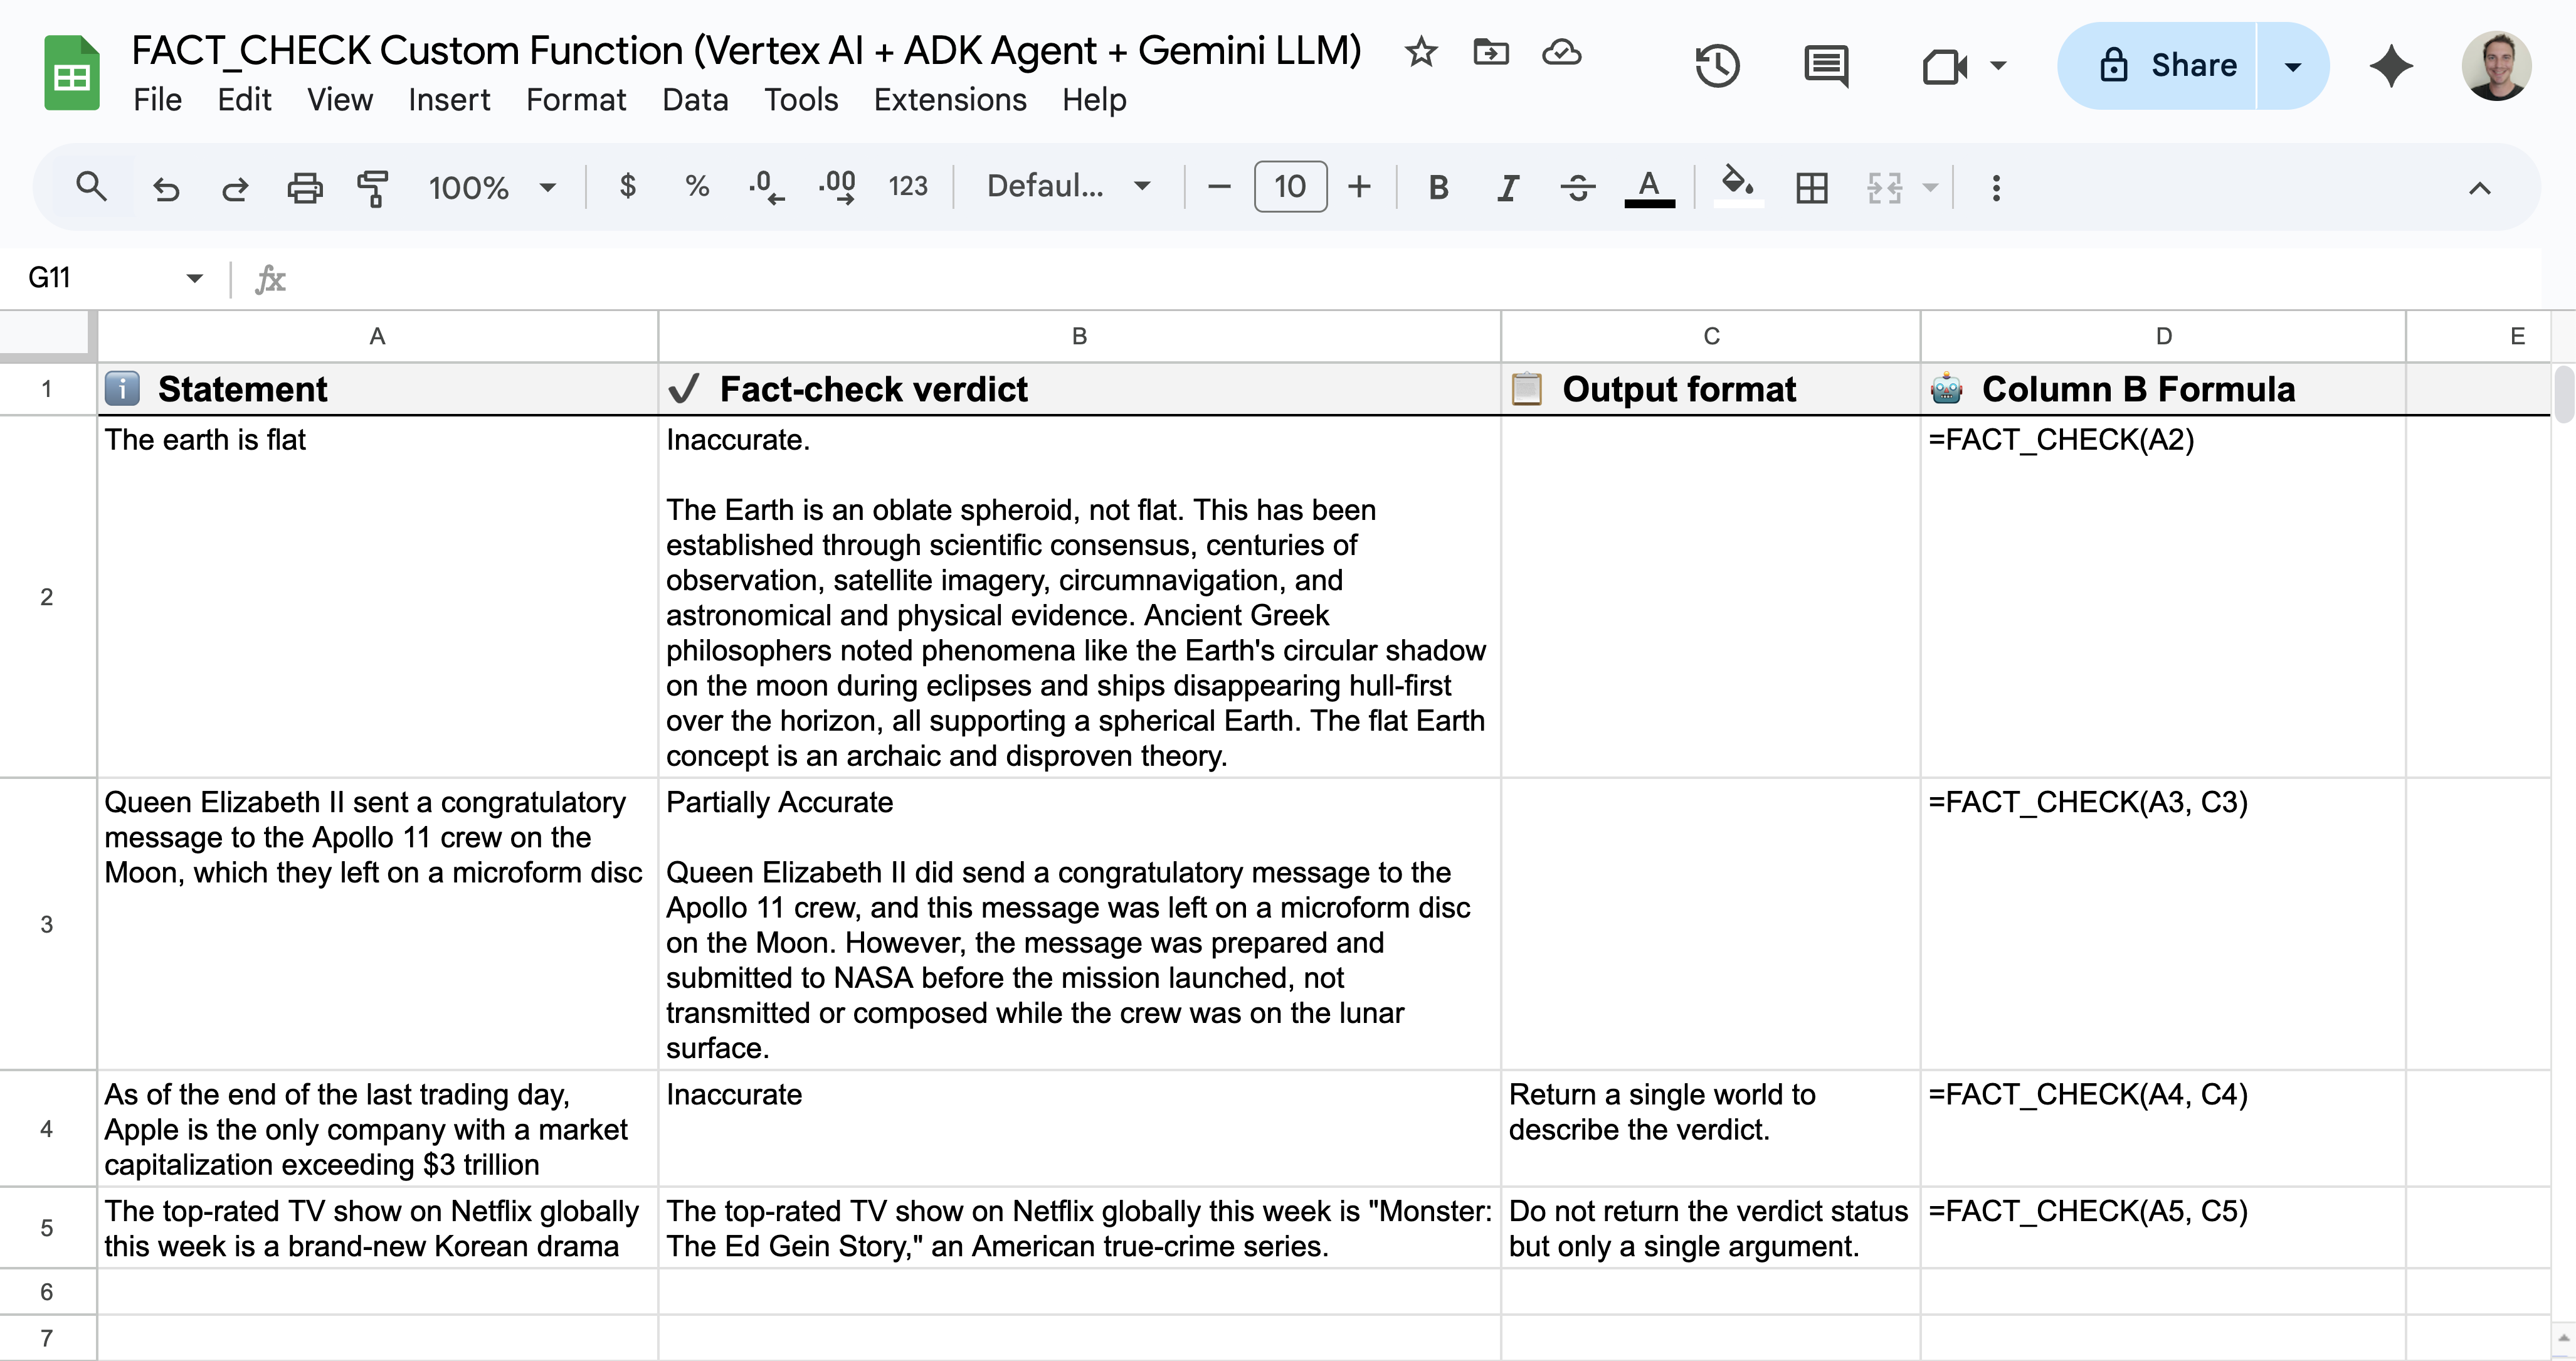
The Sheets custom function is named FACT_CHECK and it operates
as an end-to-end solution. It analyzes a statement, grounds its response using
the latest web information, and returns the result in the format you need:
- Usage:
=FACT_CHECK("Your statement here")for a concise and summarized output.=FACT_CHECK("Your statement here", "Your output formatting instructions here")for a specific output format.
- Reasoning: LLM Auditor ADK AI Agent (Python sample).
- Output formatting: Gemini model.
This solution requests Vertex AI REST APIs using UrlFetchApp.
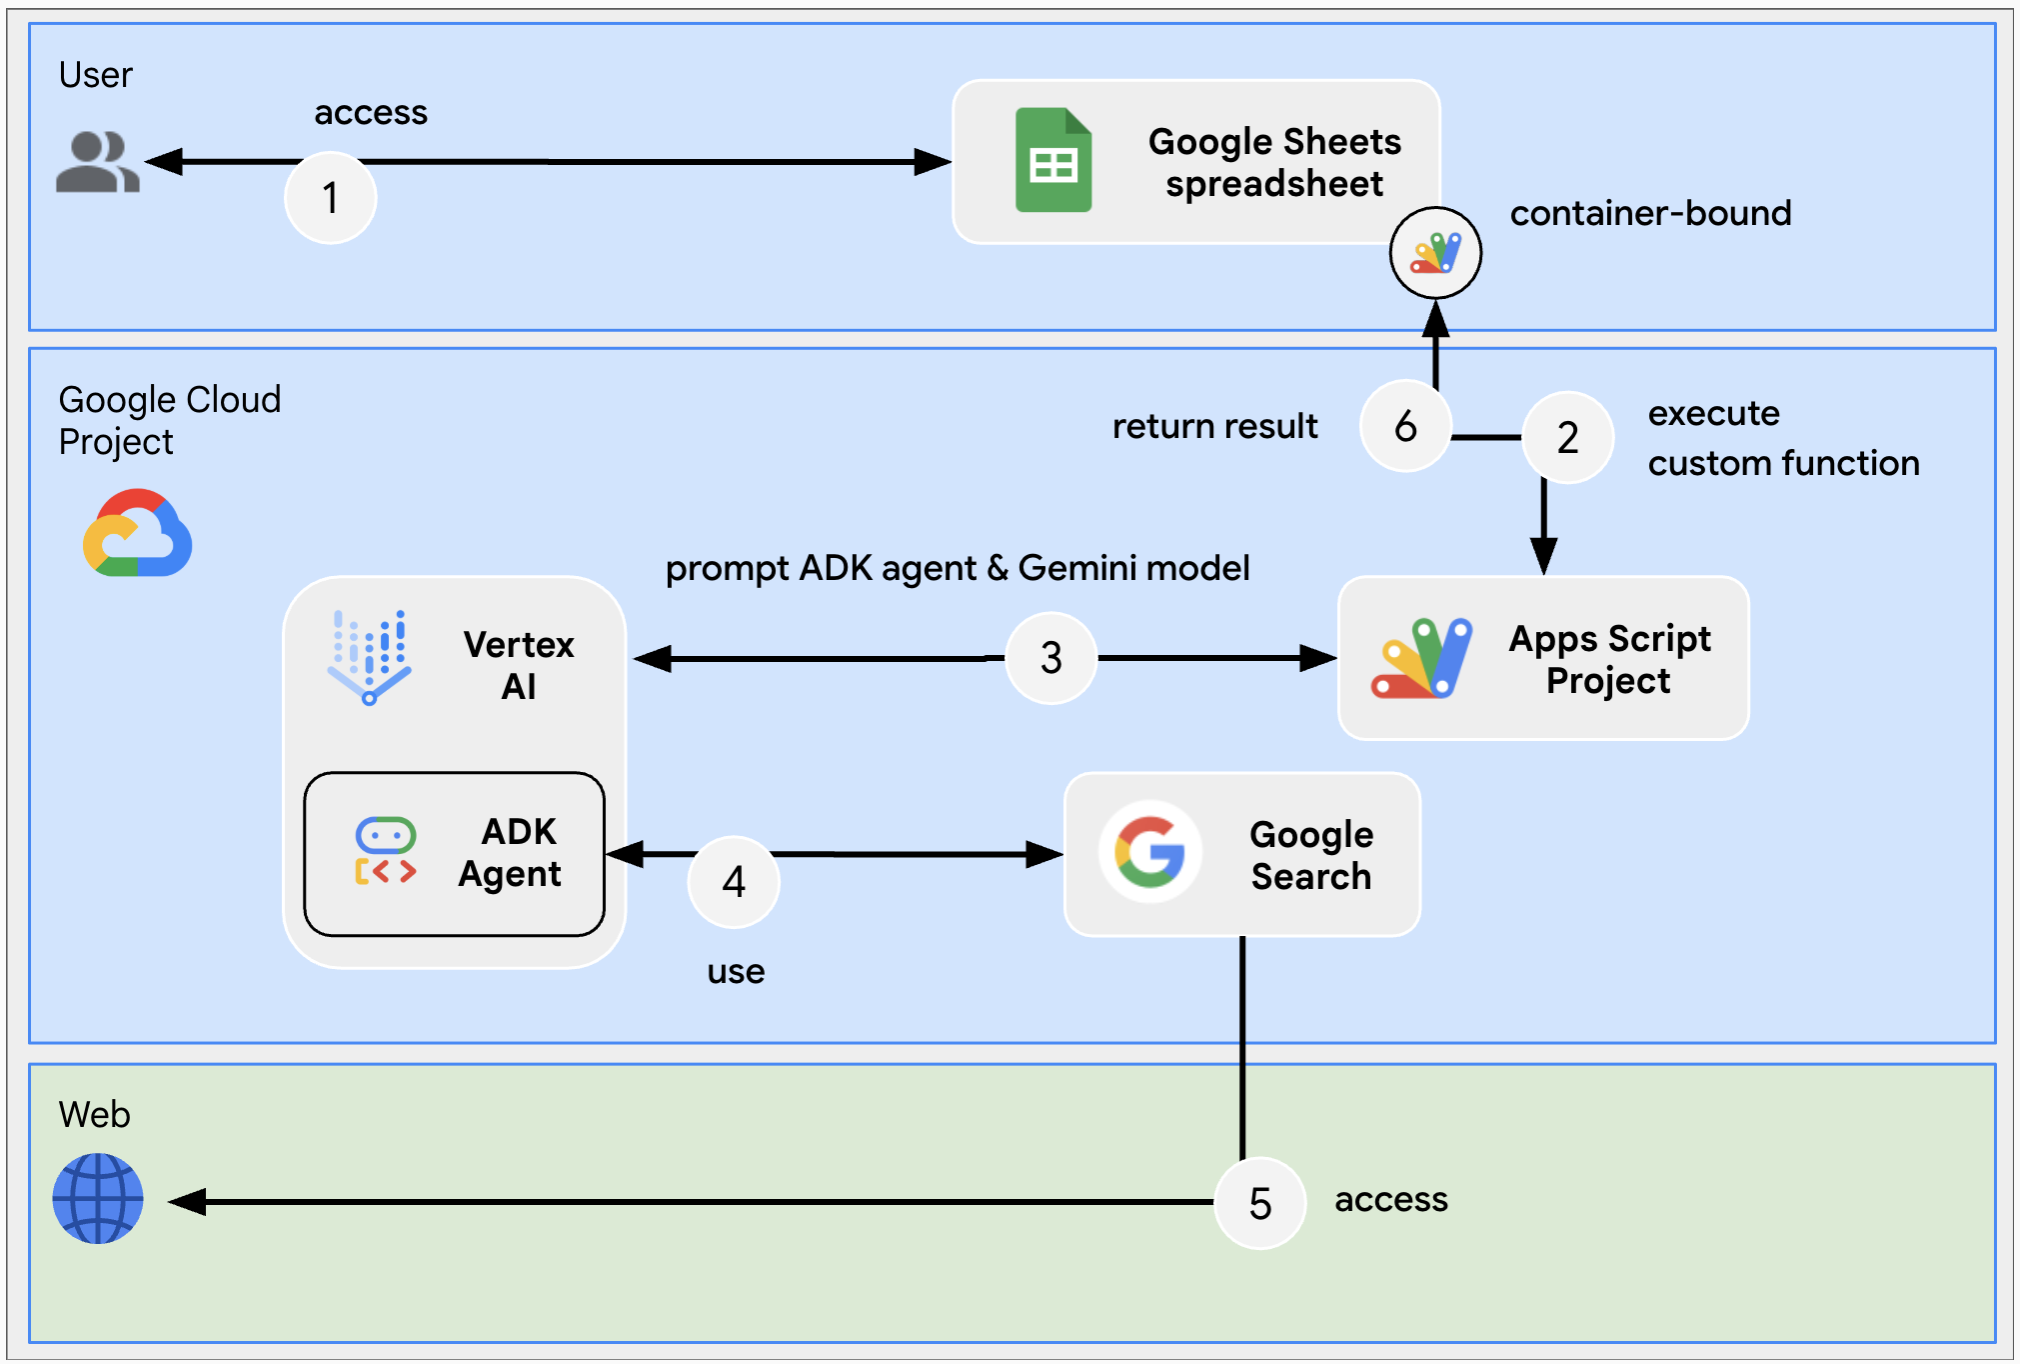
Architecture
The following diagram shows the architecture of the Google Workspace and Google Cloud resources used by the custom function.
Prerequisites
To use this sample, you need the following prerequisites:
- A Google Account (Google Workspace accounts might require administrator approval).
A web browser with access to the internet.
Prerequisites of the LLM Auditor ADK agent
- Python 3.11+: For installation, follow instructions on the official Python website.
- Python Poetry: For installation, follow instructions on the official Poetry website.
- Google Cloud CLI: For installation, follow instructions on the official Google Cloud website.
Prepare the environment
This section shows how to create and configure a Google Cloud project.
Create a Google Cloud project
Google Cloud console
- In the Google Cloud console, go to Menu > IAM & Admin > Create a Project.
-
In the Project Name field, enter a descriptive name for your project.
Optional: To edit the Project ID, click Edit. The project ID can't be changed after the project is created, so choose an ID that meets your needs for the lifetime of the project.
- In the Location field, click Browse to display potential locations for your project. Then, click Select.
- Click Create. The Google Cloud console navigates to the Dashboard page and your project is created within a few minutes.
gcloud CLI
In one of the following development environments, access the Google Cloud
CLI (gcloud):
-
Cloud Shell: To use an online terminal with the gcloud CLI
already set up, activate Cloud Shell.
Activate Cloud Shell -
Local Shell: To use a local development environment,
install and
initialize
the gcloud CLI.
To create a Cloud project, use thegcloud projects createcommand:gcloud projects create PROJECT_ID
Enable billing for the Cloud project
Google Cloud console
- In the Google Cloud console, go to Billing. Click Menu > Billing > My Projects.
- In Select an organization, choose the organization associated with your Google Cloud project.
- In the project row, open the Actions menu (), click Change billing, and choose the Cloud Billing account.
- Click Set account.
gcloud CLI
- To list available billing accounts, run:
gcloud billing accounts list - Link a billing account with a Google Cloud project:
gcloud billing projects link PROJECT_ID --billing-account=BILLING_ACCOUNT_IDReplace the following:
PROJECT_IDis the Project ID for the Cloud project for which you want to enable billing.BILLING_ACCOUNT_IDis the billing account ID to link with the Google Cloud project.
Enable the Vertex AI API
Google Cloud console
In the Google Cloud console, enable the Vertex AI, and Cloud Resource Manager APIs.
Confirm that you're enabling the Vertex AI API in the correct Cloud project, then click Next.
Confirm that you're enabling the correct API, then click Enable.
gcloud CLI
If necessary, set the current Cloud project to the one you created with the
gcloud config set projectcommand:gcloud config set project PROJECT_IDReplace PROJECT_ID with the Project ID of the Cloud project you created.
Enable the Vertex AI API with the
gcloud services enablecommand:gcloud services enable aiplatform.googleapis.com
Create a service account in Google Cloud console
Create a new service account with the role Vertex AI User by following
these steps:
Google Cloud console
- In the Google Cloud console, go to Menu > IAM & Admin > Service Accounts.
- Click Create service account.
- Fill in the service account details, then click Create and continue.
- Optional: Assign roles to your service account to grant access to your Google Cloud project's resources. For more details, refer to Granting, changing, and revoking access to resources.
- Click Continue.
- Optional: Enter users or groups that can manage and perform actions with this service account. For more details, refer to Managing service account impersonation.
- Click Done. Make a note of the email address for the service account.
gcloud CLI
- Create the service account:
gcloud iam service-accounts createSERVICE_ACCOUNT_NAME\ --display-name="SERVICE_ACCOUNT_NAME" - Optional: Assign roles to your service account to grant access to your Google Cloud project's resources. For more details, refer to Granting, changing, and revoking access to resources.
The service account appears on the service account page. Next, create a private key for the service account.
Create a private key
To create and download a private key for the service account, follow these steps:
- In the Google Cloud console, go to Menu > IAM & Admin > Service Accounts.
- Select your service account.
- Click Keys > Add key > Create new key.
- Select JSON, then click Create.
Your new public/private key pair is generated and downloaded to your machine as a new file. Save the downloaded JSON file as
credentials.jsonin your working directory. This file is the only copy of this key. For information about how to store your key securely, see Managing service account keys. - Click Close.
For more information about service accounts, see service accounts in the Google Cloud IAM documentation.
Deploy the LLM Auditor ADK AI Agent
If not done already, authenticate with your Google Cloud account and configure Google Cloud CLI to use your Google Cloud project.
gcloud auth application-default logingcloud config set project PROJECT_IDgcloud auth application-default set-quota-project PROJECT_IDReplace PROJECT_ID with the ID of the Cloud project you created.
Download this GitHub repository:
In your preferred local development environment, extract the downloaded archive file and open the
adk-samples/python/agents/llm-auditordirectory.unzip adk-samples-main.zipcd adk-samples-main/python/agents/llm-auditorCreate a new Cloud Storage bucket dedicated to the ADK agent.
gcloud storage buckets create gs://CLOUD_STORAGE_BUCKET_NAME --project=PROJECT_ID --location=PROJECT_LOCATIONReplace the following:
- CLOUD_STORAGE_BUCKET_NAME with a unique bucket name you want to use.
- PROJECT_ID with the ID of the Cloud project you created.
- PROJECT_LOCATION with the location of the Cloud project you created.
Set the following environment variables:
export GOOGLE_GENAI_USE_VERTEXAI=trueexport GOOGLE_CLOUD_PROJECT=PROJECT_IDexport GOOGLE_CLOUD_LOCATION=PROJECT_LOCATIONexport GOOGLE_CLOUD_STORAGE_BUCKET=CLOUD_STORAGE_BUCKET_NAMEReplace the following:
- CLOUD_STORAGE_BUCKET_NAME with the name of the bucket you created.
- PROJECT_ID with the ID of the Cloud project you created.
- PROJECT_LOCATION with the location of the Cloud project you created.
Install and deploy ADK agent from virtual environment.
python3 -m venv myenvsource myenv/bin/activatepoetry install --with deploymentpython3 deployment/deploy.py --createRetrieve the agent ID, you'll need it later to configure the custom function.
python3 deployment/deploy.py --list
Review the sample code
Optionally, before creating the new spreadsheet, take a moment to review and familiarize yourself with the sample code hosted on GitHub.
Create and configure in a new spreadsheet
To make a complete copy of the sample Sheets spreadsheet including its container-bound Apps Script project, click the following button:
In the newly created spreadsheet, go to Extensions > Apps Script.
In the Apps Script project, go to Project Settings, click Edit script properties, then click Add script property to add the following script properties:
LOCATIONwith the location of the Google Cloud project created in previous steps such asus-central1.GEMINI_MODEL_IDwith the Gemini model you want to use such asgemini-2.5-flash-lite.REASONING_ENGINE_IDwith the ID of the LLM Auditor ADK Agent deployed in previous steps such as1234567890.SERVICE_ACCOUNT_KEYwith the JSON key from the service account downloaded in previous steps such as{ ... }.
Click Save script properties
Test the custom function
- Go to the newly created spreadsheet.
- Change statements in column A.
- Formulas in column B execute and then display fact-check results.
Clean up
To avoid incurring charges to your Google Cloud account for the resources used in this tutorial, we recommend that you delete the Cloud project.
- In the Google Cloud console, go to the Manage resources page. Click Menu > IAM & Admin > Manage Resources.
- In the project list, select the project you want to delete and then click Delete .
- In the dialog, type the project ID and then click Shut down to delete the project.
Next steps
- Plan travels with an AI agent accessible across Google Workspace
- Build Gemini Enterprise agents that are tightly integrated with Workspace data stores, APIs, and add ons
- Build Vertex AI agents that are tightly integrated with Workspace data stores, APIs, and add ons
- Custom functions in Sheets
- Extending Sheets