Google Chat API を使用してメッセージを送信する

このガイドでは、 create() メソッドを Google Chat API の Message リソースで使用すると、次のことができます。

  • テキスト、カード、インタラクティブなウィジェットを含むメッセージを送信します。
  • 特定の Chat ユーザーに非公開でメッセージを送信する。
  • メッセージ スレッドを開始するか、スレッドに返信します。
  • 他の Chat API リクエストで指定できるように、メッセージに名前を付けます。

<ph type="x-smartling-placeholder">

メッセージの最大サイズ(テキストやカードを含む)は 32,000 バイトです。このサイズを超えるメッセージを送信するには、Chat アプリが複数のメッセージを送信する必要があります。

Chat API を呼び出してメッセージを作成するだけでなく、 Chat アプリは、ユーザーに返信するメッセージを作成して送信できる ユーザーがスペースに追加した後にウェルカム メッセージを投稿するなど、 スペースに移動します。インタラクションに応答する際、Chat アプリは、インタラクティブなダイアログやリンク プレビュー インターフェースなど、他のタイプのメッセージ機能を使用できます。ユーザーに返信するには、 Chat アプリはメッセージを同期的に返し、メッセージが送られることなく 呼び出すことができます。メッセージの送信によるインタラクションへの対応については、Google Chat アプリでインタラクションを受け取って応答するをご覧ください。

Chat API で作成されたメッセージの表示とアトリビューションの仕組み

create() メソッドは、次のコマンドを使用して呼び出すことができます。 アプリの認証 ユーザー認証があります。 Chat によってメッセージ送信者のアトリビューションが異なる 何を使用するかを選択できます

Chat アプリとして認証すると、Chat アプリがメッセージを送信します。

アプリ認証を使用して create() メソッドを呼び出す。
図 1: アプリ認証を使用すると、Chat アプリがメッセージを送信します。送信者が人間ではないことを示すため、Chat では名前の横に App が表示されます。

ユーザーとして認証すると、Chat アプリがユーザーに代わってメッセージを送信します。また、Chat アプリの名前を表示して、メッセージに Chat アプリを関連付けます。

<ph type="x-smartling-placeholder">
</ph> ユーザー認証を使用して create() メソッドを呼び出す。
図 2: ユーザー認証により、ユーザーがメッセージを送信すると、Chat に ユーザーの名前の横にある Chat 用アプリ名。

認証タイプによって、メッセージに含めることができるメッセージ機能とインターフェースも決まります。アプリ認証では Chat アプリは、リッチテキスト、 カードベースのインターフェース、 インタラクティブなウィジェットです Chat ユーザーはメッセージにテキストのみを送信できるため、ユーザー認証を使用してメッセージを作成する場合にのみテキストを含めることができます。Chat API で利用可能なメッセージ機能の詳細については、Google Chat メッセージの概要をご覧ください。

このガイドでは、どちらの認証タイプを使用して Chat API でメッセージを送信するかについて説明します。

前提条件

Node.js

Python

Java

Apps Script

<ph type="x-smartling-placeholder">

Chat アプリとしてメッセージを送信する

このセクションでは、アプリ認証を使用して、テキスト、カード、インタラクティブなアクセサリ ウィジェットを含むメッセージを送信する方法について説明します。

アプリ認証で送信されたメッセージ
図 4. Chat アプリが、テキスト、カード、アクセサリ ボタンを含むメッセージを送信します。

CreateMessage() を呼び出すには: 使用する場合は、API 呼び出しで次のフィールドを指定する必要があります。 request:

  • chat.bot 認可スコープ
  • メッセージを投稿する Space リソース。Chat アプリがスペースのメンバーである必要があります。
  • 作成する Message リソース。メッセージの内容を定義するには、 リッチテキスト (text), 1 つ以上のカード インターフェース (cardsV2), または両方を選択できます

必要に応じて、次の情報を含めることができます。

次のコードは、Chat アプリとして投稿されたメッセージ(テキスト、カード、メッセージの下部にあるクリック可能なボタンを含む)を Chat アプリが送信する方法の例を示しています。

Node.js

chat/client-libraries/cloud/create-message-app-cred.js
import {createClientWithAppCredentials} from './authentication-utils.js';

// This sample shows how to create message with app credential
async function main() {
  // Create a client
  const chatClient = createClientWithAppCredentials();

  // Initialize request argument(s)
  const request = {
    // Replace SPACE_NAME here.
    parent: 'spaces/SPACE_NAME',
    message: {
      text: '👋🌎 Hello world! I created this message by calling ' +
            'the Chat API\'s `messages.create()` method.',
      cardsV2 : [{ card: {
        header: {
          title: 'About this message',
          imageUrl: 'https://fonts.gstatic.com/s/i/short-term/release/googlesymbols/info/default/24px.svg'
        },
        sections: [{
          header: 'Contents',
          widgets: [{ textParagraph: {
              text: '🔡 <b>Text</b> which can include ' +
                    'hyperlinks 🔗, emojis 😄🎉, and @mentions 🗣️.'
            }}, { textParagraph: {
              text: '🖼️ A <b>card</b> to display visual elements' +
                    'and request information such as text 🔤, ' +
                    'dates and times 📅, and selections ☑️.'
            }}, { textParagraph: {
              text: '👉🔘 An <b>accessory widget</b> which adds ' +
                    'a button to the bottom of a message.'
            }}
          ]}, {
            header: "What's next",
            collapsible: true,
            widgets: [{ textParagraph: {
                text: "❤️ <a href='https://developers.google.com/workspace/chat/api/reference/rest/v1/spaces.messages.reactions/create'>Add a reaction</a>."
              }}, { textParagraph: {
                text: "🔄 <a href='https://developers.google.com/workspace/chat/api/reference/rest/v1/spaces.messages/patch'>Update</a> " +
                      "or ❌ <a href='https://developers.google.com/workspace/chat/api/reference/rest/v1/spaces.messages/delete'>delete</a> " +
                      "the message."
              }
            }]
          }
        ]
      }}],
      accessoryWidgets: [{ buttonList: { buttons: [{
        text: 'View documentation',
        icon: { materialIcon: { name: 'link' }},
        onClick: { openLink: {
          url: 'https://developers.google.com/workspace/chat/create-messages'
        }}
      }]}}]
    }
  };

  // Make the request
  const response = await chatClient.createMessage(request);

  // Handle the response
  console.log(response);
}

main().catch(console.error);

Python

chat/client-libraries/cloud/create_message_app_cred.py
from authentication_utils import create_client_with_app_credentials
from google.apps import chat_v1 as google_chat

# This sample shows how to create message with app credential
def create_message_with_app_cred():
    # Create a client
    client = create_client_with_app_credentials()

    # Initialize request argument(s)
    request = google_chat.CreateMessageRequest(
        # Replace SPACE_NAME here.
        parent = "spaces/SPACE_NAME",
        message = {
            "text": '👋🌎 Hello world! I created this message by calling ' +
                    'the Chat API\'s `messages.create()` method.',
            "cards_v2" : [{ "card": {
                "header": {
                    "title": 'About this message',
                    "image_url": 'https://fonts.gstatic.com/s/i/short-term/release/googlesymbols/info/default/24px.svg'
                },
                "sections": [{
                    "header": "Contents",
                    "widgets": [{ "text_paragraph": {
                            "text": '🔡 <b>Text</b> which can include ' +
                                    'hyperlinks 🔗, emojis 😄🎉, and @mentions 🗣️.'
                        }}, { "text_paragraph": {
                            "text": '🖼️ A <b>card</b> to display visual elements' +
                                    'and request information such as text 🔤, ' +
                                    'dates and times 📅, and selections ☑️.'
                        }}, { "text_paragraph": {
                            "text": '👉🔘 An <b>accessory widget</b> which adds ' +
                                    'a button to the bottom of a message.'
                        }}
                    ]}, {
                        "header": "What's next",
                        "collapsible": True,
                        "widgets": [{ "text_paragraph": {
                                "text": "❤️ <a href='https://developers.google.com/workspace/chat/api/reference/rest/v1/spaces.messages.reactions/create'>Add a reaction</a>."
                            }}, { "text_paragraph": {
                                "text": "🔄 <a href='https://developers.google.com/workspace/chat/api/reference/rest/v1/spaces.messages/patch'>Update</a> " +
                                        "or ❌ <a href='https://developers.google.com/workspace/chat/api/reference/rest/v1/spaces.messages/delete'>delete</a> " +
                                        "the message."
                            }
                        }]
                    }
                ]
            }}],
            "accessory_widgets": [{ "button_list": { "buttons": [{
                "text": 'View documentation',
                "icon": { "material_icon": { "name": 'link' }},
                "on_click": { "open_link": {
                    "url": 'https://developers.google.com/workspace/chat/create-messages'
                }}
            }]}}]
        }
    )

    # Make the request
    response = client.create_message(request)

    # Handle the response
    print(response)

create_message_with_app_cred()

Java

chat/client-libraries/cloud/src/main/java/com/google/workspace/api/chat/samples/CreateMessageAppCred.java
import com.google.apps.card.v1.Button;
import com.google.apps.card.v1.ButtonList;
import com.google.apps.card.v1.Card;
import com.google.apps.card.v1.Icon;
import com.google.apps.card.v1.MaterialIcon;
import com.google.apps.card.v1.OnClick;
import com.google.apps.card.v1.OpenLink;
import com.google.apps.card.v1.TextParagraph;
import com.google.apps.card.v1.Widget;
import com.google.apps.card.v1.Card.CardHeader;
import com.google.apps.card.v1.Card.Section;
import com.google.chat.v1.AccessoryWidget;
import com.google.chat.v1.CardWithId;
import com.google.chat.v1.ChatServiceClient;
import com.google.chat.v1.CreateMessageRequest;
import com.google.chat.v1.Message;

// This sample shows how to create message with app credential.
public class CreateMessageAppCred {

  public static void main(String[] args) throws Exception {
    try (ChatServiceClient chatServiceClient =
        AuthenticationUtils.createClientWithAppCredentials()) {
      CreateMessageRequest.Builder request = CreateMessageRequest.newBuilder()
        // Replace SPACE_NAME here.
        .setParent("spaces/SPACE_NAME")
        .setMessage(Message.newBuilder()
          .setText( "👋🌎 Hello world! I created this message by calling " +
                    "the Chat API\'s `messages.create()` method.")
          .addCardsV2(CardWithId.newBuilder().setCard(Card.newBuilder()
            .setHeader(CardHeader.newBuilder()
              .setTitle("About this message")
              .setImageUrl("https://fonts.gstatic.com/s/i/short-term/release/googlesymbols/info/default/24px.svg"))
            .addSections(Section.newBuilder()
              .setHeader("Contents")
              .addWidgets(Widget.newBuilder().setTextParagraph(TextParagraph.newBuilder().setText(
                "🔡 <b>Text</b> which can include " +
                "hyperlinks 🔗, emojis 😄🎉, and @mentions 🗣️.")))
              .addWidgets(Widget.newBuilder().setTextParagraph(TextParagraph.newBuilder().setText(
                "🖼️ A <b>card</b> to display visual elements " +
                "and request information such as text 🔤, " +
                "dates and times 📅, and selections ☑️.")))
              .addWidgets(Widget.newBuilder().setTextParagraph(TextParagraph.newBuilder().setText(
                "👉🔘 An <b>accessory widget</b> which adds " +
                "a button to the bottom of a message."))))
            .addSections(Section.newBuilder()
              .setHeader("What's next")
              .setCollapsible(true)
              .addWidgets(Widget.newBuilder().setTextParagraph(TextParagraph.newBuilder().setText(
                "❤️ <a href='https://developers.google.com/workspace/chat/api/reference/rest/v1/spaces.messages.reactions/create'>Add a reaction</a>.")))
              .addWidgets(Widget.newBuilder().setTextParagraph(TextParagraph.newBuilder().setText(
                "🔄 <a href='https://developers.google.com/workspace/chat/api/reference/rest/v1/spaces.messages/patch'>Update</a> " +
                "or ❌ <a href='https://developers.google.com/workspace/chat/api/reference/rest/v1/spaces.messages/delete'>delete</a> " +
                "the message."))))))
          .addAccessoryWidgets(AccessoryWidget.newBuilder()
            .setButtonList(ButtonList.newBuilder()
              .addButtons(Button.newBuilder()
                .setText("View documentation")
                .setIcon(Icon.newBuilder()
                  .setMaterialIcon(MaterialIcon.newBuilder().setName("link")))
                .setOnClick(OnClick.newBuilder()
                  .setOpenLink(OpenLink.newBuilder()
                    .setUrl("https://developers.google.com/workspace/chat/create-messages")))))));
      Message response = chatServiceClient.createMessage(request.build());

      System.out.println(JsonFormat.printer().print(response));
    }
  }
}

Apps Script

chat/advanced-service/Main.gs
/**
 * This sample shows how to create message with app credential
 * 
 * It relies on the OAuth2 scope 'https://www.googleapis.com/auth/chat.bot'
 * used by service accounts.
 */
function createMessageAppCred() {
  // Initialize request argument(s)
  // TODO(developer): Replace SPACE_NAME here.
  const parent = 'spaces/SPACE_NAME';
  const message = {
    text: '👋🌎 Hello world! I created this message by calling ' +
          'the Chat API\'s `messages.create()` method.',
    cardsV2 : [{ card: {
      header: {
        title: 'About this message',
        imageUrl: 'https://fonts.gstatic.com/s/i/short-term/release/googlesymbols/info/default/24px.svg'
      },
      sections: [{
        header: 'Contents',
        widgets: [{ textParagraph: {
            text: '🔡 <b>Text</b> which can include ' +
                  'hyperlinks 🔗, emojis 😄🎉, and @mentions 🗣️.'
          }}, { textParagraph: {
            text: '🖼️ A <b>card</b> to display visual elements' +
                  'and request information such as text 🔤, ' +
                  'dates and times 📅, and selections ☑️.'
          }}, { textParagraph: {
            text: '👉🔘 An <b>accessory widget</b> which adds ' +
                  'a button to the bottom of a message.'
          }}
        ]}, {
          header: "What's next",
          collapsible: true,
          widgets: [{ textParagraph: {
              text: "❤️ <a href='https://developers.google.com/workspace/chat/api/reference/rest/v1/spaces.messages.reactions/create'>Add a reaction</a>."
            }}, { textParagraph: {
              text: "🔄 <a href='https://developers.google.com/workspace/chat/api/reference/rest/v1/spaces.messages/patch'>Update</a> " +
                    "or ❌ <a href='https://developers.google.com/workspace/chat/api/reference/rest/v1/spaces.messages/delete'>delete</a> " +
                    "the message."
            }
          }]
        }
      ]
    }}],
    accessoryWidgets: [{ buttonList: { buttons: [{
      text: 'View documentation',
      icon: { materialIcon: { name: 'link' }},
      onClick: { openLink: {
        url: 'https://developers.google.com/workspace/chat/create-messages'
      }}
    }]}}]
  };
  const parameters = {};

  // Make the request
  const response = Chat.Spaces.Messages.create(
    message, parent, parameters, getHeaderWithAppCredentials()
  );

  // Handle the response
  console.log(response);
}

このサンプルを実行するには、SPACE_NAME をスペースの name フィールドの ID に置き換えます。ID を取得するには、このメソッドを呼び出して、 ListSpaces() スペースの URL から取得できます。

メッセージの下部にインタラクティブなウィジェットを追加する

このガイドの最初のコードサンプルでは、 Chat 用アプリのメッセージでは、画面上部にクリック可能なボタンが表示され、 これはアクセサリ ウィジェットと呼ばれます。アクセサリ ウィジェットは、メッセージ内のテキストまたはカードの後に表示されます。これらのウィジェットを使用して ユーザーがさまざまな方法でメッセージを操作できます。

  • メッセージの正確性または満足度を評価してください。
  • メッセージ アプリまたは Chat アプリに関する問題を報告する。
  • ドキュメントなどの関連コンテンツへのリンクを開く。
  • チャットアプリから類似のメッセージを特定の期間閉じるか、スヌーズする。

アクセサリ ウィジェットを追加するには、 accessoryWidgets[] フィールドをフィールドに追加して、リクエストするウィジェットを 1 つ以上 追加できます

次の画像は、アクセサリ ウィジェットをテキスト メッセージに追加して、ユーザーが Chat アプリの使用感を評価できるようにした Chat アプリを示しています。

<ph type="x-smartling-placeholder">
</ph> アクセサリ ウィジェット。
図 5: ウィジェットを追加しています。

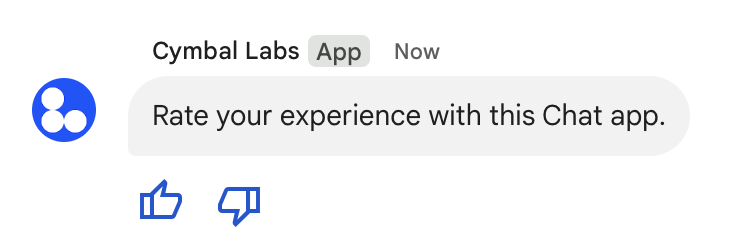
次の例は、2 つのアクセサリ ボタンを含むテキスト メッセージを作成するリクエストの本文を示しています。ユーザーがボタンをクリックすると、対応する関数(doUpvote など)が操作を処理します。

{
  text: "Rate your experience with this Chat app.",
  accessoryWidgets: [{ buttonList: { buttons: [{
    icon: { material_icon: {
      name: "thumb_up"
    }},
    color: { red: 0, blue: 255, green: 0 },
    onClick: { action: {
      function: "doUpvote"
    }}
  }, {
    icon: { material_icon: {
      name: "thumb_down"
    }},
    color: { red: 0, blue: 255, green: 0 },
    onClick: { action: {
      function: "doDownvote"
    }}
  }]}}]
}

メッセージを非公開で送信する

Chat アプリは非公開でメッセージを送信できるため、 メッセージはスペース内の特定のユーザーのみに表示されます。チャットアプリが非公開メッセージを送信すると、そのメッセージには、そのメッセージが自分だけに表示されることを伝えるラベルが表示されます。

Chat API を使用してメッセージを非公開で送信するには、 privateMessageViewer 必ず指定してください。ユーザーを指定するには、値を User ユーザーを表すリソースです。次の例に示すように、User リソースの name フィールドを使用することもできます。

{
  text: "Hello private world!",
  privateMessageViewer: {
    name: "users/USER_ID"
  }
}

このサンプルを使用するには、USER_ID をユーザーの一意の ID(12345678987654321hao@cymbalgroup.com など)に置き換えます。ユーザーの指定の詳細については、Google Chat ユーザーを特定して指定するをご覧ください。

メッセージを非公開で送信するには、リクエストで次の項目を省略する必要があります。

ユーザーの代わりにテキスト メッセージを送信する

このセクションでは、ユーザー認証を使用してユーザーに代わってメッセージを送信する方法について説明します。ユーザー認証を使用すると、メッセージのコンテンツにテキストしか メッセージ機能は、Google Chat でのみ利用できる カード インターフェースやインタラクティブなウィジェットなどのチャットアプリ。

ユーザー認証で送信されたメッセージ
図 3. Chat アプリは、Google Chat で 使用できます。

ユーザー認証を使用して CreateMessage() メソッドを呼び出すには、リクエストで次のフィールドを指定する必要があります。

  • 認可スコープ サポートしています。次のサンプルでは、chat.messages.create スコープを使用します。
  • メッセージを投稿する Space リソース。認証されたユーザーは、スペースのメンバーである必要があります。
  • 作成する Message リソース。メッセージの内容を定義するには、text フィールドを含める必要があります。

必要に応じて、次の情報を含めることができます。

次のコードは、Chat 用アプリが は、認証されたユーザーの代わりに、特定のスペースでテキスト メッセージを送信できます。

Node.js

chat/client-libraries/cloud/create-message-user-cred.js
import {createClientWithUserCredentials} from './authentication-utils.js';

const USER_AUTH_OAUTH_SCOPES = ['https://www.googleapis.com/auth/chat.messages.create'];

// This sample shows how to create message with user credential
async function main() {
  // Create a client
  const chatClient = await createClientWithUserCredentials(USER_AUTH_OAUTH_SCOPES);

  // Initialize request argument(s)
  const request = {
    // Replace SPACE_NAME here.
    parent: 'spaces/SPACE_NAME',
    message: {
      text: '👋🌎 Hello world!' +
            'Text messages can contain things like:\n\n' +
            '* Hyperlinks 🔗\n' +
            '* Emojis 😄🎉\n' +
            '* Mentions of other Chat users `@` \n\n' +
            'For details, see the ' +
            '<https://developers.google.com/workspace/chat/format-messages' +
            '|Chat API developer documentation>.'
    }
  };

  // Make the request
  const response = await chatClient.createMessage(request);

  // Handle the response
  console.log(response);
}

main().catch(console.error);

Python

chat/client-libraries/cloud/create_message_user_cred.py
from authentication_utils import create_client_with_user_credentials
from google.apps import chat_v1 as google_chat

SCOPES = ["https://www.googleapis.com/auth/chat.messages.create"]

def create_message_with_user_cred():
    # Create a client
    client = create_client_with_user_credentials(SCOPES)

    # Initialize request argument(s)
    request = google_chat.CreateMessageRequest(
        # Replace SPACE_NAME here.
        parent = "spaces/SPACE_NAME",
        message = {
            "text": '👋🌎 Hello world!' +
                    'Text messages can contain things like:\n\n' +
                    '* Hyperlinks 🔗\n' +
                    '* Emojis 😄🎉\n' +
                    '* Mentions of other Chat users `@` \n\n' +
                    'For details, see the ' +
                    '<https://developers.google.com/workspace/chat/format-messages' +
                    '|Chat API developer documentation>.'
        }
    )

    # Make the request
    response = client.create_message(request)

    # Handle the response
    print(response)

create_message_with_user_cred()

Java

chat/client-libraries/cloud/src/main/java/com/google/workspace/api/chat/samples/CreateMessageUserCred.java
import com.google.chat.v1.ChatServiceClient;
import com.google.chat.v1.CreateMessageRequest;
import com.google.chat.v1.Message;

// This sample shows how to create message with user credential.
public class CreateMessageUserCred {

  private static final String SCOPE =
    "https://www.googleapis.com/auth/chat.messages.create";

  public static void main(String[] args) throws Exception {
    try (ChatServiceClient chatServiceClient =
        AuthenticationUtils.createClientWithUserCredentials(
          ImmutableList.of(SCOPE))) {
      CreateMessageRequest.Builder request = CreateMessageRequest.newBuilder()
        // Replace SPACE_NAME here.
        .setParent("spaces/SPACE_NAME")
        .setMessage(Message.newBuilder()
          .setText( "👋🌎 Hello world!" +
                    "Text messages can contain things like:\n\n" +
                    "* Hyperlinks 🔗\n" +
                    "* Emojis 😄🎉\n" +
                    "* Mentions of other Chat users `@` \n\n" +
                    "For details, see the " +
                    "<https://developers.google.com/workspace/chat/format-messages" +
                    "|Chat API developer documentation>."));
      Message response = chatServiceClient.createMessage(request.build());

      System.out.println(JsonFormat.printer().print(response));
    }
  }
}

Apps Script

chat/advanced-service/Main.gs
/**
 * This sample shows how to create message with user credential
 * 
 * It relies on the OAuth2 scope 'https://www.googleapis.com/auth/chat.messages.create'
 * referenced in the manifest file (appsscript.json).
 */
function createMessageUserCred() {
  // Initialize request argument(s)
  // TODO(developer): Replace SPACE_NAME here.
  const parent = 'spaces/SPACE_NAME';
  const message = {
    text: '👋🌎 Hello world!' +
          'Text messages can contain things like:\n\n' +
          '* Hyperlinks 🔗\n' +
          '* Emojis 😄🎉\n' +
          '* Mentions of other Chat users `@` \n\n' +
          'For details, see the ' +
          '<https://developers.google.com/workspace/chat/format-messages' +
          '|Chat API developer documentation>.'
  };

  // Make the request
  const response = Chat.Spaces.Messages.create(message, parent);

  // Handle the response
  console.log(response);
}

このサンプルを実行するには、SPACE_NAME を スペースの name 表示されます。ID を取得するには、このメソッドを呼び出して、 ListSpaces() スペースの URL から取得できます。

スレッドを開始または返信する

スレッドを使用するスペースの場合: 新しいメッセージがスレッドを開始するか、新しいメッセージが 削除することもできます。

デフォルトでは、Chat API を使用して作成したメッセージからは、 使用します。スレッドを特定して後で返信できるように、リクエストでスレッドキーを指定できます。

  • リクエストの本文で thread.threadKey フィールドを指定します。
  • クエリ パラメータ messageReplyOption を指定して、キーがすでに存在する場合の動作を決定します。

既存のスレッドに返信するメッセージを作成するには:

  • リクエストの本文に、thread フィールドを含めます。設定すると、 「 threadKey 作成します。それ以外の場合は、スレッドの name を使用する必要があります。
  • クエリ パラメータ messageReplyOption を指定します。

次のコードは、チャットアプリが認証済みユーザーに代わって、特定のスペースのキーで識別される特定のスレッドを開始または返信するテキスト メッセージを送信する方法の例を示しています。

Node.js

chat/client-libraries/cloud/create-message-user-cred-thread-key.js
import {createClientWithUserCredentials} from './authentication-utils.js';
const {MessageReplyOption} = require('@google-apps/chat').protos.google.chat.v1.CreateMessageRequest;

const USER_AUTH_OAUTH_SCOPES = ['https://www.googleapis.com/auth/chat.messages.create'];

// This sample shows how to create message with user credential with thread key
async function main() {
  // Create a client
  const chatClient = await createClientWithUserCredentials(USER_AUTH_OAUTH_SCOPES);

  // Initialize request argument(s)
  const request = {
    // Replace SPACE_NAME here.
    parent: 'spaces/SPACE_NAME',
    // Creates the message as a reply to the thread specified by thread_key
    // If it fails, the message starts a new thread instead
    messageReplyOption: MessageReplyOption.REPLY_MESSAGE_FALLBACK_TO_NEW_THREAD,
    message: {
      text: 'Hello with user credential!',
      thread: {
        // Thread key specifies a thread and is unique to the chat app
        // that sets it
        threadKey: 'THREAD_KEY'
      }
    }
  };

  // Make the request
  const response = await chatClient.createMessage(request);

  // Handle the response
  console.log(response);
}

main().catch(console.error);

Python

chat/client-libraries/cloud/create_message_user_cred_thread_key.py
from authentication_utils import create_client_with_user_credentials
from google.apps import chat_v1 as google_chat

import google.apps.chat_v1.CreateMessageRequest.MessageReplyOption

SCOPES = ["https://www.googleapis.com/auth/chat.messages.create"]

# This sample shows how to create message with user credential with thread key
def create_message_with_user_cred_thread_key():
    # Create a client
    client = create_client_with_user_credentials(SCOPES)

    # Initialize request argument(s)
    request = google_chat.CreateMessageRequest(
        # Replace SPACE_NAME here
        parent = "spaces/SPACE_NAME",
        # Creates the message as a reply to the thread specified by thread_key.
        # If it fails, the message starts a new thread instead.
        message_reply_option = MessageReplyOption.REPLY_MESSAGE_FALLBACK_TO_NEW_THREAD,
        message = {
            "text": "Hello with user credential!",
            "thread": {
                # Thread key specifies a thread and is unique to the chat app
                # that sets it.
                "thread_key": "THREAD_KEY"
            }
        }
    )

    # Make the request
    response = client.create_message(request)

    # Handle the response
    print(response)

create_message_with_user_cred_thread_key()

Java

chat/client-libraries/cloud/src/main/java/com/google/workspace/api/chat/samples/CreateMessageUserCredThreadKey.java
import com.google.chat.v1.ChatServiceClient;
import com.google.chat.v1.CreateMessageRequest;
import com.google.chat.v1.CreateMessageRequest.MessageReplyOption;
import com.google.chat.v1.Message;
import com.google.chat.v1.Thread;

// This sample shows how to create message with a thread key with user
// credential.
public class CreateMessageUserCredThreadKey {

  private static final String SCOPE =
    "https://www.googleapis.com/auth/chat.messages.create";

  public static void main(String[] args) throws Exception {
    try (ChatServiceClient chatServiceClient =
        AuthenticationUtils.createClientWithUserCredentials(
          ImmutableList.of(SCOPE))) {
      CreateMessageRequest.Builder request = CreateMessageRequest.newBuilder()
        // Replace SPACE_NAME here.
        .setParent("spaces/SPACE_NAME")
        // Creates the message as a reply to the thread specified by thread_key.
        // If it fails, the message starts a new thread instead.
        .setMessageReplyOption(
          MessageReplyOption.REPLY_MESSAGE_FALLBACK_TO_NEW_THREAD)
        .setMessage(Message.newBuilder()
          .setText("Hello with user credentials!")
          // Thread key specifies a thread and is unique to the chat app
          // that sets it.
          .setThread(Thread.newBuilder().setThreadKey("THREAD_KEY")));
      Message response = chatServiceClient.createMessage(request.build());

      System.out.println(JsonFormat.printer().print(response));
    }
  }
}

Apps Script

chat/advanced-service/Main.gs
/**
 * This sample shows how to create message with user credential with thread key
 * 
 * It relies on the OAuth2 scope 'https://www.googleapis.com/auth/chat.messages.create'
 * referenced in the manifest file (appsscript.json).
 */
function createMessageUserCredThreadKey() {
  // Initialize request argument(s)
  // TODO(developer): Replace SPACE_NAME here.
  const parent = 'spaces/SPACE_NAME';
  // Creates the message as a reply to the thread specified by thread_key
  // If it fails, the message starts a new thread instead
  const messageReplyOption = 'REPLY_MESSAGE_FALLBACK_TO_NEW_THREAD';
  const message = {
    text: 'Hello with user credential!',
    thread: {
      // Thread key specifies a thread and is unique to the chat app
      // that sets it
      threadKey: 'THREAD_KEY'
    }
  };

  // Make the request
  const response = Chat.Spaces.Messages.create(message, parent, {
    messageReplyOption: messageReplyOption
  });

  // Handle the response
  console.log(response);
}

このサンプルを実行するには、次のように置き換えます。

  • THREAD_KEY: スペース内の既存のスレッドキー。または、新しいスレッドを作成する場合は、スレッドの一意の名前。
  • SPACE_NAME: スペースの ID name 表示されます。ID を取得するには、このメソッドを呼び出して、 ListSpaces() スペースの URL から取得できます。

メッセージに名前を付ける

今後の API 呼び出しでメッセージを取得または指定するには、メッセージに リクエストの messageId フィールドを設定します。 メッセージに名前を付けることで、 メッセージのリソース名から自動的に割り当てられた ID( name フィールド)。

たとえば、get() メソッドを使用してメッセージを取得するには、 して、取得するメッセージを指定します。リソース名の形式は spaces/{space}/messages/{message} です。ここで、{message} は、システムが割り当てた ID またはメッセージを作成したときに設定したカスタム名を表します。

メッセージに名前を付けるには、カスタム ID を messageId 指定する必要があります。messageId フィールドは、次の値を設定します。 clientAssignedMessageId Message リソースのフィールド。

メッセージに名前を付けることができるのは、メッセージの作成時のみです。名前やメールアドレスを 既存のメッセージのカスタム ID を変更できます。カスタム ID は次の要件を満たしている必要があります。

  • client- で始まります。たとえば、client-custom-name は有効なカスタム ID と一致しますが、custom-name は一致しません。
  • 63 文字以下で、小文字、数字、ハイフンのみを使用できます。
  • スペース内で一意である。Chat アプリでは、 同じカスタム ID を使用する必要があります。

次のコードは、Chat 用アプリが スペースに代理で ID を含むテキスト メッセージを送信できます。 認証されたユーザー:

Node.js

chat/client-libraries/cloud/create-message-user-cred-message-id.js
import {createClientWithUserCredentials} from './authentication-utils.js';

const USER_AUTH_OAUTH_SCOPES = ['https://www.googleapis.com/auth/chat.messages.create'];

// This sample shows how to create message with user credential with message id
async function main() {
  // Create a client
  const chatClient = await createClientWithUserCredentials(USER_AUTH_OAUTH_SCOPES);

  // Initialize request argument(s)
  const request = {
    // Replace SPACE_NAME here.
    parent: 'spaces/SPACE_NAME',
    // Message id lets chat apps get, update or delete a message without needing
    // to store the system assigned ID in the message's resource name
    messageId: 'client-MESSAGE-ID',
    message: { text: 'Hello with user credential!' }
  };

  // Make the request
  const response = await chatClient.createMessage(request);

  // Handle the response
  console.log(response);
}

main().catch(console.error);

Python

chat/client-libraries/cloud/create_message_user_cred_message_id.py
from authentication_utils import create_client_with_user_credentials
from google.apps import chat_v1 as google_chat

SCOPES = ["https://www.googleapis.com/auth/chat.messages.create"]

# This sample shows how to create message with user credential with message id
def create_message_with_user_cred_message_id():
    # Create a client
    client = create_client_with_user_credentials(SCOPES)

    # Initialize request argument(s)
    request = google_chat.CreateMessageRequest(
        # Replace SPACE_NAME here
        parent = "spaces/SPACE_NAME",
        # Message id let chat apps get, update or delete a message without needing
        # to store the system assigned ID in the message's resource name.
        message_id = "client-MESSAGE-ID",
        message = {
            "text": "Hello with user credential!"
        }
    )

    # Make the request
    response = client.create_message(request)

    # Handle the response
    print(response)

create_message_with_user_cred_message_id()

Java

chat/client-libraries/cloud/src/main/java/com/google/workspace/api/chat/samples/CreateMessageUserCredMessageId.java
import com.google.chat.v1.ChatServiceClient;
import com.google.chat.v1.CreateMessageRequest;
import com.google.chat.v1.Message;

// This sample shows how to create message with message id specified with user
// credential.
public class CreateMessageUserCredMessageId {

  private static final String SCOPE =
    "https://www.googleapis.com/auth/chat.messages.create";

  public static void main(String[] args) throws Exception {
    try (ChatServiceClient chatServiceClient =
        AuthenticationUtils.createClientWithUserCredentials(
          ImmutableList.of(SCOPE))) {
      CreateMessageRequest.Builder request = CreateMessageRequest.newBuilder()
        // Replace SPACE_NAME here.
        .setParent("spaces/SPACE_NAME")
        .setMessage(Message.newBuilder()
          .setText("Hello with user credentials!"))
        // Message ID lets chat apps get, update or delete a message without
        // needing to store the system assigned ID in the message's resource
        // name.
        .setMessageId("client-MESSAGE-ID");
      Message response = chatServiceClient.createMessage(request.build());

      System.out.println(JsonFormat.printer().print(response));
    }
  }
}

Apps Script

chat/advanced-service/Main.gs
/**
 * This sample shows how to create message with user credential with message id
 * 
 * It relies on the OAuth2 scope 'https://www.googleapis.com/auth/chat.messages.create'
 * referenced in the manifest file (appsscript.json).
 */
function createMessageUserCredMessageId() {
  // Initialize request argument(s)
  // TODO(developer): Replace SPACE_NAME here.
  const parent = 'spaces/SPACE_NAME';
  // Message id lets chat apps get, update or delete a message without needing
  // to store the system assigned ID in the message's resource name
  const messageId = 'client-MESSAGE-ID';
  const message = { text: 'Hello with user credential!' };

  // Make the request
  const response = Chat.Spaces.Messages.create(message, parent, {
    messageId: messageId
  });

  // Handle the response
  console.log(response);
}

このサンプルを実行するには、次のように置き換えます。

  • SPACE_NAME: スペースの name フィールドの ID。ID を取得するには、このメソッドを呼び出して、 ListSpaces() スペースの URL から取得できます。
  • MESSAGE-ID: 先頭のメッセージの名前 custom- に置き換えます。指定したスペースで Chat アプリによって作成された他のメッセージ名とは一意である必要があります。

トラブルシューティング

Google Chat アプリまたはカードからエラーが返されると、Chat インターフェースに「エラーが発生しました」というメッセージが表示されます。または「リクエストを処理できません」というメッセージが表示されます。Chat UI にエラー メッセージが表示されない場合でも、Chat アプリまたはカードで予期しない結果が生成されることがあります(カード メッセージが表示されないなど)。

チャット UI にエラー メッセージが表示されない場合でも、チャットアプリのエラー ロギングがオンになっている場合は、エラーの修正に役立つ説明的なエラー メッセージとログデータが利用できます。エラーの表示、デバッグ、修正については、Google Chat エラーのトラブルシューティングと修正をご覧ください。