
หน้านี้อธิบายวิธีสร้างแอปแชท HTTP คุณสามารถใช้สถาปัตยกรรมนี้ได้หลายวิธี ใน Google Cloud คุณ สามารถใช้ Cloud Run และ App Engine ได้ ในการเริ่มต้นอย่างรวดเร็วนี้ คุณจะได้เขียนและทำให้ฟังก์ชัน Cloud Run พร้อมใช้งาน ซึ่งแอป Chat จะใช้เพื่อตอบกลับข้อความของผู้ใช้
สถาปัตยกรรมนี้ช่วยให้คุณกำหนดค่า Chat เพื่อผสานรวมกับ Google Cloud หรือเซิร์ฟเวอร์ในองค์กรโดยใช้ HTTP ได้ตามที่แสดงในไดอะแกรมต่อไปนี้

ในแผนภาพก่อนหน้านี้ ผู้ใช้ที่โต้ตอบกับแอป HTTP Chat จะมีขั้นตอนการไหลของข้อมูลดังนี้
- ผู้ใช้ส่งข้อความใน Chat ไปยัง แอป Chat ไม่ว่าจะในข้อความส่วนตัวหรือใน พื้นที่ทำงานใน Chat
- ระบบจะส่งคำขอ HTTP ไปยังเว็บเซิร์ฟเวอร์ซึ่งเป็นระบบคลาวด์หรือระบบในองค์กรที่มีตรรกะของแอป Chat
- ไม่บังคับ: ตรรกะของแอป Chat สามารถผสานรวมกับ บริการของ Google Workspace (เช่น ปฏิทินและ ชีต), บริการอื่นๆ ของ Google (เช่น Maps, YouTube และ Vertex AI) หรือบริการเว็บอื่นๆ (เช่น ระบบ การจัดการโปรเจ็กต์หรือเครื่องมือออกตั๋ว)
- เว็บเซิร์ฟเวอร์จะส่งการตอบกลับ HTTP กลับไปยัง บริการแอป Chat ใน Chat
- ระบบจะส่งคำตอบให้ผู้ใช้
- แอป Chat สามารถเรียกใช้ Chat API เพื่อโพสต์ข้อความแบบไม่พร้อมกันหรือดำเนินการอื่นๆ ได้
สถาปัตยกรรมนี้ช่วยให้คุณมีความยืดหยุ่นในการใช้ไลบรารีและคอมโพเนนต์ที่มีอยู่แล้วในระบบ เนื่องจากแอปแชทเหล่านี้สามารถออกแบบโดยใช้ภาษาโปรแกรมที่แตกต่างกันได้
วัตถุประสงค์
- ตั้งค่าสภาพแวดล้อม
- สร้างและทำให้ฟังก์ชัน Cloud Run ใช้งานได้
- เผยแพร่แอปไปยัง Chat
- ทดสอบแอป
ข้อกำหนดเบื้องต้น
- บัญชี Google Workspace สำหรับธุรกิจหรือองค์กร ที่มีสิทธิ์เข้าถึง Google Chat
- โปรเจ็กต์ Google Cloud ที่เปิดใช้การเรียกเก็บเงิน หากต้องการตรวจสอบว่าโปรเจ็กต์ที่มีอยู่เปิดใช้การเรียกเก็บเงินแล้วหรือไม่ โปรดดูยืนยันสถานะการเรียกเก็บเงินของโปรเจ็กต์ หากต้องการสร้างโปรเจ็กต์และตั้งค่าการเรียกเก็บเงิน โปรดดูสร้างโปรเจ็กต์ Google Cloud
ตั้งค่าสภาพแวดล้อม
ก่อนใช้ Google API คุณต้องเปิดใช้ API ในโปรเจ็กต์ Google Cloud คุณเปิด API อย่างน้อย 1 รายการในโปรเจ็กต์ Google Cloud เดียวได้ในคอนโซล Google Cloud ให้เปิดใช้ Google Chat API, Cloud Build API, Cloud Functions API, Cloud Pub/Sub API, Cloud Logging API, Artifact Registry API และ Cloud Run API
สร้างและทำให้ฟังก์ชัน Cloud Run ใช้งานได้
สร้างและทําให้ฟังก์ชัน Cloud Run ใช้งานได้ ซึ่งจะสร้างการ์ด Chat พร้อมชื่อที่แสดงและรูปโปรไฟล์ของผู้ส่ง เมื่อแอป Chat ได้รับข้อความ แอปจะเรียกใช้ฟังก์ชันและ ตอบกลับด้วยการ์ด
หากต้องการสร้างและติดตั้งใช้งานฟังก์ชันสำหรับแอป Chat ให้ทำตามขั้นตอนต่อไปนี้
Node.js
ในคอนโซล Google Cloud ให้ไปที่หน้า Cloud Run โดยทำดังนี้
ตรวจสอบว่าได้เลือกโปรเจ็กต์สำหรับแอป Chat แล้ว
คลิกเขียนฟังก์ชัน
ในหน้าสร้างบริการ ให้ตั้งค่าฟังก์ชันดังนี้
- ในช่องชื่อบริการ ให้ป้อน
quickstartchatapp - เลือกภูมิภาคในรายการภูมิภาค
- ในรายการรันไทม์ ให้เลือก Node.js เวอร์ชันล่าสุด
- ในส่วนการตรวจสอบสิทธิ์ ให้เลือกต้องมีการตรวจสอบสิทธิ์
- คลิกสร้าง แล้วรอให้ Cloud Run สร้างบริการ คอนโซลจะเปลี่ยนเส้นทางคุณไปยังแท็บแหล่งที่มา
- ในช่องชื่อบริการ ให้ป้อน
ในแท็บแหล่งที่มา ให้ทำดังนี้
- ในจุดแรกเข้า ให้ลบข้อความเริ่มต้นแล้วป้อน
avatarApp แทนที่เนื้อหาของ
index.jsด้วยโค้ดต่อไปนี้คลิกบันทึกและติดตั้งใช้งานอีกครั้ง
- ในจุดแรกเข้า ให้ลบข้อความเริ่มต้นแล้วป้อน
Python
ในคอนโซล Google Cloud ให้ไปที่หน้า Cloud Run โดยทำดังนี้
ตรวจสอบว่าได้เลือกโปรเจ็กต์สำหรับแอป Chat แล้ว
คลิกเขียนฟังก์ชัน
ในหน้าสร้างบริการ ให้ตั้งค่าฟังก์ชันดังนี้
- ในช่องชื่อบริการ ให้ป้อน
quickstartchatapp - เลือกภูมิภาคในรายการภูมิภาค
- ในรายการรันไทม์ ให้เลือก Python เวอร์ชันล่าสุด
- ในส่วนการตรวจสอบสิทธิ์ ให้เลือกต้องมีการตรวจสอบสิทธิ์
- คลิกสร้าง แล้วรอให้ Cloud Run สร้างบริการ คอนโซลจะเปลี่ยนเส้นทางคุณไปยังแท็บแหล่งที่มา
- ในช่องชื่อบริการ ให้ป้อน
ในแท็บแหล่งที่มา ให้ทำดังนี้
- ในจุดแรกเข้า ให้ลบข้อความเริ่มต้นแล้วป้อน
avatar_app แทนที่เนื้อหาของ
main.pyด้วยโค้ดต่อไปนี้คลิกบันทึกและติดตั้งใช้งานอีกครั้ง
- ในจุดแรกเข้า ให้ลบข้อความเริ่มต้นแล้วป้อน
Java
ในคอนโซล Google Cloud ให้ไปที่หน้า Cloud Run โดยทำดังนี้
ตรวจสอบว่าได้เลือกโปรเจ็กต์สำหรับแอป Chat แล้ว
คลิกเขียนฟังก์ชัน
ในหน้าสร้างบริการ ให้ตั้งค่าฟังก์ชันดังนี้
- ในช่องชื่อบริการ ให้ป้อน
quickstartchatapp - เลือกภูมิภาคในรายการภูมิภาค
- ในรายการรันไทม์ ให้เลือก Java เวอร์ชันล่าสุด
- ในส่วนการตรวจสอบสิทธิ์ ให้เลือกต้องมีการตรวจสอบสิทธิ์
- คลิกสร้าง แล้วรอให้ Cloud Run สร้างบริการ คอนโซลจะเปลี่ยนเส้นทางคุณไปยังแท็บแหล่งที่มา
- ในช่องชื่อบริการ ให้ป้อน
ในแท็บแหล่งที่มา ให้ทำดังนี้
- ในจุดแรกเข้า ให้ลบข้อความเริ่มต้นแล้วป้อน
App - เปลี่ยนชื่อ
src/main/java/com/example/Example.javaเป็นsrc/main/java/AvatarApp.java แทนที่เนื้อหาของ
AvatarApp.javaด้วยโค้ดต่อไปนี้แทนที่เนื้อหาของ
pom.xmlด้วยโค้ดต่อไปนี้คลิกบันทึกและติดตั้งใช้งานอีกครั้ง
- ในจุดแรกเข้า ให้ลบข้อความเริ่มต้นแล้วป้อน
ให้สิทธิ์ Google Chat ในการเรียกใช้ฟังก์ชัน
หากต้องการให้สิทธิ์ Google Chat เรียกใช้ฟังก์ชัน ให้เพิ่มบัญชีบริการ Google Chat ที่มีบทบาทผู้เรียกใช้ Cloud Run
ในคอนโซล Google Cloud ให้ไปที่หน้า Cloud Run โดยทำดังนี้
ในรายการบริการ Cloud Run ให้เลือกช่องทําเครื่องหมายข้างฟังก์ชันที่รับ (อย่าคลิกฟังก์ชันโดยตรง)
คลิกสิทธิ์ แผงสิทธิ์จะเปิดขึ้น
คลิกเพิ่มหลัก
ในผู้ใช้หลักรายใหม่ ให้ป้อน
chat@system.gserviceaccount.comในเลือกบทบาท ให้เลือก Cloud Run > Cloud Run Invoker
คลิกบันทึก
กำหนดค่าแอป Chat
หลังจากที่ติดตั้งใช้งานฟังก์ชัน Cloud Run แล้ว ให้ทำตามขั้นตอนต่อไปนี้เพื่อเปลี่ยนให้เป็นแอป Google Chat
ในคอนโซล Google Cloud ให้ไปที่หน้า Cloud Run โดยทำดังนี้
ตรวจสอบว่าได้เลือกโปรเจ็กต์ที่คุณเปิดใช้ Cloud Run แล้ว
ในรายการบริการ ให้คลิก quickstartchatapp
ในหน้ารายละเอียดบริการ ให้คัดลอก URL ของฟังก์ชัน
ค้นหา "Google Chat API" แล้วคลิก Google Chat API จากนั้นคลิกจัดการ
คลิกการกำหนดค่า แล้วตั้งค่าแอป Google Chat ดังนี้
- ล้างสร้างแอป Chat นี้เป็นส่วนเสริมของ Google Workspace กล่องโต้ตอบจะเปิดขึ้นเพื่อขอให้คุณยืนยัน คลิกปิดใช้ในกล่องโต้ตอบ
- ในส่วนชื่อแอป ให้ป้อน
Quickstart App - ใน URL ของรูปโปรไฟล์ ให้ป้อน
https://developers.google.com/chat/images/quickstart-app-avatar.png - ในคำอธิบาย ให้ป้อน
Quickstart app - ในส่วนฟังก์ชันการทำงาน ให้เลือกเข้าร่วมพื้นที่ทำงานและการสนทนากลุ่ม
- ในส่วนการตั้งค่าการเชื่อมต่อ ให้เลือก URL ของปลายทาง HTTP
- ในส่วนทริกเกอร์ ให้เลือกใช้ URL ปลายทาง HTTP ทั่วไปสำหรับทริกเกอร์ทั้งหมด แล้ววาง URL สำหรับทริกเกอร์ฟังก์ชัน Cloud Run ลงในช่อง
- ในส่วนระดับการเข้าถึง ให้เลือก ทำให้แอป Chat นี้พร้อมใช้งานสำหรับบุคคลและ กลุ่มที่เฉพาะเจาะจงในโดเมนของคุณ แล้วป้อนอีเมล
- ในส่วนบันทึก ให้เลือกบันทึกข้อผิดพลาดไปยังการบันทึก
คลิกบันทึก
แอป Chat พร้อมรับและตอบกลับ ข้อความใน Chat แล้ว
ทดสอบแอป Chat
หากต้องการทดสอบแอป Chat ให้เปิดพื้นที่ข้อความส่วนตัวด้วย แอป Chat แล้วส่งข้อความโดยทำดังนี้
เปิด Google Chat โดยใช้บัญชี Google Workspace ที่คุณ ระบุเมื่อเพิ่มตัวเองเป็นผู้ทดสอบที่เชื่อถือได้
- คลิก แชทใหม่
- ในช่องเพิ่มบุคคลอย่างน้อย 1 คน ให้พิมพ์ชื่อแอป Chat
เลือกแอป Chat จากผลการค้นหา ข้อความส่วนตัวจะเปิดขึ้น
- ในข้อความส่วนตัวใหม่กับแอป ให้พิมพ์
Helloแล้วกดenter
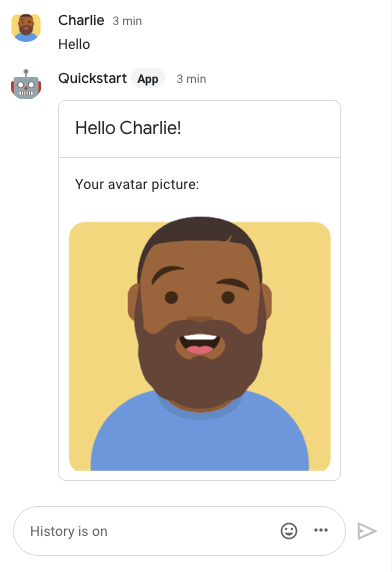
การตอบกลับของแอป Chat จะมีข้อความการ์ดที่แสดงชื่อและรูปโปรไฟล์ของผู้ส่ง ดังที่แสดงในรูปภาพต่อไปนี้
หากต้องการเพิ่มผู้ทดสอบที่เชื่อถือได้และดูข้อมูลเพิ่มเติมเกี่ยวกับการทดสอบฟีเจอร์แบบอินเทอร์แอกทีฟ โปรดดูทดสอบฟีเจอร์แบบอินเทอร์แอกทีฟสำหรับ แอป Google Chat
แก้ปัญหา
เมื่อแอป Google Chat หรือการ์ดแสดงข้อผิดพลาด อินเทอร์เฟซของ Chat จะแสดงข้อความว่า "เกิดข้อผิดพลาด" หรือ "ดำเนินการตามคำขอของคุณไม่ได้" บางครั้ง UI ของ Chat จะไม่แสดงข้อความแสดงข้อผิดพลาดใดๆ แต่แอปหรือการ์ด Chat จะแสดงผลลัพธ์ที่ไม่คาดคิด เช่น ข้อความในการ์ดอาจไม่ปรากฏ
แม้ว่าข้อความแสดงข้อผิดพลาดอาจไม่แสดงใน UI ของ Chat แต่ข้อความแสดงข้อผิดพลาดและข้อมูลบันทึกที่อธิบายไว้จะช่วยคุณแก้ไขข้อผิดพลาดได้เมื่อเปิดการบันทึกข้อผิดพลาดสำหรับแอป Chat หากต้องการความช่วยเหลือในการดู การแก้ไขข้อบกพร่อง และการแก้ไขข้อผิดพลาด โปรดดู แก้ปัญหาและแก้ไขข้อผิดพลาดของ Google Chat
ล้างข้อมูล
เราขอแนะนำให้คุณลบโปรเจ็กต์ Cloud เพื่อหลีกเลี่ยงการเรียกเก็บเงินจากบัญชี Google Cloud สำหรับทรัพยากรที่ใช้ในบทแนะนำนี้
- ใน Google Cloud Console ให้ไปที่หน้าจัดการทรัพยากร คลิก เมนู > IAM และผู้ดูแลระบบ > จัดการทรัพยากร
- ในรายการโปรเจ็กต์ ให้เลือกโปรเจ็กต์ที่ต้องการลบ แล้วคลิก ลบ
- ในกล่องโต้ตอบ ให้พิมพ์รหัสโปรเจ็กต์ แล้วคลิกปิดเพื่อลบ โปรเจ็กต์
หัวข้อที่เกี่ยวข้อง
หากต้องการเพิ่มฟีเจอร์อื่นๆ ลงในแอป Chat โปรดดู ข้อมูลต่อไปนี้