Các thẻ trực tiếp xuất hiện trong phần hiện tại của dòng thời gian và hiển thị thông tin có liên quan tại thời điểm hiện tại.
Thẻ trực tiếp rất phù hợp khi người dùng đang tích cực thực hiện một công việc, nhưng muốn kiểm tra Glass định kỳ để biết thêm thông tin. Ví dụ: kiểm tra thời gian của trẻ chạy vài phút một lần hoặc điều khiển trình phát nhạc khi họ muốn bỏ qua hoặc tạm dừng một bài hát.
Nếu đây là lần đầu tiên phát triển cho Glass, đọc hướng dẫn về Nhiệm vụ đang diễn ra đầu tiên. Tài liệu đó trình bày cách tạo một Đồ thuỷ tinh có thẻ trực tiếp, tuân theo các phương pháp thiết kế hay nhất của chúng tôi.
Cách hoạt động
Các thẻ trực tiếp giúp các thẻ luôn giữ được hiện tại của tiến trình miễn là chúng có liên quan. Không giống như thẻ tĩnh, thẻ trực tiếp không tồn tại trong dòng thời gian và người dùng hãy xoá chúng sau khi dùng xong.

Người dùng thường bắt đầu thẻ trực tiếp bằng cách nói một lệnh thoại ở trình đơn chính. Thao tác này sẽ khởi động một dịch vụ nền để kết xuất thẻ. Sau đó, họ có thể nhấn vào thẻ để hiển thị các mục trong trình đơn có thể hoạt động trên thẻ, chẳng hạn như xoá quảng cáo khỏi dòng thời gian.
Khi nào nên sử dụng tiện ích vị trí đơn vị liên kết
Thẻ trực tiếp được thiết kế cho các công việc liên tục mà người dùng có thể thực hiện và không thường xuyên, chẳng hạn như màn hình cho thấy trạng thái đang chạy về một hành động, một bản đồ động trong khi điều hướng hoặc một trình phát nhạc.
Một lợi ích khác của thẻ bài trực tiếp là thẻ rất phù hợp để Giao diện người dùng yêu cầu tương tác theo thời gian thực với người dùng và theo thời gian thực vào giao diện người dùng.
Khi sử dụng thẻ trực tiếp, dòng thời gian vẫn có quyền kiểm soát người dùng nên hãy vuốt về phía trước hoặc phía sau trên một thẻ trực tiếp điều hướng đến dòng thời gian thay vì hành động trên chính thẻ trực tiếp. Ngoài ra, màn hình sẽ bật và tắt dựa trên cách hoạt động của hệ thống (sau khi 5 giây mà không có tương tác của người dùng hoặc trong khi cử động đầu lên).
Tuy nhiên, thẻ trực tiếp có quyền truy cập vào nhiều tính năng tương tự ngâm, chẳng hạn như cảm biến hoặc Dữ liệu GPS. Nhờ đó, bạn vẫn có thể tạo ra những trải nghiệm hấp dẫn đồng thời cho phép người dùng duy trì trải nghiệm trong dòng thời gian để làm các việc khác chẳng hạn như kiểm tra tin nhắn.
Kiến trúc
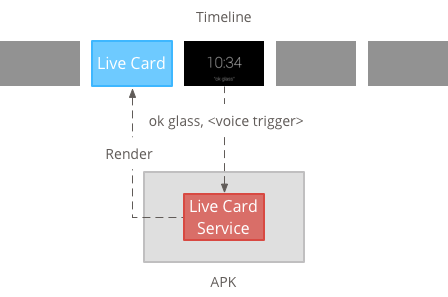
Thẻ trực tiếp cần có ngữ cảnh dài hạn để sở hữu chúng trong toàn bộ thời gian chúng sẽ hiển thị, vì vậy, hãy quản lý chúng trong một dịch vụ nền.
Sau đó, bạn có thể xuất bản và kết xuất thẻ đã hoạt động ngay khi dịch vụ được cung cấp khởi động hoặc để phản hồi các sự kiện khác mà dịch vụ giám sát. Bạn có thể hiển thị thẻ trực tiếp với tần suất thấp (mỗi vài giây một lần), hoặc tần suất cao (lên đến bao nhiêu lần hệ thống có thể làm mới).
Khi thẻ đang hoạt động không còn phù hợp, hãy huỷ dịch vụ để dừng kết xuất.
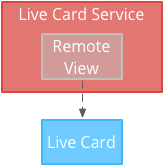
Kết xuất tần suất thấp
Tính năng kết xuất tần suất thấp chỉ xuất hiện trên một số ít thiết bị Android và chỉ có thể cập nhật màn hình một lần mỗi vài giây.
Đây là cách đơn giản để tạo thẻ trực tiếp bằng nội dung đơn giản không yêu cầu kết xuất liên tục hoặc các bản cập nhật thường xuyên.
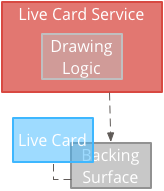
Hiển thị tần suất cao
Tính năng hiển thị tần suất cao cho phép bạn sử dụng nhiều lựa chọn hơn có sẵn trong khung đồ hoạ của Android.
Hệ thống này cung cấp cho bạn bề mặt sao lưu thực tế của thẻ trực tiếp mà bạn vẽ trực tiếp lên bằng 2D chế độ xem và bố cục hoặc thậm chí là đồ hoạ 3D phức tạp bằng OpenGL.
Tạo thẻ phát trực tiếp với tần suất thấp
Để hiển thị với tần suất thấp, giao diện người dùng được cung cấp bởi RemoteViews Đối tượng này hỗ trợ tập hợp con bố cục và khung hiển thị Android sau đây:
Sử dụng tính năng hiển thị tần suất thấp khi:
- Bạn chỉ cần các API Khung hiển thị Android tiêu chuẩn được liệt kê trước đó.
- Bạn chỉ yêu cầu cập nhật tương đối không thường xuyên (vài giây giữa làm mới).
Lưu ý:
- Thẻ trực tiếp phải luôn có
PendingIntentđã khai báo bằngsetAction()cho tiến trình xuất bản thẻ. - Để thay đổi một thẻ sau khi xuất bản, hãy gọi
setViews()trên thẻ có RemoteViews đã cập nhật trước khi xuất bản lại.
Cách tạo thẻ phát trực tiếp có tần suất thấp:
Tạo bố cục hoặc chế độ xem mà bạn muốn kết xuất. Ví dụ sau đây cho thấy bố cục của một trận bóng rổ ảo:
 <TextView
     android:id="@+id/home_team_name_text_view"
     android:layout_width="249px"
     android:layout_height="wrap_content"
     android:layout_alignParentRight="true"
     android:gravity="center"
     android:textSize="40px" />

 <TextView
     android:id="@+id/away_team_name_text_view"
     android:layout_width="249px"
     android:layout_height="wrap_content"
     android:layout_alignParentLeft="true"
     android:gravity="center"
     android:textSize="40px" />

 <TextView
     android:id="@+id/away_score_text_view"
     android:layout_width="249px"
     android:layout_height="wrap_content"
     android:layout_alignLeft="@+id/away_team_name_text_view"
     android:layout_below="@+id/away_team_name_text_view"
     android:gravity="center"
     android:textSize="70px" />

 <TextView
     android:id="@+id/home_score_text_view"
     android:layout_width="249px"
     android:layout_height="wrap_content"
     android:layout_alignLeft="@+id/home_team_name_text_view"
     android:layout_below="@+id/home_team_name_text_view"
     android:gravity="center"
     android:textSize="70px" />

 <TextView
     android:id="@+id/footer_text"
     android:layout_width="wrap_content"
     android:layout_height="wrap_content"
     android:layout_alignParentBottom="true"
     android:layout_alignParentLeft="true"
     android:layout_marginBottom="33px"
     android:textSize="26px" />
Tạo một dịch vụ quản lý thẻ trực tiếp và hiển thị bố cục hoặc chế độ xem của bạn. Dịch vụ mẫu này cập nhật tỷ số của một trận bóng rổ ảo mỗi 30 giây.
import java.util.Random;

import com.google.android.glass.timeline.LiveCard;
import com.google.android.glass.timeline.LiveCard.PublishMode;

import android.app.PendingIntent;
import android.app.Service;
import android.content.Intent;
import android.os.Handler;
import android.os.IBinder;
import android.widget.RemoteViews;

public class LiveCardService extends Service {

    private static final String LIVE_CARD_TAG = "LiveCardDemo";

    private LiveCard mLiveCard;
    private RemoteViews mLiveCardView;

    private int homeScore, awayScore;
    private Random mPointsGenerator;

    private final Handler mHandler = new Handler();
    private final UpdateLiveCardRunnable mUpdateLiveCardRunnable =
        new UpdateLiveCardRunnable();
    private static final long DELAY_MILLIS = 30000;

    @Override
    public void onCreate() {
        super.onCreate();
        mPointsGenerator = new Random();
    }

    @Override
    public int onStartCommand(Intent intent, int flags, int startId) {
        if (mLiveCard == null) {

            // Get an instance of a live card
            mLiveCard = new LiveCard(this, LIVE_CARD_TAG);

            // Inflate a layout into a remote view
            mLiveCardView = new RemoteViews(getPackageName(),
                    R.layout.main_layout);

            // Set up initial RemoteViews values
            homeScore = 0;
            awayScore = 0;
            mLiveCardView.setTextViewText(R.id.home_team_name_text_view,
                    getString(R.string.home_team));
            mLiveCardView.setTextViewText(R.id.away_team_name_text_view,
                    getString(R.string.away_team));
            mLiveCardView.setTextViewText(R.id.footer_text,
                    getString(R.string.game_quarter));

            // Set up the live card's action with a pending intent
            // to show a menu when tapped
            Intent menuIntent = new Intent(this, MenuActivity.class);
            menuIntent.addFlags(Intent.FLAG_ACTIVITY_NEW_TASK |
                    Intent.FLAG_ACTIVITY_CLEAR_TASK);
            mLiveCard.setAction(PendingIntent.getActivity(
                    this, 0, menuIntent, 0));

            // Publish the live card
            mLiveCard.publish(PublishMode.REVEAL);

            // Queue the update text runnable
            mHandler.post(mUpdateLiveCardRunnable);
        }
        return START_STICKY;
    }

    @Override
    public void onDestroy() {
        if (mLiveCard != null && mLiveCard.isPublished()) {
            //Stop the handler from queuing more Runnable jobs
            mUpdateLiveCardRunnable.setStop(true);

            mLiveCard.unpublish();
            mLiveCard = null;
        }
        super.onDestroy();
    }

    /**
     * Runnable that updates live card contents
     */
    private class UpdateLiveCardRunnable implements Runnable{

        private boolean mIsStopped = false;

        /*
         * Updates the card with a fake score every 30 seconds as a demonstration.
         * You also probably want to display something useful in your live card.
         *
         * If you are executing a long running task to get data to update a
         * live card(e.g, making a web call), do this in another thread or
         * AsyncTask.
         */
        public void run(){
            if(!isStopped()){
                // Generate fake points.
                homeScore += mPointsGenerator.nextInt(3);
                awayScore += mPointsGenerator.nextInt(3);

                // Update the remote view with the new scores.
                mLiveCardView.setTextViewText(R.id.home_score_text_view,
                        String.valueOf(homeScore));
                mLiveCardView.setTextViewText(R.id.away_score_text_view,
                        String.valueOf(awayScore));

                // Always call setViews() to update the live card's RemoteViews.
                mLiveCard.setViews(mLiveCardView);

                // Queue another score update in 30 seconds.
                mHandler.postDelayed(mUpdateLiveCardRunnable, DELAY_MILLIS);
            }
        }

        public boolean isStopped() {
            return mIsStopped;
        }

        public void setStop(boolean isStopped) {
            this.mIsStopped = isStopped;
        }
    }

    @Override
    public IBinder onBind(Intent intent) {
      /*
       * If you need to set up interprocess communication
       * (activity to a service, for instance), return a binder object
       * so that the client can receive and modify data in this service.
       *
       * A typical use is to give a menu activity access to a binder object
       * if it is trying to change a setting that is managed by the live card
       * service. The menu activity in this sample does not require any
       * of these capabilities, so this just returns null.
       */
       return null;
    }
}
Tạo thẻ phát trực tiếp có tần suất cao
Tính năng kết xuất tần suất cao cho phép bạn vẽ trực tiếp trên Surface sao lưu của thẻ trực tiếp.
Sử dụng tính năng hiển thị tần suất cao khi:
- Bạn cần cập nhật thẻ đang hoạt động thường xuyên (nhiều lần trong một giây).
- Bạn cần có sự linh hoạt trong nội dung có thể hiển thị. Tính năng kết xuất tần suất cao cho phép bạn sử dụng thành phần hiển thị và bố cục Android cho đồ hoạ OpenGL phức tạp.
Lưu ý:
- Bạn phải luôn tạo một dịch vụ nền để kết xuất trên nền tảng của thẻ trực tiếp.
- Thẻ trực tiếp phải luôn có
PendingIntentđã khai báo bằngsetAction(). - Sử dụng
GLRenderernếu bạn kết xuất OpenGL vàDirectRenderingCallbackcho mọi trường hợp khác.
Sử dụng DirectRenderingCallback
Cách tạo thẻ trực tiếp bằng khung hiển thị Android tiêu chuẩn và logic vẽ:
Tạo một lớp giúp triển khai
DirectRenderingCallback! Việc triển khai lệnh gọi lại trong các giao diện này cho phép bạn thực hiện các thao tác trong các sự kiện quan trọng trong vòng đời giao diện của thẻ trực tiếp.Ví dụ sau đây sẽ tạo một luồng trong nền để kết xuất định kỳ, nhưng bạn có thể cập nhật thẻ để phản hồi các sự kiện bên ngoài (ví dụ: thông tin cập nhật về cảm biến hoặc vị trí).
public class LiveCardRenderer implements DirectRenderingCallback {

    // About 30 FPS.
    private static final long FRAME_TIME_MILLIS = 33;

    private SurfaceHolder mHolder;
    private boolean mPaused;
    private RenderThread mRenderThread;

    @Override
    public void surfaceChanged(SurfaceHolder holder, int format,
            int width, int height) {
        // Update your views accordingly.
    }

    @Override
    public void surfaceCreated(SurfaceHolder holder) {
        mPaused = false;
        mHolder = holder;
        updateRendering();
    }

    @Override
    public void surfaceDestroyed(SurfaceHolder holder) {
        mHolder = null;
        updateRendering();
    }

    @Override
    public void renderingPaused(SurfaceHolder holder, boolean paused) {
        mPaused = paused;
        updateRendering();
    }

    /**
     * Start or stop rendering according to the timeline state.
     */
    private void updateRendering() {
        boolean shouldRender = (mHolder != null) && !mPaused;
        boolean rendering = mRenderThread != null;

        if (shouldRender != rendering) {
            if (shouldRender) {
                mRenderThread = new RenderThread();
                mRenderThread.start();
            } else {
                mRenderThread.quit();
                mRenderThread = null;
            }
        }
    }

    /**
     * Draws the view in the SurfaceHolder's canvas.
     */
    private void draw() {
        Canvas canvas;
        try {
            canvas = mHolder.lockCanvas();
        } catch (Exception e) {
            return;
        }
        if (canvas != null) {
            // Draw on the canvas.
            mHolder.unlockCanvasAndPost(canvas);
        }
    }

    /**
     * Redraws in the background.
     */
    private class RenderThread extends Thread {
        private boolean mShouldRun;

        /**
         * Initializes the background rendering thread.
         */
        public RenderThread() {
            mShouldRun = true;
        }

        /**
         * Returns true if the rendering thread should continue to run.
         *
         * @return true if the rendering thread should continue to run
         */
        private synchronized boolean shouldRun() {
            return mShouldRun;
        }

        /**
         * Requests that the rendering thread exit at the next
         opportunity.
         */
        public synchronized void quit() {
            mShouldRun = false;
        }

        @Override
        public void run() {
            while (shouldRun()) {
                draw();
                SystemClock.sleep(FRAME_TIME_MILLIS);
            }
        }
    }
}
Thiết lập một thực thể của
DirectRenderingCallbackvới tư cách làLiveCardCuộc gọi lại củaSurfaceHolder. Chiến dịch này cho phép thẻ trực tiếp biết logic nào cần sử dụng để tự kết xuất.// Tag used to identify the LiveCard in debugging logs. private static final String LIVE_CARD_TAG = "my_card"; // Cached instance of the LiveCard created by the publishCard() method. private LiveCard mLiveCard; private void publishCard(Context context) { if (mLiveCard == null) { mLiveCard = new LiveCard(this, LIVE_CARD_TAG); // Enable direct rendering. mLiveCard.setDirectRenderingEnabled(true); mLiveCard.getSurfaceHolder().addCallback( new LiveCardRenderer()); Intent intent = new Intent(context, MenuActivity.class); mLiveCard.setAction(PendingIntent.getActivity(context, 0, intent, 0)); mLiveCard.publish(LiveCard.PublishMode.SILENT); } else { // Card is already published. return; } } private void unpublishCard(Context context) { if (mLiveCard != null) { mLiveCard.unpublish(); mLiveCard = null; } }
Sử dụng OpenGL
Tạo một lớp giúp triển khai
GlRenderer. Việc triển khai các lệnh gọi lại trong giao diện này cho phép bạn thực hiện các thao tác trong các sự kiện quan trọng trong vòng đời bề mặt của thẻ trực tiếp. Ví dụ này vẽ một hình lập phương xoay tròn có màu.import com.google.android.glass.timeline.GlRenderer; import android.opengl.GLES20; import android.opengl.Matrix; import android.os.SystemClock; import java.util.concurrent.TimeUnit; import javax.microedition.khronos.egl.EGLConfig; /** * Renders a 3D OpenGL Cube on a {@link LiveCard}. */ public class CubeRenderer implements GlRenderer { /** Rotation increment per frame. */ private static final float CUBE_ROTATION_INCREMENT = 0.6f; /** The refresh rate, in frames per second. */ private static final int REFRESH_RATE_FPS = 60; /** The duration, in milliseconds, of one frame. */ private static final float FRAME_TIME_MILLIS = TimeUnit.SECONDS.toMillis(1) / REFRESH_RATE_FPS; private final float[] mMVPMatrix; private final float[] mProjectionMatrix; private final float[] mViewMatrix; private final float[] mRotationMatrix; private final float[] mFinalMVPMatrix; private Cube mCube; private float mCubeRotation; private long mLastUpdateMillis; public CubeRenderer() { mMVPMatrix = new float[16]; mProjectionMatrix = new float[16]; mViewMatrix = new float[16]; mRotationMatrix = new float[16]; mFinalMVPMatrix = new float[16]; // Set the fixed camera position (View matrix). Matrix.setLookAtM(mViewMatrix, 0, 0.0f, 0.0f, -4.0f, 0.0f, 0.0f, 0.0f, 0.0f, 1.0f, 0.0f); } @Override public void onSurfaceCreated(EGLConfig config) { // Set the background frame color GLES20.glClearColor(0.0f, 0.0f, 0.0f, 1.0f); GLES20.glClearDepthf(1.0f); GLES20.glEnable(GLES20.GL_DEPTH_TEST); GLES20.glDepthFunc(GLES20.GL_LEQUAL); mCube = new Cube(); } @Override public void onSurfaceChanged(int width, int height) { float ratio = (float) width / height; GLES20.glViewport(0, 0, width, height); // This projection matrix is applied to object coordinates in the onDrawFrame() method. Matrix.frustumM(mProjectionMatrix, 0, -ratio, ratio, -1.0f, 1.0f, 3.0f, 7.0f); // modelView = projection x view Matrix.multiplyMM(mMVPMatrix, 0, mProjectionMatrix, 0, mViewMatrix, 0); } @Override public void onDrawFrame() { GLES20.glClear(GLES20.GL_COLOR_BUFFER_BIT | GLES20.GL_DEPTH_BUFFER_BIT); // Apply the rotation. Matrix.setRotateM(mRotationMatrix, 0, mCubeRotation, 1.0f, 1.0f, 1.0f); // Combine the rotation matrix with the projection and camera view Matrix.multiplyMM(mFinalMVPMatrix, 0, mMVPMatrix, 0, mRotationMatrix, 0); // Draw cube. mCube.draw(mFinalMVPMatrix); updateCubeRotation(); } /** Updates the cube rotation. */ private void updateCubeRotation() { if (mLastUpdateMillis != 0) { float factor = (SystemClock.elapsedRealtime() - mLastUpdateMillis) / FRAME_TIME_MILLIS; mCubeRotation += CUBE_ROTATION_INCREMENT * factor; } mLastUpdateMillis = SystemClock.elapsedRealtime(); } }Tạo một dịch vụ quản lý các tập thẻ và thẻ trực tiếp lớp
CubeRendererđóng vai trò là trình kết xuất đồ hoạ của thẻ trực tiếp.import com.google.android.glass.timeline.LiveCard; import com.google.android.glass.timeline.LiveCard.PublishMode; import android.app.PendingIntent; import android.app.Service; import android.content.Intent; import android.os.IBinder; /** * Creates a {@link LiveCard} rendering a rotating 3D cube with OpenGL. */ public class OpenGlService extends Service { private static final String LIVE_CARD_TAG = "opengl"; private LiveCard mLiveCard; @Override public IBinder onBind(Intent intent) { return null; } @Override public int onStartCommand(Intent intent, int flags, int startId) { if (mLiveCard == null) { mLiveCard = new LiveCard(this, LIVE_CARD_TAG); mLiveCard.setRenderer(new CubeRenderer()); mLiveCard.setAction( PendingIntent.getActivity(this, 0, new Intent(this, MenuActivity.class), 0)); mLiveCard.publish(PublishMode.REVEAL); } else { mLiveCard.navigate(); } return START_STICKY; } @Override public void onDestroy() { if (mLiveCard != null && mLiveCard.isPublished()) { mLiveCard.unpublish(); mLiveCard = null; } super.onDestroy(); } }
import android.opengl.GLES20;

import java.nio.ByteBuffer;
import java.nio.ByteOrder;
import java.nio.FloatBuffer;

/**
 * Renders a 3D Cube using OpenGL ES 2.0.
 *
 * For more information on how to use OpenGL ES 2.0 on Android, see the
 * <a href="//developer.android.com/training/graphics/opengl/index.html">
 * Displaying Graphics with OpenGL ES</a> developer guide.
 */
public class Cube {

    /** Cube vertices */
    private static final float VERTICES[] = {
        -0.5f, -0.5f, -0.5f,
        0.5f, -0.5f, -0.5f,
        0.5f, 0.5f, -0.5f,
        -0.5f, 0.5f, -0.5f,
        -0.5f, -0.5f, 0.5f,
        0.5f, -0.5f, 0.5f,
        0.5f, 0.5f, 0.5f,
        -0.5f, 0.5f, 0.5f
    };

    /** Vertex colors. */
    private static final float COLORS[] = {
        0.0f, 1.0f, 1.0f, 1.0f,
        1.0f, 0.0f, 0.0f, 1.0f,
        1.0f, 1.0f, 0.0f, 1.0f,
        0.0f, 1.0f, 0.0f, 1.0f,
        0.0f, 0.0f, 1.0f, 1.0f,
        1.0f, 0.0f, 1.0f, 1.0f,
        1.0f, 1.0f, 1.0f, 1.0f,
        0.0f, 1.0f, 1.0f, 1.0f,
    };


    /** Order to draw vertices as triangles. */
    private static final byte INDICES[] = {
        0, 1, 3, 3, 1, 2, // Front face.
        0, 1, 4, 4, 5, 1, // Bottom face.
        1, 2, 5, 5, 6, 2, // Right face.
        2, 3, 6, 6, 7, 3, // Top face.
        3, 7, 4, 4, 3, 0, // Left face.
        4, 5, 7, 7, 6, 5, // Rear face.
    };

    /** Number of coordinates per vertex in {@link VERTICES}. */
    private static final int COORDS_PER_VERTEX = 3;

    /** Number of values per colors in {@link COLORS}. */
    private static final int VALUES_PER_COLOR = 4;

    /** Vertex size in bytes. */
    private final int VERTEX_STRIDE = COORDS_PER_VERTEX * 4;

    /** Color size in bytes. */
    private final int COLOR_STRIDE = VALUES_PER_COLOR * 4;

    /** Shader code for the vertex. */
    private static final String VERTEX_SHADER_CODE =
            "uniform mat4 uMVPMatrix;" +
            "attribute vec4 vPosition;" +
            "attribute vec4 vColor;" +
            "varying vec4 _vColor;" +
            "void main() {" +
            "  _vColor = vColor;" +
            "  gl_Position = uMVPMatrix * vPosition;" +
            "}";

    /** Shader code for the fragment. */
    private static final String FRAGMENT_SHADER_CODE =
            "precision mediump float;" +
            "varying vec4 _vColor;" +
            "void main() {" +
            "  gl_FragColor = _vColor;" +
            "}";


    private final FloatBuffer mVertexBuffer;
    private final FloatBuffer mColorBuffer;
    private final ByteBuffer mIndexBuffer;
    private final int mProgram;
    private final int mPositionHandle;
    private final int mColorHandle;
    private final int mMVPMatrixHandle;

    public Cube() {
        ByteBuffer byteBuffer = ByteBuffer.allocateDirect(VERTICES.length * 4);

        byteBuffer.order(ByteOrder.nativeOrder());
        mVertexBuffer = byteBuffer.asFloatBuffer();
        mVertexBuffer.put(VERTICES);
        mVertexBuffer.position(0);

        byteBuffer = ByteBuffer.allocateDirect(COLORS.length * 4);
        byteBuffer.order(ByteOrder.nativeOrder());
        mColorBuffer = byteBuffer.asFloatBuffer();
        mColorBuffer.put(COLORS);
        mColorBuffer.position(0);

        mIndexBuffer = ByteBuffer.allocateDirect(INDICES.length);
        mIndexBuffer.put(INDICES);
        mIndexBuffer.position(0);

        mProgram = GLES20.glCreateProgram();
        GLES20.glAttachShader(mProgram, loadShader(GLES20.GL_VERTEX_SHADER, VERTEX_SHADER_CODE));
        GLES20.glAttachShader(
                mProgram, loadShader(GLES20.GL_FRAGMENT_SHADER, FRAGMENT_SHADER_CODE));
        GLES20.glLinkProgram(mProgram);

        mPositionHandle = GLES20.glGetAttribLocation(mProgram, "vPosition");
        mColorHandle = GLES20.glGetAttribLocation(mProgram, "vColor");
        mMVPMatrixHandle = GLES20.glGetUniformLocation(mProgram, "uMVPMatrix");
    }

    /**
     * Encapsulates the OpenGL ES instructions for drawing this shape.
     *
     * @param mvpMatrix The Model View Project matrix in which to draw this shape
     */
    public void draw(float[] mvpMatrix) {
        // Add program to OpenGL environment.
        GLES20.glUseProgram(mProgram);

        // Prepare the cube coordinate data.
        GLES20.glEnableVertexAttribArray(mPositionHandle);
        GLES20.glVertexAttribPointer(
                mPositionHandle, 3, GLES20.GL_FLOAT, false, VERTEX_STRIDE, mVertexBuffer);

        // Prepare the cube color data.
        GLES20.glEnableVertexAttribArray(mColorHandle);
        GLES20.glVertexAttribPointer(
                mColorHandle, 4, GLES20.GL_FLOAT, false, COLOR_STRIDE, mColorBuffer);

        // Apply the projection and view transformation.
        GLES20.glUniformMatrix4fv(mMVPMatrixHandle, 1, false, mvpMatrix, 0);

        // Draw the cube.
        GLES20.glDrawElements(
                GLES20.GL_TRIANGLES, INDICES.length, GLES20.GL_UNSIGNED_BYTE, mIndexBuffer);

        // Disable vertex arrays.
        GLES20.glDisableVertexAttribArray(mPositionHandle);
        GLES20.glDisableVertexAttribArray(mColorHandle);
    }

    /** Loads the provided shader in the program. */
    private static int loadShader(int type, String shaderCode){
        int shader = GLES20.glCreateShader(type);

        GLES20.glShaderSource(shader, shaderCode);
        GLES20.glCompileShader(shader);

        return shader;
    }
}
Tập trung vào thẻ trực tiếp
Khi xuất bản một thẻ trực tiếp bằng LiveCard.publish(), bạn sẽ truyền vào đó một tham số
để kiểm soát việc nội dung đó có được lấy tiêu điểm ngay lập tức hay không.
Để dòng thời gian chuyển đến thẻ ngay sau khi xuất bản, hãy sử dụng
LiveCard.PublishMode.REVEAL.
Để ngầm xuất bản thẻ và giúp người dùng tự di chuyển đến thẻ, hãy dùng
LiveCard.PublishMode.SILENT.
Ngoài ra, LiveCard.navigate()
cho phép bạn chuyển đến thẻ sau khi xuất bản. Ví dụ: nếu người dùng cố gắng bắt đầu
thẻ trực tiếp từ trình đơn giọng nói chính và thẻ đó đã được chạy, bạn có thể chuyển đến thẻ trực tiếp
bằng phương thức này.
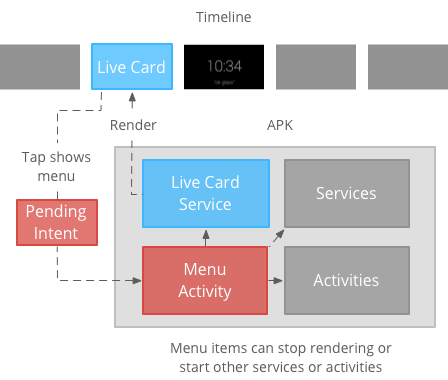
Tạo và hiển thị trình đơn
Thẻ trực tiếp không thể hiển thị hệ thống trình đơn riêng, vì vậy, bạn cần tạo một hoạt động để hiển thị trình đơn cho thẻ trực tiếp.
Sau đó, hoạt động trên trình đơn có thể có các mục để dừng thẻ trực tiếp, bắt đầu tham gia hoặc bất kỳ hành động nào khác mà bạn muốn thực hiện. Bạn cũng có thể thêm các hoạt động cài đặt hệ thống, chẳng hạn như điều khiển âm lượng, dưới dạng một mục trong trình đơn. Để biết thêm thông tin, xem Bắt đầu cài đặt.
Đang tạo tài nguyên trình đơn
Việc tạo tài nguyên trình đơn giống như trên nền tảng Android, nhưng hãy làm theo nguyên tắc dành cho Glass:
- Đối với mỗi mục trong trình đơn, hãy cung cấp biểu tượng mục trong trình đơn có kích thước 50 × 50 pixel. Thực đơn phải có màu trắng trên nền trong suốt. Xem Biểu tượng mục trong trình đơn kính cho ví dụ hoặc để tải xuống để sử dụng cho riêng bạn.
- Hãy sử dụng tên ngắn mô tả hành động và viết hoa đầu mỗi từ. Động từ bắt buộc có tác dụng (ví dụ: Chia sẻ hoặc Trả lời tất cả).
- Glass không hiển thị thẻ trực tiếp nếu không có mục trong trình đơn. Ít nhất, cung cấp mục trong trình đơn Stop (Dừng) để người dùng có thể xoá thẻ trực tiếp khỏi dòng thời gian.
Chiến lược phát hành đĩa đơn Tiện ích CheckBox không được hỗ trợ.
<menu xmlns:android="http://schemas.android.com/apk/res/android">
    <item
        android:id="@+id/menu_item_1"
        android:title="@string/Menu_Item_1"       <!-- must have "Stop" menu item -->
        android:icon="@drawable/menu_item_1_icon" />   <!-- white on transparent icon -->
</menu>
Tạo một hoạt động để xử lý lệnh gọi lại trình đơn
Bạn phải xác định một hoạt động trên trình đơn mà thẻ trực tiếp của bạn gọi khi người dùng nhấn vào hoạt động đó.
Ghi đè quy tắc sau
Phương thức gọi lại Activity
để tạo, hiển thị và đóng trình đơn đúng cách trong hoạt động của trình đơn:
onCreateOptionsMenu()tăng cường tài nguyên trình đơn XML.onAttachedToWindow()hiển thị trình đơn khi hoạt động được đặt làm tiêu điểm.onPrepareOptionsMenu()hiện hoặc ẩn các mục trong trình đơn nếu cần. Ví dụ: bạn có thể hiện nhiều mục trong trình đơn dựa vào hoạt động của người dùng. Ví dụ: bạn có thể hiển thị các mục khác nhau trong trình đơn dựa trên dựa trên một số dữ liệu theo bối cảnh.onOptionsItemSelected()xử lý lựa chọn của người dùng.onOptionsMenuClosed()để hoàn tất hoạt động sao cho hoạt động không còn xuất hiện trên thẻ trực tiếp nữa.
Bạn phải hoàn tất hoạt động tại đây để hoạt động được hoàn tất đúng cách khi trình đơn được đóng bằng một lựa chọn hoặc bằng cách vuốt xuống.
/**
 * Activity showing the options menu.
 */
public class MenuActivity extends Activity {

    @Override
    public void onAttachedToWindow() {
        super.onAttachedToWindow();
        openOptionsMenu();
    }

    @Override
    public boolean onCreateOptionsMenu(Menu menu) {
        MenuInflater inflater = getMenuInflater();
        inflater.inflate(R.menu.stopwatch, menu);
        return true;
    }

    @Override
    public boolean onOptionsItemSelected(MenuItem item) {
        // Handle item selection.
        switch (item.getItemId()) {
            case R.id.stop:
                stopService(new Intent(this, StopwatchService.class));
                return true;
            default:
                return super.onOptionsItemSelected(item);
        }
    }

    @Override
    public void onOptionsMenuClosed(Menu menu) {
        // Nothing else to do, closing the activity.
        finish();
    }
}
Làm rõ hoạt động của trình đơn
Để nhất quán với kiểu Glass, hãy đặt trình đơn ở chế độ hoạt động trong suốt để thẻ trực tiếp vẫn hiển thị bên dưới trình đơn:
Tạo một tệp
res/values/styles.xmlvà khai báo một kiểu để làm trong suốt nền của hoạt động:<resources> <style name="MenuTheme" parent="@android:style/Theme.DeviceDefault"> <item name="android:windowBackground">@android:color/transparent</item> <item name="android:colorBackgroundCacheHint">@null</item> <item name="android:windowIsTranslucent">true</item> <item name="android:windowAnimationStyle">@null</item> </style> </resources>Trong tệp
AndroidManifest.xml, hãy chỉ định giao diện cho hoạt động của trình đơn:<?xml version="1.0" encoding="utf-8"?> <manifest ... > ... <application ... > ... <activity android:name=".MenuActivity" android:theme="@style/MenuTheme" ...> </activity> </application> </manifest>
Đang hiện trình đơn
Cung cấp một
PendingIntent
cho thao tác của thẻ bằng setAction(). Ý định đang chờ xử lý được dùng để bắt đầu
hoạt động trên trình đơn khi người dùng nhấn vào thẻ đó:
Intent menuIntent = new Intent(this, MenuActivity.class);
mLiveCard.setAction(PendingIntent.getActivity(this, 0, menuIntent, 0));
mLiveCard.publish(LiveCard.PublishMode.REVEAL); // or SILENT
Hỗ trợ lệnh thoại theo ngữ cảnh
Cho biết rằng
MenuActivitycủa bạn hỗ trợ lệnh thoại theo ngữ cảnh:// Initialize your LiveCard as usual. mLiveCard.setVoiceActionEnabled(true); mLiveCard.publish(LiveCard.PublishMode.REVEAL); // or SILENTSửa đổi
MenuActivityđể hỗ trợ lệnh gọi thông qua quy trình thoại:/** * Activity showing the options menu. */ public class MenuActivity extends Activity { private boolean mFromLiveCardVoice; private boolean mIsFinishing; @Override protected void onCreate(Bundle savedInstanceState) { super.onCreate(savedInstanceState); mFromLiveCardVoice = getIntent().getBooleanExtra(LiveCard.EXTRA_FROM_LIVECARD_VOICE, false); if (mFromLiveCardVoice) { // When activated by voice from a live card, enable voice commands. The menu // will automatically "jump" ahead to the items (skipping the guard phrase // that was already said at the live card). getWindow().requestFeature(WindowUtils.FEATURE_VOICE_COMMANDS); } } @Override public void onAttachedToWindow() { super.onAttachedToWindow(); if (!mFromLiveCardVoice) { openOptionsMenu(); } } @Override public boolean onCreatePanelMenu(int featureId, Menu menu) { if (isMyMenu(featureId)) { getMenuInflater().inflate(R.menu.stopwatch, menu); return true; } return super.onCreatePanelMenu(featureId, menu); } @Override public boolean onPreparePanel(int featureId, View view, Menu menu) { if (isMyMenu(featureId)) { // Don't reopen menu once we are finishing. This is necessary // since voice menus reopen themselves while in focus. return !mIsFinishing; } return super.onPreparePanel(featureId, view, menu); } @Override public boolean onMenuItemSelected(int featureId, MenuItem item) { if (isMyMenu(featureId)) { // Handle item selection. switch (item.getItemId()) { case R.id.stop_this: stopService(new Intent(this, StopwatchService.class)); return true; } } return super.onMenuItemSelected(featureId, item); } @Override public void onPanelClosed(int featureId, Menu menu) { super.onPanelClosed(featureId, menu); if (isMyMenu(featureId)) { // When the menu panel closes, either an item is selected from the menu or the // menu is dismissed by swiping down. Either way, we end the activity. isFinishing = true; finish(); } } /** * Returns {@code true} when the {@code featureId} belongs to the options menu or voice * menu that are controlled by this menu activity. */ private boolean isMyMenu(int featureId) { return featureId == Window.FEATURE_OPTIONS_PANEL || featureId == WindowUtils.FEATURE_VOICE_COMMANDS; } }
Xem lệnh thoại theo ngữ cảnh để biết thêm thông tin.
Tiện ích trình đơn
Hiện có một số phương thức trợ giúp để sửa đổi giao diện và hoạt động của trình đơn. Xem
MenuUtils
để biết thêm thông tin.