
Neste tutorial, mostramos como adicionar um mapa do Google ao seu app Android e usar polilinhas e polígonos para representar trajetos e áreas.
Siga o tutorial e crie um app Android usando o SDK do Maps para Android. O ambiente recomendado para desenvolvedores é o Android Studio.
Acessar o código
Clone ou faça o download do repositório de exemplos da API Google Maps para Android v2 do GitHub (em inglês).
Confira a versão Java da atividade:
    // Copyright 2020 Google LLC
//
// Licensed under the Apache License, Version 2.0 (the "License");
// you may not use this file except in compliance with the License.
// You may obtain a copy of the License at
//
//      http://www.apache.org/licenses/LICENSE-2.0
//
// Unless required by applicable law or agreed to in writing, software
// distributed under the License is distributed on an "AS IS" BASIS,
// WITHOUT WARRANTIES OR CONDITIONS OF ANY KIND, either express or implied.
// See the License for the specific language governing permissions and
// limitations under the License.

package com.example.polygons;

import android.os.Bundle;
import android.widget.Toast;
import androidx.appcompat.app.AppCompatActivity;
import com.google.android.gms.maps.CameraUpdateFactory;
import com.google.android.gms.maps.GoogleMap;
import com.google.android.gms.maps.OnMapReadyCallback;
import com.google.android.gms.maps.SupportMapFragment;
import com.google.android.gms.maps.model.BitmapDescriptorFactory;
import com.google.android.gms.maps.model.CustomCap;
import com.google.android.gms.maps.model.Dash;
import com.google.android.gms.maps.model.Dot;
import com.google.android.gms.maps.model.Gap;
import com.google.android.gms.maps.model.JointType;
import com.google.android.gms.maps.model.LatLng;
import com.google.android.gms.maps.model.PatternItem;
import com.google.android.gms.maps.model.Polygon;
import com.google.android.gms.maps.model.PolygonOptions;
import com.google.android.gms.maps.model.Polyline;
import com.google.android.gms.maps.model.PolylineOptions;
import com.google.android.gms.maps.model.RoundCap;
import java.util.Arrays;
import java.util.List;


/**
 * An activity that displays a Google map with polylines to represent paths or routes,
 * and polygons to represent areas.
 */
public class PolyActivity extends AppCompatActivity
        implements
                OnMapReadyCallback,
                GoogleMap.OnPolylineClickListener,
                GoogleMap.OnPolygonClickListener {

    @Override
    protected void onCreate(Bundle savedInstanceState) {
        super.onCreate(savedInstanceState);

        // Retrieve the content view that renders the map.
        setContentView(R.layout.activity_maps);

        // Get the SupportMapFragment and request notification when the map is ready to be used.
        SupportMapFragment mapFragment = (SupportMapFragment) getSupportFragmentManager()
                .findFragmentById(R.id.map);
        mapFragment.getMapAsync(this);
    }

    /**
     * Manipulates the map when it's available.
     * The API invokes this callback when the map is ready to be used.
     * This is where we can add markers or lines, add listeners or move the camera.
     * In this tutorial, we add polylines and polygons to represent routes and areas on the map.
     */
    @Override
    public void onMapReady(GoogleMap googleMap) {

        // Add polylines to the map.
        // Polylines are useful to show a route or some other connection between points.
        Polyline polyline1 = googleMap.addPolyline(new PolylineOptions()
                .clickable(true)
                .add(
                        new LatLng(-35.016, 143.321),
                        new LatLng(-34.747, 145.592),
                        new LatLng(-34.364, 147.891),
                        new LatLng(-33.501, 150.217),
                        new LatLng(-32.306, 149.248),
                        new LatLng(-32.491, 147.309)));
        // Store a data object with the polyline, used here to indicate an arbitrary type.
        polyline1.setTag("A");
        // Style the polyline.
        stylePolyline(polyline1);

        Polyline polyline2 = googleMap.addPolyline(new PolylineOptions()
                .clickable(true)
                .add(
                        new LatLng(-29.501, 119.700),
                        new LatLng(-27.456, 119.672),
                        new LatLng(-25.971, 124.187),
                        new LatLng(-28.081, 126.555),
                        new LatLng(-28.848, 124.229),
                        new LatLng(-28.215, 123.938)));
        polyline2.setTag("B");
        stylePolyline(polyline2);

        // Add polygons to indicate areas on the map.
        Polygon polygon1 = googleMap.addPolygon(new PolygonOptions()
                .clickable(true)
                .add(
                        new LatLng(-27.457, 153.040),
                        new LatLng(-33.852, 151.211),
                        new LatLng(-37.813, 144.962),
                        new LatLng(-34.928, 138.599)));
        // Store a data object with the polygon, used here to indicate an arbitrary type.
        polygon1.setTag("alpha");
        // Style the polygon.
        stylePolygon(polygon1);

        Polygon polygon2 = googleMap.addPolygon(new PolygonOptions()
                .clickable(true)
                .add(
                        new LatLng(-31.673, 128.892),
                        new LatLng(-31.952, 115.857),
                        new LatLng(-17.785, 122.258),
                        new LatLng(-12.4258, 130.7932)));
        polygon2.setTag("beta");
        stylePolygon(polygon2);

        // Position the map's camera near Alice Springs in the center of Australia,
        // and set the zoom factor so most of Australia shows on the screen.
        googleMap.moveCamera(CameraUpdateFactory.newLatLngZoom(new LatLng(-23.684, 133.903), 4));

        // Set listeners for click events.
        googleMap.setOnPolylineClickListener(this);
        googleMap.setOnPolygonClickListener(this);
    }

    private static final int COLOR_BLACK_ARGB = 0xff000000;
    private static final int POLYLINE_STROKE_WIDTH_PX = 12;

    /**
     * Styles the polyline, based on type.
     * @param polyline The polyline object that needs styling.
     */
    private void stylePolyline(Polyline polyline) {
        String type = "";
        // Get the data object stored with the polyline.
        if (polyline.getTag() != null) {
            type = polyline.getTag().toString();
        }

        switch (type) {
            // If no type is given, allow the API to use the default.
            case "A":
                // Use a custom bitmap as the cap at the start of the line.
                polyline.setStartCap(
                        new CustomCap(
                                BitmapDescriptorFactory.fromResource(R.drawable.ic_arrow), 10));
                break;
            case "B":
                // Use a round cap at the start of the line.
                polyline.setStartCap(new RoundCap());
                break;
        }

        polyline.setEndCap(new RoundCap());
        polyline.setWidth(POLYLINE_STROKE_WIDTH_PX);
        polyline.setColor(COLOR_BLACK_ARGB);
        polyline.setJointType(JointType.ROUND);
    }

    private static final int PATTERN_GAP_LENGTH_PX = 20;
    private static final PatternItem DOT = new Dot();
    private static final PatternItem GAP = new Gap(PATTERN_GAP_LENGTH_PX);

    // Create a stroke pattern of a gap followed by a dot.
    private static final List<PatternItem> PATTERN_POLYLINE_DOTTED = Arrays.asList(GAP, DOT);

    /**
     * Listens for clicks on a polyline.
     * @param polyline The polyline object that the user has clicked.
     */
    @Override
    public void onPolylineClick(Polyline polyline) {
        // Flip from solid stroke to dotted stroke pattern.
        if ((polyline.getPattern() == null) || (!polyline.getPattern().contains(DOT))) {
            polyline.setPattern(PATTERN_POLYLINE_DOTTED);
        } else {
            // The default pattern is a solid stroke.
            polyline.setPattern(null);
        }

        Toast.makeText(this, "Route type " + polyline.getTag().toString(),
                Toast.LENGTH_SHORT).show();
    }

    /**
     * Listens for clicks on a polygon.
     * @param polygon The polygon object that the user has clicked.
     */
    @Override
    public void onPolygonClick(Polygon polygon) {
        // Flip the values of the red, green, and blue components of the polygon's color.
        int color = polygon.getStrokeColor() ^ 0x00ffffff;
        polygon.setStrokeColor(color);
        color = polygon.getFillColor() ^ 0x00ffffff;
        polygon.setFillColor(color);

        Toast.makeText(this, "Area type " + polygon.getTag().toString(), Toast.LENGTH_SHORT).show();
    }

    private static final int COLOR_WHITE_ARGB = 0xffffffff;
    private static final int COLOR_DARK_GREEN_ARGB = 0xff388E3C;
    private static final int COLOR_LIGHT_GREEN_ARGB = 0xff81C784;
    private static final int COLOR_DARK_ORANGE_ARGB = 0xffF57F17;
    private static final int COLOR_LIGHT_ORANGE_ARGB = 0xffF9A825;

    private static final int POLYGON_STROKE_WIDTH_PX = 8;
    private static final int PATTERN_DASH_LENGTH_PX = 20;
    private static final PatternItem DASH = new Dash(PATTERN_DASH_LENGTH_PX);

    // Create a stroke pattern of a gap followed by a dash.
    private static final List<PatternItem> PATTERN_POLYGON_ALPHA = Arrays.asList(GAP, DASH);

    // Create a stroke pattern of a dot followed by a gap, a dash, and another gap.
    private static final List<PatternItem> PATTERN_POLYGON_BETA =
        Arrays.asList(DOT, GAP, DASH, GAP);

    /**
     * Styles the polygon, based on type.
     * @param polygon The polygon object that needs styling.
     */
    private void stylePolygon(Polygon polygon) {
        String type = "";
        // Get the data object stored with the polygon.
        if (polygon.getTag() != null) {
            type = polygon.getTag().toString();
        }

        List<PatternItem> pattern = null;
        int strokeColor = COLOR_BLACK_ARGB;
        int fillColor = COLOR_WHITE_ARGB;

        switch (type) {
            // If no type is given, allow the API to use the default.
            case "alpha":
                // Apply a stroke pattern to render a dashed line, and define colors.
                pattern = PATTERN_POLYGON_ALPHA;
                strokeColor = COLOR_DARK_GREEN_ARGB;
                fillColor = COLOR_LIGHT_GREEN_ARGB;
                break;
            case "beta":
                // Apply a stroke pattern to render a line of dots and dashes, and define colors.
                pattern = PATTERN_POLYGON_BETA;
                strokeColor = COLOR_DARK_ORANGE_ARGB;
                fillColor = COLOR_LIGHT_ORANGE_ARGB;
                break;
        }

        polygon.setStrokePattern(pattern);
        polygon.setStrokeWidth(POLYGON_STROKE_WIDTH_PX);
        polygon.setStrokeColor(strokeColor);
        polygon.setFillColor(fillColor);
    }
}
Confira a versão em Kotlin da atividade:
    // Copyright 2020 Google LLC
//
// Licensed under the Apache License, Version 2.0 (the "License");
// you may not use this file except in compliance with the License.
// You may obtain a copy of the License at
//
//      http://www.apache.org/licenses/LICENSE-2.0
//
// Unless required by applicable law or agreed to in writing, software
// distributed under the License is distributed on an "AS IS" BASIS,
// WITHOUT WARRANTIES OR CONDITIONS OF ANY KIND, either express or implied.
// See the License for the specific language governing permissions and
// limitations under the License.
package com.example.polygons

import android.os.Bundle
import android.widget.Toast
import androidx.appcompat.app.AppCompatActivity
import com.google.android.gms.maps.CameraUpdateFactory
import com.google.android.gms.maps.GoogleMap
import com.google.android.gms.maps.GoogleMap.OnPolygonClickListener
import com.google.android.gms.maps.GoogleMap.OnPolylineClickListener
import com.google.android.gms.maps.OnMapReadyCallback
import com.google.android.gms.maps.SupportMapFragment
import com.google.android.gms.maps.model.BitmapDescriptorFactory
import com.google.android.gms.maps.model.CustomCap
import com.google.android.gms.maps.model.Dash
import com.google.android.gms.maps.model.Dot
import com.google.android.gms.maps.model.Gap
import com.google.android.gms.maps.model.JointType
import com.google.android.gms.maps.model.LatLng
import com.google.android.gms.maps.model.PatternItem
import com.google.android.gms.maps.model.Polygon
import com.google.android.gms.maps.model.PolygonOptions
import com.google.android.gms.maps.model.Polyline
import com.google.android.gms.maps.model.PolylineOptions
import com.google.android.gms.maps.model.RoundCap

/**
 * An activity that displays a Google map with polylines to represent paths or routes,
 * and polygons to represent areas.
 */
class PolyActivity : AppCompatActivity(), OnMapReadyCallback, OnPolylineClickListener, OnPolygonClickListener {

    override fun onCreate(savedInstanceState: Bundle?) {
        super.onCreate(savedInstanceState)

        // Retrieve the content view that renders the map.
        setContentView(R.layout.activity_maps)

        // Get the SupportMapFragment and request notification when the map is ready to be used.
        val mapFragment = supportFragmentManager
            .findFragmentById(R.id.map) as SupportMapFragment?
        mapFragment?.getMapAsync(this)
    }

    /**
     * Manipulates the map when it's available.
     * The API invokes this callback when the map is ready to be used.
     * This is where we can add markers or lines, add listeners or move the camera.
     * In this tutorial, we add polylines and polygons to represent routes and areas on the map.
     */
    override fun onMapReady(googleMap: GoogleMap) {

        // Add polylines to the map.
        // Polylines are useful to show a route or some other connection between points.
        val polyline1 = googleMap.addPolyline(PolylineOptions()
            .clickable(true)
            .add(
                LatLng(-35.016, 143.321),
                LatLng(-34.747, 145.592),
                LatLng(-34.364, 147.891),
                LatLng(-33.501, 150.217),
                LatLng(-32.306, 149.248),
                LatLng(-32.491, 147.309)))
        // Store a data object with the polyline, used here to indicate an arbitrary type.
        polyline1.tag = "A"
        // Style the polyline.
        stylePolyline(polyline1)

        val polyline2 = googleMap.addPolyline(PolylineOptions()
            .clickable(true)
            .add(
                LatLng(-29.501, 119.700),
                LatLng(-27.456, 119.672),
                LatLng(-25.971, 124.187),
                LatLng(-28.081, 126.555),
                LatLng(-28.848, 124.229),
                LatLng(-28.215, 123.938)))
        polyline2.tag = "B"
        stylePolyline(polyline2)

        // Add polygons to indicate areas on the map.
        val polygon1 = googleMap.addPolygon(PolygonOptions()
            .clickable(true)
            .add(
                LatLng(-27.457, 153.040),
                LatLng(-33.852, 151.211),
                LatLng(-37.813, 144.962),
                LatLng(-34.928, 138.599)))
        // Store a data object with the polygon, used here to indicate an arbitrary type.
        polygon1.tag = "alpha"
        // Style the polygon.
        stylePolygon(polygon1)

        val polygon2 = googleMap.addPolygon(PolygonOptions()
            .clickable(true)
            .add(
                LatLng(-31.673, 128.892),
                LatLng(-31.952, 115.857),
                LatLng(-17.785, 122.258),
                LatLng(-12.4258, 130.7932)))
        polygon2.tag = "beta"
        stylePolygon(polygon2)

        // Position the map's camera near Alice Springs in the center of Australia,
        // and set the zoom factor so most of Australia shows on the screen.
        googleMap.moveCamera(CameraUpdateFactory.newLatLngZoom(LatLng(-23.684, 133.903), 4f))

        // Set listeners for click events.
        googleMap.setOnPolylineClickListener(this)
        googleMap.setOnPolygonClickListener(this)
    }

    private val COLOR_BLACK_ARGB = -0x1000000
    private val POLYLINE_STROKE_WIDTH_PX = 12

    /**
     * Styles the polyline, based on type.
     * @param polyline The polyline object that needs styling.
     */
    private fun stylePolyline(polyline: Polyline) {
        // Get the data object stored with the polyline.
        val type = polyline.tag?.toString() ?: ""
        when (type) {
            "A" -> {
                // Use a custom bitmap as the cap at the start of the line.
                polyline.startCap = CustomCap(
                    BitmapDescriptorFactory.fromResource(R.drawable.ic_arrow), 10f)
            }
            "B" -> {
               // Use a round cap at the start of the line.
                polyline.startCap = RoundCap()
            }
        }
        polyline.endCap = RoundCap()
        polyline.width = POLYLINE_STROKE_WIDTH_PX.toFloat()
        polyline.color = COLOR_BLACK_ARGB
        polyline.jointType = JointType.ROUND
    }

    private val PATTERN_GAP_LENGTH_PX = 20
    private val DOT: PatternItem = Dot()
    private val GAP: PatternItem = Gap(PATTERN_GAP_LENGTH_PX.toFloat())

    // Create a stroke pattern of a gap followed by a dot.
    private val PATTERN_POLYLINE_DOTTED = listOf(GAP, DOT)

    /**
     * Listens for clicks on a polyline.
     * @param polyline The polyline object that the user has clicked.
     */
    override fun onPolylineClick(polyline: Polyline) {
        // Flip from solid stroke to dotted stroke pattern.
        if (polyline.pattern == null || !polyline.pattern!!.contains(DOT)) {
            polyline.pattern = PATTERN_POLYLINE_DOTTED
        } else {
            // The default pattern is a solid stroke.
            polyline.pattern = null
        }
        Toast.makeText(this, "Route type " + polyline.tag.toString(),
            Toast.LENGTH_SHORT).show()
    }

    /**
     * Listens for clicks on a polygon.
     * @param polygon The polygon object that the user has clicked.
     */
    override fun onPolygonClick(polygon: Polygon) {
        // Flip the values of the red, green, and blue components of the polygon's color.
        var color = polygon.strokeColor xor 0x00ffffff
        polygon.strokeColor = color
        color = polygon.fillColor xor 0x00ffffff
        polygon.fillColor = color
        Toast.makeText(this, "Area type ${polygon.tag?.toString()}", Toast.LENGTH_SHORT).show()
    }

    private val COLOR_WHITE_ARGB = -0x1
    private val COLOR_DARK_GREEN_ARGB = -0xc771c4
    private val COLOR_LIGHT_GREEN_ARGB = -0x7e387c
    private val COLOR_DARK_ORANGE_ARGB = -0xa80e9
    private val COLOR_LIGHT_ORANGE_ARGB = -0x657db
    private val POLYGON_STROKE_WIDTH_PX = 8
    private val PATTERN_DASH_LENGTH_PX = 20

    private val DASH: PatternItem = Dash(PATTERN_DASH_LENGTH_PX.toFloat())

    // Create a stroke pattern of a gap followed by a dash.
    private val PATTERN_POLYGON_ALPHA = listOf(GAP, DASH)

    // Create a stroke pattern of a dot followed by a gap, a dash, and another gap.
    private val PATTERN_POLYGON_BETA = listOf(DOT, GAP, DASH, GAP)

    /**
     * Styles the polygon, based on type.
     * @param polygon The polygon object that needs styling.
     */
    private fun stylePolygon(polygon: Polygon) {
        // Get the data object stored with the polygon.
        val type = polygon.tag?.toString() ?: ""
        var pattern: List<PatternItem>? = null
        var strokeColor = COLOR_BLACK_ARGB
        var fillColor = COLOR_WHITE_ARGB
        when (type) {
            "alpha" -> {
                // Apply a stroke pattern to render a dashed line, and define colors.
                pattern = PATTERN_POLYGON_ALPHA
                strokeColor = COLOR_DARK_GREEN_ARGB
                fillColor = COLOR_LIGHT_GREEN_ARGB
            }
            "beta" -> {
                // Apply a stroke pattern to render a line of dots and dashes, and define colors.
                pattern = PATTERN_POLYGON_BETA
                strokeColor = COLOR_DARK_ORANGE_ARGB
                fillColor = COLOR_LIGHT_ORANGE_ARGB
            }
        }
        polygon.strokePattern = pattern
        polygon.strokeWidth = POLYGON_STROKE_WIDTH_PX.toFloat()
        polygon.strokeColor = strokeColor
        polygon.fillColor = fillColor
    }
}
Configurar seu projeto de desenvolvimento
Siga estas etapas para criar o projeto de tutorial no Android Studio.
- Faça o download e instale o Android Studio.
- Adicione o pacote Google Play Services ao Android Studio.
- Clone ou faça o download do repositório de exemplos da API Google Maps Android v2 (link em inglês), caso não tenha feito isso no início do tutorial.
Importe o projeto do tutorial:
- No Android Studio, selecione File > New > Import Project.
- Acesse o local onde você salvou o repositório de exemplos da API Google Maps Android v2 após fazer o download.
- Encontre o projeto Polygons neste local:
PATH-TO-SAVED-REPO/android-samples/tutorials/java/Polygons(Java) ou
PATH-TO-SAVED-REPO/android-samples/tutorials/kotlin/Polygons(Kotlin) - Selecione o diretório do projeto e clique em Open. O Android Studio vai criar seu projeto usando a ferramenta Gradle.
Ativar as APIs necessárias e gerar uma chave de API
Para concluir este tutorial, você precisa de um projeto do Google Cloud com as APIs necessárias ativadas e uma chave de API que possa usar o SDK do Maps para Android. Confira mais detalhes em:
Adicionar a chave de API ao seu app
- Abra o arquivo
local.propertiesdo projeto. Adicione a string a seguir e substitua
YOUR_API_KEYpelo valor da sua chave de API:MAPS_API_KEY=YOUR_API_KEYQuando você cria o app, o plug-in Secrets Gradle para Android (link em inglês) copia a chave de API e a disponibiliza como uma variante de build no manifesto do Android, como explicado abaixo.
Criar e executar o app
Para criar e executar o app, faça o seguinte:
Conecte um dispositivo Android ao computador. Siga as instruções se você quiser ativar as opções para desenvolvedores no seu dispositivo Android e permitir que o sistema detecte o aparelho.
Também é possível usar o AVD Manager para configurar um dispositivo virtual. Ao escolher um emulador, selecione uma imagem que inclua as APIs do Google. Para mais detalhes, consulte o artigo Configurar um projeto do Android Studio.
No Android Studio, clique na opção de menu Run ou no ícone do botão de reprodução. Escolha um dispositivo quando solicitado.
O Android Studio invoca o Gradle para criar o app e, em seguida, executa o aplicativo no aparelho ou no emulador.
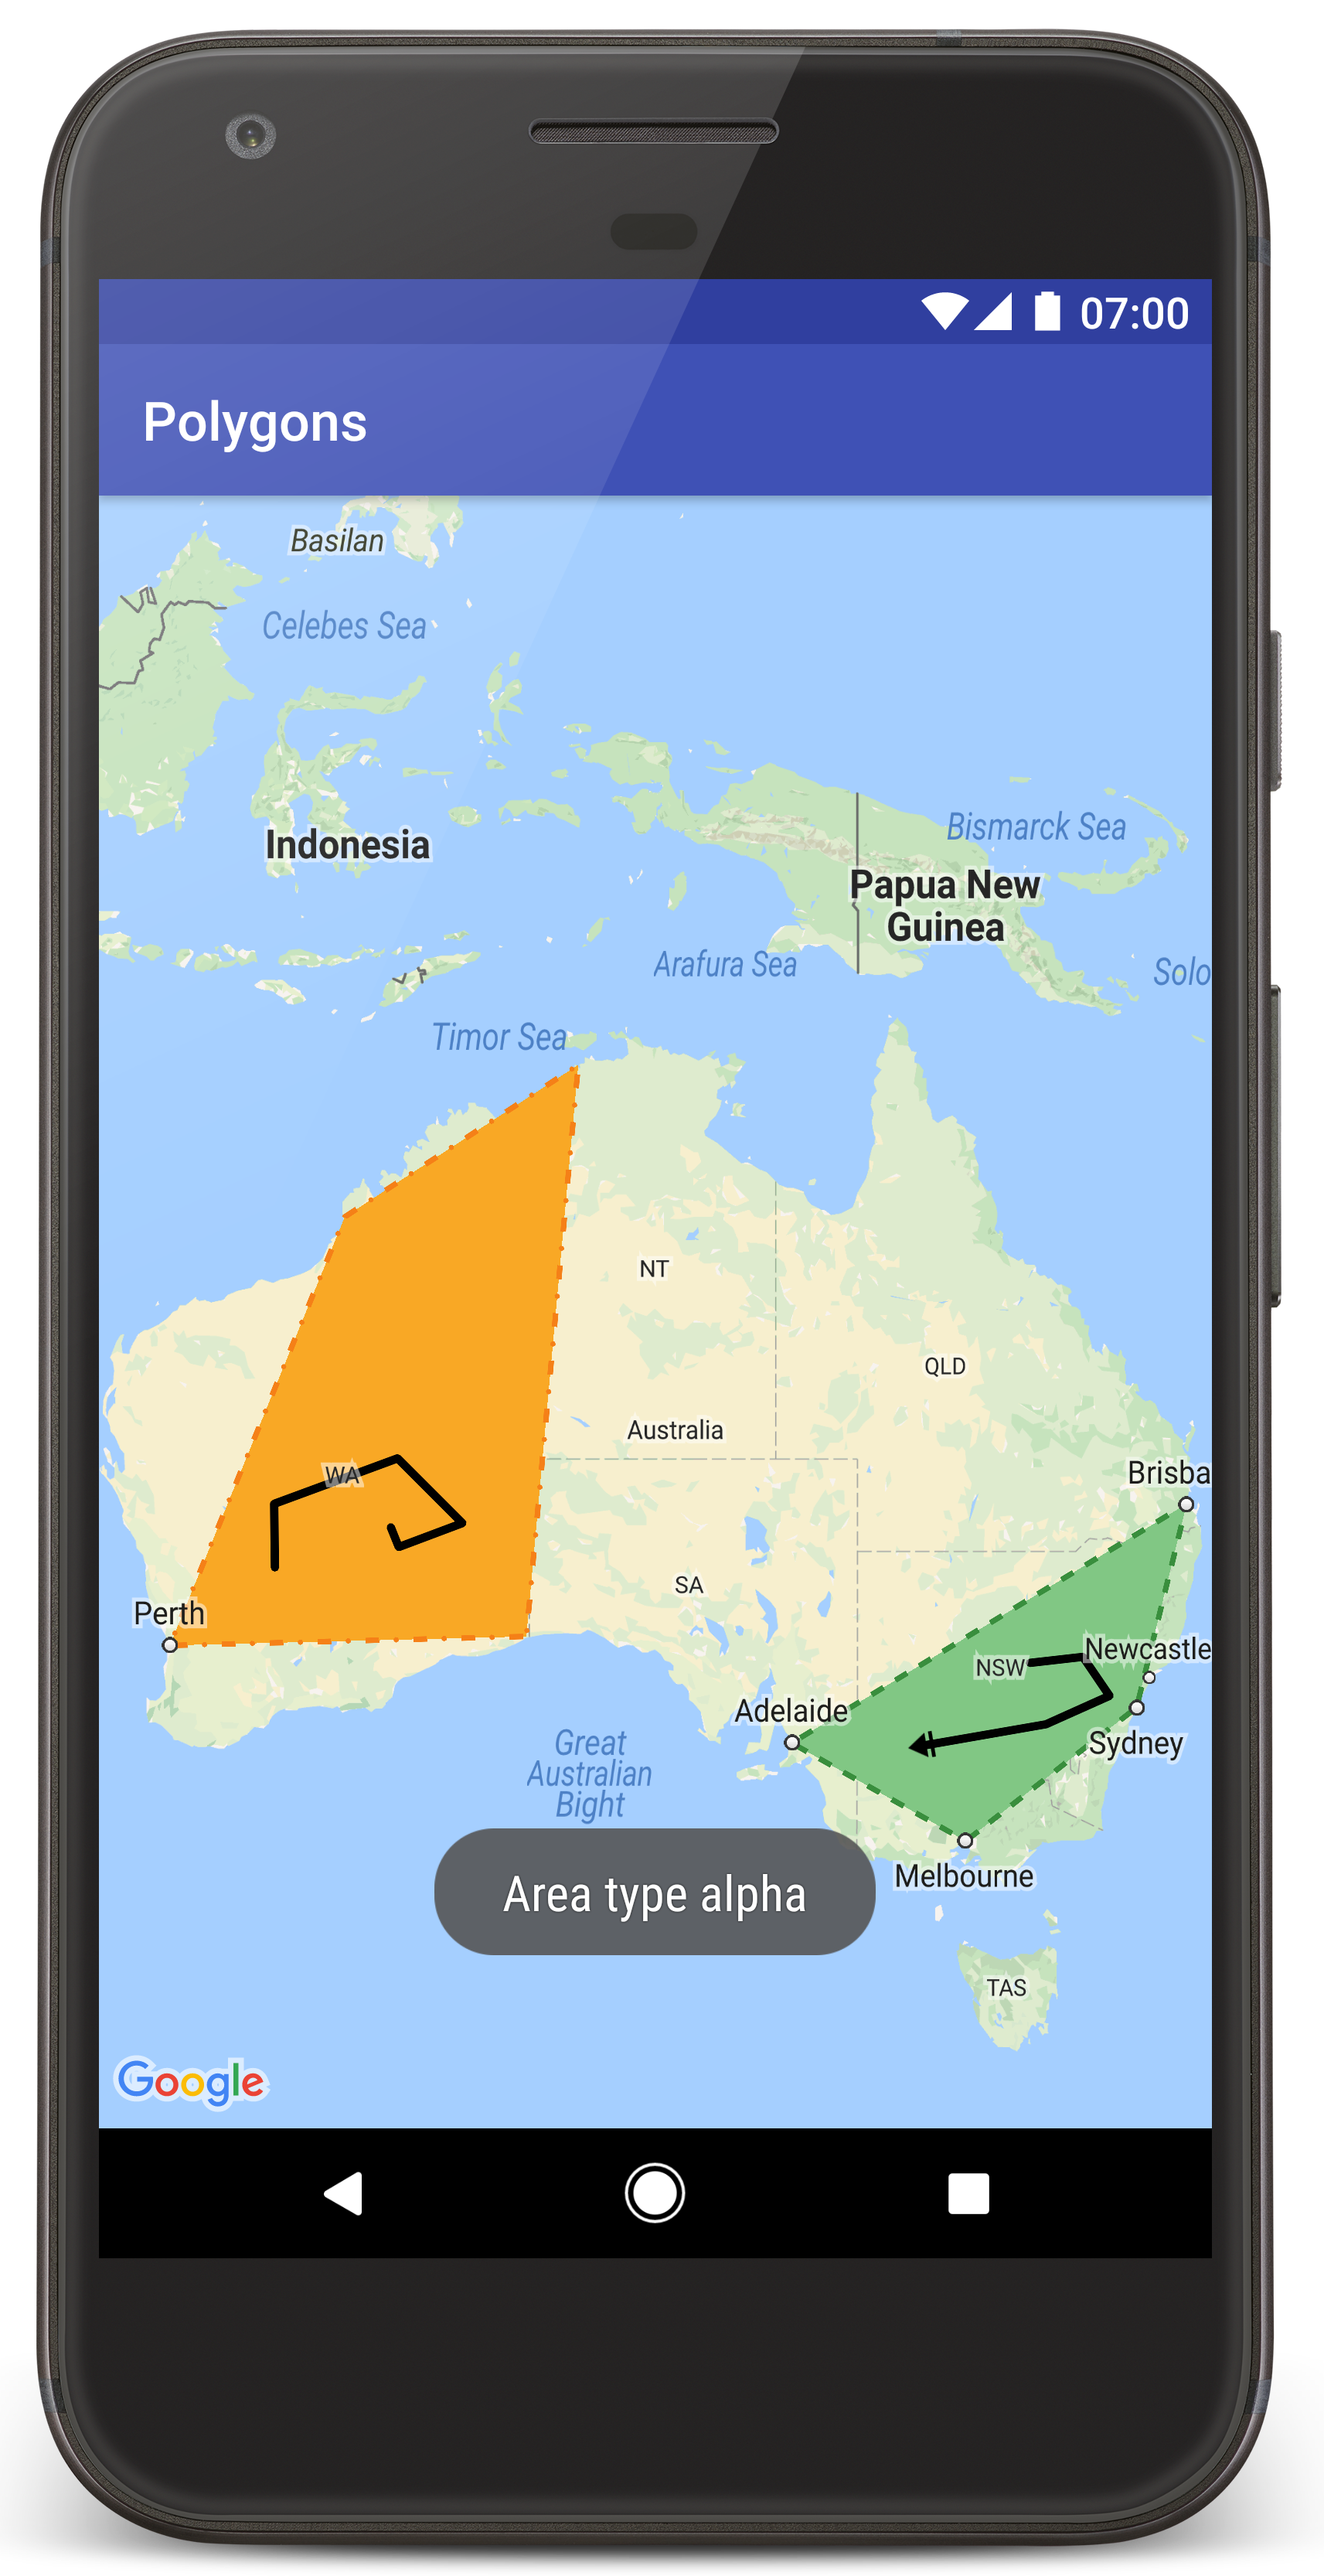
Será mostrado um mapa com dois polígonos sobrepostos na Austrália, como na imagem desta página.
Solução de problemas:
- Se o mapa não aparecer, confirme se você recebeu uma chave de API e a incluiu no app, como descrito acima. Verifique se há mensagens de erro sobre essa chave no registro do Android Monitor do Android Studio.
- Use as ferramentas de depuração do Android Studio para conferir os registros e depurar o app.
Entender o código
Nesta seção do tutorial, explicamos as partes mais importantes do app Polygons para mostrar como criar um aplicativo semelhante.
Verificar o manifesto do Android
Observe os seguintes elementos no arquivo AndroidManifest.xml do seu app:
Adicione um elemento
meta-datapara incorporar a versão do Google Play Services com que o app foi compilado.<meta-data android:name="com.google.android.gms.version" android:value="@integer/google_play_services_version" />Inclua um elemento
meta-dataque especifique sua chave de API. O exemplo neste tutorial mapeia o valor da chave de API para uma variante de build correspondente ao nome da chave definida antes,MAPS_API_KEY. Quando você cria o app, o plug-in de secrets do Gradle para Android disponibiliza as chaves no seu arquivolocal.propertiescomo variantes de build no manifesto.<meta-data android:name="com.google.android.geo.API_KEY" android:value="${MAPS_API_KEY}" />No arquivo
build.gradle, a linha a seguir transmite sua chave de API ao manifesto do Android.id 'com.google.android.libraries.mapsplatform.secrets-gradle-plugin'
Confira o exemplo completo de um manifesto:
<?xml version="1.0" encoding="utf-8"?>
<!--
Copyright 2020 Google LLC
Licensed under the Apache License, Version 2.0 (the "License");
you may not use this file except in compliance with the License.
You may obtain a copy of the License at
http://www.apache.org/licenses/LICENSE-2.0
Unless required by applicable law or agreed to in writing, software
distributed under the License is distributed on an "AS IS" BASIS,
WITHOUT WARRANTIES OR CONDITIONS OF ANY KIND, either express or implied.
See the License for the specific language governing permissions and
limitations under the License.
-->
<manifest xmlns:android="http://schemas.android.com/apk/res/android">
<application
android:allowBackup="true"
android:icon="@mipmap/ic_launcher"
android:label="@string/app_name"
android:supportsRtl="true"
android:theme="@style/AppTheme">
<meta-data
    android:name="com.google.android.gms.version"
    android:value="@integer/google_play_services_version" />
<!--
The API key for Google Maps-based APIs.
-->
<meta-data
  android:name="com.google.android.geo.API_KEY"
  android:value="${MAPS_API_KEY}" />
<activity
android:name="com.example.polygons.PolyActivity"
android:exported="true"
android:label="@string/title_activity_maps">
<intent-filter>
<action android:name="android.intent.action.MAIN" />
<category android:name="android.intent.category.LAUNCHER" />
</intent-filter>
</activity>
</application>
</manifest>
Adicionar um mapa
Mostre mapas usando o SDK do Maps para Android.
Adicione um elemento
<fragment>ao arquivo de layout da sua atividade,activity_maps.xml. Esse elemento define umSupportMapFragmentpara atuar como um contêiner do mapa e permitir o acesso ao objetoGoogleMap. O tutorial usa a versão do fragmento de mapa da Biblioteca de Suporte do Android para oferecer compatibilidade com versões anteriores do framework Android.<!-- Copyright 2020 Google LLC Licensed under the Apache License, Version 2.0 (the "License"); you may not use this file except in compliance with the License. You may obtain a copy of the License at http://www.apache.org/licenses/LICENSE-2.0 Unless required by applicable law or agreed to in writing, software distributed under the License is distributed on an "AS IS" BASIS, WITHOUT WARRANTIES OR CONDITIONS OF ANY KIND, either express or implied. See the License for the specific language governing permissions and limitations under the License. --> <fragment xmlns:android="http://schemas.android.com/apk/res/android" xmlns:tools="http://schemas.android.com/tools" android:id="@+id/map" android:name="com.google.android.gms.maps.SupportMapFragment" android:layout_width="match_parent" android:layout_height="match_parent" tools:context="com.example.polygons.PolyActivity" />No método
onCreate()da sua atividade, defina o arquivo de layout como a visualização de conteúdo. Gere um identificador para o fragmento de mapa chamandoFragmentManager.findFragmentById(). Depois, usegetMapAsync()para se registrar no callback:Java
@Override protected void onCreate(Bundle savedInstanceState) { super.onCreate(savedInstanceState); // Retrieve the content view that renders the map. setContentView(R.layout.activity_maps); // Get the SupportMapFragment and request notification when the map is ready to be used. SupportMapFragment mapFragment = (SupportMapFragment) getSupportFragmentManager() .findFragmentById(R.id.map); mapFragment.getMapAsync(this); }Kotlin
override fun onCreate(savedInstanceState: Bundle?) { super.onCreate(savedInstanceState) // Retrieve the content view that renders the map. setContentView(R.layout.activity_maps) // Get the SupportMapFragment and request notification when the map is ready to be used. val mapFragment = supportFragmentManager .findFragmentById(R.id.map) as SupportMapFragment? mapFragment?.getMapAsync(this) }Implemente a interface
OnMapReadyCallbacke modifique o métodoonMapReady(). A API invoca esse callback quando o objetoGoogleMapestá disponível. Assim, você pode adicionar objetos ao mapa e personalizá-lo ainda mais:Java
public class PolyActivity extends AppCompatActivity implements OnMapReadyCallback, GoogleMap.OnPolylineClickListener, GoogleMap.OnPolygonClickListener { @Override protected void onCreate(Bundle savedInstanceState) { super.onCreate(savedInstanceState); // Retrieve the content view that renders the map. setContentView(R.layout.activity_maps); // Get the SupportMapFragment and request notification when the map is ready to be used. SupportMapFragment mapFragment = (SupportMapFragment) getSupportFragmentManager() .findFragmentById(R.id.map); mapFragment.getMapAsync(this); } /** * Manipulates the map when it's available. * The API invokes this callback when the map is ready to be used. * This is where we can add markers or lines, add listeners or move the camera. * In this tutorial, we add polylines and polygons to represent routes and areas on the map. */ @Override public void onMapReady(GoogleMap googleMap) { // Add polylines to the map. // Polylines are useful to show a route or some other connection between points. Polyline polyline1 = googleMap.addPolyline(new PolylineOptions() .clickable(true) .add( new LatLng(-35.016, 143.321), new LatLng(-34.747, 145.592), new LatLng(-34.364, 147.891), new LatLng(-33.501, 150.217), new LatLng(-32.306, 149.248), new LatLng(-32.491, 147.309))); // Position the map's camera near Alice Springs in the center of Australia, // and set the zoom factor so most of Australia shows on the screen. googleMap.moveCamera(CameraUpdateFactory.newLatLngZoom(new LatLng(-23.684, 133.903), 4)); // Set listeners for click events. googleMap.setOnPolylineClickListener(this); googleMap.setOnPolygonClickListener(this); }Kotlin
class PolyActivity : AppCompatActivity(), OnMapReadyCallback, OnPolylineClickListener, OnPolygonClickListener { override fun onCreate(savedInstanceState: Bundle?) { super.onCreate(savedInstanceState) // Retrieve the content view that renders the map. setContentView(R.layout.activity_maps) // Get the SupportMapFragment and request notification when the map is ready to be used. val mapFragment = supportFragmentManager .findFragmentById(R.id.map) as SupportMapFragment? mapFragment?.getMapAsync(this) } /** * Manipulates the map when it's available. * The API invokes this callback when the map is ready to be used. * This is where we can add markers or lines, add listeners or move the camera. * In this tutorial, we add polylines and polygons to represent routes and areas on the map. */ override fun onMapReady(googleMap: GoogleMap) { // Add polylines to the map. // Polylines are useful to show a route or some other connection between points. val polyline1 = googleMap.addPolyline(PolylineOptions() .clickable(true) .add( LatLng(-35.016, 143.321), LatLng(-34.747, 145.592), LatLng(-34.364, 147.891), LatLng(-33.501, 150.217), LatLng(-32.306, 149.248), LatLng(-32.491, 147.309))) // Position the map's camera near Alice Springs in the center of Australia, // and set the zoom factor so most of Australia shows on the screen. googleMap.moveCamera(CameraUpdateFactory.newLatLngZoom(LatLng(-23.684, 133.903), 4f)) // Set listeners for click events. googleMap.setOnPolylineClickListener(this) googleMap.setOnPolygonClickListener(this) }
Adicionar uma polilinha para desenhar uma linha no mapa
Uma Polyline é uma série de segmentos de linha conectados. As polilinhas são úteis para representar trajetos, caminhos ou outras conexões entre locais no mapa.
Crie um objeto
PolylineOptionse adicione pontos a ele. Cada ponto representa um local no mapa, que você define com um objetoLatLngcontendo valores de latitude e longitude. O exemplo de código abaixo cria uma polilinha com seis pontos.Chame
GoogleMap.addPolyline()para adicionar a polilinha ao mapa.Java
Polyline polyline1 = googleMap.addPolyline(new PolylineOptions() .clickable(true) .add( new LatLng(-35.016, 143.321), new LatLng(-34.747, 145.592), new LatLng(-34.364, 147.891), new LatLng(-33.501, 150.217), new LatLng(-32.306, 149.248), new LatLng(-32.491, 147.309)));Kotlin
val polyline1 = googleMap.addPolyline(PolylineOptions() .clickable(true) .add( LatLng(-35.016, 143.321), LatLng(-34.747, 145.592), LatLng(-34.364, 147.891), LatLng(-33.501, 150.217), LatLng(-32.306, 149.248), LatLng(-32.491, 147.309)))
Defina a opção clickable da polilinha como true se você quiser gerenciar os eventos de clique dela. Falaremos mais sobre gerenciamento de eventos mais adiante neste tutorial.
Armazenar dados arbitrários com uma polilinha
Você pode armazenar objetos de dados arbitrários com polilinhas e outros objetos de geometria.
Chame
Polyline.setTag()para armazenar um objeto de dados com a polilinha. O código abaixo define uma tag arbitrária (A) indicando um tipo de polilinha.Java
Polyline polyline1 = googleMap.addPolyline(new PolylineOptions()
    .clickable(true)
    .add(
            new LatLng(-35.016, 143.321),
            new LatLng(-34.747, 145.592),
            new LatLng(-34.364, 147.891),
            new LatLng(-33.501, 150.217),
            new LatLng(-32.306, 149.248),
            new LatLng(-32.491, 147.309)));
// Store a data object with the polyline, used here to indicate an arbitrary type.
polyline1.setTag("A");
Kotlin
val polyline1 = googleMap.addPolyline(PolylineOptions()
.clickable(true)
.add(
    LatLng(-35.016, 143.321),
    LatLng(-34.747, 145.592),
    LatLng(-34.364, 147.891),
    LatLng(-33.501, 150.217),
    LatLng(-32.306, 149.248),
    LatLng(-32.491, 147.309)))
// Store a data object with the polyline, used here to indicate an arbitrary type.
polyline1.tag = "A
Recupere os dados usando
Polyline.getTag(), conforme a seção a seguir.
Adicionar um estilo personalizado à polilinha
Você pode especificar várias propriedades de estilo no objeto PolylineOptions. As opções de estilo incluem a cor, a largura e o padrão do traço, os tipos de junção e os limites inicial e final. Se você não definir uma propriedade específica, a API usará um padrão.
No código a seguir, um limite redondo é aplicado ao fim da linha, além de um limite inicial diferente, dependendo do tipo da polilinha. Esse tipo é uma propriedade arbitrária armazenada no objeto de dados da polilinha. O exemplo também especifica a largura e a cor do traço, bem como o tipo de junção:
Java
private static final int COLOR_BLACK_ARGB = 0xff000000;
private static final int POLYLINE_STROKE_WIDTH_PX = 12;
/**
* Styles the polyline, based on type.
* @param polyline The polyline object that needs styling.
*/
private void stylePolyline(Polyline polyline) {
String type = "";
// Get the data object stored with the polyline.
if (polyline.getTag() != null) {
type = polyline.getTag().toString();
}
switch (type) {
// If no type is given, allow the API to use the default.
case "A":
// Use a custom bitmap as the cap at the start of the line.
polyline.setStartCap(
new CustomCap(
BitmapDescriptorFactory.fromResource(R.drawable.ic_arrow), 10));
break;
case "B":
// Use a round cap at the start of the line.
polyline.setStartCap(new RoundCap());
break;
}
polyline.setEndCap(new RoundCap());
polyline.setWidth(POLYLINE_STROKE_WIDTH_PX);
polyline.setColor(COLOR_BLACK_ARGB);
polyline.setJointType(JointType.ROUND);
}
Kotlin
private val COLOR_BLACK_ARGB = -0x1000000
private val POLYLINE_STROKE_WIDTH_PX = 12
/**
* Styles the polyline, based on type.
* @param polyline The polyline object that needs styling.
*/
private fun stylePolyline(polyline: Polyline) {
// Get the data object stored with the polyline.
val type = polyline.tag?.toString() ?: ""
when (type) {
"A" -> {
// Use a custom bitmap as the cap at the start of the line.
polyline.startCap = CustomCap(
BitmapDescriptorFactory.fromResource(R.drawable.ic_arrow), 10f)
}
"B" -> {
// Use a round cap at the start of the line.
polyline.startCap = RoundCap()
}
}
polyline.endCap = RoundCap()
polyline.width = POLYLINE_STROKE_WIDTH_PX.toFloat()
polyline.color = COLOR_BLACK_ARGB
polyline.jointType = JointType.ROUND
}
O código acima especifica um bitmap personalizado para o limite inicial da polilinha do tipo A e define uma largura de traço de referência de 10 pixels. A API dimensiona o bitmap de acordo com essa largura de referência. Ao especificar a largura, informe o valor usado ao criar a imagem em bitmap, com a dimensão original da imagem. Dica: abra a imagem em bitmap com zoom de 100% em um editor e insira a largura desejada do traço de linha em relação à imagem.
Leia mais sobre limites de linha e outras opções para personalizar formas.
Processar eventos de clique na polilinha
Para tornar a polilinha clicável, chame
Polyline.setClickable(). Por padrão, as polilinhas não são clicáveis, e seu app não recebe uma notificação quando o usuário toca nelas.Implemente a interface
OnPolylineClickListenere chameGoogleMap.setOnPolylineClickListener()para definir o listener no mapa:Java
public class PolyActivity extends AppCompatActivity implements OnMapReadyCallback, GoogleMap.OnPolylineClickListener, GoogleMap.OnPolygonClickListener { @Override protected void onCreate(Bundle savedInstanceState) { super.onCreate(savedInstanceState); // Retrieve the content view that renders the map. setContentView(R.layout.activity_maps); // Get the SupportMapFragment and request notification when the map is ready to be used. SupportMapFragment mapFragment = (SupportMapFragment) getSupportFragmentManager() .findFragmentById(R.id.map); mapFragment.getMapAsync(this); } /** * Manipulates the map when it's available. * The API invokes this callback when the map is ready to be used. * This is where we can add markers or lines, add listeners or move the camera. * In this tutorial, we add polylines and polygons to represent routes and areas on the map. */ @Override public void onMapReady(GoogleMap googleMap) { // Add polylines to the map. // Polylines are useful to show a route or some other connection between points. Polyline polyline1 = googleMap.addPolyline(new PolylineOptions() .clickable(true) .add( new LatLng(-35.016, 143.321), new LatLng(-34.747, 145.592), new LatLng(-34.364, 147.891), new LatLng(-33.501, 150.217), new LatLng(-32.306, 149.248), new LatLng(-32.491, 147.309))); // Position the map's camera near Alice Springs in the center of Australia, // and set the zoom factor so most of Australia shows on the screen. googleMap.moveCamera(CameraUpdateFactory.newLatLngZoom(new LatLng(-23.684, 133.903), 4)); // Set listeners for click events. googleMap.setOnPolylineClickListener(this); googleMap.setOnPolygonClickListener(this); }Kotlin
class PolyActivity : AppCompatActivity(), OnMapReadyCallback, OnPolylineClickListener, OnPolygonClickListener { override fun onCreate(savedInstanceState: Bundle?) { super.onCreate(savedInstanceState) // Retrieve the content view that renders the map. setContentView(R.layout.activity_maps) // Get the SupportMapFragment and request notification when the map is ready to be used. val mapFragment = supportFragmentManager .findFragmentById(R.id.map) as SupportMapFragment? mapFragment?.getMapAsync(this) } /** * Manipulates the map when it's available. * The API invokes this callback when the map is ready to be used. * This is where we can add markers or lines, add listeners or move the camera. * In this tutorial, we add polylines and polygons to represent routes and areas on the map. */ override fun onMapReady(googleMap: GoogleMap) { // Add polylines to the map. // Polylines are useful to show a route or some other connection between points. val polyline1 = googleMap.addPolyline(PolylineOptions() .clickable(true) .add( LatLng(-35.016, 143.321), LatLng(-34.747, 145.592), LatLng(-34.364, 147.891), LatLng(-33.501, 150.217), LatLng(-32.306, 149.248), LatLng(-32.491, 147.309))) // Position the map's camera near Alice Springs in the center of Australia, // and set the zoom factor so most of Australia shows on the screen. googleMap.moveCamera(CameraUpdateFactory.newLatLngZoom(LatLng(-23.684, 133.903), 4f)) // Set listeners for click events. googleMap.setOnPolylineClickListener(this) googleMap.setOnPolygonClickListener(this) }Substitua o método de callback
onPolylineClick(). No exemplo a seguir, o padrão de traço da linha muda de sólido para pontilhado cada vez que o usuário clica na polilinha:Java
private static final int PATTERN_GAP_LENGTH_PX = 20; private static final PatternItem DOT = new Dot(); private static final PatternItem GAP = new Gap(PATTERN_GAP_LENGTH_PX); // Create a stroke pattern of a gap followed by a dot. private static final List<PatternItem> PATTERN_POLYLINE_DOTTED = Arrays.asList(GAP, DOT); /** * Listens for clicks on a polyline. * @param polyline The polyline object that the user has clicked. */ @Override public void onPolylineClick(Polyline polyline) { // Flip from solid stroke to dotted stroke pattern. if ((polyline.getPattern() == null) || (!polyline.getPattern().contains(DOT))) { polyline.setPattern(PATTERN_POLYLINE_DOTTED); } else { // The default pattern is a solid stroke. polyline.setPattern(null); } Toast.makeText(this, "Route type " + polyline.getTag().toString(), Toast.LENGTH_SHORT).show(); }Kotlin
private val PATTERN_GAP_LENGTH_PX = 20 private val DOT: PatternItem = Dot() private val GAP: PatternItem = Gap(PATTERN_GAP_LENGTH_PX.toFloat()) // Create a stroke pattern of a gap followed by a dot. private val PATTERN_POLYLINE_DOTTED = listOf(GAP, DOT) /** * Listens for clicks on a polyline. * @param polyline The polyline object that the user has clicked. */ override fun onPolylineClick(polyline: Polyline) { // Flip from solid stroke to dotted stroke pattern. if (polyline.pattern == null || !polyline.pattern!!.contains(DOT)) { polyline.pattern = PATTERN_POLYLINE_DOTTED } else { // The default pattern is a solid stroke. polyline.pattern = null } Toast.makeText(this, "Route type " + polyline.tag.toString(), Toast.LENGTH_SHORT).show() }
Adicionar polígonos para representar áreas no mapa
Um Polygon é uma forma que consiste em várias coordenadas em uma sequência ordenada, semelhante a uma Polyline. A diferença é que o polígono define uma área fechada com um interior preenchível, enquanto uma polilinha é aberta.
Crie um objeto
PolygonOptionse adicione pontos a ele. Cada ponto representa um local no mapa, que você define com um objetoLatLngcontendo valores de latitude e longitude. O exemplo de código abaixo cria um polígono com quatro pontos.Para tornar o polígono clicável, chame
Polygon.setClickable(). Por padrão, os polígonos não são clicáveis, e seu app não recebe uma notificação quando o usuário toca neles. A forma de lidar com eventos de clique no polígono é igual ao gerenciamento de eventos em polilinhas, que já foi explicado neste tutorial.Chame
GoogleMap.addPolygon()para adicionar o polígono ao mapa.Chame
Polygon.setTag()para armazenar um objeto de dados com o polígono. O código abaixo define um tipo arbitrário (alpha) para o polígono.Java
// Add polygons to indicate areas on the map. Polygon polygon1 = googleMap.addPolygon(new PolygonOptions() .clickable(true) .add( new LatLng(-27.457, 153.040), new LatLng(-33.852, 151.211), new LatLng(-37.813, 144.962), new LatLng(-34.928, 138.599))); // Store a data object with the polygon, used here to indicate an arbitrary type. polygon1.setTag("alpha");Kotlin
// Add polygons to indicate areas on the map. val polygon1 = googleMap.addPolygon(PolygonOptions() .clickable(true) .add( LatLng(-27.457, 153.040), LatLng(-33.852, 151.211), LatLng(-37.813, 144.962), LatLng(-34.928, 138.599))) // Store a data object with the polygon, used here to indicate an arbitrary type. polygon1.tag = "alpha" // Style the polygon.
Adicionar um estilo personalizado ao polígono
É possível especificar várias propriedades de estilo no objeto PolygonOptions. As opções de estilo incluem a cor, a largura, o padrão e os tipos de junção do traço, além da cor de preenchimento. Se você não definir uma propriedade específica, a API usará um padrão.
No código a seguir, cores específicas e padrões de traço são aplicados, dependendo do tipo do polígono. Esse tipo é uma propriedade arbitrária armazenada no objeto de dados do polígono:
Java
private static final int COLOR_WHITE_ARGB = 0xffffffff;
private static final int COLOR_DARK_GREEN_ARGB = 0xff388E3C;
private static final int COLOR_LIGHT_GREEN_ARGB = 0xff81C784;
private static final int COLOR_DARK_ORANGE_ARGB = 0xffF57F17;
private static final int COLOR_LIGHT_ORANGE_ARGB = 0xffF9A825;
private static final int POLYGON_STROKE_WIDTH_PX = 8;
private static final int PATTERN_DASH_LENGTH_PX = 20;
private static final PatternItem DASH = new Dash(PATTERN_DASH_LENGTH_PX);
// Create a stroke pattern of a gap followed by a dash.
private static final List<PatternItem> PATTERN_POLYGON_ALPHA = Arrays.asList(GAP, DASH);
// Create a stroke pattern of a dot followed by a gap, a dash, and another gap.
private static final List<PatternItem> PATTERN_POLYGON_BETA =
Arrays.asList(DOT, GAP, DASH, GAP);
/**
* Styles the polygon, based on type.
* @param polygon The polygon object that needs styling.
*/
private void stylePolygon(Polygon polygon) {
String type = "";
// Get the data object stored with the polygon.
if (polygon.getTag() != null) {
type = polygon.getTag().toString();
}
List<PatternItem> pattern = null;
int strokeColor = COLOR_BLACK_ARGB;
int fillColor = COLOR_WHITE_ARGB;
switch (type) {
// If no type is given, allow the API to use the default.
case "alpha":
// Apply a stroke pattern to render a dashed line, and define colors.
pattern = PATTERN_POLYGON_ALPHA;
strokeColor = COLOR_DARK_GREEN_ARGB;
fillColor = COLOR_LIGHT_GREEN_ARGB;
break;
case "beta":
// Apply a stroke pattern to render a line of dots and dashes, and define colors.
pattern = PATTERN_POLYGON_BETA;
strokeColor = COLOR_DARK_ORANGE_ARGB;
fillColor = COLOR_LIGHT_ORANGE_ARGB;
break;
}
polygon.setStrokePattern(pattern);
polygon.setStrokeWidth(POLYGON_STROKE_WIDTH_PX);
polygon.setStrokeColor(strokeColor);
polygon.setFillColor(fillColor);
}
Kotlin
private val COLOR_WHITE_ARGB = -0x1
private val COLOR_DARK_GREEN_ARGB = -0xc771c4
private val COLOR_LIGHT_GREEN_ARGB = -0x7e387c
private val COLOR_DARK_ORANGE_ARGB = -0xa80e9
private val COLOR_LIGHT_ORANGE_ARGB = -0x657db
private val POLYGON_STROKE_WIDTH_PX = 8
private val PATTERN_DASH_LENGTH_PX = 20
private val DASH: PatternItem = Dash(PATTERN_DASH_LENGTH_PX.toFloat())
// Create a stroke pattern of a gap followed by a dash.
private val PATTERN_POLYGON_ALPHA = listOf(GAP, DASH)
// Create a stroke pattern of a dot followed by a gap, a dash, and another gap.
private val PATTERN_POLYGON_BETA = listOf(DOT, GAP, DASH, GAP)
/**
* Styles the polygon, based on type.
* @param polygon The polygon object that needs styling.
*/
private fun stylePolygon(polygon: Polygon) {
// Get the data object stored with the polygon.
val type = polygon.tag?.toString() ?: ""
var pattern: List<PatternItem>? = null
var strokeColor = COLOR_BLACK_ARGB
var fillColor = COLOR_WHITE_ARGB
when (type) {
"alpha" -> {
// Apply a stroke pattern to render a dashed line, and define colors.
pattern = PATTERN_POLYGON_ALPHA
strokeColor = COLOR_DARK_GREEN_ARGB
fillColor = COLOR_LIGHT_GREEN_ARGB
}
"beta" -> {
// Apply a stroke pattern to render a line of dots and dashes, and define colors.
pattern = PATTERN_POLYGON_BETA
strokeColor = COLOR_DARK_ORANGE_ARGB
fillColor = COLOR_LIGHT_ORANGE_ARGB
}
}
polygon.strokePattern = pattern
polygon.strokeWidth = POLYGON_STROKE_WIDTH_PX.toFloat()
polygon.strokeColor = strokeColor
polygon.fillColor = fillColor
}
Leia mais sobre padrões de traço e outras opções para personalizar formas.
Próximas etapas
Saiba mais sobre o objeto Circle. Os Circles são semelhantes aos polígonos, mas têm propriedades que refletem a forma de um círculo.