
इस पेज पर, एचटीटीपी चैट ऐप्लिकेशन बनाने का तरीका बताया गया है. इस आर्किटेक्चर को लागू करने के अलग-अलग तरीके हैं. Google Cloud पर, Cloud Functions, Cloud Run, और App Engine का इस्तेमाल किया जा सकता है. इस क्विकस्टार्ट में, आप एक ऐसे Cloud Function को लिखते और डिप्लॉय करते हैं जिसका इस्तेमाल Chat ऐप्लिकेशन, उपयोगकर्ता के मैसेज का जवाब देने के लिए करता है.
इस आर्किटेक्चर के साथ, एचटीटीपी का इस्तेमाल करके Chat को Google Cloud या कंपनी की इमारत में मौजूद सर्वर के साथ इंटिग्रेट करने के लिए कॉन्फ़िगर किया जा सकता है, जैसा कि इस डायग्राम में दिखाया गया है:

पिछले डायग्राम में, एचटीटीपी चैट ऐप्लिकेशन से इंटरैक्ट करने वाले उपयोगकर्ता की जानकारी इस तरह से दी गई है:
- कोई उपयोगकर्ता, Chat ऐप्लिकेशन में Chat में मैसेज भेजता है. यह मैसेज, डायरेक्ट मैसेज या Chat स्पेस में भेजा जा सकता है.
- एचटीटीपी अनुरोध ऐसे वेब सर्वर को भेजा जाता है जो क्लाउड या कंपनी की इमारत में मौजूद सिस्टम होता है. इसमें Chat ऐप्लिकेशन का लॉजिक होता है.
- इसके अलावा, Chat ऐप्लिकेशन के लॉजिक को Google Workspace की सेवाओं (जैसे, Calendar और Sheets), Google की अन्य सेवाओं (जैसे, Maps, YouTube, और Vertex AI) या अन्य वेब सेवाओं (जैसे, प्रोजेक्ट मैनेजमेंट सिस्टम या टिकट करने वाला टूल) के साथ इंटिग्रेट किया जा सकता है.
- वेब सर्वर, Chat में Chat ऐप्लिकेशन सेवा को एचटीटीपी रिस्पॉन्स भेजता है.
- उपयोगकर्ता को जवाब भेजा जाता है.
- इसके अलावा, Chat ऐप्लिकेशन में मैसेज पोस्ट करने या दूसरे काम करने के लिए, Chat API को कॉल किया जा सकता है.
इस आर्किटेक्चर की मदद से, आपके पास अपने सिस्टम में पहले से मौजूद लाइब्रेरी और कॉम्पोनेंट का इस्तेमाल करने का विकल्प होता है. ऐसा इसलिए, क्योंकि चैट ऐप्लिकेशन को अलग-अलग प्रोग्रामिंग भाषाओं का इस्तेमाल करके डिज़ाइन किया जा सकता है.
मकसद
- अपना एनवायरमेंट सेट अप करें.
- Cloud फ़ंक्शन बनाना और उसे डिप्लॉय करना.
- ऐप्लिकेशन को Chat पर पब्लिश करें.
- ऐप्लिकेशन की जांच करें.
ज़रूरी शर्तें
- आपके पास ऐसा Business या Enterprise Google Workspace खाता होना चाहिए जिसके पास Google Chat का ऐक्सेस हो.
- बिलिंग की सुविधा वाला Google Cloud प्रोजेक्ट. किसी मौजूदा प्रोजेक्ट के लिए बिलिंग की सुविधा चालू है या नहीं, यह देखने के लिए अपने प्रोजेक्ट के लिए बिलिंग की सुविधा के चालू होने की पुष्टि करना लेख पढ़ें. प्रोजेक्ट बनाने और बिलिंग सेट अप करने के लिए, Google Cloud प्रोजेक्ट बनाना लेख पढ़ें.
एनवायरमेंट सेट अप करना
Google API का इस्तेमाल करने से पहले, आपको उन्हें Google Cloud प्रोजेक्ट में चालू करना होगा. किसी एक Google Cloud प्रोजेक्ट में, एक या उससे ज़्यादा एपीआई चालू किए जा सकते हैं.Google Cloud Console में, Google Chat API, Cloud Build API, Cloud Functions API, Cloud Pub/Sub एपीआई, Cloud Logging API, Artifact Registry API, और Cloud Run API को चालू करें.
Cloud फ़ंक्शन बनाना और डिप्लॉय करना
ऐसा Cloud फ़ंक्शन बनाएं और डिप्लॉय करें जो मैसेज भेजने वाले व्यक्ति के डिसप्ले नेम और अवतार की इमेज के साथ Chat कार्ड जनरेट करता हो. जब Chat ऐप्लिकेशन को कोई मैसेज मिलता है, तो यह फ़ंक्शन को चलाता है और कार्ड से जवाब देता है.
अपने Chat ऐप्लिकेशन के लिए फ़ंक्शन बनाने और उसे डिप्लॉय करने के लिए, ये काम करें:
Node.js
Google Cloud Console में, Cloud Functions पेज पर जाएं:
पक्का करें कि आपके Chat ऐप्लिकेशन का प्रोजेक्ट चुना गया हो.
फ़ंक्शन बनाएं पर क्लिक करें.
'फ़ंक्शन बनाएं' पेज पर, अपना फ़ंक्शन सेट अप करें:
- एनवायरमेंट में, Cloud Run फ़ंक्शन चुनें.
- फ़ंक्शन के नाम में
QuickStartChatAppडालें. - इलाका में, कोई इलाका चुनें.
- पुष्टि करने की सुविधा में जाकर, पुष्टि करना ज़रूरी है चुनें.
- आगे बढ़ें पर क्लिक करें.
रनटाइम में, Node.js का सबसे नया वर्शन चुनें.
सोर्स कोड में, इनलाइन एडिटर चुनें.
एंट्री पॉइंट में, डिफ़ॉल्ट टेक्स्ट मिटाएं और
avatarAppडालें.index.jsके कॉन्टेंट को इस कोड से बदलें:डिप्लॉय करें पर क्लिक करें.
Python
Google Cloud Console में, Cloud Functions पेज पर जाएं:
पक्का करें कि आपके Chat ऐप्लिकेशन का प्रोजेक्ट चुना गया हो.
फ़ंक्शन बनाएं पर क्लिक करें.
'फ़ंक्शन बनाएं' पेज पर, अपना फ़ंक्शन सेट अप करें:
- एनवायरमेंट में, Cloud Run फ़ंक्शन चुनें.
- फ़ंक्शन के नाम में
QuickStartChatAppडालें. - इलाका में, कोई इलाका चुनें.
- पुष्टि करने की सुविधा में जाकर, पुष्टि करना ज़रूरी है चुनें.
- आगे बढ़ें पर क्लिक करें.
रनटाइम में, Python का सबसे नया वर्शन चुनें.
सोर्स कोड में, इनलाइन एडिटर चुनें.
एंट्री पॉइंट में, डिफ़ॉल्ट टेक्स्ट मिटाएं और
avatar_appडालें.main.pyके कॉन्टेंट को इस कोड से बदलें:डिप्लॉय करें पर क्लिक करें.
Java
Google Cloud Console में, Cloud Functions पेज पर जाएं:
पक्का करें कि आपके Chat ऐप्लिकेशन का प्रोजेक्ट चुना गया हो.
फ़ंक्शन बनाएं पर क्लिक करें.
'फ़ंक्शन बनाएं' पेज पर, अपना फ़ंक्शन सेट अप करें:
- एनवायरमेंट में, Cloud Run फ़ंक्शन चुनें.
- फ़ंक्शन के नाम में
QuickStartChatAppडालें. - इलाका में, कोई इलाका चुनें.
- पुष्टि करने की सुविधा में जाकर, पुष्टि करना ज़रूरी है चुनें.
- आगे बढ़ें पर क्लिक करें.
रनटाइम में, Java का सबसे नया वर्शन चुनें.
सोर्स कोड में, इनलाइन एडिटर चुनें.
एंट्री पॉइंट में जाकर, डिफ़ॉल्ट टेक्स्ट मिटाएं और
Appडालें.src/main/java/com/example/Example.javaका नाम बदलकरsrc/main/java/App.javaकरें.App.javaके कॉन्टेंट को इस कोड से बदलें:pom.xmlके कॉन्टेंट को इस कोड से बदलें:डिप्लॉय करें पर क्लिक करें.
ऐसा करने पर, Cloud Functions की जानकारी वाला पेज खुलेगा. इसके बाद, आपका फ़ंक्शन दो तरह के प्रोग्रेस इंंडिकेटर के साथ दिखेगा: एक बिल्ड के लिए और दूसरा सेवा के लिए. जब प्रोग्रेस इंडिकेटर हट जाते हैं और उनकी जगह सही का निशान दिखने लगता है, तो इसका मतलब है कि फ़ंक्शन डिप्लॉय हो गया है और इस्तेमाल के लिए तैयार है.
Google Chat को अपने फ़ंक्शन को लागू करने की अनुमति देना
Google Chat को अपने फ़ंक्शन को ट्रिगर करने की अनुमति देने के लिए, Google Chat के सेवा खाते को Cloud Run Invoker भूमिका के साथ जोड़ें.
Google Cloud Console में, Cloud Run पेज पर जाएं:
Cloud Run सेवाओं की सूची में, डेटा पाने वाले फ़ंक्शन के बगल में मौजूद चेकबॉक्स को चुनें. (फ़ंक्शन पर क्लिक न करें.)
अनुमतियां पर क्लिक करें. अनुमतियां पैनल खुलता है.
प्रिंसिपल जोड़ें पर क्लिक करें.
नए प्रिंसिपल में,
chat@system.gserviceaccount.comडालें.कोई भूमिका चुनें में जाकर, Cloud Run > Cloud Run Invoker चुनें.
सेव करें पर क्लिक करें.
ऐप्लिकेशन को Google Chat पर पब्लिश करना
Cloud फ़ंक्शन को डिप्लॉय करने के बाद, इसे Google Chat ऐप्लिकेशन में बदलने के लिए यह तरीका अपनाएं:
Google Cloud Console में, मेन्यू > Cloud Functions पर क्लिक करें.
पक्का करें कि आपने जिस प्रोजेक्ट के लिए Cloud Functions चालू किया है वह चुना गया हो.
फ़ंक्शन की सूची में, QuickStartChatApp पर क्लिक करें.
ट्रिगर टैब पर क्लिक करें.
एचटीटीपीएस में जाकर, यूआरएल कॉपी करें.
"Google Chat API" खोजें और Google Chat API पर क्लिक करें. इसके बाद, मैनेज करें पर क्लिक करें.
कॉन्फ़िगरेशन पर क्लिक करें और Google Chat ऐप्लिकेशन सेट अप करें:
- ऐप्लिकेशन का नाम में,
Quickstart Appडालें. - अवतार का यूआरएल में,
https://developers.google.com/chat/images/quickstart-app-avatar.pngडालें. - ब्यौरा में,
Quickstart appडालें. - काम करने का तरीका में जाकर, 1:1 मैसेज पाएं और स्पेसेज़ और ग्रुप बातचीत में शामिल हों को चुनें.
- कनेक्शन सेटिंग में जाकर, एचटीटीपी एंडपॉइंट यूआरएल चुनें. इसके बाद, Cloud फ़ंक्शन ट्रिगर के लिए यूआरएल को बॉक्स में चिपकाएं.
- पुष्टि करने वाली ऑडियंस में, एचटीटीपी एंडपॉइंट यूआरएल चुनें.
- प्रॉडक्ट की उपलब्धता में जाकर, अपने डोमेन में Google Chat ऐप्लिकेशन को कुछ लोगों और ग्रुप के लिए उपलब्ध कराएं को चुनें. इसके बाद, अपना ईमेल पता डालें.
- लॉग में जाकर, लॉगिंग में गड़बड़ियां लॉग करें को चुनें.
- ऐप्लिकेशन का नाम में,
सेव करें पर क्लिक करें.
Chat ऐप्लिकेशन, Chat पर मैसेज पाने और उनका जवाब देने के लिए तैयार है.
Chat ऐप्लिकेशन की जांच करना
अपने Chat ऐप्लिकेशन की जांच करने के लिए, Chat ऐप्लिकेशन में डायरेक्ट मैसेज स्पेस खोलें और मैसेज भेजें:
उस Google Workspace खाते का इस्तेमाल करके Google Chat खोलें जो आपने भरोसेमंद टेस्टर के तौर पर जोड़ते समय दिया था.
- नई चैट पर क्लिक करें.
- एक या उससे ज़्यादा लोगों को जोड़ें फ़ील्ड में, अपने Chat ऐप्लिकेशन का नाम लिखें.
नतीजों में से अपना Chat ऐप्लिकेशन चुनें. एक डायरेक्ट मैसेज खुलेगा.
- ऐप्लिकेशन को भेजे गए नए डायरेक्ट मैसेज में,
Helloलिखें औरenterदबाएं.
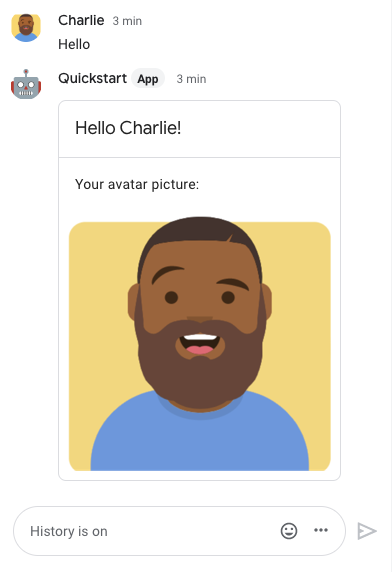
Chat ऐप्लिकेशन के जवाब में एक कार्ड मैसेज होता है. इसमें, मैसेज भेजने वाले व्यक्ति का नाम और अवतार इमेज दिखती है. इसकी इमेज यहां दी गई है:
भरोसेमंद टेस्टर जोड़ने और इंटरैक्टिव सुविधाओं की जांच करने के बारे में ज़्यादा जानने के लिए, Google Chat ऐप्लिकेशन के लिए इंटरैक्टिव सुविधाओं की जांच करना लेख पढ़ें.
समस्या हल करें
जब Google Chat ऐप्लिकेशन या कार्ड की ओर से गड़बड़ी का मैसेज दिखता है, तो Chat के इंटरफ़ेस पर "कोई गड़बड़ी हुई" मैसेज दिखता है. या "आपका अनुरोध प्रोसेस नहीं किया जा सका." कभी-कभी Chat के यूज़र इंटरफ़ेस (यूआई) पर, गड़बड़ी का कोई मैसेज नहीं दिखता. हालांकि, Chat ऐप्लिकेशन या कार्ड से कोई अनचाहा नतीजा मिल सकता है. उदाहरण के लिए, हो सकता है कि कार्ड का मैसेज न दिखे.
ऐसा हो सकता है कि Chat के यूज़र इंटरफ़ेस (यूआई) में गड़बड़ी का मैसेज न दिखे. हालांकि, Chat ऐप्लिकेशन के लिए गड़बड़ी को लॉग करने की सुविधा चालू होने पर, गड़बड़ी के बारे में जानकारी देने वाले मैसेज और लॉग डेटा उपलब्ध होते हैं. इनकी मदद से, गड़बड़ियों को ठीक किया जा सकता है. गड़बड़ियों को देखने, डीबग करने, और ठीक करने में मदद के लिए, Google Chat की गड़बड़ियों को ठीक करना और समस्या हल करना देखें.
व्यवस्थित करें
हमारा सुझाव है कि आप इस ट्यूटोरियल में इस्तेमाल किए गए संसाधनों के लिए, अपने Google Cloud खाते से शुल्क लगने से बचने के लिए, Cloud प्रोजेक्ट मिटा दें.
- Google Cloud Console में, संसाधन मैनेज करें पेज पर जाएं. मेन्यू > IAM और एडमिन> संसाधन मैनेज करें पर क्लिक करें.
- प्रोजेक्ट की सूची में, वह प्रोजेक्ट चुनें जिसे मिटाना है. इसके बाद, मिटाएं पर क्लिक करें.
- डायलॉग में, प्रोजेक्ट आईडी टाइप करें. इसके बाद, प्रोजेक्ट को मिटाने के लिए बंद करें पर क्लिक करें.
मिलते-जुलते विषय
Chat ऐप्लिकेशन में ज़्यादा सुविधाएं जोड़ने के लिए, ये देखें: