HTTP Google Chat アプリを作成する

このページでは、HTTP Chat アプリを作成する方法について説明します。このアーキテクチャを実装するには、さまざまな方法があります。Google Cloud では、Cloud Functions、Cloud Run、App Engine を使用できます。このクイックスタートでは、 コードを書いてデプロイする Cloud Functions の関数 メッセージに返信するために Google Chat アプリが使用するもの。

このアーキテクチャでは、Google Chat を Google Chat と HTTP を使用して Google Cloud またはオンプレミス サーバーと通信します。 次の図をご覧ください。

オンプレミス サーバーでウェブサービスを使用している Chat アプリのアーキテクチャ。

上の図では、HTTP HTTPS サーバーを操作しているユーザー Chat アプリには、次のような情報の流れがあります。

  1. ユーザーが、ダイレクト メッセージまたは Chat スペースで Chat アプリにメッセージを送信します。
  2. HTTP リクエストが、Chat アプリのロジックを含むクラウドまたはオンプレミス システムであるウェブサーバーに送信されます。
  3. 必要に応じて、Chat 用アプリのロジックを Google Workspace サービス(カレンダー、 スプレッドシートなど)、その他の Google サービス (Google マップ、YouTube、Vertex AI など)、またはその他のウェブサービス(プロジェクトなど) チケット発行ツールなど)を使用することです。
  4. ウェブサーバーが HTTP レスポンスを Chat での Chat アプリサービス。
  5. レスポンスがユーザーに配信されます。
  6. 必要に応じて、Chat アプリは Chat API を使用して、メッセージを非同期で投稿したり、 必要があります。

これらの Chat アプリはさまざまなプログラミング言語を使用して設計できるため、このアーキテクチャでは、システムにすでに存在する既存のライブラリとコンポーネントを柔軟に使用できます。

目標

  • 環境を設定する。
  • Cloud Functions の関数を作成してデプロイします。
  • アプリを Chat に公開します。
  • アプリをテストします。

前提条件

環境を設定する

Google API を使用する前に、Google Cloud プロジェクトで有効にする必要があります。 1 つの Google Cloud プロジェクトで 1 つ以上の API を有効にできます。
  • Google Cloud コンソールで、Google Chat API、Cloud Build API、Cloud Functions API、Cloud Pub/Sub API、Cloud Logging API、Artifact Registry API、Cloud Run API を有効にします。

    API を有効にする

Cloud 関数を作成してデプロイする

Chat カードを生成する Cloud Functions の関数を作成してデプロイする 送信者の表示名とアバター画像が表示されます。Chat アプリがメッセージを受信すると、関数を実行してカードで応答します。

Chat アプリの関数を作成してデプロイする手順は次のとおりです。

Node.js

  1. Google Cloud コンソールで、[Cloud Functions] ページに移動します。

    Cloud Functions に移動

    Chat アプリのプロジェクトが選択されていることを確認します。

  2. [関数を作成] をクリックします。

  3. [関数の作成] ページで、関数を設定します。

    1. [環境] で [第 2 世代] を選択します。
    2. [関数名] に「QuickStartChatApp」と入力します。
    3. [リージョン] でリージョンを選択します。
    4. [認証] で [認証が必要] を選択します。
    5. [次へ] をクリックします。
  4. [ランタイム] で、最新バージョンの Node.js を選択します。

  5. [ソースコード] で [インライン エディタ] を選択します。

  6. [エントリ ポイント] でデフォルトのテキストを削除し、「avatarApp」と入力します。

  7. index.js の内容を次のコードに置き換えます。

    node/avatar-app/index.js
    // The ID of the slash command "/about".
    // It's not enabled by default, set to the actual ID to enable it. You need to
    // use the same ID as set in the Google Chat API configuration.
    const ABOUT_COMMAND_ID = "";
    
    /**
     * Google Cloud Function that responds to messages sent from a
     * Google Chat space.
     *
     * @param {Object} req Request sent from Google Chat space
     * @param {Object} res Response to send back
     */
    exports.avatarApp = function avatarApp(req, res) {
      if (req.method === 'GET' || !req.body.message) {
        return res.send('Hello! This function is meant to be used ' +
          'in a Google Chat Space.');
      }
    
      // Stores the Google Chat event as a variable.
      const event = req.body;
    
      // Checks for the presence of a slash command in the message.
      if (event.message.slashCommand) {
        // Executes the slash command logic based on its ID.
        // Slash command IDs are set in the Google Chat API configuration.
        switch (event.message.slashCommand.commandId) {
          case ABOUT_COMMAND_ID:
            return res.send({
              privateMessageViewer: event.user,
              text: 'The Avatar app replies to Google Chat messages.'
            });
        }
      }
    
      const sender = req.body.message.sender.displayName;
      const image = req.body.message.sender.avatarUrl;
      const data = createMessage(sender, image);
      res.send(data);
    };
    
    /**
     * Creates a card with two widgets.
     * 
     * @param {string} displayName the sender's display name
     * @param {string} avatarUrl the URL for the sender's avatar
     * @return {Object} a card with the user's avatar.
     */
    function createMessage(displayName, avatarUrl) {
      return {
        text: 'Here\'s your avatar',
        cardsV2: [{
          cardId: 'avatarCard',
          card: {
            name: 'Avatar Card',
            header: {
              title: `Hello ${displayName}!`,
            },
            sections: [{ widgets: [{
              textParagraph: { text: 'Your avatar picture: ' }
            }, {
              image: { imageUrl: avatarUrl }
            }]}]
          }
        }]
      };
    }

  8. [デプロイ] をクリックします。

Python

  1. Google Cloud コンソールで、[Cloud Functions] ページに移動します。

    Cloud Functions に移動

    Chat アプリのプロジェクトが選択されていることを確認します。

  2. [関数を作成] をクリックします。

  3. [関数の作成] ページで、関数を設定します。

    1. [環境] で [第 2 世代] を選択します。
    2. [関数名] に「QuickStartChatApp」と入力します。
    3. [リージョン] でリージョンを選択します。
    4. [認証] で [認証が必要] を選択します。
    5. [次へ] をクリックします。
  4. [ランタイム] で、最新バージョンの Python を選択します。

  5. [ソースコード] で [インライン エディタ] を選択します。

  6. [エントリ ポイント] で、デフォルトのテキストを削除して avatar_app と入力します。

  7. main.py の内容を次のコードに置き換えます。

    python/avatar-app/main.py
    from typing import Any, Mapping
    
    import flask
    import functions_framework
    
    # The ID of the slash command "/about".
    # It's not enabled by default, set to the actual ID to enable it. You need to
    # use the same ID as set in the Google Chat API configuration.
    ABOUT_COMMAND_ID = ""
    
    @functions_framework.http
    def avatar_app(req: flask.Request) -> Mapping[str, Any]:
      """Google Cloud Function that handles requests from Google Chat
    
      Args:
          flask.Request: the request
    
      Returns:
          Mapping[str, Any]: the response
      """
      if req.method == "GET":
        return "Hello! This function must be called from Google Chat."
    
      request_json = req.get_json(silent=True)
    
      # Checks for the presence of a slash command in the message.
      if "slashCommand" in request_json["message"]:
        # Executes the slash command logic based on its ID.
        # Slash command IDs are set in the Google Chat API configuration.
        if request_json["message"]["slashCommand"]["commandId"] == ABOUT_COMMAND_ID:
          return {
            "privateMessageViewer": request_json["user"],
            "text": 'The Avatar app replies to Google Chat messages.'
          }
    
      display_name = request_json["message"]["sender"]["displayName"]
      avatar = request_json["message"]["sender"]["avatarUrl"]
      response = create_message(name=display_name, image_url=avatar)
      return response
    
    
    def create_message(name: str, image_url: str) -> Mapping[str, Any]:
      """Google Cloud Function that handles requests from Google Chat
    
      Args:
          str name: the sender's display name.
          str image_url: the URL for the sender's avatar.
    
      Returns:
          Mapping[str, Any]: a card with the user's avatar.
      """
      return {
        "text": "Here's your avatar",
        "cardsV2": [{
          "cardId": "avatarCard",
          "card": {
              "name": "Avatar Card",
              "header": { "title": f"Hello {name}!" },
              "sections": [{
                "widgets": [{
                  "textParagraph": { "text": "Your avatar picture:" }
                }, {
                  "image": { "imageUrl": image_url }
                }]
              }]
          }
        }]
      }

  8. [デプロイ] をクリックします。

Java

  1. Google Cloud コンソールで、[Cloud Functions] ページに移動します。

    Cloud Functions に移動

    Chat 用アプリのプロジェクトが 選択済みです。

  2. [関数を作成] をクリックします。

  3. [関数の作成] ページで、関数を設定します。

    1. [環境] で [第 2 世代] を選択します。
    2. [関数名] に「QuickStartChatApp」と入力します。
    3. [リージョン] でリージョンを選択します。
    4. [認証] で [認証が必要] を選択します。
    5. [次へ] をクリックします。
  4. [ランタイム] で、最新バージョンの Java を選択します。

  5. [ソースコード] で [インライン エディタ] を選択します。

  6. [エントリ ポイント] でデフォルトのテキストを削除し、「App」と入力します。

  7. src/main/java/com/example/Example.javasrc/main/java/App.java に名前変更します。

  8. App.java の内容を次のコードに置き換えます。

    java/avatar-app/src/main/java/App.java
    import java.util.List;
    
    import com.google.api.services.chat.v1.model.CardWithId;
    import com.google.api.services.chat.v1.model.GoogleAppsCardV1Card;
    import com.google.api.services.chat.v1.model.GoogleAppsCardV1CardHeader;
    import com.google.api.services.chat.v1.model.GoogleAppsCardV1Image;
    import com.google.api.services.chat.v1.model.GoogleAppsCardV1Section;
    import com.google.api.services.chat.v1.model.GoogleAppsCardV1TextParagraph;
    import com.google.api.services.chat.v1.model.GoogleAppsCardV1Widget;
    import com.google.api.services.chat.v1.model.Message;
    import com.google.cloud.functions.HttpFunction;
    import com.google.cloud.functions.HttpRequest;
    import com.google.cloud.functions.HttpResponse;
    import com.google.gson.Gson;
    import com.google.gson.JsonObject;
    
    public class App implements HttpFunction {
      private static final Gson gson = new Gson();
    
      // The ID of the slash command "/about".
      // It's not enabled by default, set to the actual ID to enable it. You need to
      // use the same ID as set in the Google Chat API configuration.
      private static final String ABOUT_COMMAND_ID = "";
    
      @Override
      public void service(HttpRequest request, HttpResponse response) throws Exception {
        JsonObject body = gson.fromJson(request.getReader(), JsonObject.class);
    
        if (request.getMethod().equals("GET") || !body.has("message")) {
          response.getWriter().write("Hello! This function must be called from Google Chat.");
          return;
        }
    
        // Checks for the presence of a slash command in the message.
        if (body.getAsJsonObject("message").has("slashCommand")) {
          // Executes the slash command logic based on its ID.
          // Slash command IDs are set in the Google Chat API configuration.
          JsonObject slashCommand = body.getAsJsonObject("message").getAsJsonObject("slashCommand");
          switch (slashCommand.get("commandId").getAsString()) {
            case ABOUT_COMMAND_ID:
            JsonObject aboutMessage = new JsonObject();
            aboutMessage.addProperty("text", "The Avatar app replies to Google Chat messages.");
            aboutMessage.add("privateMessageViewer", body.getAsJsonObject("user"));
              response.getWriter().write(gson.toJson(aboutMessage));
              return;
          }
        }
    
        JsonObject sender = body.getAsJsonObject("message").getAsJsonObject("sender");
        String displayName = sender.has("displayName") ? sender.get("displayName").getAsString() : "";
        String avatarUrl = sender.has("avatarUrl") ? sender.get("avatarUrl").getAsString() : "";
        Message message = createMessage(displayName, avatarUrl);
        response.getWriter().write(gson.toJson(message));
      }
    
      Message createMessage(String displayName, String avatarUrl) {
        GoogleAppsCardV1CardHeader cardHeader = new GoogleAppsCardV1CardHeader();
        cardHeader.setTitle(String.format("Hello %s!", displayName));
    
        GoogleAppsCardV1TextParagraph textParagraph = new GoogleAppsCardV1TextParagraph();
        textParagraph.setText("Your avatar picture: ");
    
        GoogleAppsCardV1Widget avatarWidget = new GoogleAppsCardV1Widget();
        avatarWidget.setTextParagraph(textParagraph);
    
        GoogleAppsCardV1Image image = new GoogleAppsCardV1Image();
        image.setImageUrl(avatarUrl);
    
        GoogleAppsCardV1Widget avatarImageWidget = new GoogleAppsCardV1Widget();
        avatarImageWidget.setImage(image);
    
        GoogleAppsCardV1Section section = new GoogleAppsCardV1Section();
        section.setWidgets(List.of(avatarWidget, avatarImageWidget));
    
        GoogleAppsCardV1Card card = new GoogleAppsCardV1Card();
        card.setName("Avatar Card");
        card.setHeader(cardHeader);
        card.setSections(List.of(section));
    
        CardWithId cardWithId = new CardWithId();
        cardWithId.setCardId("previewLink");
        cardWithId.setCard(card);
    
        Message message = new Message();
        message.setText("Here's your avatar");
        message.setCardsV2(List.of(cardWithId));
    
        return message;
      }
    }

  9. pom.xml の内容を次のコードに置き換えます。

    java/avatar-app/pom.xml
    <project xmlns="http://maven.apache.org/POM/4.0.0"
             xmlns:xsi="http://www.w3.org/2001/XMLSchema-instance"
             xsi:schemaLocation="http://maven.apache.org/POM/4.0.0 http://maven.apache.org/xsd/maven-4.0.0.xsd">
      <modelVersion>4.0.0</modelVersion>
    
      <groupId>com.google.chat</groupId>
      <artifactId>avatar-app</artifactId>
      <version>1.0-SNAPSHOT</version>
    
      <properties>
        <maven.compiler.target>17</maven.compiler.target>
        <maven.compiler.source>17</maven.compiler.source>
      </properties>
    
      <dependencies>
        <dependency>
          <groupId>com.google.cloud.functions</groupId>
          <artifactId>functions-framework-api</artifactId>
          <version>1.0.1</version>
        </dependency>
    
        <!-- https://mvnrepository.com/artifact/com.google.code.gson/gson -->
        <dependency>
            <groupId>com.google.code.gson</groupId>
            <artifactId>gson</artifactId>
            <version>2.9.1</version>
        </dependency>
    
        <!-- https://mvnrepository.com/artifact/com.google.apis/google-api-services-chat -->
        <dependency>
          <groupId>com.google.apis</groupId>
          <artifactId>google-api-services-chat</artifactId>
          <version>v1-rev20230115-2.0.0</version>
        </dependency>
      </dependencies>
    
      <!-- Required for Java 11 functions in the inline editor -->
      <build>
        <plugins>
          <plugin>
            <groupId>org.apache.maven.plugins</groupId>
            <artifactId>maven-compiler-plugin</artifactId>
            <version>3.8.1</version>
            <configuration>
              <excludes>
                <exclude>.google/</exclude>
              </excludes>
            </configuration>
          </plugin>
        </plugins>
      </build>
    </project>

  10. [デプロイ] をクリックします。

Cloud Functions の詳細ページが開き、関数と 2 つの関数が表示されます。 進行状況インジケーター: 1 つはビルド用で、もう 1 つはサービス用です。両方の進行状況インジケーターが消えてチェックマークに置き換えられると、関数はデプロイされ、準備が整います。

関数の呼び出しを Google Chat に許可する

Google Chat が関数を呼び出すことを許可するには、Cloud Run 起動元ロールを持つ Google Chat サービス アカウントを追加します。

  1. Google Cloud コンソールで [Cloud Run] ページに移動します。

    Cloud Run に移動します

  2. Cloud Run サービスのリストで、受信側 使用します。(関数自体はクリックしないでください)。

  3. [権限] をクリックします。[権限] パネルが開きます。

  4. [プリンシパルを追加] をクリックします。

  5. [新しいプリンシパル] に「chat@system.gserviceaccount.com」と入力します。

  6. [ロールを選択] で、[Cloud Run] > [Cloud Run 起動元] を選択します。

  7. [保存] をクリックします。

アプリを Google Chat に公開する

Cloud Functions の関数をデプロイしたら、以下の手順で関数を Google Chat アプリ:

  1. Google Cloud コンソールでメニュー アイコンをクリック &gt; [Cloud Functions] を選択します。

    Cloud Functions に移動

    Cloud Functions を有効にしたプロジェクトが選択されていることを確認します。

  2. 関数のリストで、[QuickStartChatApp] をクリックします。

  3. [トリガー] タブをクリックします。

  4. [HTTPS] の下の URL をコピーします。

  5. 「Google Chat API」を検索する[Google Chat API]、[管理] の順にクリックします。

    Chat API に移動

  6. [Configuration] をクリックし、Google Chat アプリを設定します。

    1. [アプリ名] に「Quickstart App」と入力します。
    2. [アバターの URL] に「https://developers.google.com/chat/images/quickstart-app-avatar.png」と入力します。
    3. [説明] に「Quickstart app」と入力します。
    4. [機能] で [1:1 のメッセージを受信する] を選択し、 スペースやグループの会話に参加する
    5. [接続設定] で [HTTP エンドポイント URL] を選択し、Cloud Functions トリガーの URL をボックスに貼り付けます。
    6. [Authentication Audience] で、[HTTP endpoint URL] を選択します。
    7. [公開設定] で [ この Google Chat アプリを特定のユーザーや グループを選択してメールアドレスを入力します。
    8. [ログ] で [エラーを Logging にロギング] を選択します。
  7. [保存] をクリックします。

Chat アプリが受信して応答する準備が整いました 表示されます。

Chat 用アプリをテストする

Chat アプリをテストするには、Chat アプリでダイレクト メッセージ スペースを開き、メッセージを送信します。

  1. 信頼できるテスターとして自分自身を追加したときに指定した Google Workspace アカウントを使用して Google Chat を開きます。

    Google Chat にアクセス

  2. [ 新しいチャット] をクリックします。
  3. [1 人以上のユーザーを追加] フィールドに、招待する Chat アプリ。
  4. 結果から Chat 用アプリを選択します。ダイレクト というメッセージが開きます。

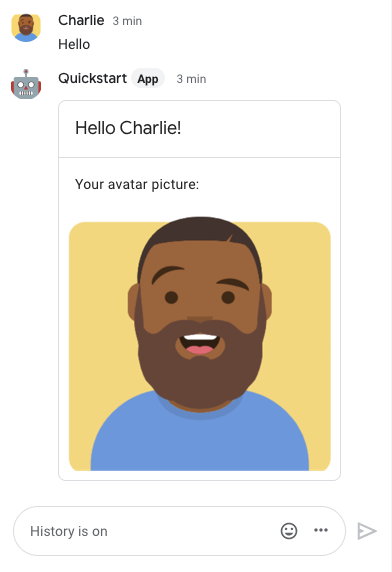
  5. そのアプリの新しいダイレクト メッセージに、「Hello」と入力して enter を押します。

Chat アプリのレスポンスには、 カード メッセージが表示されます。 送信者の名前とアバター画像が表示されます(以下の画像を参照)。

送信者の表示名とアバター画像を表示したカードで応答する Chat アプリ

Trusted Tester を追加し、インタラクティブ機能のテストについて詳しくは、以下をご覧ください。 インタラクティブ機能のテスト Google Chat アプリ

トラブルシューティング

Google Chat アプリまたはカードからエラーが返されると、Chat インターフェースに「エラーが発生しました」というメッセージが表示されます。または「リクエストを処理できません」が表示されます。場合によっては、Chat の UI が エラー メッセージは表示されませんが、Chat 用アプリまたは 予期しない結果が生じた場合たとえば、カード メッセージに 表示されます。

Chat UI にエラー メッセージが表示されない場合がありますが、 エラーの修正に役立つ、わかりやすいエラー メッセージとログデータ Chat 用アプリのエラーロギングが有効になっている場合。表示のヘルプについては、 エラーの修正について詳しくは、このモジュールの Google Chat のエラーのトラブルシューティングと修正

クリーンアップ

サービス アカウントに対する Google Cloud アカウントへの課金を回避するために、 リソースがある場合は、その Terraform Registry に できます。

  1. Google Cloud コンソールで、[リソースの管理] ページに移動します。[ メニュー &gt; IAM と管理者 &gt; [リソースの管理] をクリックします。

    <ph type="x-smartling-placeholder"></ph> Resource Manager に移動

  2. プロジェクト リストで、削除するプロジェクトを選択し、[ 削除します。
  3. ダイアログでプロジェクト ID を入力し、[シャットダウン] をクリックして削除します。 できます。