Các bước được mô tả trên trang này giải thích cách nhanh chóng tạo một ứng dụng iOS đơn giản để đưa ra yêu cầu cho YouTube Data API. Mẫu này minh hoạ cách truy xuất dữ liệu về kênh YouTube GoogleDevelopers. Đoạn mã này cũng bao gồm các nhận xét giải thích cách sửa đổi truy vấn để truy xuất dữ liệu về kênh YouTube của người dùng hiện tại.
Điều kiện tiên quyết
Để chạy hướng dẫn bắt đầu nhanh này, bạn cần:
- Xcode 8.0 trở lên.
- Trình quản lý phần phụ thuộc CocoaPods.
- Có quyền truy cập vào Internet và trình duyệt web.
- Tài khoản Google.
Bước 1: Bật YouTube Data API
-
Sử dụng trình hướng dẫn này để tạo hoặc chọn một dự án trong Google Developers Console và tự động bật API. Nhấp vào Tiếp tục, rồi nhấp vào Chuyển đến thông tin đăng nhập.
-
Trên trang Tạo thông tin xác thực, hãy nhấp vào nút Huỷ.
-
Ở đầu trang, hãy chọn thẻ Màn hình xin phép bằng OAuth. Chọn một Địa chỉ email, nhập Tên sản phẩm nếu chưa đặt và nhấp vào nút Lưu.
-
Chọn thẻ Thông tin xác thực, nhấp vào nút Tạo thông tin xác thực rồi chọn Mã ứng dụng OAuth.
- Chọn loại ứng dụng iOS, nhập tên "YouTube Data API Quickstart", mã nhận dạng gói
com.example.QuickstartApprồi nhấp vào nút Create (Tạo).
Bước 2: Chuẩn bị không gian làm việc
- Mở Xcode rồi tạo một dự án mới:
- Nhấp vào File > New > Project (Tệp > Mới > Dự án), chọn mẫu iOS > Application > Single View Application (iOS > Ứng dụng > Ứng dụng một khung hiển thị) rồi nhấp vào Next (Tiếp theo).
- Đặt Tên sản phẩm thành "QuickstartApp", Mã nhận dạng tổ chức thành "com.example" và Ngôn ngữ thànhObjective-C.
Bên dưới mã nhận dạng tổ chức, bạn sẽ thấy một Mã nhận dạng gói được tạo khớp với Mã nhận dạng gói iOS (
com.example.QuickstartApp) mà bạn đã nhập trong bước 1.b. - Nhấp vào Tiếp theo.
- Chọn một thư mục đích cho dự án rồi nhấp vào Tạo.
- Đóng dự án bằng cách nhấp vào File > Close Project (Tệp > Đóng dự án).
- Mở cửa sổ Terminal rồi chuyển đến thư mục chứa tệp
QuickstartApp.xcodeprojmà bạn vừa tạo. Chạy các lệnh sau để tạo Podfile, cài đặt thư viện và mở dự án XCode kết quả:
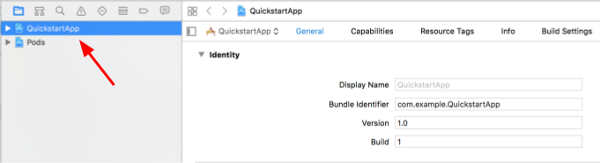
cat << EOF > Podfile &&
platform :ios, '8.0'
target 'QuickstartApp' do
    pod 'GoogleAPIClientForREST/YouTube', '~> 1.2.1'
    pod 'Google/SignIn', '~> 3.0.3'
end
EOF
pod install &&
open QuickstartApp.xcworkspace
Trong Project Navigator (Trình điều hướng dự án) của XCode, hãy chọn nút dự án "QuickstartApp". Sau đó, hãy nhấp vào mục trong trình đơn File > Add files to "QuickstartApp" (Tệp > Thêm tệp vào "QuickstartApp").
Tìm tệp
GoogleService-Info.plistđã tải xuống trước đó rồi chọn tệp đó. Nhấp vào nút Tuỳ chọn.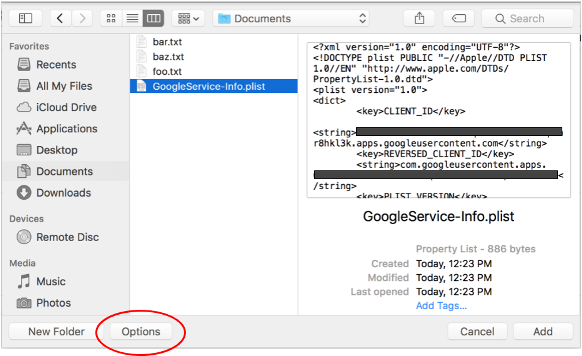
Chọn các mục sau trong cửa sổ tuỳ chọn rồi nhấp vào nút Thêm:
- Đánh dấu vào hộp Sao chép các mục nếu cần.
- Chọn tất cả các mục tiêu được liệt kê trong phần Thêm vào mục tiêu.

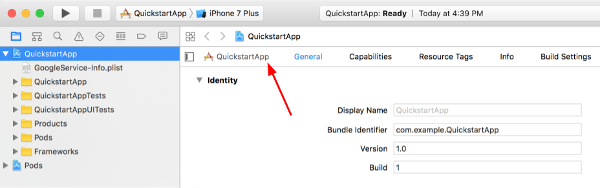
Khi vẫn chọn nút dự án, hãy chọn "QuickstartApp" trong phần TARGETS (MỤC TIÊU) như minh hoạ trong 2 hình bên dưới:
Nhấp vào khu vực xuất hiện trong ảnh chụp màn hình này:
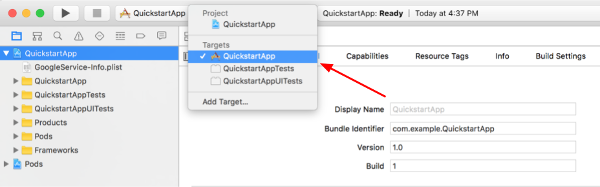
Sau đó, hãy chọn mục tiêu phù hợp:
Chọn thẻ Thông tin rồi mở rộng mục Loại URL.
Nhấp vào nút + rồi thêm một sơ đồ URL cho mã ứng dụng khách đảo ngược của bạn. Để tìm giá trị này, hãy mở tệp cấu hình
GoogleService-Info.plistmà bạn đã chọn ở bước 2.f. Tìm khoá REVERSED_CLIENT_ID. Sao chép giá trị của khoá đó rồi dán vào hộp URL Schemes (Lược đồ URL) trên trang cấu hình. Để trống các trường khác.Tạo lại dự án:
- Nhấp vào Product > Clean Build Folder (Sản phẩm > Dọn sạch thư mục bản dựng) (trong khi giữ phím option).
- Nhấp vào Product > Build (Sản phẩm > Bản dựng).
Bước 3: Thiết lập mẫu
Thay thế nội dung của các tệp sau bằng mã được cung cấp:#import <UIKit/UIKit.h> @import GoogleSignIn; @interface AppDelegate : UIResponder <UIApplicationDelegate> @property (strong, nonatomic) UIWindow *window; @end
#import "AppDelegate.h"

@implementation AppDelegate

- (BOOL)application:(UIApplication *)application
didFinishLaunchingWithOptions:(NSDictionary *)launchOptions {
    // Initialize Google sign-in.
    [GIDSignIn sharedInstance].clientID = @"<YOUR_CLIENT_ID>";

    return YES;
}

- (BOOL)application:(UIApplication *)application
            openURL:(NSURL *)url
  sourceApplication:(NSString *)sourceApplication
         annotation:(id)annotation {
    return [[GIDSignIn sharedInstance] handleURL:url
                               sourceApplication:sourceApplication
                                      annotation:annotation];
}


@end
#import <UIKit/UIKit.h>
@import GoogleSignIn;
#import <GTLRYouTube.h>

@interface ViewController : UIViewController <GIDSignInDelegate, GIDSignInUIDelegate>

@property (nonatomic, strong) IBOutlet GIDSignInButton *signInButton;
@property (nonatomic, strong) UITextView *output;
@property (nonatomic, strong) GTLRYouTubeService *service;


@end
#import "ViewController.h"

@implementation ViewController

- (void)viewDidLoad {
    [super viewDidLoad];
    // Configure Google Sign-in.
    GIDSignIn* signIn = [GIDSignIn sharedInstance];
    signIn.delegate = self;
    signIn.uiDelegate = self;
    signIn.scopes = [NSArray arrayWithObjects:kGTLRAuthScopeYouTubeReadonly, nil];
    [signIn signInSilently];

    // Add the sign-in button.
    self.signInButton = [[GIDSignInButton alloc] init];
    [self.view addSubview:self.signInButton];

    // Create a UITextView to display output.
    self.output = [[UITextView alloc] initWithFrame:self.view.bounds];
    self.output.editable = false;
    self.output.contentInset = UIEdgeInsetsMake(20.0, 0.0, 20.0, 0.0);
    self.output.autoresizingMask = UIViewAutoresizingFlexibleHeight | UIViewAutoresizingFlexibleWidth;
    self.output.hidden = true;
    [self.view addSubview:self.output];

    // Initialize the service object.
    self.service = [[GTLRYouTubeService alloc] init];
}

- (void)signIn:(GIDSignIn *)signIn
didSignInForUser:(GIDGoogleUser *)user
     withError:(NSError *)error {
    if (error != nil) {
        [self showAlert:@"Authentication Error" message:error.localizedDescription];
        self.service.authorizer = nil;
    } else {
        self.signInButton.hidden = true;
        self.output.hidden = false;
        self.service.authorizer = user.authentication.fetcherAuthorizer;
        [self fetchChannelResource];
    }
}


// Construct a query and retrieve the channel resource for the GoogleDevelopers
// YouTube channel. Display the channel title, description, and view count.
- (void)fetchChannelResource {
    GTLRYouTubeQuery_ChannelsList *query =
    [GTLRYouTubeQuery_ChannelsList queryWithPart:@"snippet,statistics"];
  query.identifier = @"UC_x5XG1OV2P6uZZ5FSM9Ttw";
  // To retrieve data for the current user's channel, comment out the previous
  // line (query.identifier ...) and uncomment the next line (query.mine ...).
  // query.mine = true;

  [self.service executeQuery:query
                    delegate:self
           didFinishSelector:@selector(displayResultWithTicket:finishedWithObject:error:)];
}

// Process the response and display output
- (void)displayResultWithTicket:(GTLRServiceTicket *)ticket
             finishedWithObject:(GTLRYouTube_ChannelListResponse *)channels
                          error:(NSError *)error {
  if (error == nil) {
    NSMutableString *output = [[NSMutableString alloc] init];
    if (channels.items.count > 0) {
      [output appendString:@"Channel information:\n"];
      for (GTLRYouTube_Channel *channel in channels) {
        NSString *title = channel.snippet.title;
        NSString *description = channel.snippet.description;
        NSNumber *viewCount = channel.statistics.viewCount;
        [output appendFormat:@"Title: %@\nDescription: %@\nViewCount: %@\n", title, description, viewCount];
      }
    } else {
      [output appendString:@"Channel not found."];
    }
    self.output.text = output;
  } else {
    [self showAlert:@"Error" message:error.localizedDescription];
  }
}


// Helper for showing an alert
- (void)showAlert:(NSString *)title message:(NSString *)message {
    UIAlertController *alert =
    [UIAlertController alertControllerWithTitle:title
                                        message:message
                                 preferredStyle:UIAlertControllerStyleAlert];
    UIAlertAction *ok =
    [UIAlertAction actionWithTitle:@"OK"
                             style:UIAlertActionStyleDefault
                           handler:^(UIAlertAction * action)
     {
         [alert dismissViewControllerAnimated:YES completion:nil];
     }];
    [alert addAction:ok];
    [self presentViewController:alert animated:YES completion:nil];
}


@end
Bước 4: Chạy mẫu
Chuyển sang lược đồ QuickstartApp bằng cách nhấp vào Product > Scheme > QuickstartApp (Sản phẩm > Lược đồ > QuickstartApp) rồi chạy mẫu (Cmd+R) bằng trình mô phỏng thiết bị hoặc một thiết bị đã định cấu hình. Trong lần đầu tiên chạy mẫu, mẫu này sẽ nhắc bạn đăng nhập vào Tài khoản Google và cho phép truy cập.
Ghi chú
- Thông tin uỷ quyền được lưu trữ trong Keychain của bạn, vì vậy, các lần thực thi tiếp theo sẽ không nhắc bạn uỷ quyền.