Ausgewählte Inhalte senden

Programmierniveau: Anfänger
Dauer: 20 Minuten
Projekttyp: Automatisierung mit einem ereignisgesteuerter Trigger

Zielsetzungen

  • Machen Sie sich mit der Lösung vertraut.
  • Informieren Sie sich über die Funktionsweise der Apps Script-Dienste im Lösung.
  • Richten Sie das Skript ein.
  • Führen Sie das Skript aus.

Informationen zu dieser Lösung

Wenn du deinen Zuschauern verschiedene Inhaltstypen anbieten möchtest, können Nutzer in Google Formulare auswählen, welche Inhalte sie von Ihnen erhalten möchten. So können Nutzer die Themen auswählen, für die sie sich interessieren, sendet ihnen die ausgewählten Inhalte automatisch per E-Mail.

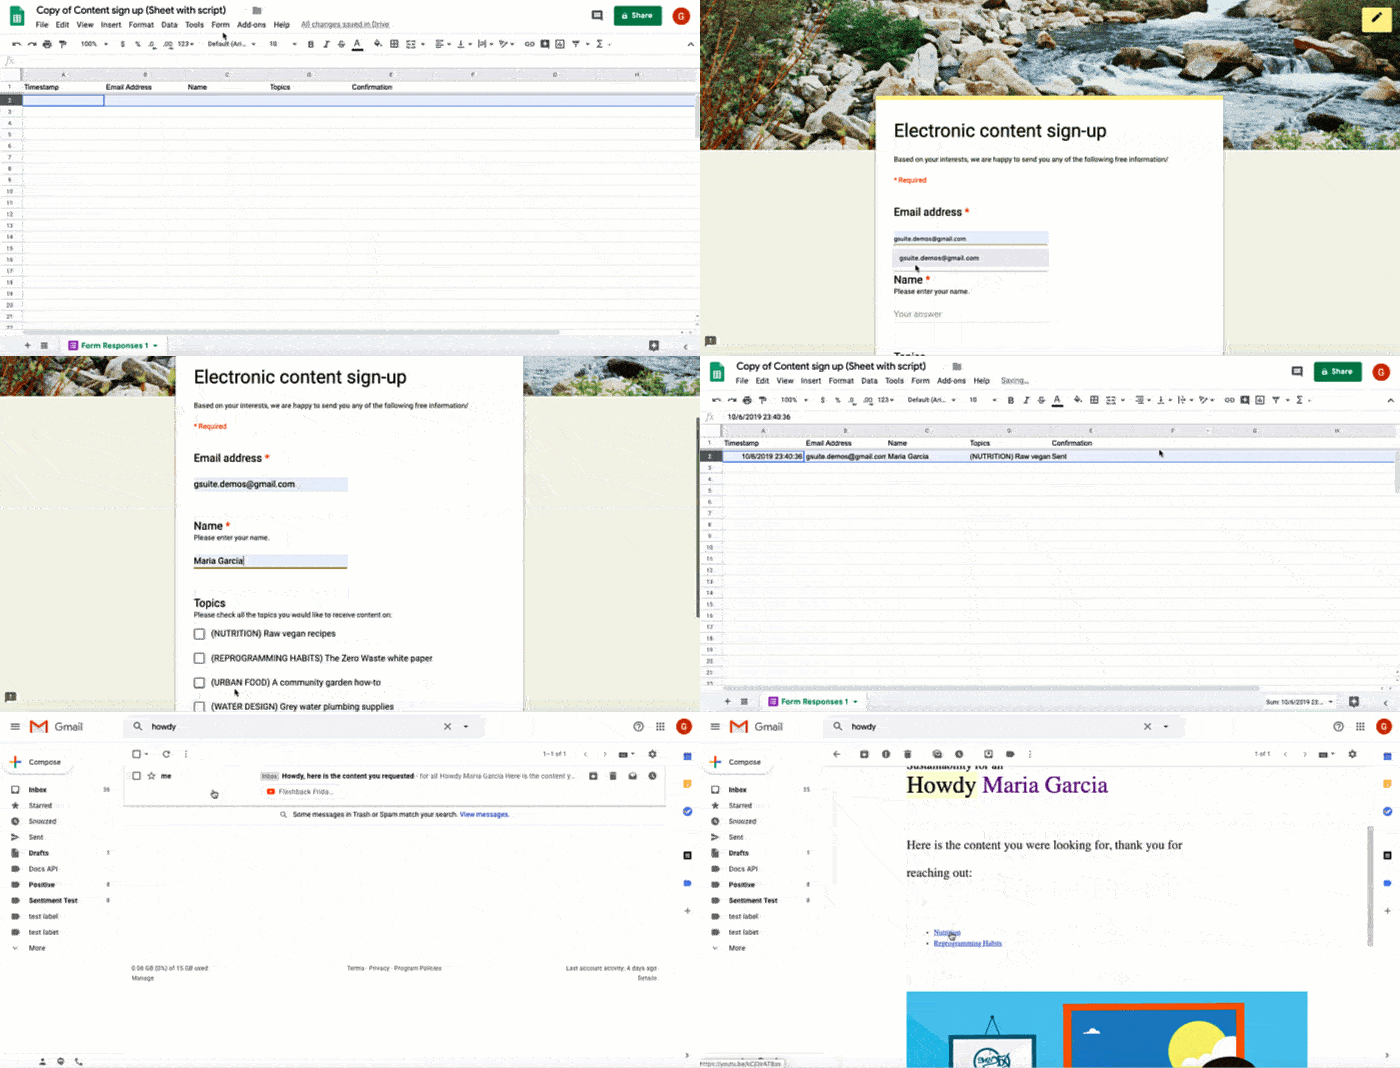
Demo zum Senden von Inhalten mit Google Formulare und Gmail

Funktionsweise

Das Skript installiert einen ereignisgesteuerten Trigger, der jedes Mal ausgeführt wird, wenn ein Nutzer etwas sendet. ein Formular. Bei jeder Formulareinreichung erstellt und sendet das Skript eine E-Mail von eine Google Docs-Vorlage. Die E-Mail enthält den Namen und den Inhalt des Nutzers ausgewählt. Die von Ihnen angebotenen Inhalte können beliebig sein, solange darin von eine URL.

Apps Script-Dienste

Diese Lösung verwendet die folgenden Dienste:

  • Script-Dienst: Damit wird das ereignisgesteuerte Trigger, der immer dann ausgelöst wird, wenn jemand das Formular sendet.
  • Document service: Öffnet die Google Docs-Vorlage mit dem das Skript die E-Mail erstellt.
  • E-Mail-Dienst: Erstellt und sendet E-Mails mit den Namen und die Inhaltsauswahl des Nutzers.
  • Tabellendienst: Fügt eine Bestätigung hinzu. Formularantworten hinzufügen, nachdem das Skript die E-Mail gesendet hat.

Vorbereitung

Damit Sie dieses Beispiel verwenden können, müssen folgende Voraussetzungen erfüllt sein:

  • Ein Google-Konto (Google Workspace-Konten können Genehmigung des Administrators erforderlich.
  • Ein Webbrowser mit Zugriff auf das Internet.

Skript einrichten

  1. Klicken Sie auf die folgende Schaltfläche, um eine Kopie des Berichts Ausgewählte Inhalte senden zu erstellen. Tabelle. Das Apps Script-Projekt dafür Lösung an die Tabellenkalkulation angehängt.
    Kopie erstellen

  2. Klicken Sie in der kopierten Tabelle auf Erweiterungen. > Apps Script.

  3. Wählen Sie im Drop-down-Menü für die Funktion installTrigger aus.

  4. Klicken Sie auf Ausführen.

  5. Autorisieren Sie das Skript, wenn Sie dazu aufgefordert werden. Wenn auf dem OAuth-Zustimmungsbildschirm die Warnung Diese App wurde nicht überprüft angezeigt wird, wählen Sie Erweitert > aus. Rufen Sie {Project Name} auf (unsicher).

Wichtig: Wenn Sie installTrigger mehr als einmal ausführen, erstellt das Skript Mehrere Trigger, die jeweils eine E-Mail senden, wenn ein Nutzer das Formular absendet Bis Wenn Sie zusätzliche Trigger löschen und doppelte E-Mails vermeiden möchten, klicken Sie auf Trigger. Klicken Sie mit der rechten Maustaste auf jeden zusätzlichen Trigger. und klicken Sie auf Trigger löschen.

Skript ausführen

  1. Wechseln Sie zurück zur Tabelle und klicken Sie auf Tools. > Formular verwalten > Zum Live-Formular wechseln.
  2. Füllen Sie das Formular aus und klicken Sie auf Senden.
  3. Suchen Sie in Ihrem Posteingang nach einer E-Mail mit Links zu den ausgewählten Inhalten.

Code ansehen

Um den Apps Script-Code für diese Lösung zu überprüfen, klicken Sie auf Sehen Sie sich den Quellcode unten an:

Quellcode ansehen

Code.gs

solutions/automations/content-signup/Code.js
// To learn how to use this script, refer to the documentation:
// https://developers.google.com/apps-script/samples/automations/content-signup

/*
Copyright 2022 Google LLC

Licensed under the Apache License, Version 2.0 (the "License");
you may not use this file except in compliance with the License.
You may obtain a copy of the License at

    https://www.apache.org/licenses/LICENSE-2.0

Unless required by applicable law or agreed to in writing, software
distributed under the License is distributed on an "AS IS" BASIS,
WITHOUT WARRANTIES OR CONDITIONS OF ANY KIND, either express or implied.
See the License for the specific language governing permissions and
limitations under the License.
*/

// To use your own template doc, update the below variable with the URL of your own Google Doc template.
// Make sure you update the sharing settings so that 'anyone'  or 'anyone in your organization' can view.
const EMAIL_TEMPLATE_DOC_URL = 'https://docs.google.com/document/d/1enes74gWsMG3dkK3SFO08apXkr0rcYBd3JHKOb2Nksk/edit?usp=sharing';
// Update this variable to customize the email subject.
const EMAIL_SUBJECT = 'Hello, here is the content you requested';

// Update this variable to the content titles and URLs you want to offer. Make sure you update the form so that the content titles listed here match the content titles you list in the form.
const topicUrls = {
  'Google Calendar how-to videos': 'https://www.youtube.com/playlist?list=PLU8ezI8GYqs7IPb_UdmUNKyUCqjzGO9PJ',
  'Google Drive how-to videos': 'https://www.youtube.com/playlist?list=PLU8ezI8GYqs7Y5d1cgZm2Obq7leVtLkT4',
  'Google Docs how-to videos': 'https://www.youtube.com/playlist?list=PLU8ezI8GYqs4JKwZ-fpBP-zSoWPL8Sit7',
  'Google Sheets how-to videos': 'https://www.youtube.com/playlist?list=PLU8ezI8GYqs61ciKpXf_KkV7ZRbRHVG38',
};

/**
 * Installs a trigger on the spreadsheet for when someone submits a form.
 */
function installTrigger() {
  ScriptApp.newTrigger('onFormSubmit')
      .forSpreadsheet(SpreadsheetApp.getActive())
      .onFormSubmit()
      .create();
}

/**
 * Sends a customized email for every form response.
 * 
 * @param {Object} event - Form submit event
 */
function onFormSubmit(e) {
  let responses = e.namedValues;

  // If the question title is a label, it can be accessed as an object field.
  // If it has spaces or other characters, it can be accessed as a dictionary.
  let timestamp = responses.Timestamp[0];
  let email = responses['Email address'][0].trim();
  let name = responses.Name[0].trim();
  let topicsString = responses.Topics[0].toLowerCase();

  // Parse topics of interest into a list (since there are multiple items
  // that are saved in the row as blob of text).
  let topics = Object.keys(topicUrls).filter(function(topic) {
    // indexOf searches for the topic in topicsString and returns a non-negative
    // index if the topic is found, or it will return -1 if it's not found.
    return topicsString.indexOf(topic.toLowerCase()) != -1;
  });

  // If there is at least one topic selected, send an email to the recipient.
  let status = '';
  if (topics.length > 0) {
    MailApp.sendEmail({
      to: email,
      subject: EMAIL_SUBJECT,
      htmlBody: createEmailBody(name, topics),
    });
    status = 'Sent';
  }
  else {
    status = 'No topics selected';
  }

  // Append the status on the spreadsheet to the responses' row.
  let sheet = SpreadsheetApp.getActiveSheet();
  let row = sheet.getActiveRange().getRow();
  let column = e.values.length + 1;
  sheet.getRange(row, column).setValue(status);

  console.log("status=" + status + "; responses=" + JSON.stringify(responses));
}

/**
 * Creates email body and includes the links based on topic.
 *
 * @param {string} recipient - The recipient's email address.
 * @param {string[]} topics - List of topics to include in the email body.
 * @return {string} - The email body as an HTML string.
 */
function createEmailBody(name, topics) {
  let topicsHtml = topics.map(function(topic) {
  let url = topicUrls[topic];
    return '<li><a href="' + url + '">' + topic + '</a></li>';
  }).join('');
  topicsHtml = '<ul>' + topicsHtml + '</ul>';

  // Make sure to update the emailTemplateDocId at the top.
  let docId = DocumentApp.openByUrl(EMAIL_TEMPLATE_DOC_URL).getId();
  let emailBody = docToHtml(docId);
  emailBody = emailBody.replace(/{{NAME}}/g, name);
  emailBody = emailBody.replace(/{{TOPICS}}/g, topicsHtml);
  return emailBody;
}

/**
 * Downloads a Google Doc as an HTML string.
 * 
 * @param {string} docId - The ID of a Google Doc to fetch content from.
 * @return {string} The Google Doc rendered as an HTML string.
 */
function docToHtml(docId) {

  // Downloads a Google Doc as an HTML string.
  let url = "https://docs.google.com/feeds/download/documents/export/Export?id=" +
            docId + "&exportFormat=html";
  let param = {
    method: "get",
    headers: {"Authorization": "Bearer " + ScriptApp.getOAuthToken()},
    muteHttpExceptions: true,
  };
  return UrlFetchApp.fetch(url, param).getContentText();
}

Beitragende

Dieses Beispiel wird von Google mit Unterstützung von Google-Entwicklerexperten verwaltet.

Nächste Schritte