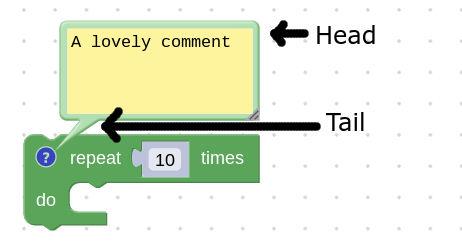
對話框是一種彈出式使用者介面,看起來像您在 漫畫。具有「尾」指向一個區塊,而「頭」包含 任意 svg 元素

如果內建對話框不適用於您的用途,
可以將 Bubble 類別設為子類別,即可建立自訂泡泡。
建立檢視畫面
說明圖示的檢視畫麵包含位於「head」中的所有 SVG 元素的
泡泡。這些元素是在泡泡的建構函式中建立,而且
應該是 this.contentContainer 元素的子項,這樣系統才會取得
。
Blockly.utils.dom 模組提供簡潔的介面
以便建立 svgs 的例項
class MyBubble extends Blockly.bubbles.Bubble {
  // See the Blockly.bubbles.Bubble class for information about what these
  // parameters are.
  constructor(workspace, anchor, ownerRect) {
    super(workspace, anchor, ownerRect);

    this.text = Blockly.utils.dom.createSvgElement(
          Blockly.utils.Svg.TEXT,
          {'class': 'my-bubble-class'},
          this.contentContainer);
    const node = Blockly.utils.dom.createTextNode('some text');
    this.text.appendChild(node);
  }
}
設定大小
泡泡的大小必須使用 setSize 設定外部
邊框可以正確圍繞泡泡內容。應設定
以及當 UI 元素大小變更時
constructor(workspace, anchor, ownerRect) {
  // Create the view elements... (see above)

  const bbox = this.text.getBBox();
  this.setSize(
    new Blockly.utils.Size(
      bbox.width + Blockly.bubbles.Bubble.BORDER_WIDTH * 2,
      bbox.height + Blockly.bubbles.Bubble.BORDER_WIDTH * 2,
    ),
    true
  );
}
丟棄泡泡
對話框應清理任何 Pod 元素或外部參照,
處理。根據預設,附加至 this.contentContainer 的任何內容都會獲得
已刪除,但其他參照需要手動清理。這應該是
是在 dispose 方法內完成。
dispose() {
  super.dispose();

  // Dispose of other references.
  this.myArbitraryReference.dispose();
}

