
이 페이지에서는 문자 메시지와 카드 메시지의 차이점을 설명합니다.
채팅 앱에서 기본 정보를 전달하기 위해 문자 메시지를 보내면 Google Chat의 사용자가 메시지를 작성하는 방식과 마찬가지로 메시지가 인라인으로 표시됩니다. 채팅 앱은 텍스트 이외의 내용이 포함된 메시지를 만들거나 사용자가 상호작용할 수 있는 메시지를 만들려면 카드를 사용하면 됩니다. 채팅 앱에서 카드를 사용하여 문자 메시지를 추가할 수도 있습니다. 사용자에게 양식 작성과 같은 다단계 프로세스를 완료하라는 메시지를 표시하기 위해 Chat 앱은 새 창에서 열리는 카드를 대화상자로 만들 수도 있습니다.
문자 메시지 분석
Google Chat API에서 메시지는 JSON 객체로 표시됩니다. 메시지 내에서 텍스트 메시지는 text 객체로 표현됩니다.
다음 예에서 채팅 앱은 코드 동결이 임박한 소프트웨어 개발자팀을 위해 스페이스에 문자 메시지를 만듭니다.
{
  "text": "Attention <users/all>: Code freeze starts at `11:59 am` Pacific Standard Time! If you need a little more time, type `/moreTime` and I'll push the code freeze back one hour."
}
JSON은 다음 메시지를 반환합니다.

카드 메시지 분석
Google Chat API에서 메시지는 JSON 객체로 표시됩니다. 메시지 내에서 카드는 cardsV2 배열로 표시되며 다음과 같이 구성됩니다.
- 하나 이상의
CardWithId객체 cardId: 카드를 식별하는 데 사용되며 지정된 메시지 내에서 범위가 지정됩니다. (서로 다른 메시지의 카드는 동일한 ID를 가질 수 있습니다.)다음으로 구성된
card객체- 제목, 부제목, 아바타 스타일 이미지 등을 지정하는
header객체 - 각각 하나 이상의 위젯이 포함된 하나 이상의
section객체 - 하나 이상의
widget객체 각 위젯은 텍스트, 이미지, 버튼, 기타 객체 유형을 나타낼 수 있는 복합 객체입니다.
- 제목, 부제목, 아바타 스타일 이미지 등을 지정하는
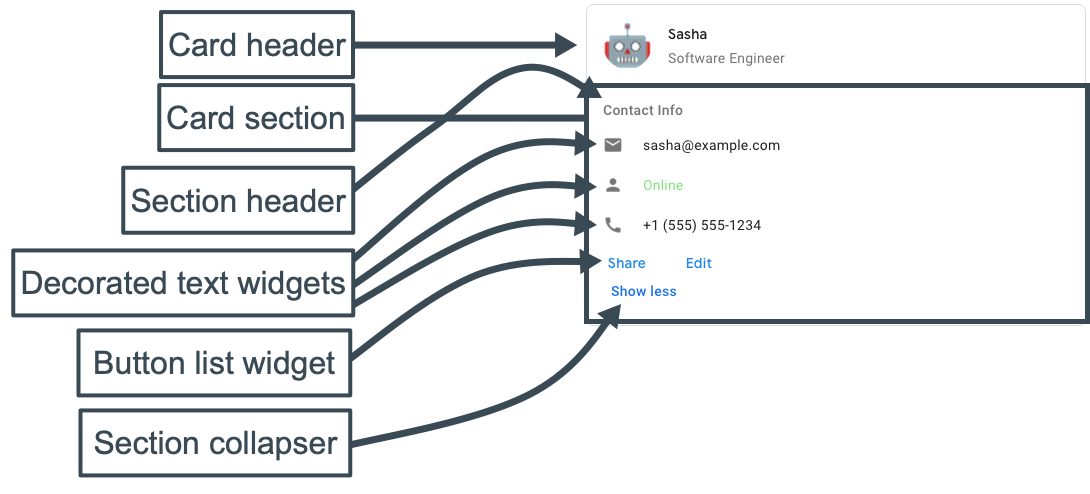
예를 들어 다음 카드 메시지에는 header, section, widget 객체가 포함됩니다.
다음 코드는 카드 메시지의 JSON을 나타냅니다.
JSON
{
  "cardsV2": [
    {
      "cardId": "unique-card-id",
      "card": {
        "header": {
          "title": "Sasha",
          "subtitle": "Software Engineer",
          "imageUrl": "https://developers.google.com/chat/images/quickstart-app-avatar.png",
          "imageType": "CIRCLE",
          "imageAltText": "Avatar for Sasha"
        },
        "sections": [
          {
            "header": "Contact Info",
            "collapsible": true,
            "uncollapsibleWidgetsCount": 1,
            "widgets": [
              {
                "decoratedText": {
                  "startIcon": {
                    "knownIcon": "EMAIL"
                  },
                  "text": "sasha@example.com"
                }
              },
              {
                "decoratedText": {
                  "startIcon": {
                    "knownIcon": "PERSON"
                  },
                  "text": "<font color=\"#80e27e\">Online</font>"
                }
              },
              {
                "decoratedText": {
                  "startIcon": {
                    "knownIcon": "PHONE"
                  },
                  "text": "+1 (555) 555-1234"
                }
              },
              {
                "buttonList": {
                  "buttons": [
                    {
                      "text": "Share",
                      "onClick": {
                        "openLink": {
                          "url": "https://example.com/share"
                        }
                      }
                    },
                    {
                      "text": "Edit",
                      "onClick": {
                        "action": {
                          "function": "goToView",
                          "parameters": [
                            {
                              "key": "viewType",
                              "value": "EDIT"
                            }
                          ]
                        }
                      }
                    }
                  ]
                }
              }
            ]
          }
        ]
      }
    }
  ]
}
카드 빌더로 카드를 디자인하고 미리 봅니다.
카드 빌더 열기