
Bu kılavuzda, Google Chat API'nin Message kaynağında create() yöntemini kullanarak aşağıdakilerden herhangi birini nasıl yapacağınız açıklanmaktadır:
- Metin, kart ve etkileşimli widget içeren mesajlar gönderme
- Belirli bir Chat kullanıcısına özel mesaj gönderme
- Mesaj dizisi başlatma veya yanıtlama
- Diğer Chat API isteklerinde belirtebilmek için bir mesajı adlandırın.
Maksimum ileti boyutu (metin veya kartlar dahil) 32.000 bayttır. Bu boyutu aşan bir mesaj göndermek için sohbet uygulamanız bunun yerine birden fazla mesaj göndermelidir.
Chat uygulamaları, mesaj oluşturmak için Chat API'sini çağırmanın yanı sıra kullanıcı etkileşimlerini yanıtlamak için mesaj oluşturup gönderebilir. Örneğin, kullanıcı bir alana Chat uygulamasını ekledikten sonra karşılama mesajı yayınlayabilir. Sohbet uygulamaları, etkileşimlere yanıt verirken etkileşimli iletişim kutuları ve bağlantı önizleme arayüzleri gibi diğer mesajlaşma özelliklerini kullanabilir. Sohbet uygulaması, bir kullanıcıyı yanıtlamak için Chat API'yi çağırmadan mesajı senkron olarak döndürür. Etkileşimlere yanıt vermek için mesaj gönderme hakkında bilgi edinmek istiyorsanız Google Chat uygulamanızla etkileşimleri alma ve yanıtlama başlıklı makaleyi inceleyin.
Chat API ile oluşturulan mesajları Chat'in nasıl gösterdiği ve ilişkilendirdiği
create() yöntemini uygulama kimlik doğrulaması ve kullanıcı kimlik doğrulaması ile çağırabilirsiniz.
Chat, kullandığınız kimlik doğrulama türüne bağlı olarak mesaj gönderen kişiyi farklı şekilde ilişkilendirir.
Sohbet uygulaması olarak kimliğinizi doğruladığınızda Sohbet uygulaması mesajı gönderir.

App simgesini gösterir.Kullanıcı olarak kimlik doğruladığınızda Sohbet uygulaması, mesajı kullanıcı adına gönderir. Chat, adını göstererek sohbet uygulamasını da mesajla ilişkilendirir.

Kimlik doğrulama türü, iletiye ekleyebileceğiniz mesajlaşma özelliklerini ve arayüzlerini de belirler. Uygulama kimlik doğrulaması ile Chat uygulamaları, zengin metin, kart tabanlı arayüzler ve etkileşimli widget'lar içeren mesajlar gönderebilir. Kullanıcı kimlik doğrulamasıyla kısa mesaj gönderebilirsiniz. Geliştirici Önizlemesi'nde, Kart oluşturma ve güncelleme başlıklı makalede belirtildiği gibi kart da gönderebilirsiniz.
Chat API'de kullanılabilen mesajlaşma özellikleri hakkında daha fazla bilgi edinmek için Google Chat mesajlarına genel bakış başlıklı makaleyi inceleyin.
Bu kılavuzda, Chat API ile mesaj göndermek için kimlik doğrulama türlerinden birinin nasıl kullanılacağı açıklanmaktadır.
Ön koşullar
Node.js
- Google Chat'e erişimi olan bir Business veya Enterprise Google Workspace hesabı.
- Ortamınızı ayarlayın:
- Google Cloud projesi oluşturun.
- OAuth kullanıcı rızası ekranını yapılandırın.
- Chat uygulamanız için ad, simge ve açıklama belirterek Google Chat API'yi etkinleştirin ve yapılandırın.
- Node.js Cloud İstemci Kitaplığı'nı yükleyin.
- Google Chat API isteğinizde kimlik doğrulaması yapmak istediğiniz yönteme göre erişim kimlik bilgileri oluşturun:
- Chat kullanıcısı olarak kimlik doğrulamak için OAuth istemci kimliği kimlik bilgileri oluşturun ve kimlik bilgilerini yerel dizininize
credentials.jsonadlı bir JSON dosyası olarak kaydedin. - Sohbet uygulaması olarak kimlik doğrulamak için hizmet hesabı kimlik bilgileri oluşturun ve kimlik bilgilerini
credentials.jsonadlı bir JSON dosyası olarak kaydedin.
- Chat kullanıcısı olarak kimlik doğrulamak için OAuth istemci kimliği kimlik bilgileri oluşturun ve kimlik bilgilerini yerel dizininize
- Kullanıcı veya Chat uygulaması olarak kimliğinizi doğrulamak isteyip istemediğinize bağlı olarak bir yetkilendirme kapsamı seçin.
- Kimliği doğrulanmış kullanıcının veya arama sohbet uygulamasının üyesi olduğu bir Google Chat alanı. Chat uygulaması olarak kimlik doğrulamak için Chat uygulamasını alana ekleyin.
Python
- Google Chat'e erişimi olan bir Business veya Enterprise Google Workspace hesabı.
- Ortamınızı ayarlayın:
- Google Cloud projesi oluşturun.
- OAuth kullanıcı rızası ekranını yapılandırın.
- Chat uygulamanız için ad, simge ve açıklama belirterek Google Chat API'yi etkinleştirin ve yapılandırın.
- Python Cloud İstemci Kitaplığı'nı yükleyin.
- Google Chat API isteğinizde kimlik doğrulaması yapmak istediğiniz yönteme göre erişim kimlik bilgileri oluşturun:
- Chat kullanıcısı olarak kimlik doğrulamak için OAuth istemci kimliği kimlik bilgileri oluşturun ve kimlik bilgilerini yerel dizininize
credentials.jsonadlı bir JSON dosyası olarak kaydedin. - Chat uygulaması olarak kimlik doğrulamak için hizmet hesabı kimlik bilgileri oluşturun ve kimlik bilgilerini
credentials.jsonadlı bir JSON dosyası olarak kaydedin.
- Chat kullanıcısı olarak kimlik doğrulamak için OAuth istemci kimliği kimlik bilgileri oluşturun ve kimlik bilgilerini yerel dizininize
- Kullanıcı veya Chat uygulaması olarak kimliğinizi doğrulamak isteyip istemediğinize bağlı olarak bir yetkilendirme kapsamı seçin.
- Kimliği doğrulanmış kullanıcının veya arama sohbet uygulamasının üyesi olduğu bir Google Chat alanı. Chat uygulaması olarak kimlik doğrulamak için Chat uygulamasını alana ekleyin.
Java
- Google Chat'e erişimi olan bir Business veya Enterprise Google Workspace hesabı.
- Ortamınızı ayarlayın:
- Google Cloud projesi oluşturun.
- OAuth kullanıcı rızası ekranını yapılandırın.
- Chat uygulamanız için ad, simge ve açıklama belirterek Google Chat API'yi etkinleştirin ve yapılandırın.
- Java Cloud İstemci Kitaplığı'nı yükleyin.
- Google Chat API isteğinizde kimlik doğrulaması yapmak istediğiniz yönteme göre erişim kimlik bilgileri oluşturun:
- Chat kullanıcısı olarak kimlik doğrulamak için OAuth istemci kimliği kimlik bilgileri oluşturun ve kimlik bilgilerini yerel dizininize
credentials.jsonadlı bir JSON dosyası olarak kaydedin. - Sohbet uygulaması olarak kimlik doğrulamak için hizmet hesabı kimlik bilgileri oluşturun ve kimlik bilgilerini
credentials.jsonadlı bir JSON dosyası olarak kaydedin.
- Chat kullanıcısı olarak kimlik doğrulamak için OAuth istemci kimliği kimlik bilgileri oluşturun ve kimlik bilgilerini yerel dizininize
- Kullanıcı veya Chat uygulaması olarak kimliğinizi doğrulamak isteyip istemediğinize bağlı olarak bir yetkilendirme kapsamı seçin.
- Kimliği doğrulanmış kullanıcının veya arama sohbet uygulamasının üyesi olduğu bir Google Chat alanı. Chat uygulaması olarak kimlik doğrulamak için Chat uygulamasını alana ekleyin.
Apps Komut Dosyası
- Google Chat'e erişimi olan bir Business veya Enterprise Google Workspace hesabı.
- Ortamınızı ayarlayın:
- Google Cloud projesi oluşturun.
- OAuth kullanıcı rızası ekranını yapılandırın.
- Chat uygulamanız için ad, simge ve açıklama belirterek Google Chat API'yi etkinleştirin ve yapılandırın.
- Bağımsız bir Apps Komut Dosyası projesi oluşturun ve Gelişmiş Chat Hizmeti'ni etkinleştirin.
- Bu kılavuzda kullanıcı veya uygulama kimlik doğrulamasını kullanmanız gerekir. Sohbet uygulaması olarak kimlik doğrulamak için hizmet hesabı kimlik bilgileri oluşturun. Adımlar için Google Chat uygulaması olarak kimlik doğrulama ve yetkilendirme başlıklı makaleyi inceleyin.
- Kullanıcı veya Chat uygulaması olarak kimliğinizi doğrulamak isteyip istemediğinize bağlı olarak bir yetkilendirme kapsamı seçin.
- Kimliği doğrulanmış kullanıcının veya arama sohbet uygulamasının üyesi olduğu bir Google Chat alanı. Chat uygulaması olarak kimlik doğrulamak için Chat uygulamasını alana ekleyin.
Sohbet uygulaması olarak mesaj gönderme
Bu bölümde, Uygulama kimlik doğrulaması kullanılarak metin, kart ve etkileşimli aksesuar widget'ları içeren mesajların nasıl gönderileceği açıklanmaktadır.

Uygulama kimlik doğrulaması kullanarak CreateMessage()
yöntemini çağırmak için istekte aşağıdaki alanları belirtmeniz gerekir:
chat.botYetkilendirme kapsamı.- Mesajı yayınlamak istediğiniz
Spacekaynağı. Sohbet uygulaması, alanın üyesi olmalıdır. - Oluşturulacak
Messagekaynağı. İletinin içeriğini tanımlamak için zengin metin (text), bir veya daha fazla kart arayüzü (cardsV2) ya da her ikisini de ekleyebilirsiniz.
İsteğe bağlı olarak aşağıdakileri ekleyebilirsiniz:
accessoryWidgetsalanı, iletiğin alt kısmında etkileşimli düğmeler içerir.- Belirli bir kullanıcıya
privateMessageVieweralanını kullanarak iletiyi gizli olarak gönderebilirsiniz. - Diğer API isteklerinde kullanılacak mesaja ad vermenizi sağlayan
messageIdalanı. thread.threadKeyvemessageReplyOptionalanları, bir ileti dizisini başlatmak veya yanıtlamak için kullanılır. Alan ileti dizilerini kullanmıyorsa bu alan yoksayılır.
Aşağıdaki kodda, sohbet uygulamasının, sohbet uygulaması olarak yayınlanan ve metin, kart ve mesajın alt kısmında tıklanabilir bir düğme içeren bir mesajı nasıl gönderebileceğine dair bir örnek gösterilmektedir:
Node.js
Python
Java
Apps Komut Dosyası
Bu örneği çalıştırmak için SPACE_NAME yerine alanın name alanındaki kimliği girin. Kimliği ListSpaces() yöntemini çağırarak veya alanın URL'sinden alabilirsiniz.
İletinin alt kısmına etkileşimli widget'lar ekleme
Bu kılavuzun ilk kod örneğinde, Sohbet uygulaması mesajında mesajın alt kısmında tıklanabilir bir düğme gösterilir. Bu düğmeye aksesuar widget'ı adı verilir. Aksesuar widget'ları, iletideki metin veya kartlardan sonra görünür. Bu widget'ları kullanarak kullanıcıları iletinizle etkileşime geçmeye teşvik edebilirsiniz. Örneğin:
- Bir mesajın doğruluğunu veya memnuniyet düzeyini değerlendirin.
- Mesaj veya sohbet uygulamasıyla ilgili sorun bildirme
- Doküman gibi ilgili içeriklerin bağlantılarını açma
- Sohbet uygulamasından gelen benzer mesajları belirli bir süre boyunca kapatabilir veya erteleyebilirsiniz.
Aksesuar widget'ları eklemek için isteğinizin gövdesine accessoryWidgets[] alanını ekleyin ve dahil etmek istediğiniz bir veya daha fazla widget'ı belirtin.
Aşağıdaki resimde, kullanıcıların sohbet uygulamasıyla ilgili deneyimlerini değerlendirebilmeleri için kısa mesaja aksesuar widget'ları ekleyen bir sohbet uygulaması gösterilmektedir.
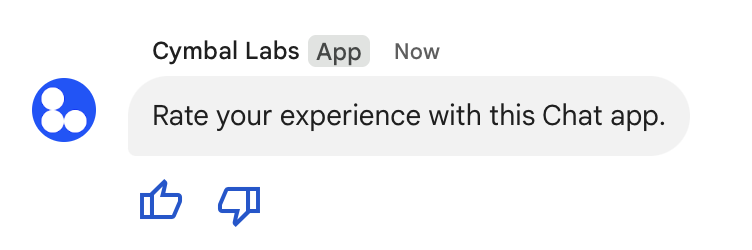
Aşağıda, iki aksesuar düğmesi içeren bir kısa mesaj oluşturan isteğin gövdesi gösterilmektedir. Kullanıcı bir düğmeyi tıkladığında ilgili işlev (ör. doUpvote) etkileşimi işler:
{
  text: "Rate your experience with this Chat app.",
  accessoryWidgets: [{ buttonList: { buttons: [{
    icon: { material_icon: {
      name: "thumb_up"
    }},
    color: { red: 0, blue: 255, green: 0 },
    onClick: { action: {
      function: "doUpvote"
    }}
  }, {
    icon: { material_icon: {
      name: "thumb_down"
    }},
    color: { red: 0, blue: 255, green: 0 },
    onClick: { action: {
      function: "doDownvote"
    }}
  }]}}]
}
Özel mesaj gönderme
Sohbet uygulamaları, mesajı yalnızca alandaki belirli bir kullanıcının görebileceği şekilde özel olarak gönderebilir. Bir sohbet uygulaması özel mesaj gönderdiğinde, mesajda kullanıcının mesajı yalnızca kendisinin görebileceğini belirten bir etiket gösterilir.
Chat API'yi kullanarak özel olarak mesaj göndermek için isteğinizin gövdesinde privateMessageViewer alanını belirtin. Kullanıcıyı belirtmek için değeri, Chat kullanıcısını temsil eden User kaynağına ayarlarsınız. Ayrıca, aşağıdaki örnekte gösterildiği gibi, User kaynağının name alanını da kullanabilirsiniz:
{
  text: "Hello private world!",
  privateMessageViewer: {
    name: "users/USER_ID"
  }
}
Bu örneği kullanmak için USER_ID
yerine kullanıcı için benzersiz bir kimlik (ör. 12345678987654321 veya
hao@cymbalgroup.com) girin. Kullanıcıları belirtme hakkında daha fazla bilgi için Google Chat kullanıcılarını tanımlama ve belirtme başlıklı makaleyi inceleyin.
Özel mesaj göndermek için isteğinizde aşağıdakileri belirtmemeniz gerekir:
Kullanıcı adına kısa mesaj gönderme
Bu bölümde, kullanıcı kimlik doğrulaması kullanarak kullanıcı adına nasıl ileti gönderileceği açıklanmaktadır. Kullanıcı kimlik doğrulamasıyla, mesajın içeriği yalnızca metin içerebilir ve kart arayüzleri ile etkileşimli widget'lar da dahil olmak üzere yalnızca Chat uygulamalarında kullanılabilen mesajlaşma özellikleri çıkarılmalıdır. Geliştirici Önizlemesi'nde, kullanıcı adına kart içeren mesajlar oluşturabilirsiniz. Ayrıntılar için Kart oluşturma ve güncelleme başlıklı makaleyi inceleyin.

Kullanıcı kimlik doğrulamasıyla CreateMessage() yöntemini çağırmak için istekte aşağıdaki alanları belirtmeniz gerekir:
- Bu yöntem için kullanıcı kimlik doğrulamasını destekleyen bir yetkilendirme kapsamı. Aşağıdaki örnekte
chat.messages.createkapsamı kullanılmaktadır. - Mesajı yayınlamak istediğiniz
Spacekaynağı. Kimliği doğrulanmış kullanıcı, alanın üyesi olmalıdır. - Oluşturulacak
Messagekaynağı. İletinin içeriğini tanımlamak içintextalanını eklemeniz gerekir.
İsteğe bağlı olarak aşağıdakileri ekleyebilirsiniz:
- Diğer API isteklerinde kullanılacak mesaja ad vermenizi sağlayan
messageIdalanı. thread.threadKeyvemessageReplyOptionalanları, bir ileti dizisini başlatmak veya yanıtlamak için kullanılır. Alan ileti dizilerini kullanmıyorsa bu alan yoksayılır.
Aşağıdaki kod, bir sohbet uygulamasının kimliği doğrulanmış bir kullanıcı adına belirli bir alanda nasıl kısa mesaj gönderebileceğine dair bir örnek gösterir:
Node.js
Python
Java
Apps Komut Dosyası
Bu örneği çalıştırmak için SPACE_NAME yerine alanın name alanındaki kimliği girin. Kimliği ListSpaces() yöntemini çağırarak veya alanın URL'sinden alabilirsiniz.
İleti dizisi başlatma veya ileti dizisinde yanıt verme
İleti dizilerinin kullanıldığı alanlarda, yeni bir mesajın ileti dizisi başlatıp başlatmayacağını veya mevcut bir ileti dizisini yanıtlayıp yanıtlamayacağını belirleyebilirsiniz.
Varsayılan olarak, Chat API kullanılarak oluşturulan mesajlar yeni bir ileti dizisi başlatır. İş parçacığını belirlemenize ve daha sonra yanıtlamanıza yardımcı olması için isteğinizde bir iş parçacığı anahtarı belirtebilirsiniz:
- İsteğinizin gövde bölümünde
thread.threadKeyalanını belirtin. - Anahtar zaten varsa ne olacağını belirlemek için sorgu parametresini
messageReplyOptionbelirtin.
Mevcut bir mesaj dizisini yanıtlayan bir mesaj oluşturmak için:
- İsteğinizin gövdesine
threadalanını ekleyin. Ayarlanmışsa oluşturduğunuzthreadKey'ı belirtebilirsiniz. Aksi takdirde, ileti dizisininnamekullanmanız gerekir. messageReplyOptionsorgu parametresini belirtin.
Aşağıdaki kod, bir Sohbet uygulamasının kimliği doğrulanmış bir kullanıcı adına, belirli bir alandaki anahtarla tanımlanan belirli bir ileti dizisini başlatan veya bu ileti dizisine yanıt veren bir kısa mesaj gönderme örneğini gösterir:
Node.js
Python
Java
Apps Komut Dosyası
Bu örneği çalıştırmak için aşağıdakileri değiştirin:
THREAD_KEY: Alanın mevcut bir ileti dizisi anahtarı veya yeni bir ileti dizisi oluşturmak için ileti dizisinin benzersiz adı.SPACE_NAME: Alanınnamealanındaki kimlik. KimliğiListSpaces()yöntemini çağırarak veya alanın URL'sinden alabilirsiniz.
Mesaj adlandırma
Gelecekteki API çağrılarında bir mesajı almak veya belirtmek için isteğinizdeki messageId alanını ayarlayarak bir mesaja ad verebilirsiniz.
İletinize ad verdiğinizde, iletinin kaynak adından sisteme atanan kimliği (name alanında gösterilir) depolamanıza gerek kalmadan iletiyi belirtebilirsiniz.
Örneğin, get() yöntemini kullanarak bir iletiyi almak için hangi iletinin alınacağını belirtmek üzere kaynak adını kullanırsınız. Kaynak adı, spaces/{space}/messages/{message} biçimindedir. Burada {message}, sisteme atanan kimliği veya mesajı oluştururken ayarladığınız özel adı temsil eder.
Bir iletiye ad vermek için iletiyi oluştururken messageId alanında özel bir kimlik belirtin. messageId alanı, Message kaynağının clientAssignedMessageId alanının değerini ayarlar.
Yalnızca oluşturduğunuz mesajlara ad verebilirsiniz. Mevcut iletiler için özel kimlikleri adlandıramaz veya değiştiremezsiniz. Özel kimlik aşağıdaki koşulları karşılamalıdır:
client-ile başlar. Örneğin,client-custom-namegeçerli bir özel kimliktir ancakcustom-namegeçerli değildir.- En fazla 63 karakter içerir ve yalnızca küçük harf, rakam ve kısa çizgi içerebilir.
- Bir alan içinde benzersiz olmalıdır. Bir sohbet uygulaması, farklı mesajlar için aynı özel kimliği kullanamaz.
Aşağıdaki kod, bir sohbet uygulamasının kimliği doğrulanmış bir kullanıcı adına belirli bir alana kimlik içeren bir kısa mesaj gönderme örneğini gösterir:
Node.js
Python
Java
Apps Komut Dosyası
Bu örneği çalıştırmak için aşağıdakileri değiştirin:
SPACE_NAME: Alanınnamealanındaki kimlik. KimliğiListSpaces()yöntemini çağırarak veya alanın URL'sinden alabilirsiniz.MESSAGE-ID:custom-ile başlayan ileti adı. Belirtilen alanda Sohbet uygulaması tarafından oluşturulan diğer mesaj adlarından farklı olmalıdır.
Mesaj alıntılama
CreateMessage()
(rpc,
rest)
işlevini çağırıp quotedMessageMetadata
(rpc,
rest)
işlevini isteğe ayarlayarak başka bir mesajı alıntılayabilirsiniz.
Bir ileti dizisindeki veya ana sohbetteki iletileri alıntılayabilirsiniz ancak farklı bir ileti dizisindeki iletileri alıntılayamazsınız.
Aşağıdaki kodda, başka bir mesajı alıntılayan bir mesajın nasıl oluşturulacağı gösterilmektedir:
Node.js
import {createClientWithUserCredentials} from './authentication-utils.js';

const USER_AUTH_OAUTH_SCOPES = ['https://www.googleapis.com/auth/chat.messages.create'];

// This sample shows how to create a message that quotes another message.
async function main() {

  // Create a client
  const chatClient = await createClientWithUserCredentials(USER_AUTH_OAUTH_SCOPES);

  // Initialize request argument(s)
  const request = {

    // TODO(developer): Replace SPACE_NAME .
    parent: 'spaces/SPACE_NAME',

    message: {
      text: 'I am responding to a quoted message!',

      // quotedMessageMetadata lets chat apps respond to a message by quoting it.
      quotedMessageMetadata: {

        // TODO(developer): Replace QUOTED_MESSAGE_NAME
        // and QUOTED_MESSAGE_LAST_UPDATE_TIME.
        name: 'QUOTED_MESSAGE_NAME',
        lastUpdateTime: 'QUOTED_MESSAGE_LAST_UPDATE_TIME'
      }
    }
  };

  // Make the request
  const response = await chatClient.createMessage(request);

  // Handle the response
  console.log(response);
}

main().catch(console.error);
Python
from authentication_utils import create_client_with_user_credentials
from google.apps import chat_v1 as google_chat
from google.protobuf.timestamp_pb2 import Timestamp

SCOPES = ['https://www.googleapis.com/auth/chat.messages.create']

# This sample shows how to create a message that quotes another message.
def create_message_quote_message():
    '''Creates a message that quotes another message.'''

    # Create a client
    client = create_client_with_user_credentials(SCOPES)

    # Create a timestamp from the RFC-3339 string.
    # TODO(developer): Replace QUOTED_MESSAGE_LAST_UPDATE_TIME.
    last_update_time = Timestamp()
    last_update_time.FromJsonString('QUOTED_MESSAGE_LAST_UPDATE_TIME')

    # Initialize request argument(s)
    request = google_chat.CreateMessageRequest(

        # TODO(developer): Replace SPACE_NAME.
        parent='spaces/SPACE_NAME',

        # Create the message.
        message = google_chat.Message(
            text='I am responding to a quoted message!',

            # quotedMessageMetadata lets chat apps respond to a message by quoting it.
            quoted_message_metadata=google_chat.QuotedMessageMetadata(

                name='QUOTED_MESSAGE_NAME',
                last_update_time=last_update_time
            )
        )
    )

    # Make the request
    response = client.create_message(request)

    # Handle the response
    print(response)

create_message_quote_message()
Java
import com.google.chat.v1.ChatServiceClient;
import com.google.chat.v1.CreateMessageRequest;
import com.google.chat.v1.Message;
import com.google.chat.v1.QuotedMessageMetadata;
import com.google.protobuf.util.Timestamps;
import com.google.workspace.api.chat.samples.utils.AuthenticationUtils;
import java.text.ParseException;

// This sample shows how to create a message that quotes another message.
public class CreateMessageQuoteMessage {
  public static void main(String[] args) throws Exception, ParseException {
    // Create a client.
    ChatServiceClient chatClient = AuthenticationUtils.createClientWithUserCredentials();

    // Initialize request argument(s).
    // TODO(developer): Replace SPACE_NAME, QUOTED_MESSAGE_NAME,
    // and QUOTED_MESSAGE_LAST_UPDATE_TIME here.
    String parent = "spaces/SPACE_NAME";
    String quotedMessageName = "QUOTED_MESSAGE_NAME";
    String lastUpdateTime = "QUOTED_MESSAGE_LAST_UPDATE_TIME";

    QuotedMessageMetadata quotedMessageMetadata =
        QuotedMessageMetadata.newBuilder()
            .setName(quotedMessageName)
            .setLastUpdateTime(Timestamps.parse(lastUpdateTime))
            .build();

    Message message = Message.newBuilder()
        .setText("I am responding to a quoted message!")
        .setQuotedMessageMetadata(quotedMessageMetadata)
        .build();

    CreateMessageRequest request =
        CreateMessageRequest.newBuilder()
            .setParent(parent)
            .setMessage(message)
            .build();

    // Make the request.
    Message response = chatClient.createMessage(request);

    // Handle the response.
    System.out.println(response);
  }
}
Apps Komut Dosyası
/**
 * Creates a message that quotes another message.
 *
 * Relies on the OAuth2 scope 'https://www.googleapis.com/auth/chat.messages.create'
 * referenced in the manifest file (appsscript.json).
 */
function createMessageQuoteMessage() {

  // Initialize request argument(s)
  // TODO(developer): Replace SPACE_NAME here.
  const parent = 'spaces/SPACE_NAME';

  const message = {

    // The text content of the message.
    text: 'I am responding to a quoted message!',

    // quotedMessageMetadata lets chat apps respond to a message by quoting it.
    //
    // TODO(developer): Replace QUOTED_MESSAGE_NAME
    // and QUOTED_MESSAGE_LAST_UPDATE_TIME .
    quotedMessageMetadata: {
      name: 'QUOTED_MESSAGE_NAME',
      lastUpdateTime: 'QUOTED_MESSAGE_LAST_UPDATE_TIME',
    }
  };

  // Make the request
  const response = Chat.Spaces.Messages.create(message, parent);

  // Handle the response
  console.log(response);
}
Bu örneği çalıştırmak için aşağıdakileri değiştirin:
SPACE_NAME: Alanınnamealanındaki kimlik. Kimliği,ListSpaces()(rpc,rest) yöntemini çağırarak veya alanın URL'sinden alabilirsiniz.QUOTED_MESSAGE_NAME:spaces/{space}/messages/{message}biçiminde alıntı yapılacak mesajın mesaj kaynağıname(rpc,rest).QUOTED_MESSAGE_LAST_UPDATE_TIME: Alıntılamak istediğiniz mesajın son güncelleme zamanı. Mesaj hiç düzenlenmediysecreateTime(rpc,rest) ile eşleşir. Mesaj düzenlendiyselastUpdateTime(rpc,rest) ile eşleşir.
Sorun giderme
Bir Google Chat uygulaması veya kartı hata döndürdüğünde Chat arayüzünde "Bir hata oluştu" veya "İsteğiniz işlenemiyor" mesajı gösterilir. Bazen Chat kullanıcı arayüzünde hata mesajı gösterilmez ancak Chat uygulaması veya kartı beklenmedik bir sonuç üretir. Örneğin, kart mesajı görünmeyebilir.
Chat kullanıcı arayüzünde hata mesajı gösterilmese de Chat uygulamaları için hata günlüğü kaydı etkinleştirildiğinde hataları düzeltmenize yardımcı olacak açıklayıcı hata mesajları ve günlük verileri kullanılabilir. Hataları görüntüleme, hataları ayıklama ve düzeltme konusunda yardım için Google Chat hatalarını giderme ve düzeltme başlıklı makaleyi inceleyin.
İlgili konular
- Chat uygulamaları için JSON kart mesajları tasarlamak ve önizlemek üzere Kart Oluşturucu'yu kullanın.
- İletileri biçimlendirme
- İleti hakkında ayrıntılı bilgi edinme.
- Alanımdaki mesajları listele.
- Mesaj güncelleme
- İletileri silme
- Google Chat mesajlarındaki kullanıcıları tanımlama.
- Gelen webhook'larla Google Chat'e mesaj gönderme.