
本頁說明如何建立 HTTP Chat 應用程式。實作這項架構的方法有很多種,在 Google Cloud 中,您可以使用 Cloud Run 和 App Engine。在本快速入門導覽課程中,您將編寫及部署 Cloud Run 函式,供 Chat 應用程式用來回覆使用者訊息。
在這個架構中,您會設定 Chat 透過 HTTP 與 Google Cloud 或地端部署伺服器整合,如下圖所示:

在上圖中,使用者與 HTTP Chat 應用程式互動時,資訊流程如下:
- 使用者在 Chat 中傳送訊息給 Chat 應用程式,無論是透過即時訊息或 Chat 聊天室。
- HTTP 要求會傳送至網路伺服器,該伺服器是雲端或地端系統,內含 Chat 應用程式邏輯。
- 視需要,Chat 應用程式邏輯可以整合 Google Workspace 服務 (例如 Google 日曆和 Google 試算表)、其他 Google 服務 (例如 Google 地圖、YouTube 和 Vertex AI),或是其他網路服務 (例如專案管理系統或票證工具)。
- 網路伺服器會將 HTTP 回應傳回給 Chat 中的 Chat 應用程式服務。
- 系統將回應送達使用者。
- Chat 應用程式可以選擇呼叫 Chat API,以非同步方式發布訊息或執行其他作業。
由於這些 Chat 應用程式可使用不同的程式設計語言設計,因此您能彈性運用系統中現有的程式庫和元件。
目標
- 設定環境。
- 建立及部署 Cloud Run 函式。
- 將應用程式發布到 Chat。
- 測試應用程式。
必要條件
- 具有 Google Chat 存取權的 Business 或 Enterprise 版 Google Workspace 帳戶。
- 啟用計費功能的 Google Cloud 專案。如要確認現有專案是否已啟用計費功能,請參閱「驗證專案的計費狀態」。如要建立專案及設定帳單,請參閱「建立 Google Cloud 專案」。
設定環境
使用 Google API 前,您需要在 Google Cloud 專案中啟用這些 API。 您可以在單一 Google Cloud 專案中啟用一或多個 API。在 Google Cloud 控制台中,啟用 Google Chat API、Cloud Build API、Cloud Functions API、Cloud Pub/Sub API、Cloud Logging API、Artifact Registry API 和 Cloud Run API。
建立及部署 Cloud Run 函式
建立並部署 Cloud Run 函式,產生含有傳送者顯示名稱和個人資料相片的 Chat 資訊卡。當 Chat 應用程式收到訊息時,會執行函式並以資訊卡回覆。
如要為 Chat 應用程式建立及部署函式,請完成下列步驟:
Node.js
前往 Google Cloud 控制台的 Cloud Run 頁面:
確認已選取 Chat 應用程式的專案。
按一下「編寫函式」。
在「建立服務」頁面中,設定函式:
- 在「Service name」(服務名稱) 欄位中輸入
quickstartchatapp。 - 在「Region」(區域) 清單中選取區域。
- 在「Runtime」(執行階段) 清單中,選取最新版的 Node.js。
- 在「驗證」部分,選取「需要驗證」。
- 按一下「建立」,然後等待 Cloud Run 建立服務。 控制台會將您重新導向至「來源」分頁。
- 在「Service name」(服務名稱) 欄位中輸入
在「來源」分頁中:
- 在「進入點」中刪除預設文字,然後輸入
avatarApp。 將
index.js的內容替換為下列程式碼:按一下「儲存並重新部署」。
- 在「進入點」中刪除預設文字,然後輸入
Python
前往 Google Cloud 控制台的 Cloud Run 頁面:
確認已選取 Chat 應用程式的專案。
按一下「編寫函式」。
在「建立服務」頁面中,設定函式:
- 在「Service name」(服務名稱) 欄位中輸入
quickstartchatapp。 - 在「Region」(區域) 清單中選取區域。
- 在「Runtime」清單中,選取最新版本的 Python。
- 在「驗證」部分,選取「需要驗證」。
- 按一下「建立」,然後等待 Cloud Run 建立服務。 控制台會將您重新導向至「來源」分頁。
- 在「Service name」(服務名稱) 欄位中輸入
在「來源」分頁中:
- 在「進入點」中,刪除預設文字並輸入
avatar_app。 將
main.py的內容替換為下列程式碼:按一下「儲存並重新部署」。
- 在「進入點」中,刪除預設文字並輸入
Java
前往 Google Cloud 控制台的 Cloud Run 頁面:
確認已選取 Chat 應用程式的專案。
按一下「編寫函式」。
在「建立服務」頁面中,設定函式:
- 在「Service name」(服務名稱) 欄位中輸入
quickstartchatapp。 - 在「Region」(區域) 清單中選取區域。
- 在「執行階段」清單中,選取最新版本的 Java。
- 在「驗證」部分,選取「需要驗證」。
- 按一下「建立」,然後等待 Cloud Run 建立服務。 控制台會將您重新導向至「來源」分頁。
- 在「Service name」(服務名稱) 欄位中輸入
在「來源」分頁中:
- 在「進入點」中,刪除預設文字並輸入
App。 - 將
src/main/java/com/example/Example.java重新命名為src/main/java/AvatarApp.java。 將
AvatarApp.java的內容替換為下列程式碼:將
pom.xml的內容替換為下列程式碼:按一下「儲存並重新部署」。
- 在「進入點」中,刪除預設文字並輸入
授權 Google Chat 叫用函式
如要授權 Google Chat 叫用函式,請新增 Google Chat 服務帳戶,並指派 Cloud Run 叫用者角色。
前往 Google Cloud 控制台的 Cloud Run 頁面:
在 Cloud Run 服務清單中,選取接收函式旁的核取方塊。(請勿點選函式本身)。
按一下 [權限],「權限」面板隨即開啟。
按一下「新增主體」。
在「New principals」(新增主體) 部分輸入
chat@system.gserviceaccount.com。在「請選擇角色」中,依序選取「Cloud Run」 >「Cloud Run 叫用者」。
按一下 [儲存]。
設定 Chat 應用程式
部署 Cloud Run 函式後,請按照下列步驟將其轉換為 Google Chat 應用程式:
前往 Google Cloud 控制台的 Cloud Run 頁面:
請確保選取的是已啟用 Cloud Run 的專案。
在服務清單中,按一下「quickstartchatapp」quickstartchatapp。
在「服務詳細資料」頁面中,複製函式的「網址」。
搜尋「Google Chat API」,然後按一下「Google Chat API」,再按一下「管理」。
按一下「設定」,然後設定 Google Chat 應用程式:
- 取消勾選「將這個 Chat 擴充應用程式建構為 Google Workspace 外掛程式」。系統會開啟對話方塊,要求您確認。按一下對話方塊中的「停用」。
- 在「應用程式名稱」中輸入
Quickstart App。 - 在「顯示圖片網址」中輸入
https://developers.google.com/chat/images/quickstart-app-avatar.png。 - 在「Description」(說明) 中輸入
Quickstart app。 - 在「功能」下方,選取「加入聊天室和群組對話」。
- 在「連線設定」下方,選取「HTTP 端點網址」。
- 在「觸發條件」下方,選取「為所有觸發條件使用通用的 HTTP 端點網址」,然後將 Cloud Run 函式觸發條件的網址貼到方塊中。
- 在「瀏覽權限」下方,選取「將這個 Chat 擴充應用程式提供給網域中的特定使用者和群組」,然後輸入電子郵件地址。
- 在「記錄」下方,選取「將錯誤記錄至 Logging」。
按一下 [儲存]。
Chat 應用程式已準備好接收及回覆 Chat 訊息。
測試 Chat 應用程式
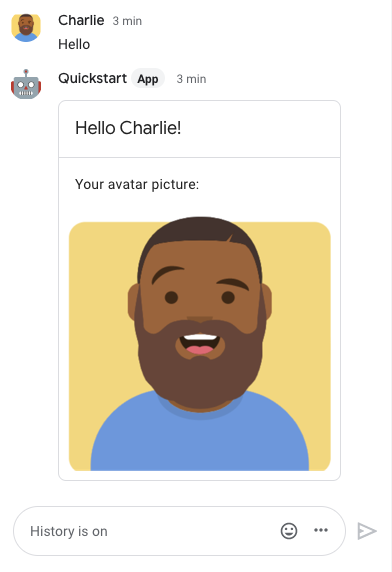
如要測試 Chat 應用程式,請開啟與該應用程式互傳的即時訊息,然後傳送訊息:
使用您在新增自己為信任測試人員時提供的 Google Workspace 帳戶,開啟 Google Chat。
- 按一下 「發起新即時通訊」。
- 在「新增 1 位以上使用者」欄位中,輸入 Chat 應用程式的名稱。
從結果中選取 Chat 應用程式。系統會開啟即時訊息。
- 在與應用程式互傳的新即時訊息中,輸入
Hello並按下enter。
Chat 應用程式的回覆包含訊息卡片,會顯示傳送者的名稱和個人資料相片,如下圖所示:
如要新增信任的測試人員,並進一步瞭解如何測試互動式功能,請參閱「測試 Google Chat 應用程式的互動式功能」。
疑難排解
如果 Google Chat 應用程式或資訊卡傳回錯誤,Chat 介面會顯示「發生錯誤」訊息。或「無法處理您的要求」。有時 Chat UI 不會顯示任何錯誤訊息,但 Chat 應用程式或資訊卡會產生非預期的結果,例如資訊卡訊息可能不會顯示。
即使 Chat 使用者介面可能不會顯示錯誤訊息,但如果開啟 Chat 應用程式的錯誤記錄功能,系統就會提供說明性錯誤訊息和記錄資料,協助您修正錯誤。如需查看、偵錯及修正錯誤的相關協助,請參閱「排解及修正 Google Chat 錯誤」。
清除所用資源
為避免系統向您的 Google Cloud 帳戶收取本教學課程中所用資源的相關費用,建議您刪除 Cloud 專案。
- 在 Google Cloud 控制台中,前往「管理資源」頁面。依序點選「選單」「IAM 與管理」>「管理資源」>。
- 在專案清單中選取要刪除的專案,然後按一下「刪除」圖示 。
- 在對話方塊中輸入專案 ID,然後按一下「Shut down」(關閉) 即可刪除專案。
相關主題
如要為 Chat 應用程式新增更多功能,請參閱下列文章: