建構 HTTP Google Chat 應用程式

本頁說明如何建立 HTTP Chat 應用程式。實作此架構的方法有很多種。在 Google Cloud 中,您可以使用 Cloud Functions、Cloud Run 和 App Engine。在本快速入門課程中,您將編寫並部署 Cloud 函式,供 Chat 應用程式用來回覆使用者的訊息。

在這個架構中,您可以使用 HTTP 將 Chat 設定為與 Google Cloud 或內部部署伺服器整合,如以下圖所示:

使用內部伺服器中的網路服務,即時通訊應用程式的架構。

在上方的圖表中,使用者與 HTTP Chat 應用程式互動時,資訊會按照以下流程傳送:

  1. 使用者在 Chat 中傳送訊息給 Chat 應用程式,可能是透過即時訊息或 Chat 聊天室。
  2. HTTP 要求會傳送至網路伺服器,該伺服器是雲端或內部系統,其中包含 Chat 應用程式邏輯。
  3. 您也可以視需要將 Chat 擴充應用程式邏輯與 Google Workspace 服務 (例如日曆和試算表)、其他 Google 服務 (例如地圖、YouTube 和 Vertex AI) 或其他網路服務 (例如專案管理系統或支援單工具) 整合。
  4. 網路伺服器會將 HTTP 回應傳回至 Chat 中的 Chat 應用程式服務。
  5. 系統會將回應傳送給使用者。
  6. 如有需要,Chat 應用程式可以呼叫 Chat API,以非同步方式發布訊息或執行其他作業。

由於 Chat 應用程式可使用不同的程式設計語言設計,因此這個架構可讓您靈活運用系統中現有的程式庫和元件。

目標

  • 設定環境。
  • 建立及部署 Cloud 函式。
  • 將應用程式發布到 Chat。
  • 測試應用程式。

必要條件

設定環境

使用 Google API 前,您必須先在 Google Cloud 專案中啟用這些 API。您可以在單一 Google Cloud 專案中啟用一或多個 API。
  • 在 Google Cloud 控制台中啟用 Google Chat API、Cloud Build API、Cloud Functions API、Cloud Pub/Sub API、Cloud Logging API、Artifact Registry API 和 Cloud Run API。

    啟用 API

建立及部署 Cloud 函式

建立及部署 Cloud 函式,產生 Chat 資訊卡,其中包含傳送者的顯示名稱和顯示圖片。當 Chat 應用程式收到訊息時,就會執行函式並回應資訊卡。

如要為 Chat 應用程式建立及部署函式,請完成下列步驟:

Node.js

  1. 前往 Google Cloud 控制台中的「Cloud Functions」頁面。

    前往 Cloud Functions 頁面

    確認已選取 Chat 應用程式的專案。

  2. 按一下 「Create Function」

  3. 在「建立函式」頁面中設定函式:

    1. 在「環境」中,選取「Cloud Run 函式」
    2. 在「Function name」 中輸入 QuickStartChatApp
    3. 在「區域」中選取所需區域。
    4. 在「Authentication」(驗證) 下方,選取「Require authentication」(需要驗證)
    5. 點選「下一步」
  4. 在「Runtime」中,選取 Node.js 的最新版本。

  5. 在「Source code」中,選取「Inline Editor」

  6. 在「Entry point」中,刪除預設文字並輸入 avatarApp

  7. 使用下列程式碼取代 index.js 的內容:

    node/avatar-app/index.js
    // The ID of the slash command "/about".
    // It's not enabled by default, set to the actual ID to enable it. You need to
    // use the same ID as set in the Google Chat API configuration.
    const ABOUT_COMMAND_ID = "";
    
    /**
     * Google Cloud Function that responds to messages sent from a
     * Google Chat space.
     *
     * @param {Object} req Request sent from Google Chat space
     * @param {Object} res Response to send back
     */
    exports.avatarApp = function avatarApp(req, res) {
      if (req.method === 'GET' || !req.body.message) {
        return res.send('Hello! This function is meant to be used ' +
          'in a Google Chat Space.');
      }
    
      // Stores the Google Chat event as a variable.
      const event = req.body;
    
      // Checks for the presence of a slash command in the message.
      if (event.message.slashCommand) {
        // Executes the slash command logic based on its ID.
        // Slash command IDs are set in the Google Chat API configuration.
        switch (event.message.slashCommand.commandId) {
          case ABOUT_COMMAND_ID:
            return res.send({
              privateMessageViewer: event.user,
              text: 'The Avatar app replies to Google Chat messages.'
            });
        }
      }
    
      const sender = req.body.message.sender.displayName;
      const image = req.body.message.sender.avatarUrl;
      const data = createMessage(sender, image);
      res.send(data);
    };
    
    /**
     * Creates a card with two widgets.
     * 
     * @param {string} displayName the sender's display name
     * @param {string} avatarUrl the URL for the sender's avatar
     * @return {Object} a card with the user's avatar.
     */
    function createMessage(displayName, avatarUrl) {
      return {
        text: 'Here\'s your avatar',
        cardsV2: [{
          cardId: 'avatarCard',
          card: {
            name: 'Avatar Card',
            header: {
              title: `Hello ${displayName}!`,
            },
            sections: [{ widgets: [{
              textParagraph: { text: 'Your avatar picture: ' }
            }, {
              image: { imageUrl: avatarUrl }
            }]}]
          }
        }]
      };
    }

  8. 按一下「部署」

Python

  1. 前往 Google Cloud 控制台的「Cloud Functions」頁面:

    前往 Cloud Functions 頁面

    確認已選取 Chat 應用程式的專案。

  2. 按一下 「Create Function」

  3. 在「建立函式」頁面中設定函式:

    1. 在「環境」中,選取「Cloud Run 函式」
    2. 在「Function name」 中輸入 QuickStartChatApp
    3. 在「區域」中選取所需區域。
    4. 在「Authentication」(驗證) 下方,選取「Require authentication」(需要驗證)
    5. 點選「下一步」
  4. 在「Runtime」中,選取 Python 的最新版本。

  5. 在「原始碼」中,選取「內嵌編輯器」

  6. 在「Entry point」中,刪除預設文字並輸入 avatar_app

  7. main.py 的內容替換為以下程式碼:

    python/avatar-app/main.py
    from typing import Any, Mapping
    
    import flask
    import functions_framework
    
    # The ID of the slash command "/about".
    # It's not enabled by default, set to the actual ID to enable it. You need to
    # use the same ID as set in the Google Chat API configuration.
    ABOUT_COMMAND_ID = ""
    
    @functions_framework.http
    def avatar_app(req: flask.Request) -> Mapping[str, Any]:
      """Google Cloud Function that handles requests from Google Chat
    
      Args:
          flask.Request: the request
    
      Returns:
          Mapping[str, Any]: the response
      """
      if req.method == "GET":
        return "Hello! This function must be called from Google Chat."
    
      request_json = req.get_json(silent=True)
    
      # Checks for the presence of a slash command in the message.
      if "slashCommand" in request_json["message"]:
        # Executes the slash command logic based on its ID.
        # Slash command IDs are set in the Google Chat API configuration.
        if request_json["message"]["slashCommand"]["commandId"] == ABOUT_COMMAND_ID:
          return {
            "privateMessageViewer": request_json["user"],
            "text": 'The Avatar app replies to Google Chat messages.'
          }
    
      display_name = request_json["message"]["sender"]["displayName"]
      avatar = request_json["message"]["sender"]["avatarUrl"]
      response = create_message(name=display_name, image_url=avatar)
      return response
    
    
    def create_message(name: str, image_url: str) -> Mapping[str, Any]:
      """Google Cloud Function that handles requests from Google Chat
    
      Args:
          str name: the sender's display name.
          str image_url: the URL for the sender's avatar.
    
      Returns:
          Mapping[str, Any]: a card with the user's avatar.
      """
      return {
        "text": "Here's your avatar",
        "cardsV2": [{
          "cardId": "avatarCard",
          "card": {
              "name": "Avatar Card",
              "header": { "title": f"Hello {name}!" },
              "sections": [{
                "widgets": [{
                  "textParagraph": { "text": "Your avatar picture:" }
                }, {
                  "image": { "imageUrl": image_url }
                }]
              }]
          }
        }]
      }

  8. 按一下「部署」

Java

  1. 前往 Google Cloud 控制台的「Cloud Functions」頁面:

    前往 Cloud Functions 頁面

    確認已選取 Chat 應用程式的專案。

  2. 按一下 「Create Function」

  3. 在「建立函式」頁面中設定函式:

    1. 在「環境」中,選取「Cloud Run 函式」
    2. 在「Function name」 中輸入 QuickStartChatApp
    3. 在「區域」中選取所需區域。
    4. 在「Authentication」(驗證) 下方,選取「Require authentication」(需要驗證)
    5. 點選「下一步」
  4. 在「執行階段」中,選取 Java 的最新版本。

  5. 在「原始碼」中,選取「內嵌編輯器」

  6. 在「Entry point」中,刪除預設文字並輸入 App

  7. src/main/java/com/example/Example.java 重新命名為 src/main/java/App.java

  8. 使用下列程式碼取代 App.java 的內容:

    java/avatar-app/src/main/java/App.java
    import java.util.List;
    
    import com.google.api.services.chat.v1.model.CardWithId;
    import com.google.api.services.chat.v1.model.GoogleAppsCardV1Card;
    import com.google.api.services.chat.v1.model.GoogleAppsCardV1CardHeader;
    import com.google.api.services.chat.v1.model.GoogleAppsCardV1Image;
    import com.google.api.services.chat.v1.model.GoogleAppsCardV1Section;
    import com.google.api.services.chat.v1.model.GoogleAppsCardV1TextParagraph;
    import com.google.api.services.chat.v1.model.GoogleAppsCardV1Widget;
    import com.google.api.services.chat.v1.model.Message;
    import com.google.api.services.chat.v1.model.User;
    import com.google.cloud.functions.HttpFunction;
    import com.google.cloud.functions.HttpRequest;
    import com.google.cloud.functions.HttpResponse;
    import com.google.gson.Gson;
    import com.google.gson.JsonObject;
    
    public class App implements HttpFunction {
      private static final Gson gson = new Gson();
    
      // The ID of the slash command "/about".
      // It's not enabled by default, set to the actual ID to enable it. You need to
      // use the same ID as set in the Google Chat API configuration.
      private static final String ABOUT_COMMAND_ID = "";
    
      @Override
      public void service(HttpRequest request, HttpResponse response) throws Exception {
        JsonObject body = gson.fromJson(request.getReader(), JsonObject.class);
    
        if (request.getMethod().equals("GET") || !body.has("message")) {
          response.getWriter().write("Hello! This function must be called from Google Chat.");
          return;
        }
    
        // Checks for the presence of a slash command in the message.
        if (body.getAsJsonObject("message").has("slashCommand")) {
          // Executes the slash command logic based on its ID.
          // Slash command IDs are set in the Google Chat API configuration.
          JsonObject slashCommand = body.getAsJsonObject("message").getAsJsonObject("slashCommand");
          switch (slashCommand.get("commandId").getAsString()) {
            case ABOUT_COMMAND_ID:
              Message aboutMessage = new Message();
              aboutMessage.setText("The Avatar app replies to Google Chat messages.");
              aboutMessage.setPrivateMessageViewer(new User()
                .setName(body.getAsJsonObject("user").get("name").getAsString()));
              response.getWriter().write(gson.toJson(aboutMessage));
              return;
          }
        }
    
        JsonObject sender = body.getAsJsonObject("message").getAsJsonObject("sender");
        String displayName = sender.has("displayName") ? sender.get("displayName").getAsString() : "";
        String avatarUrl = sender.has("avatarUrl") ? sender.get("avatarUrl").getAsString() : "";
        Message message = createMessage(displayName, avatarUrl);
        response.getWriter().write(gson.toJson(message));
      }
    
      Message createMessage(String displayName, String avatarUrl) {
        return new Message()
          .setText("Here's your avatar")
          .setCardsV2(List.of(new CardWithId()
            .setCardId("previewLink")
            .setCard(new GoogleAppsCardV1Card()
              .setName("Avatar Card")
              .setHeader(new GoogleAppsCardV1CardHeader()
                .setTitle(String.format("Hello %s!", displayName)))
              .setSections(List.of(new GoogleAppsCardV1Section().setWidgets(List.of(
                new GoogleAppsCardV1Widget()
                  .setTextParagraph(new GoogleAppsCardV1TextParagraph()
                    .setText("Your avatar picture: ")),
                new GoogleAppsCardV1Widget()
                  .setImage(new GoogleAppsCardV1Image().setImageUrl(avatarUrl)))))))));
      }
    }

  9. pom.xml 的內容替換為以下程式碼:

    java/avatar-app/pom.xml
    <project xmlns="http://maven.apache.org/POM/4.0.0"
             xmlns:xsi="http://www.w3.org/2001/XMLSchema-instance"
             xsi:schemaLocation="http://maven.apache.org/POM/4.0.0 http://maven.apache.org/xsd/maven-4.0.0.xsd">
      <modelVersion>4.0.0</modelVersion>
    
      <groupId>com.google.chat</groupId>
      <artifactId>avatar-app</artifactId>
      <version>1.0-SNAPSHOT</version>
    
      <properties>
        <maven.compiler.target>17</maven.compiler.target>
        <maven.compiler.source>17</maven.compiler.source>
      </properties>
    
      <dependencies>
        <dependency>
          <groupId>com.google.cloud.functions</groupId>
          <artifactId>functions-framework-api</artifactId>
          <version>1.0.1</version>
        </dependency>
    
        <!-- https://mvnrepository.com/artifact/com.google.code.gson/gson -->
        <dependency>
            <groupId>com.google.code.gson</groupId>
            <artifactId>gson</artifactId>
            <version>2.9.1</version>
        </dependency>
    
        <!-- https://mvnrepository.com/artifact/com.google.apis/google-api-services-chat -->
        <dependency>
          <groupId>com.google.apis</groupId>
          <artifactId>google-api-services-chat</artifactId>
          <version>v1-rev20241008-2.0.0</version>
        </dependency>
      </dependencies>
    
      <!-- Required for Java 11 functions in the inline editor -->
      <build>
        <plugins>
          <plugin>
            <groupId>org.apache.maven.plugins</groupId>
            <artifactId>maven-compiler-plugin</artifactId>
            <version>3.8.1</version>
            <configuration>
              <excludes>
                <exclude>.google/</exclude>
              </excludes>
            </configuration>
          </plugin>
        </plugins>
      </build>
    </project>

  10. 按一下「部署」

Cloud Functions 詳細資料頁面隨即會開啟,並顯示您的函式和兩個進度指標:一個用於建構,另一個用於服務。當兩個進度指標都消失,並且被勾號取代時,函式就會部署完成並準備就緒。

授權 Google Chat 叫用您的函式

如要授權 Google Chat 叫用函式,請新增具備 Cloud Run 叫用者角色的 Google Chat 服務帳戶。

  1. 前往 Google Cloud 控制台中的 Cloud Run 頁面。

    前往 Cloud Run

  2. 在 Cloud Run 服務清單中,選取接收函式旁的核取方塊。(請勿按一下函式本身)。

  3. 按一下 [權限],「Permissions」面板隨即開啟。

  4. 按一下「新增主體」

  5. 在「New principals」(新增主體) 中輸入 chat@system.gserviceaccount.com

  6. 在「請選擇角色」中,依序選取「Cloud Run」>「Cloud Run 叫用者」

  7. 按一下 [儲存]

將應用程式發布到 Google Chat

部署 Cloud 函式後,請按照下列步驟將其轉換為 Google Chat 應用程式:

  1. 在 Google Cloud 控制台中,依序點選「Menu」圖示 >「Cloud Functions」

    前往 Cloud Functions 頁面

    請確保選取的是已啟用 Cloud Functions 的專案。

  2. 在函式清單中,按一下「QuickStartChatApp」QuickStartChatApp

  3. 按一下「觸發條件」分頁標籤。

  4. 在「HTTPS」下方複製網址。

  5. 搜尋「Google Chat API」,然後按一下「Google Chat API」,再按一下「管理」

    前往 Chat API

  6. 按一下「設定」,然後設定 Google Chat 應用程式:

    1. 在「應用程式名稱」中輸入 Quickstart App
    2. 在「Avatar URL」(顯示圖片) 中輸入 https://developers.google.com/chat/images/quickstart-app-avatar.png
    3. 在「Description」中輸入 Quickstart app
    4. 在「功能」下方,選取「接收一對一訊息」和「加入聊天室和群組對話」
    5. 在「連線設定」下方,選取「HTTP 端點網址」,然後將 Cloud Function 觸發事件的網址貼到方塊中。
    6. 在「Authentication Audience」中,選取「HTTP 端點網址」
    7. 在「瀏覽權限」下方,選取「將這個 Google Chat 應用程式提供給網域中的特定使用者和群組」,然後輸入您的電子郵件地址。
    8. 在「Logs」下方,選取「Log errors to Logging」
  7. 按一下 [儲存]

Chat 應用程式已準備好接收及回覆 Chat 中的訊息。

測試 Chat 應用程式

如要測試 Chat 應用程式,請使用 Chat 應用程式開啟即時訊息聊天室並傳送訊息:

  1. 使用當初將自己新增為信任的測試人員時提供的 Google Workspace 帳戶開啟 Google Chat。

    前往 Google Chat

  2. 按一下「新的即時通訊」圖示
  3. 在「新增 1 位或多位使用者」欄位中,輸入 Chat 應用程式的名稱。
  4. 從搜尋結果中選取 Chat 應用程式。即時訊息會隨即開啟。

  5. 在與應用程式互傳的新即時訊息中,輸入 Hello 並按下 enter

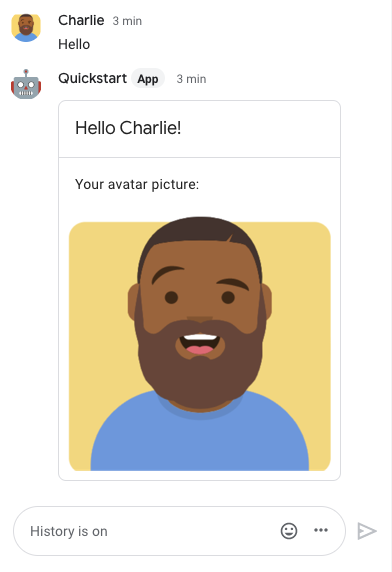
Chat 應用程式的回應包含卡片訊息,會顯示傳送者的名稱和顯示圖片,如以下圖片所示:

Chat 應用程式以卡片回應,其中包含傳送者的顯示名稱和顯示圖片

如要新增信任的測試人員,並進一步瞭解如何測試互動功能,請參閱「測試 Google Chat 應用程式的互動功能」。

疑難排解

當 Google Chat 應用程式或資訊卡傳回錯誤時,Chat 介面會顯示「發生錯誤」的訊息。或「無法處理您的要求」。有時 Chat UI 不會顯示任何錯誤訊息,但 Chat 應用程式或資訊卡會產生意外結果,例如資訊卡訊息可能不會顯示。

雖然 Chat UI 可能不會顯示錯誤訊息,但只要開啟 Chat 應用程式的錯誤記錄功能,您就能取得描述性錯誤訊息和記錄資料,協助修正錯誤。如需查看、偵錯及修正錯誤的相關說明,請參閱「排解及修正 Google Chat 錯誤」一文。

清除所用資源

如要避免系統向您的 Google Cloud 帳戶收取本教學課程中所用資源的相關費用,建議您刪除 Cloud 專案。

  1. 在 Google Cloud 控制台中,前往「管理資源」頁面。依序按一下「選單」圖示 >「IAM 與管理」 >「管理資源」

    前往 Resource Manager

  2. 在專案清單中選取要刪除的專案,然後按一下「刪除」圖示
  3. 在對話方塊中輸入專案 ID,然後按一下「Shut down」(關閉) 即可刪除專案。