ส่งใบรับรองแสดงความชื่นชมเฉพาะบุคคลให้กับพนักงาน

ระดับการเขียนโค้ด: ผู้เริ่มต้น
ระยะเวลา: 15 นาที
ประเภทโปรเจ็กต์: การทำงานอัตโนมัติด้วยเมนูที่กำหนดเอง

วัตถุประสงค์

  • ทำความเข้าใจว่าโซลูชันทำอะไรได้บ้าง
  • ทำความเข้าใจสิ่งที่บริการ Apps Script ทำภายในโซลูชัน
  • ตั้งค่าสภาพแวดล้อม
  • ตั้งค่าสคริปต์
  • เรียกใช้สคริปต์

เกี่ยวกับโซลูชันนี้

ปรับแต่งเทมเพลตใบรับรองพนักงานของ Google สไลด์โดยอัตโนมัติ ด้วยข้อมูลพนักงานใน Google ชีต แล้วส่งใบรับรองโดยใช้ Gmail
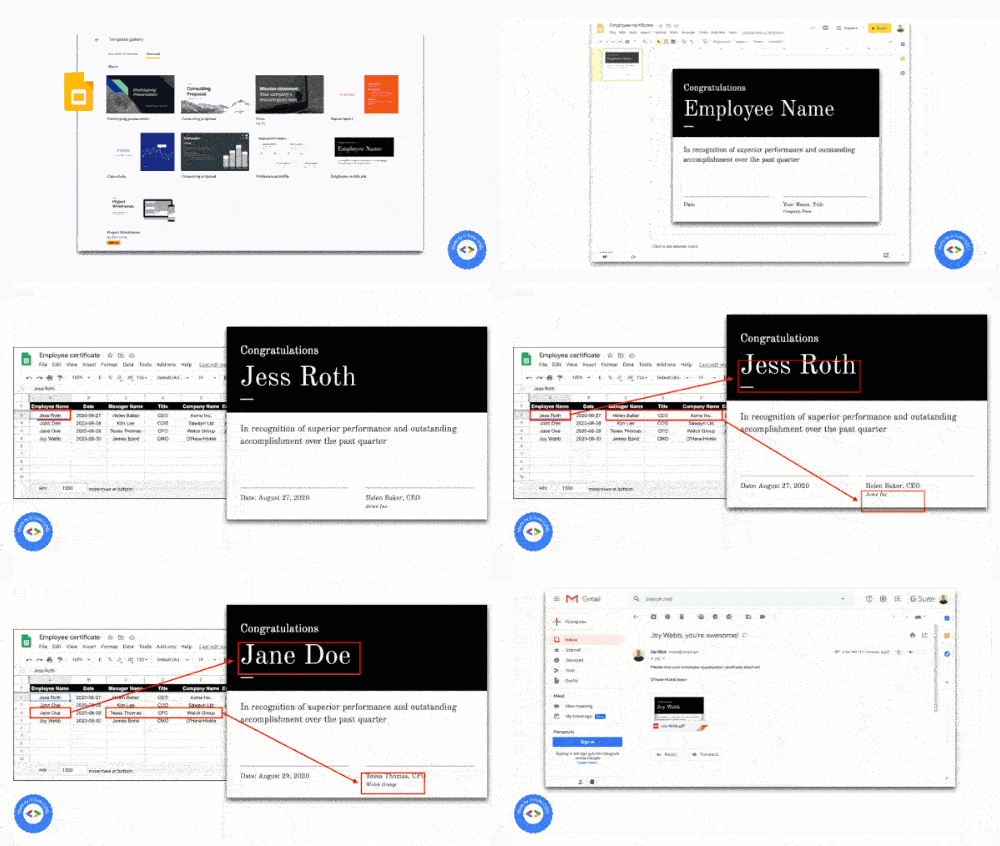
การสร้างใบรับรองพนักงาน

วิธีการทำงาน

สคริปต์ใช้เทมเพลตการนำเสนอใบรับรองพนักงานจาก สไลด์และสเปรดชีตชีตที่มีรายละเอียด พนักงาน สคริปต์จะคัดลอกเทมเพลตและ แทนที่ตัวยึดตำแหน่งด้วยข้อมูลจากสเปรดชีต เมื่อสคริปต์ สร้างสไลด์สำหรับพนักงานทุกคนแล้ว สคริปต์จะแยกแต่ละสไลด์เป็นไฟล์ PDF ที่แนบมาและส่งใบรับรองให้พนักงาน

บริการ Apps Script

โซลูชันนี้ใช้บริการต่อไปนี้

  • บริการไดรฟ์ - คัดลอกเทมเพลต ใบรับรองพนักงาน ของสไลด์
  • บริการสเปรดชีต - ให้รายละเอียดพนักงานและอัปเดตสถานะของพนักงานแต่ละคนที่ระบุไว้
  • บริการสไลด์ - แทนที่ตัวยึดตำแหน่งในงานนำเสนอด้วยข้อมูลพนักงานจากสเปรดชีต
  • บริการ Gmail - รับสไลด์แต่ละรายการเป็น PDF และส่งให้พนักงาน

ข้อกำหนดเบื้องต้น

หากต้องการใช้ตัวอย่างนี้ คุณต้องมีข้อกำหนดเบื้องต้นต่อไปนี้

  • บัญชี Google (บัญชี Google Workspace อาจต้อง ได้รับการอนุมัติจากผู้ดูแลระบบ)
  • เว็บเบราว์เซอร์ที่มีสิทธิ์เข้าถึงอินเทอร์เน็ต

ตั้งค่าสภาพแวดล้อม

  1. คลิกปุ่มต่อไปนี้เพื่อทำสำเนาเทมเพลตสไลด์ใบรับรองพนักงาน
    ทำสำเนา

  2. จดรหัสงานนำเสนอไว้เพื่อใช้ในขั้นตอนถัดไป คุณดูรหัสได้ใน URL โดยทำดังนี้

    https://docs.google.com/presentation/d/PRESENTATION_ID/edit

  3. สร้างโฟลเดอร์ใหม่ในไดรฟ์เพื่อเก็บใบรับรอง

  4. จดรหัสโฟลเดอร์ไว้เพื่อใช้ในขั้นตอนถัดไป คุณดู รหัสได้ใน URL โดยทำดังนี้ https://drive.google.com/drive/folders/FOLDER_ID

ตั้งค่าสคริปต์

  1. คลิกปุ่มด้านล่างเพื่อทำสำเนาสเปรดชีตตัวอย่างใบรับรองพนักงาน โปรเจ็กต์ Apps Script สำหรับโซลูชันนี้ แนบมากับสเปรดชีต
    ทำสำเนา

  2. ในสเปรดชีต ให้เปิดโปรเจ็กต์ Apps Script โดยคลิกส่วนเสริม > Apps Script

  3. สำหรับตัวแปร slideTemplateId ให้แทนที่ PRESENTATION_ID ด้วยรหัสของงานนำเสนอ

  4. สําหรับตัวแปร tempFolderId ให้แทนที่ FOLDER_ID ด้วยรหัสของโฟลเดอร์

  5. คลิกบันทึก ไอคอนบันทึก

เรียกใช้สคริปต์

  1. กลับไปที่สเปรดชีตแล้วคลิกการแสดงความขอบคุณ > สร้างใบรับรอง คุณอาจต้องรีเฟรชหน้าเว็บเพื่อให้เมนูที่กำหนดเองนี้ปรากฏขึ้น
  2. ให้สิทธิ์สคริปต์เมื่อได้รับข้อความแจ้ง หากหน้าจอคำยินยอมของ OAuth แสดงคำเตือนว่า แอปนี้ยังไม่ได้รับการยืนยัน ให้ดำเนินการต่อโดยเลือกขั้นสูง > ไปที่ {ชื่อโปรเจ็กต์} (ไม่ปลอดภัย)

  3. คลิกการแสดงความขอบคุณ > สร้างใบรับรองอีกครั้ง

  4. เมื่ออัปเดตคอลัมน์สถานะของทุกแถวเป็นสร้างแล้ว ให้คลิก การแสดงความขอบคุณ > ส่งใบรับรอง

ตรวจสอบโค้ด

หากต้องการตรวจสอบโค้ด Apps Script สำหรับโซลูชันนี้ ให้คลิกดูซอร์สโค้ดด้านล่าง

ดูซอร์สโค้ด

Code.gs

solutions/automations/employee-certificate/Code.js
// To learn how to use this script, refer to the documentation:
// https://developers.google.com/apps-script/samples/automations/employee-certificate

/*
Copyright 2022 Google LLC

Licensed under the Apache License, Version 2.0 (the "License");
you may not use this file except in compliance with the License.
You may obtain a copy of the License at

    https://www.apache.org/licenses/LICENSE-2.0

Unless required by applicable law or agreed to in writing, software
distributed under the License is distributed on an "AS IS" BASIS,
WITHOUT WARRANTIES OR CONDITIONS OF ANY KIND, either express or implied.
See the License for the specific language governing permissions and
limitations under the License.
*/

const slideTemplateId = 'PRESENTATION_ID';
const tempFolderId = 'FOLDER_ID'; // Create an empty folder in Google Drive

/**
 * Creates a custom menu "Appreciation" in the spreadsheet
 * with drop-down options to create and send certificates
 */
function onOpen() {
  const ui = SpreadsheetApp.getUi();
  ui.createMenu('Appreciation')
      .addItem('Create certificates', 'createCertificates')
      .addSeparator()
      .addItem('Send certificates', 'sendCertificates')
      .addToUi();
}

/**
 * Creates a personalized certificate for each employee
 * and stores every individual Slides doc on Google Drive
 */
function createCertificates() {
  // Load the Google Slide template file
  const template = DriveApp.getFileById(slideTemplateId);

  // Get all employee data from the spreadsheet and identify the headers
  const sheet = SpreadsheetApp.getActiveSpreadsheet().getActiveSheet();
  const values = sheet.getDataRange().getValues();
  const headers = values[0];
  const empNameIndex = headers.indexOf('Employee Name');
  const dateIndex = headers.indexOf('Date');
  const managerNameIndex = headers.indexOf('Manager Name');
  const titleIndex = headers.indexOf('Title');
  const compNameIndex = headers.indexOf('Company Name');
  const empEmailIndex = headers.indexOf('Employee Email');
  const empSlideIndex = headers.indexOf('Employee Slide');
  const statusIndex = headers.indexOf('Status');

  // Iterate through each row to capture individual details
  for (let i = 1; i < values.length; i++) {
    const rowData = values[i];
    const empName = rowData[empNameIndex];
    const date = rowData[dateIndex];
    const managerName = rowData[managerNameIndex];
    const title = rowData[titleIndex];
    const compName = rowData[compNameIndex];

    // Make a copy of the Slide template and rename it with employee name
    const tempFolder = DriveApp.getFolderById(tempFolderId);
    const empSlideId = template.makeCopy(tempFolder).setName(empName).getId();
    const empSlide = SlidesApp.openById(empSlideId).getSlides()[0];

    // Replace placeholder values with actual employee related details
    empSlide.replaceAllText('Employee Name', empName);
    empSlide.replaceAllText('Date', 'Date: ' + Utilities.formatDate(date, Session.getScriptTimeZone(), 'MMMM dd, yyyy'));
    empSlide.replaceAllText('Your Name', managerName);
    empSlide.replaceAllText('Title', title);
    empSlide.replaceAllText('Company Name', compName);

    // Update the spreadsheet with the new Slide Id and status
    sheet.getRange(i + 1, empSlideIndex + 1).setValue(empSlideId);
    sheet.getRange(i + 1, statusIndex + 1).setValue('CREATED');
    SpreadsheetApp.flush();
  }
}

/**
 * Send an email to each individual employee
 * with a PDF attachment of their appreciation certificate
 */
function sendCertificates() {
  // Get all employee data from the spreadsheet and identify the headers
  const sheet = SpreadsheetApp.getActiveSpreadsheet().getActiveSheet();
  const values = sheet.getDataRange().getValues();
  const headers = values[0];
  const empNameIndex = headers.indexOf('Employee Name');
  const dateIndex = headers.indexOf('Date');
  const managerNameIndex = headers.indexOf('Manager Name');
  const titleIndex = headers.indexOf('Title');
  const compNameIndex = headers.indexOf('Company Name');
  const empEmailIndex = headers.indexOf('Employee Email');
  const empSlideIndex = headers.indexOf('Employee Slide');
  const statusIndex = headers.indexOf('Status');

  // Iterate through each row to capture individual details
  for (let i = 1; i < values.length; i++) {
    const rowData = values[i];
    const empName = rowData[empNameIndex];
    const date = rowData[dateIndex];
    const managerName = rowData[managerNameIndex];
    const title = rowData[titleIndex];
    const compName = rowData[compNameIndex];
    const empSlideId = rowData[empSlideIndex];
    const empEmail = rowData[empEmailIndex];

    // Load the employee's personalized Google Slide file
    const attachment = DriveApp.getFileById(empSlideId);

    // Setup the required parameters and send them the email
    const senderName = 'CertBot';
    const subject = empName + ', you\'re awesome!';
    const body = 'Please find your employee appreciation certificate attached.' +
    '\n\n' + compName + ' team';
    GmailApp.sendEmail(empEmail, subject, body, {
      attachments: [attachment.getAs(MimeType.PDF)],
      name: senderName
    });

    // Update the spreadsheet with email status
    sheet.getRange(i + 1, statusIndex + 1).setValue('SENT');
    SpreadsheetApp.flush();
  }
}

ผู้ร่วมให้ข้อมูล

ตัวอย่างนี้สร้างโดย Sourabh Choraria บล็อกเกอร์และ Google Developer Expert

ตัวอย่างนี้ได้รับการดูแลโดย Google โดยได้รับความช่วยเหลือจาก Google Developer Expert

ขั้นตอนถัดไป