تحميل ملفات إلى Google Drive من "نماذج Google"

مستوى الترميز: مبتدئ
المدة: 10 دقائق
نوع المشروع: برمجة باستخدام عامل تشغيل مستند إلى الأحداث

الأهداف

  • فهم دور الحلّ
  • فهم ما تفعله خدمات Apps Script ضمن الحلّ
  • إعداد النص البرمجي
  • شغِّل النص البرمجي.

لمحة عن هذا الحل

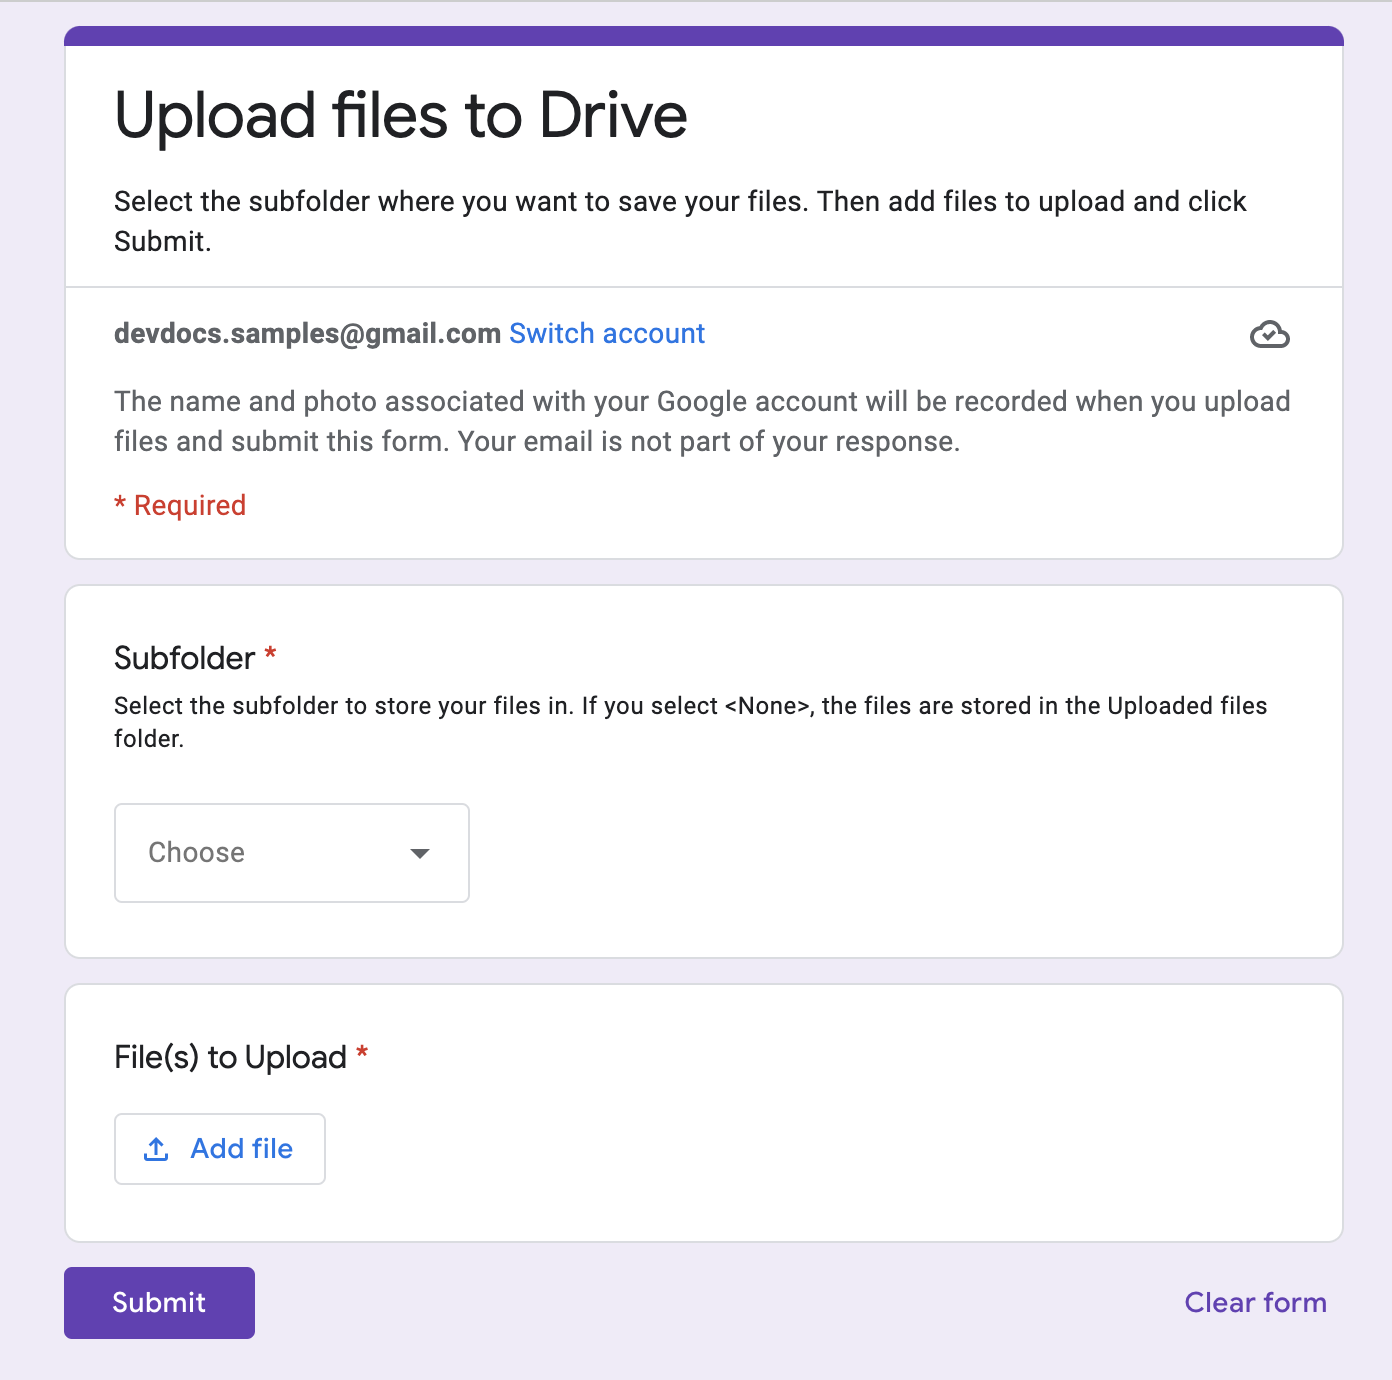
تحميل الملفات وتنظيمها في Google Drive في الوقت نفسه باستخدام "نماذج Google" يتضمّن النموذج إدخالات للملفات المطلوب تحميلها وكيفية تنظيمها.

لقطة شاشة لنموذج تحميل الملفات

آلية العمل

تنشئ دالة الإعداد مجلدًا لتخزين جميع الملفات المحمَّلة وعامل تشغيل يتم بدء عمله في كل مرة يُرسل فيها أحد الأشخاص النموذج. عندما يملؤه المستخدم، عليه اختيار الملفات المطلوب تحميلها والمجلد الفرعي الذي سيتم تخزين الملفات فيه. بعد أن يُرسِل المستخدِم النموذج، يوجّه النص البرمجي الملفات إلى المجلد الفرعي المقابل. إذا لم يكن المجلد متوفّرًا بعد، ينشئه النص البرمجي.

خدمات "برمجة تطبيقات Google"

يستخدم هذا الحلّ الخدمات التالية:

  • خدمة النصوص البرمجية: لإنشاء العامل المشغِّل الذي يتم بدء عمله في كل مرة يُرسل فيها أحد المستخدِمين النموذج.
  • خدمة السمات: تخزِّن معرّف العبارة التي ينشئها النص البرمجي أثناء الإعداد لمنع تكرار العبارة.
  • خدمة Drive: أثناء الإعداد، تحصل على موقع النموذج في Drive وتُنشئ مجلدًا في الموقع نفسه. عندما يرسل مستخدم النموذج، تعيد خدمة Drive توجيه الملفات إلى هذا المجلد، وإذا اختَر مستخدم مجلدًا فرعيًا محدّدًا، يتم توجيه الملفات إليه. إذا لم يكن المجلد الفرعي متوفّرًا بعد، ينشئه الرمز البرمجي.
  • خدمة النماذج: تحصل على اسم الملفات والمجلد الذي اختاره المستخدم بعد إرسال النموذج وترسله إلى خدمة Drive.

المتطلبات الأساسية

لاستخدام هذا العيّنة، يجب استيفاء المتطلبات الأساسية التالية:

  • حساب Google (قد تحتاج حسابات Google Workspace إلى موافقة المشرف).
  • متصفح ويب يمكنه الوصول إلى الإنترنت

إعداد النص البرمجي

إنشاء النموذج

  1. انتقِل إلى forms.google.com وانقر على "فارغ" .
  2. انقر على نموذج بلا عنوان وأعِد تسمية النموذج إلى تحميل الملفات إلى Drive.
  3. انقر على السؤال بلا عنوان وأعِد تسمية السؤال ليصبح المجلد الفرعي.
  4. في سؤال المجلد الفرعي، انقر على رمز المزيد > الوصف.
  5. بالنسبة إلى الوصف، أدخِل اختَر المجلد الفرعي لتخزين ملفاتك فيه. إذا اختَرت <بدون>، سيتم تخزين الملفات في مجلد "الملفات المحمَّلة".
  6. أضِف الخيارات التالية إلى سؤال الملف الفرعي:
    • <none>
    • المشروع "أ"
    • المشروع "ب"
    • المشروع "ج"
  7. لجعل السؤال مطلوبًا، انقر على مطلوب.
  8. انقر على رمز إضافة سؤال .
  9. انقر على خيارات متعدّدة واختَر تحميل ملف.
  10. انقر على متابعة.
  11. في حقل السؤال، أدخِل الملفات المطلوب تحميلها. يمكنك اختيار أنواع الملفات والحد الأقصى لعدد الملفات التي تريد السماح للمستخدمين بتحميلها.
  12. لجعل السؤال مطلوبًا، انقر على مطلوب.

إنشاء مشروع "برمجة تطبيقات Google"

  1. من النموذج، انقر على رمز المزيد > محرِّر النصوص البرمجية.
  2. انقر على مشروع بلا عنوان وأعِد تسمية المشروع إلى تحميل الملفات إلى Drive.
  3. لإنشاء ملف نص برمجي آخر، انقر على رمز إضافة ملف > نص برمجي. أدخِل اسم الملف Setup.
  4. استبدِل محتوى ملفّي النصوص البرمجية بالمحتوى التالي:

    Code.gs

    solutions/automations/upload-files/Code.js
    // TODO Before you start using this sample, you must run the setUp() 
    // function in the Setup.gs file.
    
    // Application constants
    const APP_TITLE = "Upload files to Drive from Forms";
    const APP_FOLDER_NAME = "Upload files to Drive (File responses)";
    
    // Identifies the subfolder form item
    const APP_SUBFOLDER_ITEM = "Subfolder";
    const APP_SUBFOLDER_NONE = "<None>";
    
    
    /**
     * Gets the file uploads from a form response and moves files to the corresponding subfolder.
     *  
     * @param {object} event - Form submit.
     */
    function onFormSubmit(e) {
      try {
        // Gets the application root folder.
        var destFolder = getFolder_(APP_FOLDER_NAME);
    
        // Gets all form responses.
        let itemResponses = e.response.getItemResponses();
    
        // Determines the subfolder to route the file to, if any.
        var subFolderName;
        let dest = itemResponses.filter((itemResponse) =>
          itemResponse.getItem().getTitle().toString() === APP_SUBFOLDER_ITEM);
    
        // Gets the destination subfolder name, but ignores if APP_SUBFOLDER_NONE was selected;
        if (dest.length > 0) {
          if (dest[0].getResponse() != APP_SUBFOLDER_NONE) {
            subFolderName = dest[0].getResponse();
          }
        }
        // Gets the subfolder or creates it if it doesn't exist.
        if (subFolderName != undefined) {
          destFolder = getSubFolder_(destFolder, subFolderName)
        }
        console.log(`Destination folder to use:
        Name: ${destFolder.getName()}
        ID: ${destFolder.getId()}
        URL: ${destFolder.getUrl()}`)
    
        // Gets the file upload response as an array to allow for multiple files.
        let fileUploads = itemResponses.filter((itemResponse) => itemResponse.getItem().getType().toString() === "FILE_UPLOAD")
          .map((itemResponse) => itemResponse.getResponse())
          .reduce((a, b) => [...a, ...b], []);
    
        // Moves the files to the destination folder.
        if (fileUploads.length > 0) {
          fileUploads.forEach((fileId) => {
            DriveApp.getFileById(fileId).moveTo(destFolder);
            console.log(`File Copied: ${fileId}`)
          });
        }
      }
      catch (err) {
        console.log(err);
      }
    }
    
    
    /**
     * Returns a Drive folder under the passed in objParentFolder parent
     * folder. Checks if folder of same name exists before creating, returning 
     * the existing folder or the newly created one if not found.
     *
     * @param {object} objParentFolder - Drive folder as an object.
     * @param {string} subFolderName - Name of subfolder to create/return.
     * @return {object} Drive folder
     */
    function getSubFolder_(objParentFolder, subFolderName) {
    
      // Iterates subfolders of parent folder to check if folder already exists.
      const subFolders = objParentFolder.getFolders();
      while (subFolders.hasNext()) {
        let folder = subFolders.next();
    
        // Returns the existing folder if found.
        if (folder.getName() === subFolderName) {
          return folder;
        }
      }
      // Creates a new folder if one doesn't already exist.
      return objParentFolder.createFolder(subFolderName)
        .setDescription(`Created by ${APP_TITLE} application to store uploaded Forms files.`);
    }

    Setup.gs

    solutions/automations/upload-files/Setup.js
    // TODO You must run the setUp() function before you start using this sample.
    
    /** 
     * The setUp() function performs the following:
     *  - Creates a Google Drive folder named by the APP_FOLDER_NAME
     *    variable in the Code.gs file.
     *  - Creates a trigger to handle onFormSubmit events.
     */
    function setUp() {
      // Ensures the root destination folder exists.
      const appFolder = getFolder_(APP_FOLDER_NAME);
      if (appFolder !== null) {
        console.log(`Application folder setup.
        Name: ${appFolder.getName()}
        ID: ${appFolder.getId()}
        URL: ${appFolder.getUrl()}`)
      }
      else {
        console.log(`Could not setup application folder.`)
      }
      // Calls the function that creates the Forms onSubmit trigger.
      installTrigger_();
    }
    
    /** 
     * Returns a folder to store uploaded files in the same location
     * in Drive where the form is located. First, it checks if the folder
     * already exists, and creates it if it doesn't.
     *
     * @param {string} folderName - Name of the Drive folder. 
     * @return {object} Google Drive Folder
     */
    function getFolder_(folderName) {
    
      // Gets the Drive folder where the form is located.
      const ssId = FormApp.getActiveForm().getId();
      const parentFolder = DriveApp.getFileById(ssId).getParents().next();
    
      // Iterates through the subfolders to check if folder already exists.
      // The script checks for the folder name specified in the APP_FOLDER_NAME variable.
      const subFolders = parentFolder.getFolders();
      while (subFolders.hasNext()) {
        let folder = subFolders.next();
    
        // Returns the existing folder if found.
        if (folder.getName() === folderName) {
          return folder;
        }
      }
      // Creates a new folder if one doesn't already exist.
      return parentFolder.createFolder(folderName)
        .setDescription(`Created by ${APP_TITLE} application to store uploaded files.`);
    }
    
    /**
     * Installs trigger to capture onFormSubmit event when a form is submitted.
     * Ensures that the trigger is only installed once.
     * Called by setup().
     */
    function installTrigger_() {
      // Ensures existing trigger doesn't already exist.
      let propTriggerId = PropertiesService.getScriptProperties().getProperty('triggerUniqueId')
      if (propTriggerId !== null) {
        const triggers = ScriptApp.getProjectTriggers();
        for (let t in triggers) {
          if (triggers[t].getUniqueId() === propTriggerId) {
            console.log(`Trigger with the following unique ID already exists: ${propTriggerId}`);
            return;
          }
        }
      }
      // Creates the trigger if one doesn't exist.
      let triggerUniqueId = ScriptApp.newTrigger('onFormSubmit')
        .forForm(FormApp.getActiveForm())
        .onFormSubmit()
        .create()
        .getUniqueId();
      PropertiesService.getScriptProperties().setProperty('triggerUniqueId', triggerUniqueId);
      console.log(`Trigger with the following unique ID was created: ${triggerUniqueId}`);
    }
    
    /**
     * Removes all script properties and triggers for the project.
     * Use primarily to test setup routines.
     */
    function removeTriggersAndScriptProperties() {
      PropertiesService.getScriptProperties().deleteAllProperties();
      // Removes all triggers associated with project.
      const triggers = ScriptApp.getProjectTriggers();
      for (let t in triggers) {
        ScriptApp.deleteTrigger(triggers[t]);
      }
    }
    
    /**
     * Removes all form responses to reset the form.
     */
    function deleteAllResponses() {
      FormApp.getActiveForm().deleteAllResponses();
    }

تشغيل النص البرمجي

  1. في محرِّر "برمجة تطبيقات Google"، انتقِل إلى ملف Setup.gs.
  2. في القائمة المنسدلة للدالة، اختَر setUp.
  3. انقر على تشغيل.
  4. امنح الإذن للنصّ البرمجي عند مطالبتك بذلك. إذا ظهرت الرسالة التحذيرية لم يتم التحقّق من هذا التطبيق على شاشة موافقة OAuth، يمكن المتابعة من خلال النقر على الإعدادات المتقدّمة > الانتقال إلى {Project Name} (غير آمن).

  5. ارجع إلى النموذج وانقر على رمز المعاينة رمز المعاينة.

  6. في النموذج، اختَر مجلدًا فرعيًا وحمِّل ملفًا.

  7. انقر على إرسال.

  8. انتقِل إلى Drive وافتح مجلد تحميل الملفات إلى Drive (ردود الملفات). الملفات التي حمّلتها موجودة في المجلد الفرعي الذي اخترته في النموذج.

المساهمون

تُعدّ Google هذه العينة بمساعدة خبراء Google Developers.

الخطوات التالية