העלאת קבצים ל-Google Drive מ-Google Forms

רמת הקידוד: מתחילים
משך הזמן: 10 דקות
סוג הפרויקט: אוטומציה עם טריגר מבוסס-אירועים

מטרות

  • להבין מה הפתרון עושה.
  • הסבר על הפעולות של שירותי Apps Script בפתרון.
  • מגדירים את הסקריפט.
  • מריצים את הסקריפט.

מידע על הפתרון הזה

להעלות קבצים ולסדר אותם ב-Google Drive בו-זמנית באמצעות Google Forms. הטופס כולל שדות לקבצים שרוצים להעלות ולדרך שבה הקבצים צריכים להיות מאורגנים.

צילום מסך של טופס להעלאת קבצים

איך זה עובד

פונקציית ההגדרה יוצרת תיקייה לאחסון כל הקבצים שהועלו וטריגר שמופעל בכל פעם שמישהו שולח את הטופס. כשמשתמש ממלא את הטופס, הוא בוחר קבצים להעלאה ותיקיית משנה לאחסון הקבצים. אחרי שהמשתמש שולח את הטופס, הסקריפט מעביר את הקבצים לתיקיית המשנה המתאימה. אם התיקייה עדיין לא קיימת, הסקריפט יוצר אותה.

שירותי Apps Script

הפתרון הזה משתמש בשירותים הבאים:

  • Script service (שירות סקריפטים) – יוצר את הטריגר שמופעל בכל פעם שמישהו שולח את הטופס.
  • שירות המאפיינים – מאחסן את המזהה של הטריגר שהסקריפט יוצר במהלך ההגדרה כדי למנוע טריגרים כפולים.
  • שירות Drive – במהלך ההגדרה, השירות מאחזר את המיקום של הטופס ב-Drive ויוצר תיקייה באותו מיקום. כשמשתמש שולח את הטופס, שירות Drive מעביר את הקבצים לתיקייה הזו, ואם נבחרה תיקיית משנה ייעודית, הוא מעביר אותם לתיקיית המשנה. אם תיקיית המשנה עדיין לא קיימת, הסקריפט יוצר אותה.
  • שירות הטפסים – מקבל את הקבצים ואת שם התיקייה שהמשתמש בחר אחרי שהוא שולח את הטופס, ושולח אותם לשירות Drive.

דרישות מוקדמות

כדי להשתמש בדוגמה הזו, צריך לעמוד בדרישות המוקדמות הבאות:

  • חשבון Google (יכול להיות שחשבונות Google Workspace ידרשו אישור אדמין).
  • דפדפן אינטרנט עם גישה לאינטרנט.

הגדרת הסקריפט

יצירת הטופס

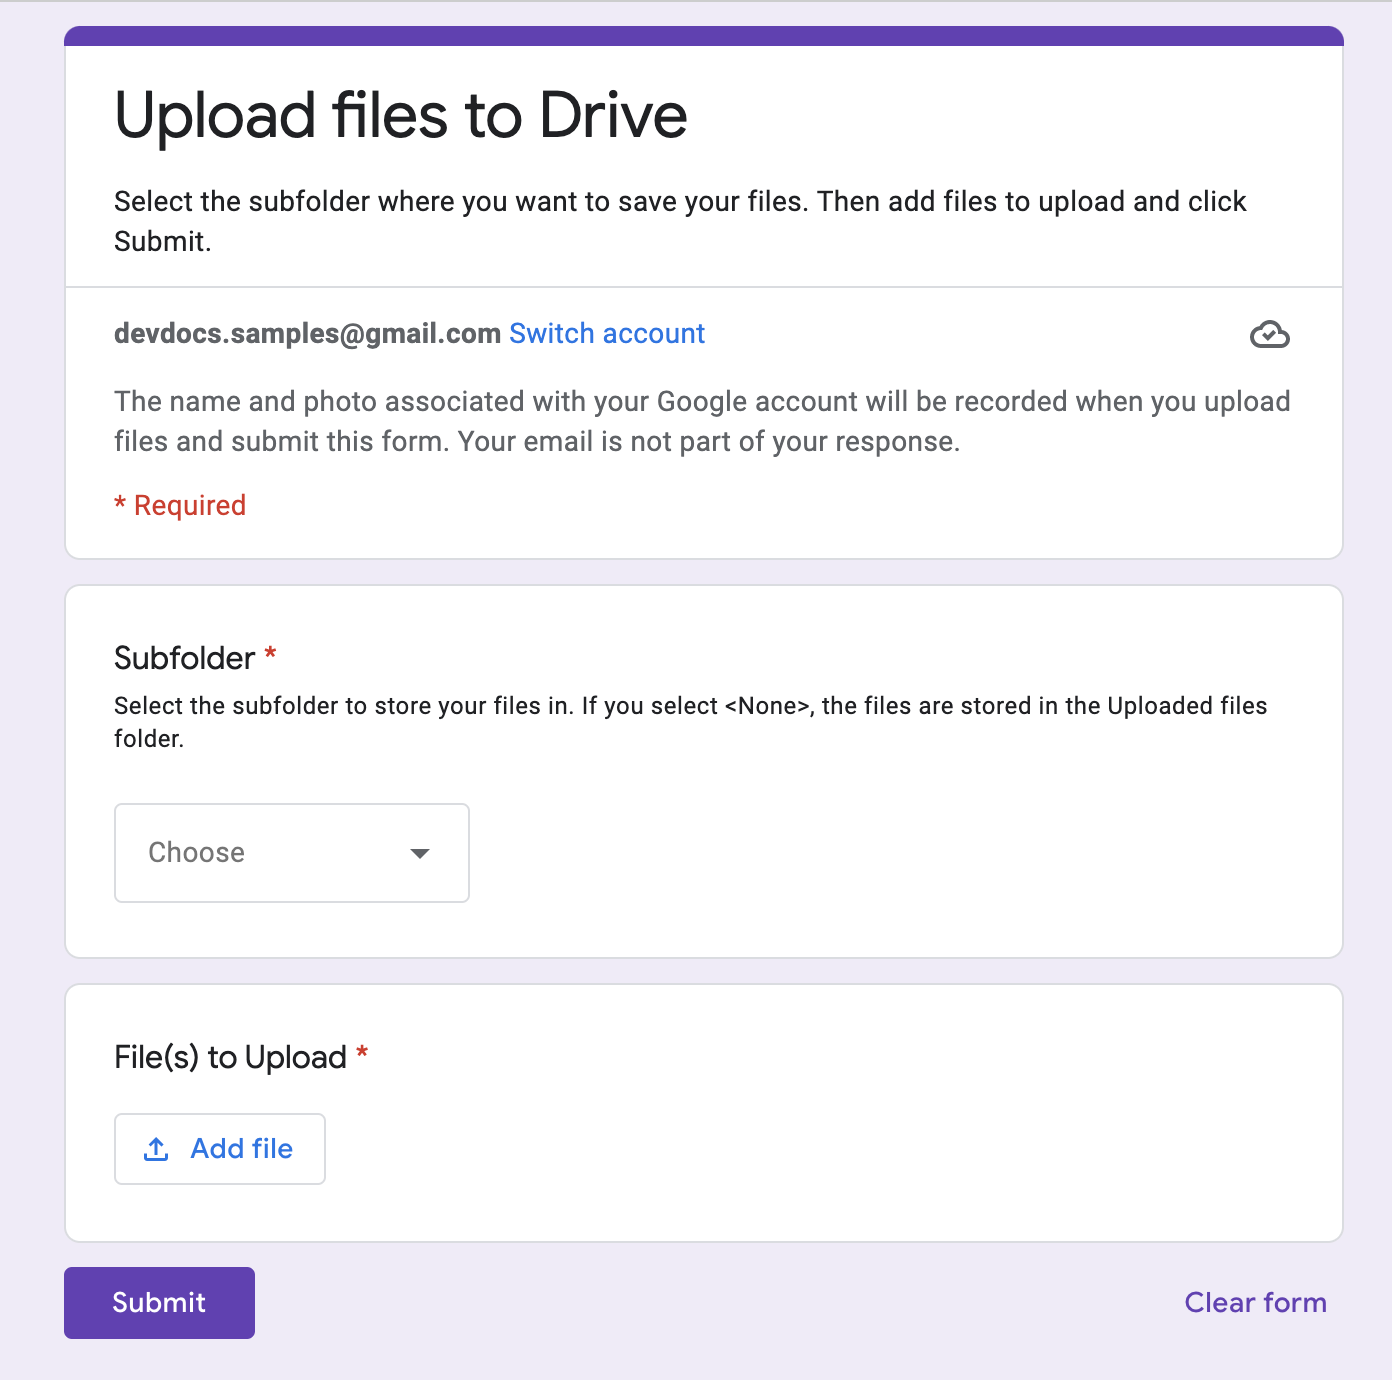
  1. נכנסים אל forms.google.com ולוחצים על סמל הטופס הריק .
  2. לוחצים על טופס ללא שם ומשנים את שם הטופס להעלאת קבצים ל-Drive.
  3. לוחצים על שאלה ללא שם ומשנים את השם של השאלה ל-תיקיית משנה.
  4. בשאלת תיקיית משנה, לוחצים על סמל האפשרויות הנוספות > תיאור.
  5. בשדה תיאור, מזינים בחירת תיקיית המשנה שבה יישמרו הקבצים. אם בוחרים באפשרות <ללא>, הקבצים מאוחסנים בתיקייה 'קבצים שהועלו'.
  6. מוסיפים את האפשרויות הבאות לשאלה Subfolder:
    • <none>
    • פרויקט א'
    • פרויקט ב'
    • פרויקט ג'
  7. כדי להפוך את השאלה לשאלה חובה, לוחצים על חובה.
  8. לוחצים על סמל הוספת השאלה .
  9. לוחצים על שאלה אמריקאית ובוחרים באפשרות העלאת קובץ.
  10. לוחצים על המשך.
  11. בשדה שאלה, מזינים קובץ להעלאה. אתם יכולים לבחור את סוגי הקבצים ואת המספר המקסימלי של הקבצים שאתם רוצים לאפשר לאנשים להעלות.
  12. כדי להפוך את השאלה לשאלה חובה, לוחצים על חובה.

יצירת פרויקט Apps Script

  1. בטופס, לוחצים על סמל האפשרויות הנוספות > עורך קובצי סקריפט.
  2. לוחצים על Untitled project (פרויקט ללא שם) ומשנים את שם הפרויקט ל-Upload files to Drive (העלאת קבצים ל-Drive).
  3. כדי ליצור עוד קובץ סקריפט, לוחצים על 'הוספת קובץ' > סקריפט. נותנים לקובץ את השם Setup.
  4. מחליפים את התוכן של שני קובצי הסקריפט בתוכן הבא:

    Code.gs

    solutions/automations/upload-files/Code.js
    // TODO Before you start using this sample, you must run the setUp() 
    // function in the Setup.gs file.
    
    // Application constants
    const APP_TITLE = "Upload files to Drive from Forms";
    const APP_FOLDER_NAME = "Upload files to Drive (File responses)";
    
    // Identifies the subfolder form item
    const APP_SUBFOLDER_ITEM = "Subfolder";
    const APP_SUBFOLDER_NONE = "<None>";
    
    
    /**
     * Gets the file uploads from a form response and moves files to the corresponding subfolder.
     *  
     * @param {object} event - Form submit.
     */
    function onFormSubmit(e) {
      try {
        // Gets the application root folder.
        var destFolder = getFolder_(APP_FOLDER_NAME);
    
        // Gets all form responses.
        let itemResponses = e.response.getItemResponses();
    
        // Determines the subfolder to route the file to, if any.
        var subFolderName;
        let dest = itemResponses.filter((itemResponse) =>
          itemResponse.getItem().getTitle().toString() === APP_SUBFOLDER_ITEM);
    
        // Gets the destination subfolder name, but ignores if APP_SUBFOLDER_NONE was selected;
        if (dest.length > 0) {
          if (dest[0].getResponse() != APP_SUBFOLDER_NONE) {
            subFolderName = dest[0].getResponse();
          }
        }
        // Gets the subfolder or creates it if it doesn't exist.
        if (subFolderName != undefined) {
          destFolder = getSubFolder_(destFolder, subFolderName)
        }
        console.log(`Destination folder to use:
        Name: ${destFolder.getName()}
        ID: ${destFolder.getId()}
        URL: ${destFolder.getUrl()}`)
    
        // Gets the file upload response as an array to allow for multiple files.
        let fileUploads = itemResponses.filter((itemResponse) => itemResponse.getItem().getType().toString() === "FILE_UPLOAD")
          .map((itemResponse) => itemResponse.getResponse())
          .reduce((a, b) => [...a, ...b], []);
    
        // Moves the files to the destination folder.
        if (fileUploads.length > 0) {
          fileUploads.forEach((fileId) => {
            DriveApp.getFileById(fileId).moveTo(destFolder);
            console.log(`File Copied: ${fileId}`)
          });
        }
      }
      catch (err) {
        console.log(err);
      }
    }
    
    
    /**
     * Returns a Drive folder under the passed in objParentFolder parent
     * folder. Checks if folder of same name exists before creating, returning 
     * the existing folder or the newly created one if not found.
     *
     * @param {object} objParentFolder - Drive folder as an object.
     * @param {string} subFolderName - Name of subfolder to create/return.
     * @return {object} Drive folder
     */
    function getSubFolder_(objParentFolder, subFolderName) {
    
      // Iterates subfolders of parent folder to check if folder already exists.
      const subFolders = objParentFolder.getFolders();
      while (subFolders.hasNext()) {
        let folder = subFolders.next();
    
        // Returns the existing folder if found.
        if (folder.getName() === subFolderName) {
          return folder;
        }
      }
      // Creates a new folder if one doesn't already exist.
      return objParentFolder.createFolder(subFolderName)
        .setDescription(`Created by ${APP_TITLE} application to store uploaded Forms files.`);
    }

    Setup.gs

    solutions/automations/upload-files/Setup.js
    // TODO You must run the setUp() function before you start using this sample.
    
    /** 
     * The setUp() function performs the following:
     *  - Creates a Google Drive folder named by the APP_FOLDER_NAME
     *    variable in the Code.gs file.
     *  - Creates a trigger to handle onFormSubmit events.
     */
    function setUp() {
      // Ensures the root destination folder exists.
      const appFolder = getFolder_(APP_FOLDER_NAME);
      if (appFolder !== null) {
        console.log(`Application folder setup.
        Name: ${appFolder.getName()}
        ID: ${appFolder.getId()}
        URL: ${appFolder.getUrl()}`)
      }
      else {
        console.log(`Could not setup application folder.`)
      }
      // Calls the function that creates the Forms onSubmit trigger.
      installTrigger_();
    }
    
    /** 
     * Returns a folder to store uploaded files in the same location
     * in Drive where the form is located. First, it checks if the folder
     * already exists, and creates it if it doesn't.
     *
     * @param {string} folderName - Name of the Drive folder. 
     * @return {object} Google Drive Folder
     */
    function getFolder_(folderName) {
    
      // Gets the Drive folder where the form is located.
      const ssId = FormApp.getActiveForm().getId();
      const parentFolder = DriveApp.getFileById(ssId).getParents().next();
    
      // Iterates through the subfolders to check if folder already exists.
      // The script checks for the folder name specified in the APP_FOLDER_NAME variable.
      const subFolders = parentFolder.getFolders();
      while (subFolders.hasNext()) {
        let folder = subFolders.next();
    
        // Returns the existing folder if found.
        if (folder.getName() === folderName) {
          return folder;
        }
      }
      // Creates a new folder if one doesn't already exist.
      return parentFolder.createFolder(folderName)
        .setDescription(`Created by ${APP_TITLE} application to store uploaded files.`);
    }
    
    /**
     * Installs trigger to capture onFormSubmit event when a form is submitted.
     * Ensures that the trigger is only installed once.
     * Called by setup().
     */
    function installTrigger_() {
      // Ensures existing trigger doesn't already exist.
      let propTriggerId = PropertiesService.getScriptProperties().getProperty('triggerUniqueId')
      if (propTriggerId !== null) {
        const triggers = ScriptApp.getProjectTriggers();
        for (let t in triggers) {
          if (triggers[t].getUniqueId() === propTriggerId) {
            console.log(`Trigger with the following unique ID already exists: ${propTriggerId}`);
            return;
          }
        }
      }
      // Creates the trigger if one doesn't exist.
      let triggerUniqueId = ScriptApp.newTrigger('onFormSubmit')
        .forForm(FormApp.getActiveForm())
        .onFormSubmit()
        .create()
        .getUniqueId();
      PropertiesService.getScriptProperties().setProperty('triggerUniqueId', triggerUniqueId);
      console.log(`Trigger with the following unique ID was created: ${triggerUniqueId}`);
    }
    
    /**
     * Removes all script properties and triggers for the project.
     * Use primarily to test setup routines.
     */
    function removeTriggersAndScriptProperties() {
      PropertiesService.getScriptProperties().deleteAllProperties();
      // Removes all triggers associated with project.
      const triggers = ScriptApp.getProjectTriggers();
      for (let t in triggers) {
        ScriptApp.deleteTrigger(triggers[t]);
      }
    }
    
    /**
     * Removes all form responses to reset the form.
     */
    function deleteAllResponses() {
      FormApp.getActiveForm().deleteAllResponses();
    }

הפעלת הסקריפט

  1. בעורך Apps Script, עוברים לקובץ Setup.gs.
  2. בתפריט הנפתח של הפונקציה, בוחרים באפשרות setUp.
  3. לוחצים על Run.
  4. כשמוצגת בקשה, מאשרים את הסקריפט. אם במסך ההסכמה ל-OAuth מוצגת האזהרה האפליקציה הזו לא אומתה, ממשיכים בתהליך על ידי בחירה באפשרות מתקדם > מעבר אל {שם הפרויקט} (לא בטוח).

  5. חוזרים לטופס ולוחצים על סמל התצוגה המקדימה סמל תצוגה מקדימה.

  6. בטופס, בוחרים תיקיית משנה ומעלים קובץ.

  7. לוחצים על שליחה.

  8. עוברים אל Drive ופותחים את התיקייה העלאת קבצים ל-Drive (תגובות לקובץ). הקבצים שהעליתם נמצאים בתיקיית המשנה שבחרתם בטופס.

תורמים

הדוגמה הזו מתוחזקת על ידי Google בעזרת מומחי Google לפיתוח.

השלבים הבאים