
Bu eğitimde, yol ağını vurgulayan bir açık mod harita stili oluşturma ve kullanma adımları açıklanmaktadır:
Kullanıma hazır olması için harita stili oluşturup yayınlayın.
Stilinizi uygulamalarda ve web sitelerinde kullanmanıza olanak tanıyan bir harita kimliği oluşturup bağlayın.
Uygulamalarınızın harita stilinizi kullanması için harita kimliğini uygulamalarınıza ve web sitelerinize ekleyin.
1. adım: Harita stili oluşturun ve yayınlayın
Bulut tabanlı harita stillerini açma
Google Cloud Console'a gidin ve Harita Stilleri'ni seçin. Gerekirse bir proje seçin veya oluşturun.
Stil Oluştur'u seçin.
Açık'ı seçin.
İletişim kutusunun alt kısmında Özelleştir'i seçin.
Yol ağını stilize etme
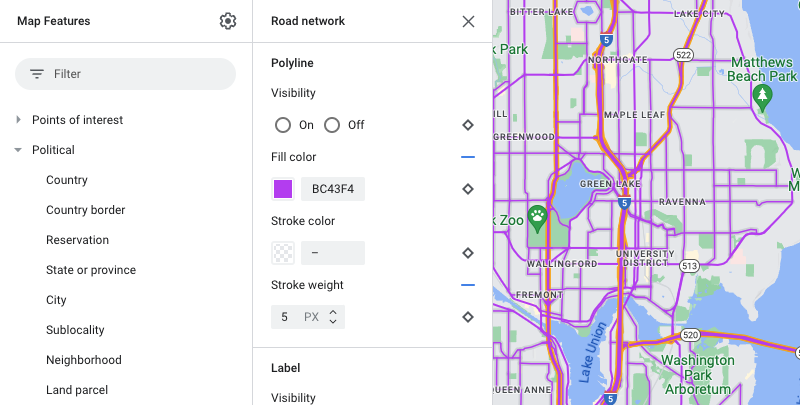
Harita Özellikleri bölümünde Altyapı'yı genişletin, ardından Yol ağı'nı seçin.
Yol ağı stili panelinde Çoklu çizgi'nin altındaki Dolgu rengi'nde renk kutusunu seçin.
Parlak bir renk seçin. Rengi değiştirdiğinizde Dolgu rengi kutusu otomatik olarak işaretlenir.
Çizgi genişliği bölümünde çizgi genişliğini 5 piksel olarak ayarlayın.
Değişikliklerinizin etkisini görmek için haritayı yakınlaştırın ve uzaklaştırın. Hiyerarşide nispeten yüksek bir konumda bulunan bir harita özelliği seçtiğiniz için, bu özelliğin altındaki tüm yol türleri değişikliklerinizi devraldı.
Harita stilinizi kaydetme ve yayınlama
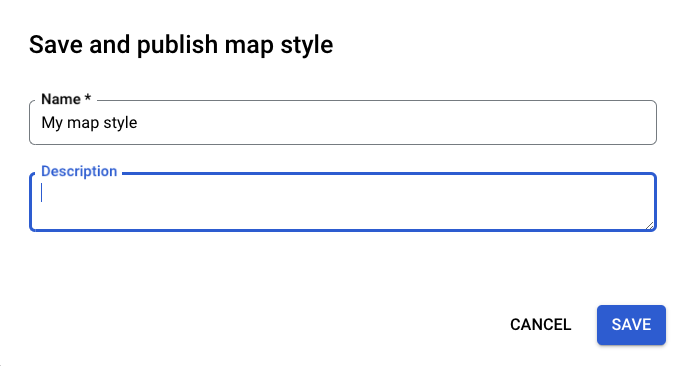
Sağ üstte Kaydet'i seçin.
Harita stilini kaydedip yayınlayın bölümünde, harita stiliniz için bir ad ve isteğe bağlı olarak bir açıklama girin.
Kaydet'i seçin. Harita stiliniz kaydedilir ve yayınlanır.
2. adım: Harita kimliği oluşturun ve bağlayın
Harita kimliği, harita stilinizi uygulamalarda ve web sitelerinde kullanmanıza olanak tanır. Bir harita kimliğiyle ilişkili harita stilinde değişiklik yaparsanız stil değişiklikleriniz yayınladığınızda etkinleşir. Bu nedenle, yazılım veya uygulama güncellemeleri gerekmez.
Harita kimliği oluşturma
Google Cloud Console'da Harita Yönetimi'ni seçin.
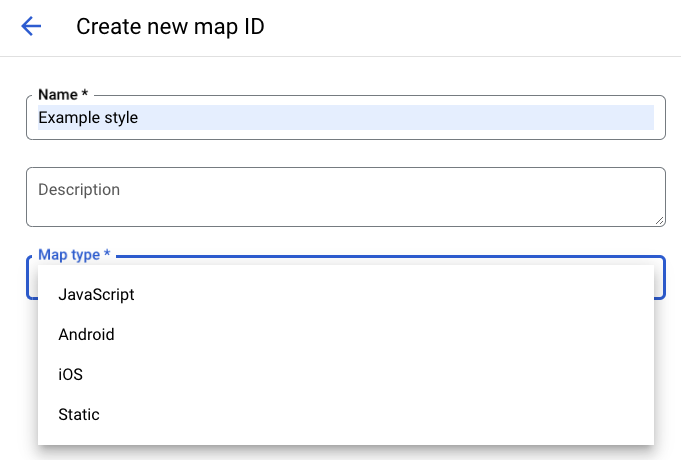
Üst kısımdan Harita kimliği oluştur'u seçin.

Harita kimliğiniz için bir ad ve isteğe bağlı olarak bir açıklama ekleyin.
Harita stilinizi nerede kullanmak istediğinize bağlı olarak harita kimliği için harita türünü seçin.
Sayfanın alt kısmında, Kaydet'i seçin. Harita kimliğiniz oluşturulur.
Harita kimliğini harita stilinize bağlama
Harita stilleri bölümünde Açık mod için Açık mod stilini değiştir'i seçin.
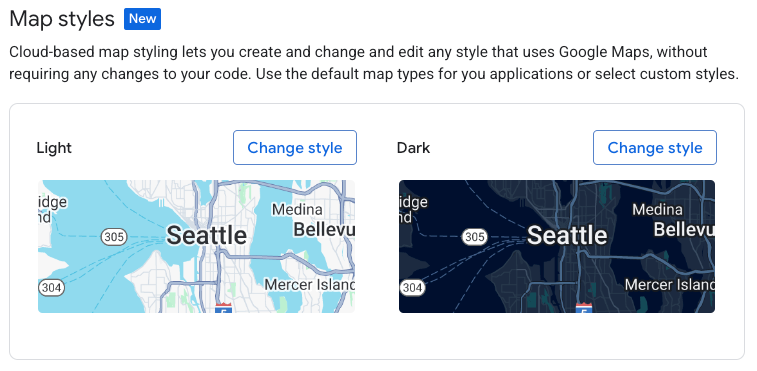
Işık stilini değiştir bölümünde, uygulamalarınızda açık mod için hangi harita stilinin kullanılacağını seçin ve Bitti'yi belirleyin.
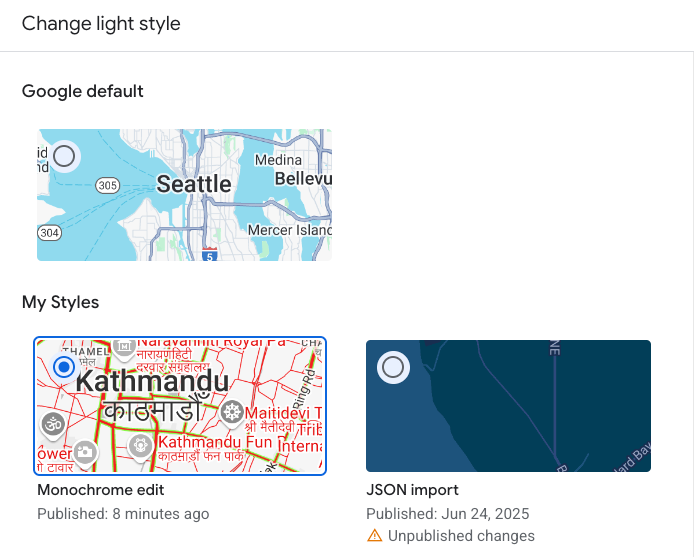
Kaydet'i seçin. Harita kimliğiniz artık harita stillerinizle ilişkilendirildi.
3. adım: Harita kimliğini uygulamalarınıza veya web sitelerinize ekleyin
Yayınlanmış bir harita stiliyle ilişkilendirilmiş bir harita kimliğiniz olduğuna göre, bu kimliği uygulamalarınıza veya web sitelerinize ekleyebilir ve beklendiği gibi çalıştığından emin olmak için test edebilirsiniz.
Harita kodu ekleme hakkında daha fazla bilgi için Haritanıza harita kodu ekleme başlıklı makaleyi inceleyin.
Sırada ne var?
Şimdi deneyebileceğiniz bazı şeyler:
Stili güncelleme. Harita stilinizde değişiklik yapmak ve bu stili yayınlamak için Stili değiştirme başlıklı makaleyi inceleyin.
Stilinizin farklı harita türlerinde nasıl uygulandığını anlayın. Daha fazla bilgi için Modlar ve harita türleri hakkında bilgi başlıklı makaleyi inceleyin.
Harita stili güncellemelerinizi test edin. Stil değişikliklerinizi yayınlanmadan önce test etmek istiyorsanız Harita stili güncellemelerini test etme başlıklı makaleyi inceleyin.
Belirli yakınlaştırma seviyeleri için stiller oluşturun. Örneğin, haritayı yakınlaştırdığınızda belirli harita özelliklerinin nasıl görüneceğini, uzaklaştırdığınızda nasıl görüneceğine kıyasla özelleştirebilirsiniz. Daha fazla bilgi için Stil yakınlaştırma düzeyleri konusuna bakın.
İstediğiniz stilleri verimli bir şekilde elde etmek için harita özellik hiyerarşisini kullanın. Örneğin, üst düzey harita özelliği Natural>Land'i stilize edebilirsiniz. Bu durumda, altındaki tüm arazi haritası özellikleri stilize edilir. Ardından, yalnızca farklı olmasını istediğiniz alt harita özelliklerinde özel stil oluşturabilirsiniz. Daha fazla bilgi için Harita stili devralma ve hiyerarşisini anlama başlıklı makaleyi inceleyin.