שליחת אישורי הערכה מותאמים אישית לעובדים

רמת קידוד: מתחילים
משך: 15 דקות
סוג הפרויקט: אוטומציה עם תפריט מותאם אישית

מטרות

  • להבין מה הפתרון עושה.
  • הסבר על הפעולות של שירותי Apps Script בתוך הפתרון.
  • מגדירים את הסביבה.
  • מגדירים את הסקריפט.
  • מריצים את הסקריפט.

מידע על הפתרון הזה

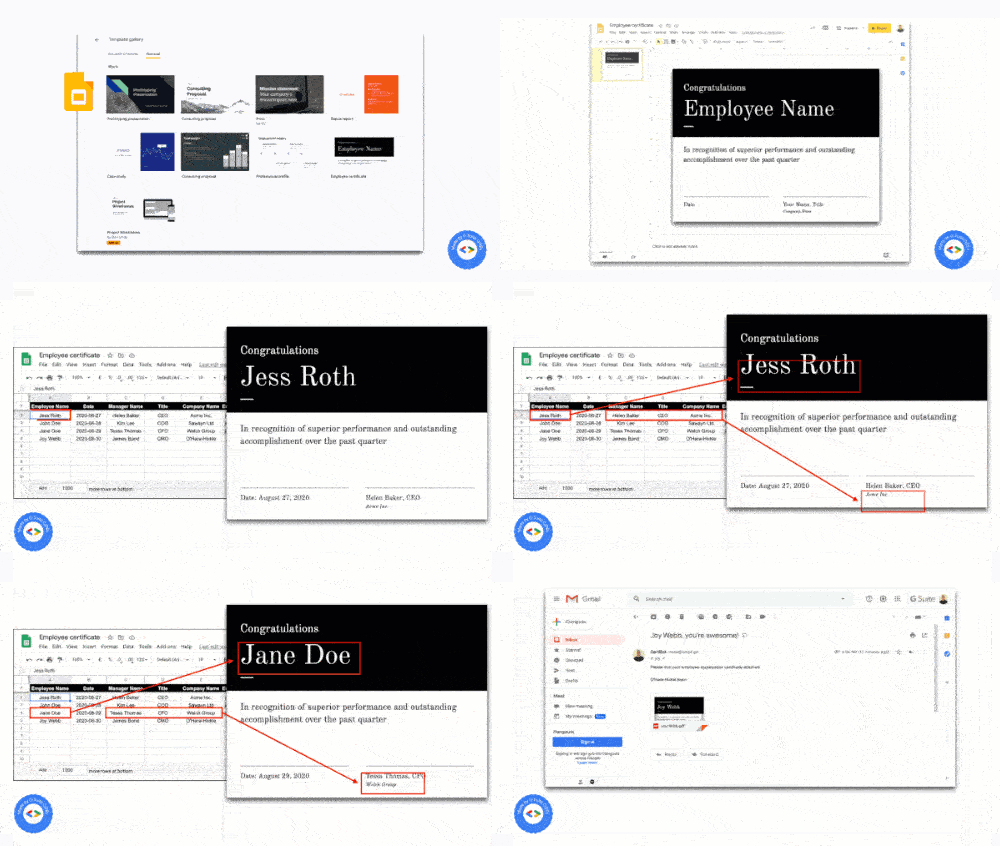
התאמה אישית אוטומטית של התבנית של תעודת העובד ב-Google Slides באמצעות נתוני העובדים ב-Google Sheets, ולאחר מכן שליחת התעודות באמצעות Gmail.

יצירת אישור לעובד

איך זה עובד

הסקריפט משתמש בתבנית של מצגת אישור העובד מ-Slides ובגיליון אלקטרוני ב-Sheets עם פרטי העובד. הסקריפט מעתיק את התבנית ומחליף את ה-placeholders בנתונים מהגיליון האלקטרוני. אחרי שהתסריט יוצר שקף לכל עובד, הוא מחלץ כל שקף בנפרד כקובץ PDF מצורף ושולח את האישור לעובדים.

שירותי Apps Script

הפתרון הזה משתמש בשירותים הבאים:

  • שירות Drive – העתקת התבנית של אישור העובד ב-Slides.
  • שירות גיליון אלקטרוני – מספק את פרטי העובדים ומעדכן את הסטטוס של כל אחד מהעובדים שמפורטים.
  • שירות Slides – השירות מחליף את ה-placeholders במצגת בנתוני העובדים מהגיליון האלקטרוני.
  • שירות Gmail – המערכת מקבלת את השקפים הנפרדים כקובצי PDF ושולחת אותם לעובדים.

דרישות מוקדמות

כדי להשתמש בדוגמה הזו, צריך לעמוד בדרישות המוקדמות הבאות:

  • חשבון Google (יכול להיות שחשבונות Google Workspace ידרשו אישור אדמין).
  • דפדפן אינטרנט עם גישה לאינטרנט.

הגדרת הסביבה

  1. לוחצים על הלחצן הבא כדי ליצור עותק של התבנית אישורי עובדים ב-Slides.
    יצירת עותק

  2. שימו לב למזהה ההצגה, כי תצטרכו אותו בשלב מאוחר יותר. המזהה מופיע בכתובת ה-URL:

    https://docs.google.com/presentation/d/PRESENTATION_ID/edit

  3. ב-Drive, יוצרים תיקייה חדשה לאחסון התעודות.

  4. חשוב לזכור את מזהה התיקייה כי תצטרכו אותו בשלב מאוחר יותר. המזהה מופיע בכתובת ה-URL: https://drive.google.com/drive/folders/FOLDER_ID

הגדרת הסקריפט

  1. אפשר ללחוץ על הלחצן שלמטה כדי ליצור עותק של הגיליון האלקטרוני לדוגמה בנושא אישורי עובדים. פרויקט Apps Script של הפתרון הזה מצורף לגיליון האלקטרוני.
    יצירת עותק

  2. בגיליון האלקטרוני, פותחים את פרויקט Apps Script בלחיצה על תוספים > Apps Script.

  3. במשתנה slideTemplateId, מחליפים את PRESENTATION_ID במזהה של המצגת.

  4. במשתנה tempFolderId, מחליפים את FOLDER_ID במזהה התיקייה.

  5. לוחצים על סמל השמירה סמל השמירה.

מריצים את הסקריפט

  1. חוזרים לגיליון האלקטרוני ולוחצים על הערכה > יצירת אישורים. יכול להיות שתצטרכו לרענן את הדף כדי שהתפריט המותאם אישית יופיע.
  2. כשמוצגת בקשה, מאשרים את הסקריפט. אם במסך ההסכמה ל-OAuth מוצגת האזהרה This app isn't verified, ממשיכים על ידי בחירה באפשרות Advanced > Go to {Project Name} (unsafe).

  3. לוחצים שוב על הערכה > יצירת אישורים.

  4. אחרי שסטטוס העמודה של כל השורות יתעדכן ל-Created, לוחצים על Appreciation > Send certificates.

בדיקת הקוד

כדי לבדוק את הקוד של Apps Script לפתרון הזה, לוחצים על הצגת קוד המקור בהמשך:

הצגת קוד המקור

Code.gs

solutions/automations/employee-certificate/Code.js
// To learn how to use this script, refer to the documentation:
// https://developers.google.com/apps-script/samples/automations/employee-certificate

/*
Copyright 2022 Google LLC

Licensed under the Apache License, Version 2.0 (the "License");
you may not use this file except in compliance with the License.
You may obtain a copy of the License at

    https://www.apache.org/licenses/LICENSE-2.0

Unless required by applicable law or agreed to in writing, software
distributed under the License is distributed on an "AS IS" BASIS,
WITHOUT WARRANTIES OR CONDITIONS OF ANY KIND, either express or implied.
See the License for the specific language governing permissions and
limitations under the License.
*/

const slideTemplateId = 'PRESENTATION_ID';
const tempFolderId = 'FOLDER_ID'; // Create an empty folder in Google Drive

/**
 * Creates a custom menu "Appreciation" in the spreadsheet
 * with drop-down options to create and send certificates
 */
function onOpen() {
  const ui = SpreadsheetApp.getUi();
  ui.createMenu('Appreciation')
      .addItem('Create certificates', 'createCertificates')
      .addSeparator()
      .addItem('Send certificates', 'sendCertificates')
      .addToUi();
}

/**
 * Creates a personalized certificate for each employee
 * and stores every individual Slides doc on Google Drive
 */
function createCertificates() {
  // Load the Google Slide template file
  const template = DriveApp.getFileById(slideTemplateId);

  // Get all employee data from the spreadsheet and identify the headers
  const sheet = SpreadsheetApp.getActiveSpreadsheet().getActiveSheet();
  const values = sheet.getDataRange().getValues();
  const headers = values[0];
  const empNameIndex = headers.indexOf('Employee Name');
  const dateIndex = headers.indexOf('Date');
  const managerNameIndex = headers.indexOf('Manager Name');
  const titleIndex = headers.indexOf('Title');
  const compNameIndex = headers.indexOf('Company Name');
  const empEmailIndex = headers.indexOf('Employee Email');
  const empSlideIndex = headers.indexOf('Employee Slide');
  const statusIndex = headers.indexOf('Status');

  // Iterate through each row to capture individual details
  for (let i = 1; i < values.length; i++) {
    const rowData = values[i];
    const empName = rowData[empNameIndex];
    const date = rowData[dateIndex];
    const managerName = rowData[managerNameIndex];
    const title = rowData[titleIndex];
    const compName = rowData[compNameIndex];

    // Make a copy of the Slide template and rename it with employee name
    const tempFolder = DriveApp.getFolderById(tempFolderId);
    const empSlideId = template.makeCopy(tempFolder).setName(empName).getId();
    const empSlide = SlidesApp.openById(empSlideId).getSlides()[0];

    // Replace placeholder values with actual employee related details
    empSlide.replaceAllText('Employee Name', empName);
    empSlide.replaceAllText('Date', 'Date: ' + Utilities.formatDate(date, Session.getScriptTimeZone(), 'MMMM dd, yyyy'));
    empSlide.replaceAllText('Your Name', managerName);
    empSlide.replaceAllText('Title', title);
    empSlide.replaceAllText('Company Name', compName);

    // Update the spreadsheet with the new Slide Id and status
    sheet.getRange(i + 1, empSlideIndex + 1).setValue(empSlideId);
    sheet.getRange(i + 1, statusIndex + 1).setValue('CREATED');
    SpreadsheetApp.flush();
  }
}

/**
 * Send an email to each individual employee
 * with a PDF attachment of their appreciation certificate
 */
function sendCertificates() {
  // Get all employee data from the spreadsheet and identify the headers
  const sheet = SpreadsheetApp.getActiveSpreadsheet().getActiveSheet();
  const values = sheet.getDataRange().getValues();
  const headers = values[0];
  const empNameIndex = headers.indexOf('Employee Name');
  const dateIndex = headers.indexOf('Date');
  const managerNameIndex = headers.indexOf('Manager Name');
  const titleIndex = headers.indexOf('Title');
  const compNameIndex = headers.indexOf('Company Name');
  const empEmailIndex = headers.indexOf('Employee Email');
  const empSlideIndex = headers.indexOf('Employee Slide');
  const statusIndex = headers.indexOf('Status');

  // Iterate through each row to capture individual details
  for (let i = 1; i < values.length; i++) {
    const rowData = values[i];
    const empName = rowData[empNameIndex];
    const date = rowData[dateIndex];
    const managerName = rowData[managerNameIndex];
    const title = rowData[titleIndex];
    const compName = rowData[compNameIndex];
    const empSlideId = rowData[empSlideIndex];
    const empEmail = rowData[empEmailIndex];

    // Load the employee's personalized Google Slide file
    const attachment = DriveApp.getFileById(empSlideId);

    // Setup the required parameters and send them the email
    const senderName = 'CertBot';
    const subject = empName + ', you\'re awesome!';
    const body = 'Please find your employee appreciation certificate attached.' +
    '\n\n' + compName + ' team';
    GmailApp.sendEmail(empEmail, subject, body, {
      attachments: [attachment.getAs(MimeType.PDF)],
      name: senderName
    });

    // Update the spreadsheet with email status
    sheet.getRange(i + 1, statusIndex + 1).setValue('SENT');
    SpreadsheetApp.flush();
  }
}

תורמים

הדוגמה הזו נוצרה על ידי Sourabh Choraria, בלוגר ומומחה לפיתוח ב-Google.

Google שומרת על הדוגמה הזו בעזרת מומחי הפיתוח של Google.

השלבים הבאים