
पूरे उदाहरण का सोर्स कोड देखें
इस उदाहरण में, मार्कर को इन तरीकों से पसंद के मुताबिक बनाने का तरीका दिखाया गया है: टाइटल टेक्स्ट जोड़ना, मार्कर को स्केल करना, बैकग्राउंड का रंग बदलना, बॉर्डर का रंग बदलना, ग्लिफ़ का रंग बदलना, और ग्लिफ़ को छिपाना.
TypeScript
const mapElement = document.querySelector('gmp-map')!; async function init() { // Request needed libraries. const [{ AdvancedMarkerElement, PinElement }] = await Promise.all([ google.maps.importLibrary('marker'), google.maps.importLibrary('maps'), ]); // Each PinElement is paired with a marker to demonstrate setting each parameter. // Default marker with title text (no PinElement). const markerWithText = new AdvancedMarkerElement({ position: { lat: 37.419, lng: -122.03 }, title: 'Title text for the marker at lat: 37.419, lng: -122.03', }); mapElement.append(markerWithText); // Adjust the scale. const pinScaled = new PinElement({ scale: 1.5, }); const markerScaled = new AdvancedMarkerElement({ position: { lat: 37.419, lng: -122.02 }, }); markerScaled.append(pinScaled); mapElement.append(markerScaled); // Change the background color. const pinBackground = new PinElement({ background: '#FBBC04', }); const markerBackground = new AdvancedMarkerElement({ position: { lat: 37.419, lng: -122.01 }, }); markerBackground.append(pinBackground); mapElement.append(markerBackground); // Change the border color. const pinBorder = new PinElement({ borderColor: '#137333', }); const markerBorder = new AdvancedMarkerElement({ position: { lat: 37.415, lng: -122.035 }, }); markerBorder.append(pinBorder); mapElement.append(markerBorder); // Change the glyph color. const pinGlyph = new PinElement({ glyphColor: 'white', }); const markerGlyph = new AdvancedMarkerElement({ position: { lat: 37.415, lng: -122.025 }, }); markerGlyph.append(pinGlyph); mapElement.append(markerGlyph); const pinTextGlyph = new PinElement({ glyphText: 'T', glyphColor: 'white', }); const markerGlyphText = new AdvancedMarkerElement({ position: { lat: 37.415, lng: -122.015 }, }); markerGlyphText.append(pinTextGlyph); mapElement.append(markerGlyphText); // Hide the glyph. const pinNoGlyph = new PinElement({ glyphText: '', }); const markerNoGlyph = new AdvancedMarkerElement({ position: { lat: 37.415, lng: -122.005 }, }); markerNoGlyph.append(pinNoGlyph); mapElement.append(markerNoGlyph); } void init();
JavaScript
const mapElement = document.querySelector('gmp-map'); async function init() { // Request needed libraries. const [{ AdvancedMarkerElement, PinElement }] = await Promise.all([ google.maps.importLibrary('marker'), google.maps.importLibrary('maps'), ]); // Each PinElement is paired with a marker to demonstrate setting each parameter. // Default marker with title text (no PinElement). const markerWithText = new AdvancedMarkerElement({ position: { lat: 37.419, lng: -122.03 }, title: 'Title text for the marker at lat: 37.419, lng: -122.03', }); mapElement.append(markerWithText); // Adjust the scale. const pinScaled = new PinElement({ scale: 1.5, }); const markerScaled = new AdvancedMarkerElement({ position: { lat: 37.419, lng: -122.02 }, }); markerScaled.append(pinScaled); mapElement.append(markerScaled); // Change the background color. const pinBackground = new PinElement({ background: '#FBBC04', }); const markerBackground = new AdvancedMarkerElement({ position: { lat: 37.419, lng: -122.01 }, }); markerBackground.append(pinBackground); mapElement.append(markerBackground); // Change the border color. const pinBorder = new PinElement({ borderColor: '#137333', }); const markerBorder = new AdvancedMarkerElement({ position: { lat: 37.415, lng: -122.035 }, }); markerBorder.append(pinBorder); mapElement.append(markerBorder); // Change the glyph color. const pinGlyph = new PinElement({ glyphColor: 'white', }); const markerGlyph = new AdvancedMarkerElement({ position: { lat: 37.415, lng: -122.025 }, }); markerGlyph.append(pinGlyph); mapElement.append(markerGlyph); const pinTextGlyph = new PinElement({ glyphText: 'T', glyphColor: 'white', }); const markerGlyphText = new AdvancedMarkerElement({ position: { lat: 37.415, lng: -122.015 }, }); markerGlyphText.append(pinTextGlyph); mapElement.append(markerGlyphText); // Hide the glyph. const pinNoGlyph = new PinElement({ glyphText: '', }); const markerNoGlyph = new AdvancedMarkerElement({ position: { lat: 37.415, lng: -122.005 }, }); markerNoGlyph.append(pinNoGlyph); mapElement.append(markerNoGlyph); } void init();
सीएसएस
/* * Always set the map height explicitly to define the size of the div element * that contains the map. */ gmp-map { height: 100%; } /* * Optional: Makes the sample page fill the window. */ html, body { height: 100%; margin: 0; padding: 0; }
एचटीएमएल
<html>
<head>
<title>Advanced Marker Basic Customization</title>
<link rel="stylesheet" type="text/css" href="./style.css" />
<script type="module" src="./index.js"></script>
<script>
// prettier-ignore
(g=>{var h,a,k,p="The Google Maps JavaScript API",c="google",l="importLibrary",q="__ib__",m=document,b=window;b=b[c]||(b[c]={});var d=b.maps||(b.maps={}),r=new Set,e=new URLSearchParams,u=()=>h||(h=new Promise(async(f,n)=>{await (a=m.createElement("script"));e.set("libraries",[...r]+"");for(k in g)e.set(k.replace(/[A-Z]/g,t=>"_"+t[0].toLowerCase()),g[k]);e.set("callback",c+".maps."+q);a.src=`https://maps.${c}apis.com/maps/api/js?`+e;d[q]=f;a.onerror=()=>h=n(Error(p+" could not load."));a.nonce=m.querySelector("script[nonce]")?.nonce||"";m.head.append(a)}));d[l]?console.warn(p+" only loads once. Ignoring:",g):d[l]=(f,...n)=>r.add(f)&&u().then(()=>d[l](f,...n))})({
key: "AIzaSyA6myHzS10YXdcazAFalmXvDkrYCp5cLc8"
});
</script>
</head>
<body>
<gmp-map
center="37.419,-122.02"
zoom="14"
map-id="4504f8b37365c3d0"></gmp-map>
</body>
</html>सैंपल आज़माएं
इस पेज पर, मार्कर को इन तरीकों से पसंद के मुताबिक बनाने का तरीका बताया गया है:
- टाइटल का टेक्स्ट जोड़ना
- मार्कर को स्केल करना
- बैकग्राउंड का रंग बदलना
- बॉर्डर का रंग बदलना
- ग्लिफ़ का रंग बदलना
- किसी ग्लिफ़ में टेक्स्ट का इस्तेमाल करना
- ग्लिफ़ को छिपाना
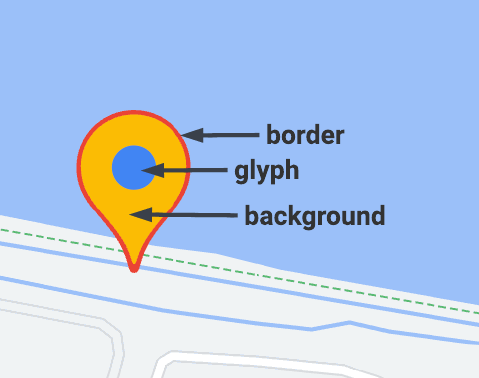
ऐडवांस मार्कर, मार्कर तय करने के लिए दो क्लास का इस्तेमाल करता है: AdvancedMarkerElement क्लास, बुनियादी पैरामीटर (position, title, और map) उपलब्ध कराती है. वहीं, PinElement क्लास में मार्कर को और ज़्यादा पसंद के मुताबिक बनाने के विकल्प होते हैं.
मैप में मार्कर जोड़ने के लिए, आपको सबसे पहले marker लाइब्रेरी लोड करनी होगी. यह लाइब्रेरी, AdvancedMarkerElement और PinElement क्लास उपलब्ध कराती है.
यहां दिए गए स्निपेट में, नया PinElement बनाने और फिर उसे मार्कर पर लागू करने का कोड दिखाया गया है.
// Create a pin element.
const myPin = new PinElement({
    scale: 1.5,
});
// Create a marker.
const myMarker = new AdvancedMarkerElement({
    position: { lat: 37.4239163, lng: -122.0947209 },
});
// Append the pin to the marker.
myMarker.append(myPin);
// Append the marker to the map.
mapElement.append(myMarker);
कस्टम एचटीएमएल एलिमेंट का इस्तेमाल करके बनाए गए मैप में, मार्कर के बुनियादी पैरामीटर gmp-advanced-marker एचटीएमएल एलिमेंट का इस्तेमाल करके तय किए जाते हैं. PinElement क्लास का इस्तेमाल करके किए गए किसी भी बदलाव को प्रोग्राम के हिसाब से लागू किया जाना चाहिए. इसके लिए, आपके कोड को एचटीएमएल पेज से gmp-advanced-marker एलिमेंट वापस पाने होंगे. नीचे दिए गए स्निपेट में, gmp-advanced-marker एलिमेंट के कलेक्शन के लिए क्वेरी करने का कोड दिखाया गया है. इसके बाद, PinElement में बताए गए बदलावों को लागू करने के लिए, नतीजों को दोहराया जाता है.
// Return an array of markers.
const advancedMarkers = [...document.querySelectorAll('gmp-advanced-marker')];

// Loop through the markers
for (let i = 0; i < advancedMarkers.length; i++) {
  const pin = new PinElement({
      scale: 2.0,
  });

  marker.append(pin);
}
टाइटल टेक्स्ट जोड़ना
कर्सर को मार्कर पर घुमाने पर, टाइटल टेक्स्ट दिखता है. टाइटल टेक्स्ट को स्क्रीन रीडर पढ़ सकते हैं.
प्रोग्राम के हिसाब से टाइटल टेक्स्ट जोड़ने के लिए, AdvancedMarkerElement.title
विकल्प का इस्तेमाल करें:
// Default marker with title text (no PinElement). const markerWithText = new AdvancedMarkerElement({ position: { lat: 37.419, lng: -122.03 }, title: 'Title text for the marker at lat: 37.419, lng: -122.03', }); mapElement.append(markerWithText);
कस्टम एचटीएमएल एलिमेंट का इस्तेमाल करके बनाए गए मार्कर में टाइटल टेक्स्ट जोड़ने के लिए, title एट्रिब्यूट का इस्तेमाल करें:
<gmp-map
center="43.4142989,-124.2301242"
zoom="4"
map-id="DEMO_MAP_ID"
style="height: 400px"
>
<gmp-advanced-marker
position="37.4220656,-122.0840897"
title="Mountain View, CA"
></gmp-advanced-marker>
<gmp-advanced-marker
position="47.648994,-122.3503845"
title="Seattle, WA"
></gmp-advanced-marker>
</gmp-map>मार्कर का साइज़ बदलना
मार्कर का साइज़ बदलने के लिए, scale विकल्प का इस्तेमाल करें.
TypeScript
// Adjust the scale. const pinScaled = new PinElement({ scale: 1.5, }); const markerScaled = new AdvancedMarkerElement({ position: { lat: 37.419, lng: -122.02 }, }); markerScaled.append(pinScaled); mapElement.append(markerScaled);
JavaScript
// Adjust the scale. const pinScaled = new PinElement({ scale: 1.5, }); const markerScaled = new AdvancedMarkerElement({ position: { lat: 37.419, lng: -122.02 }, }); markerScaled.append(pinScaled); mapElement.append(markerScaled);
बैकग्राउंड का रंग बदलना
मार्कर के बैकग्राउंड का रंग बदलने के लिए, PinElement.background विकल्प का इस्तेमाल करें:
TypeScript
// Change the background color. const pinBackground = new PinElement({ background: '#FBBC04', }); const markerBackground = new AdvancedMarkerElement({ position: { lat: 37.419, lng: -122.01 }, }); markerBackground.append(pinBackground); mapElement.append(markerBackground);
JavaScript
// Change the background color. const pinBackground = new PinElement({ background: '#FBBC04', }); const markerBackground = new AdvancedMarkerElement({ position: { lat: 37.419, lng: -122.01 }, }); markerBackground.append(pinBackground); mapElement.append(markerBackground);
बॉर्डर का रंग बदलना
मार्कर के बॉर्डर का रंग बदलने के लिए, PinElement.borderColor विकल्प का इस्तेमाल करें:
TypeScript
// Change the border color. const pinBorder = new PinElement({ borderColor: '#137333', }); const markerBorder = new AdvancedMarkerElement({ position: { lat: 37.415, lng: -122.035 }, }); markerBorder.append(pinBorder); mapElement.append(markerBorder);
JavaScript
// Change the border color. const pinBorder = new PinElement({ borderColor: '#137333', }); const markerBorder = new AdvancedMarkerElement({ position: { lat: 37.415, lng: -122.035 }, }); markerBorder.append(pinBorder); mapElement.append(markerBorder);
ग्लिफ़ का रंग बदलना
मार्कर के ग्लिफ़ का रंग बदलने के लिए, PinElement.glyphColor विकल्प का इस्तेमाल करें:
TypeScript
// Change the glyph color. const pinGlyph = new PinElement({ glyphColor: 'white', }); const markerGlyph = new AdvancedMarkerElement({ position: { lat: 37.415, lng: -122.025 }, }); markerGlyph.append(pinGlyph); mapElement.append(markerGlyph);
JavaScript
// Change the glyph color. const pinGlyph = new PinElement({ glyphColor: 'white', }); const markerGlyph = new AdvancedMarkerElement({ position: { lat: 37.415, lng: -122.025 }, }); markerGlyph.append(pinGlyph); mapElement.append(markerGlyph);
किसी ग्लिफ़ में टेक्स्ट का इस्तेमाल करना
डिफ़ॉल्ट ग्लिफ़ को टेक्स्ट वर्ण से बदलने के लिए, PinElement.glyphText विकल्प का इस्तेमाल करें. PinElement का टेक्स्ट ग्लिफ़, PinElement के साथ स्केल करता है. साथ ही, इसका डिफ़ॉल्ट रंग, PinElement के डिफ़ॉल्ट glyphColor से मेल खाता है.
TypeScript
const pinTextGlyph = new PinElement({ glyphText: 'T', glyphColor: 'white', }); const markerGlyphText = new AdvancedMarkerElement({ position: { lat: 37.415, lng: -122.015 }, }); markerGlyphText.append(pinTextGlyph); mapElement.append(markerGlyphText);
JavaScript
const pinTextGlyph = new PinElement({ glyphText: 'T', glyphColor: 'white', }); const markerGlyphText = new AdvancedMarkerElement({ position: { lat: 37.415, lng: -122.015 }, }); markerGlyphText.append(pinTextGlyph); mapElement.append(markerGlyphText);
ग्लिफ़ छिपाना
मार्कर के ग्लिफ़ को छिपाने के लिए, PinElement.glyphText विकल्प को खाली स्ट्रिंग पर सेट करें:
TypeScript
// Hide the glyph. const pinNoGlyph = new PinElement({ glyphText: '', }); const markerNoGlyph = new AdvancedMarkerElement({ position: { lat: 37.415, lng: -122.005 }, }); markerNoGlyph.append(pinNoGlyph); mapElement.append(markerNoGlyph);
JavaScript
// Hide the glyph. const pinNoGlyph = new PinElement({ glyphText: '', }); const markerNoGlyph = new AdvancedMarkerElement({ position: { lat: 37.415, lng: -122.005 }, }); markerNoGlyph.append(pinNoGlyph); mapElement.append(markerNoGlyph);
इसके अलावा, PinElement.glyphColor को PinElement.background के बराबर वैल्यू पर सेट करें. इससे ग्लिफ़ को विज़ुअली छिपा दिया जाता है.