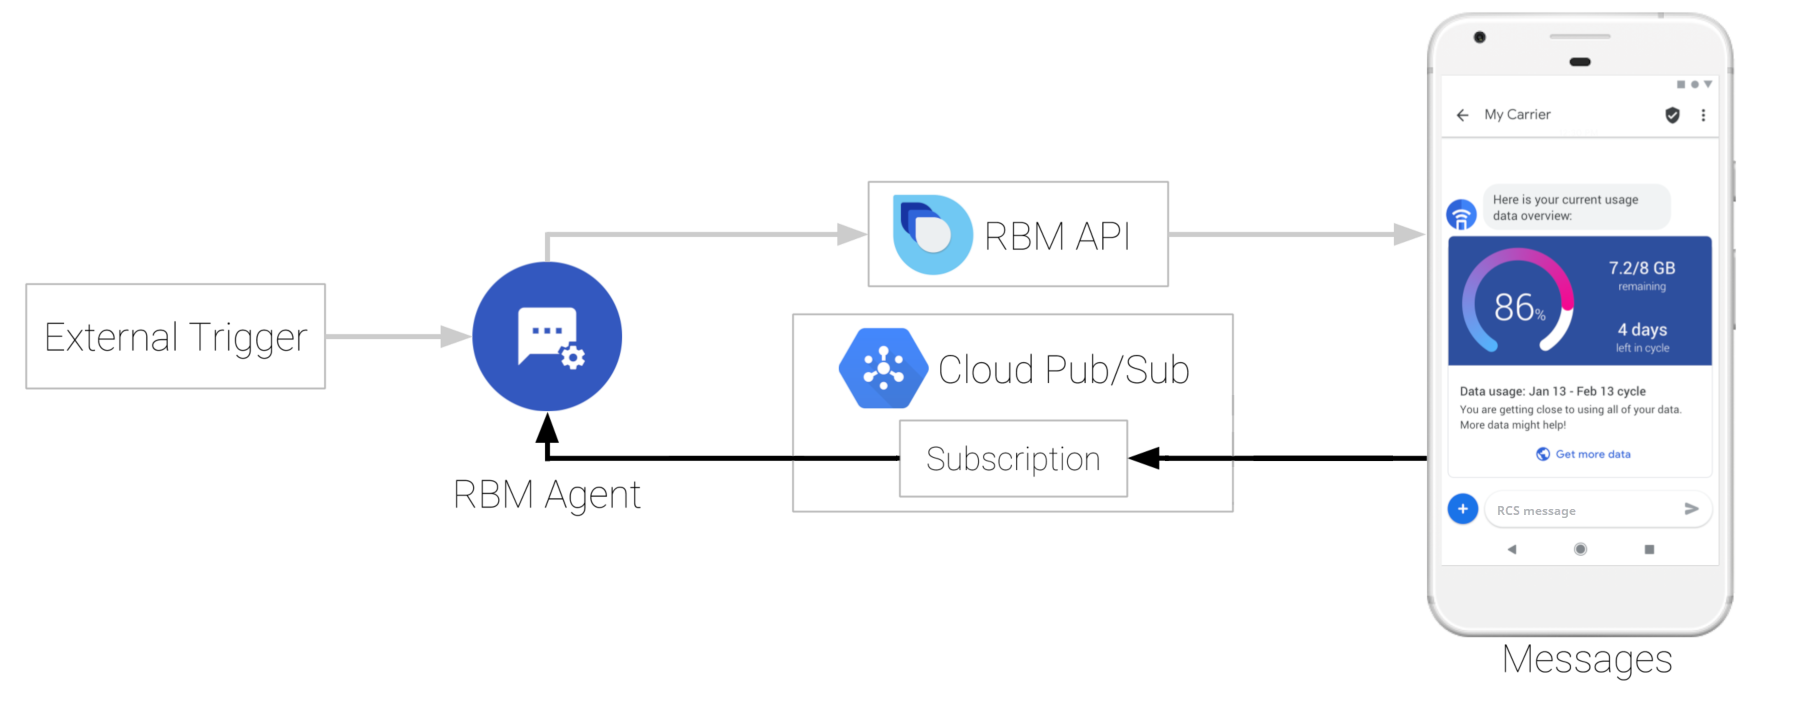
RBM agents receive messages and events through a publish/subscribe relationship with Cloud Pub/Sub. When a user sends a message to your agent or generates an event, their messaging app sends the information to your agent's Pub/Sub subscription, where your agent can access the message or event. See Receive messages.
Your agent's Pub/Sub subscription type determines how your agent receives messages, so you need to configure your Pub/Sub subscription before your agent can receive messages. RBM agents support both pull and push subscriptions.
Pull subscription
With a pull subscription, your agent contacts Cloud Pub/Sub and fetches messages, events, and other requests.
Prerequisites
Before you get started, you need an RBM agent.
Setup
- Open the Business Communications Developer Console, sign in with your RBM Google Account, and click your agent.
- In the left navigation, click Integrations.
- Click Edit subscription.
- Choose Pull, then click Save.
- Configure your agent to use the pull subscription:
- If you use a sample agent with a pull subscription, follow the instructions in the sample's README file.
- If you don't use a sample agent, see Receiving messages using Pull for code to enable your agent to use the pull subscription. Depending on your programming language, you may need your agent's project ID.
Find your project ID
Some pull subscription mechanisms require you to specify your agent's Google
Cloud Project (GCP) project ID. Your agent's project ID is embedded in the pull
subscription name following project/.
- Open the Business Communications Developer Console, sign in with your RBM Google Account, and click your agent.
- In the left navigation, click Integrations.
- Find your agent's Subscription name.
- Locate the text segment between
project/and the following/. This is your agent's project ID. For example, if the subscription name isprojects/rbm-growing-tree-bank-nbdjkl6t/subscriptions/rbm-agent-subscription, your agent's project ID isrbm-growing-tree-bank-nbdjkl6t.
C#
private async void InitPullMessages(string projectId, string jsonPath)
{
  GoogleCredential googleCredential = null;
  using (var jsonStream = new FileStream(jsonPath, FileMode.Open,
    FileAccess.Read, FileShare.Read))
  {
    googleCredential = GoogleCredential.FromStream(jsonStream)
      .CreateScoped(SubscriberServiceApiClient.DefaultScopes);
  }

  SubscriptionName subscriptionName = new SubscriptionName(projectId, subscriptionId);
  SubscriberClient subscriber = new SubscriberClientBuilder
  {
    SubscriptionName = subscriptionName,
    GoogleCredential = googleCredential

  }.Build();

  // setup listener for pubsub messages
  await subscriber.StartAsync(
    async (PubsubMessage message, CancellationToken cancel) =>
    {
      string text = System.Text.Encoding.UTF8.GetString(message.Data.ToArray());

      JObject jsonObject = JObject.Parse(jsonAsString);

      string userResponse = GetResponseText(jsonObject);
      string eventType = (string)jsonObject["eventType"];

      // check if the message is a user response message
      if ((userResponse.Length > 0) && (eventType == null))
      {
        string messageId = (string)jsonObject["messageId"];
        string msisdn = (string)jsonObject["senderPhoneNumber"];
        // let the user know their message has been read
        kitchenSinkBot.SendReadMessage(messageId, msisdn);
        HandleUserResponse(userResponse, msisdn);
      }
      await Console.Out.WriteLineAsync(
        $"Message {message.MessageId}: {jsonAsString}");
      return SubscriberClient.Reply.Ack;
    });
  }
}
This code is an excerpt from an RBM sample agent.
Push subscription
With a push subscription, Cloud Pub/Sub pushes messages, events, and other requests to a webhook URL that you specify.
Prerequisites
Before you get started, you need the following:
- An RBM agent
- A live webhook endpoint URL that supports
- HTTPS with a valid SSL certificate
POSTrequests- The ability to echo a parameter in response to a validation request
Setup
- Open the Business Communications Developer Console, sign in with your RBM Google Account, and click your agent.
- In the left navigation, click Integrations.
- Click Edit subscription.
- Choose Push.
- For Webhook endpoint URL, enter your webhook's URL, beginning with "https://".
Configure your webhook to accept a
POSTrequest with the specifiedclientTokenparameter and send a200 OKresponse with the value of thesecretparameter.For example, if your webhook receives a POST request with the following body content
{
  "clientToken":"SJENCPGJESMGUFPY",
  "secret":"1234567890"
}
your webhook should confirm the
clientTokenvalue and, ifclientTokenis correct, return a200 OKresponse with a body ofsecret: 1234567890.In the console, click Verify.
When the RBM platform verifies your webhook, the Configure your webhook dialog closes.
Click Save.
Configure your agent to receive messages from your webhook:
- If you use a sample agent with a push subscription, follow the instructions in the sample's README file.
- If don't use a sample agent, configure your infrastructure to pass messages from your webhook to your agent.
Node.js
let requestBody = req.body;

if ((requestBody.hasOwnProperty('clientToken')) && (requestBody.hasOwnProperty('secret'))) {
  console.log('RBM webhook verification request');

  // Confirm that the clientToken is the one we are seeing in the RBM console
  if (requestBody.clientToken == CLIENT_TOKEN) {
    console.log('Tokens match, returning secret');
    res.status(200).send('secret: ' + requestBody.secret);
  }
  else {
    // Client tokens did not match - sending permission denied
    console.log('Tokens do not match');
    res.sendStatus(403);
  }
}
Verify incoming messages
Because webhooks can receive messages from any senders, you should verify that Google sent incoming messages before processing message content.
To verify that Google sent a message you received, follow these steps:
- Extract the message's
X-Goog-Signatureheader. This is a hashed, base64-encoded copy of the message body payload. - Base-64-decode the RBM payload in the
message.bodyelement of the request. - Using your webhook's client token (which you specified when you set up your push subscription) as a key, create a SHA512 HMAC of the bytes of the base-64 decoded message payload and base64-encode the result.
- Compare the
X-Goog-Signaturehash with the hash you created.- If the hashes match, you've confirmed that Google sent the message.
If the hashes don't match, check your hashing process on a known-good message.
If your hashing process is working correctly and you receive a message that you believe was fraudulently sent to you, contact us.
Node.js
if ((requestBody.hasOwnProperty('message')) && (requestBody.message.hasOwnProperty('data'))) {
  // Validate the received hash to ensure the message came from Google RBM
  let userEventString = Buffer.from(requestBody.message.data, 'base64');
  let hmac = crypto.createHmac('sha512', CLIENT_TOKEN);
  let data = hmac.update(userEventString);
  let genHash = data.digest('base64');
  let headerHash = req.header('X-Goog-Signature');

  if (headerHash === genHash) {
    let userEvent = JSON.parse(userEventString);

    console.log('userEventString: ' + userEventString);
    handleMessage(userEvent);
  }
  else {
    console.log('hash mismatch - ignoring message');
  }
}

res.sendStatus(200);
Next steps
Once you configure your subscription and set up your agent to communicate with Cloud Pub/Sub, your agent can receive messages from your test devices. Send a message to validate your setup.