विज्ञापन दिखाने और कमाई करने की दिशा में पहला कदम है, Google Mobile Ads SDK को किसी ऐप्लिकेशन के साथ इंटिग्रेट करना. SDK टूल को इंटिग्रेट करने के बाद, एक या एक से ज़्यादा काम करने वाले विज्ञापन फ़ॉर्मैट लागू किए जा सकते हैं.
ज़रूरी शर्तें
- Xcode 15.3 या उसके बाद के वर्शन का इस्तेमाल करें
- टारगेट iOS 12.0 या उसके बाद वाला वर्शन
मोबाइल विज्ञापन SDK टूल इंपोर्ट करें
Google Mobile Ads SDK इंपोर्ट करने के लिए, इनमें से किसी एक तरीके का इस्तेमाल करें.
CocoaPods (पसंदीदा)
किसी iOS प्रोजेक्ट में SDK टूल को इंपोर्ट करने का सबसे आसान तरीका है, CocoaPods का इस्तेमाल करना. अपने प्रोजेक्ट का Podfile खोलें और इस लाइन को अपने ऐप्लिकेशन के टारगेट में जोड़ें:
pod 'Google-Mobile-Ads-SDK'
इसके बाद, कमांड लाइन रन करने के बाद:
pod install --repo-update
अगर CocoaPods का इस्तेमाल पहले नहीं किया जा रहा है, तो Podफ़ाइलें बनाने और इस्तेमाल करने के तरीके के बारे में जानने के लिए, उनके आधिकारिक दस्तावेज़ देखें.
स्विफ़्ट पैकेज मैनेजर
Google मोबाइल विज्ञापन SDK टूल के 9.0.0 वर्शन से शुरू होने वाला Swift Package Manager पर काम करता है. Swift पैकेज इंपोर्ट करने के लिए यह तरीका अपनाएं:
Xcode में, फ़ाइल > पैकेज जोड़ें... पर जाकर Google Mobile Ads Swift Package इंस्टॉल करें.
स्क्रीन पर दिखने वाले प्रॉम्प्ट में, Google Mobile Ads के Swift Package GitHub रिपॉज़िटरी को खोजें:
https://github.com/googleads/swift-package-manager-google-mobile-ads.gitGoogle Mobile Ads के Swift पैकेज का वह वर्शन चुनें जिसका आपको इस्तेमाल करना है. नए प्रोजेक्ट के लिए, हमारा सुझाव है कि आप अगला मेजर वर्शन इस्तेमाल करें.
यह प्रक्रिया पूरी होने के बाद, Xcode आपके पैकेज डिपेंडेंसी को ठीक करना और उन्हें बैकग्राउंड में डाउनलोड करना शुरू कर देगा. पैकेज डिपेंडेंसी जोड़ने के तरीके के बारे में ज़्यादा जानकारी के लिए, Apple का लेख पढ़ें.
मैन्युअल डाउनलोड
Google Mobile Ads SDK और इन फ़्रेमवर्क को
Embed & Signअपने Xcode प्रोजेक्ट में डाउनलोड करें:GoogleMobileAds.xcframeworkUserMessagingPlatform.xcframework
अपने प्रोजेक्ट की बिल्ड सेटिंग में
-ObjCलिंकर फ़्लैग को अन्य लिंकर फ़्लैग में जोड़ें: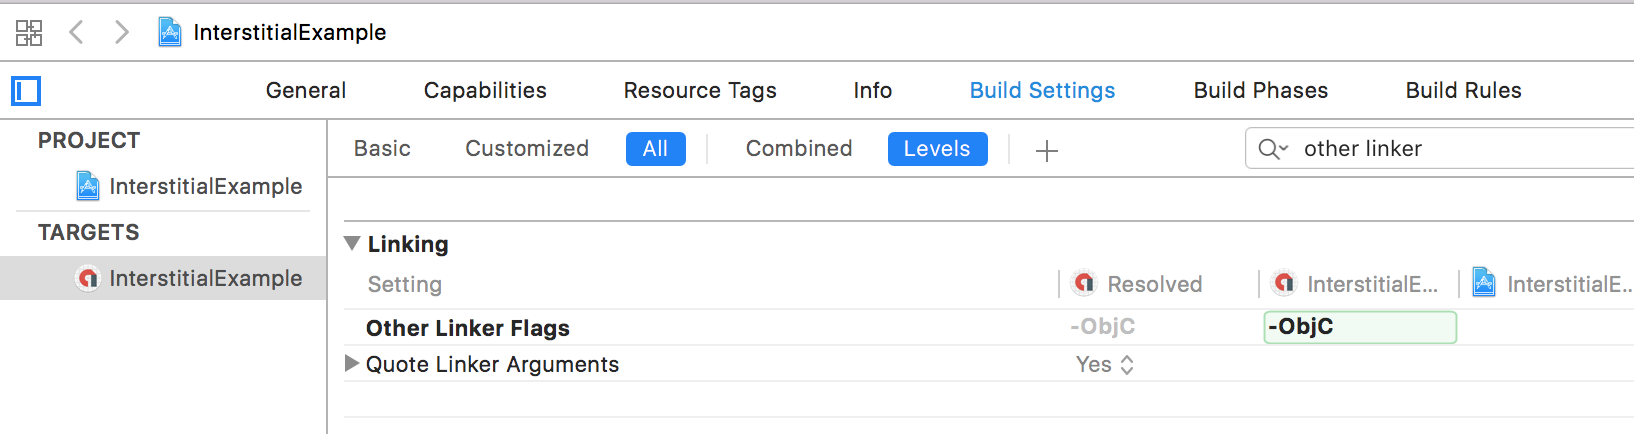
अपनी Info.plist अपडेट करें
दो कुंजियां जोड़ने के लिए, अपने ऐप्लिकेशन की Info.plist फ़ाइल अपडेट करें:
GADApplicationIdentifierकुंजी, जिसमें आपके Ad Manager app ID found in the Ad Manager UI and of the formca-app-pub-################~##########की स्ट्रिंग वैल्यू है.Google (
cstr6suwn9.skadnetwork) के लिएSKAdNetworkIdentifierवैल्यू वालीSKAdNetworkItemsकुंजी और तीसरे पक्ष के उन खरीदारों को चुनें जिन्होंने Google को ये वैल्यू दी हैं.
स्निपेट को पूरा करें
<key>GADApplicationIdentifier</key>
<string>ca-app-pub-3940256099942544~1458002511</string>
<key>SKAdNetworkItems</key>
<array>
  <dict>
    <key>SKAdNetworkIdentifier</key>
    <string>cstr6suwn9.skadnetwork</string>
  </dict>
  <dict>
    <key>SKAdNetworkIdentifier</key>
    <string>4fzdc2evr5.skadnetwork</string>
  </dict>
  <dict>
    <key>SKAdNetworkIdentifier</key>
    <string>4pfyvq9l8r.skadnetwork</string>
  </dict>
  <dict>
    <key>SKAdNetworkIdentifier</key>
    <string>2fnua5tdw4.skadnetwork</string>
  </dict>
  <dict>
    <key>SKAdNetworkIdentifier</key>
    <string>ydx93a7ass.skadnetwork</string>
  </dict>
  <dict>
    <key>SKAdNetworkIdentifier</key>
    <string>5a6flpkh64.skadnetwork</string>
  </dict>
  <dict>
    <key>SKAdNetworkIdentifier</key>
    <string>p78axxw29g.skadnetwork</string>
  </dict>
  <dict>
    <key>SKAdNetworkIdentifier</key>
    <string>v72qych5uu.skadnetwork</string>
  </dict>
  <dict>
    <key>SKAdNetworkIdentifier</key>
    <string>ludvb6z3bs.skadnetwork</string>
  </dict>
  <dict>
    <key>SKAdNetworkIdentifier</key>
    <string>cp8zw746q7.skadnetwork</string>
  </dict>
  <dict>
    <key>SKAdNetworkIdentifier</key>
    <string>3sh42y64q3.skadnetwork</string>
  </dict>
  <dict>
    <key>SKAdNetworkIdentifier</key>
    <string>c6k4g5qg8m.skadnetwork</string>
  </dict>
  <dict>
    <key>SKAdNetworkIdentifier</key>
    <string>s39g8k73mm.skadnetwork</string>
  </dict>
  <dict>
    <key>SKAdNetworkIdentifier</key>
    <string>3qy4746246.skadnetwork</string>
  </dict>
  <dict>
    <key>SKAdNetworkIdentifier</key>
    <string>f38h382jlk.skadnetwork</string>
  </dict>
  <dict>
    <key>SKAdNetworkIdentifier</key>
    <string>hs6bdukanm.skadnetwork</string>
  </dict>
  <dict>
    <key>SKAdNetworkIdentifier</key>
    <string>v4nxqhlyqp.skadnetwork</string>
  </dict>
  <dict>
    <key>SKAdNetworkIdentifier</key>
    <string>wzmmz9fp6w.skadnetwork</string>
  </dict>
  <dict>
    <key>SKAdNetworkIdentifier</key>
    <string>yclnxrl5pm.skadnetwork</string>
  </dict>
  <dict>
    <key>SKAdNetworkIdentifier</key>
    <string>t38b2kh725.skadnetwork</string>
  </dict>
  <dict>
    <key>SKAdNetworkIdentifier</key>
    <string>7ug5zh24hu.skadnetwork</string>
  </dict>
  <dict>
    <key>SKAdNetworkIdentifier</key>
    <string>gta9lk7p23.skadnetwork</string>
  </dict>
  <dict>
    <key>SKAdNetworkIdentifier</key>
    <string>vutu7akeur.skadnetwork</string>
  </dict>
  <dict>
    <key>SKAdNetworkIdentifier</key>
    <string>y5ghdn5j9k.skadnetwork</string>
  </dict>
  <dict>
    <key>SKAdNetworkIdentifier</key>
    <string>n6fk4nfna4.skadnetwork</string>
  </dict>
  <dict>
    <key>SKAdNetworkIdentifier</key>
    <string>v9wttpbfk9.skadnetwork</string>
  </dict>
  <dict>
    <key>SKAdNetworkIdentifier</key>
    <string>n38lu8286q.skadnetwork</string>
  </dict>
  <dict>
    <key>SKAdNetworkIdentifier</key>
    <string>47vhws6wlr.skadnetwork</string>
  </dict>
  <dict>
    <key>SKAdNetworkIdentifier</key>
    <string>kbd757ywx3.skadnetwork</string>
  </dict>
  <dict>
    <key>SKAdNetworkIdentifier</key>
    <string>9t245vhmpl.skadnetwork</string>
  </dict>
  <dict>
    <key>SKAdNetworkIdentifier</key>
    <string>eh6m2bh4zr.skadnetwork</string>
  </dict>
  <dict>
    <key>SKAdNetworkIdentifier</key>
    <string>a2p9lx4jpn.skadnetwork</string>
  </dict>
  <dict>
    <key>SKAdNetworkIdentifier</key>
    <string>22mmun2rn5.skadnetwork</string>
  </dict>
  <dict>
    <key>SKAdNetworkIdentifier</key>
    <string>4468km3ulz.skadnetwork</string>
  </dict>
  <dict>
    <key>SKAdNetworkIdentifier</key>
    <string>2u9pt9hc89.skadnetwork</string>
  </dict>
  <dict>
    <key>SKAdNetworkIdentifier</key>
    <string>8s468mfl3y.skadnetwork</string>
  </dict>
  <dict>
    <key>SKAdNetworkIdentifier</key>
    <string>klf5c3l5u5.skadnetwork</string>
  </dict>
  <dict>
    <key>SKAdNetworkIdentifier</key>
    <string>ppxm28t8ap.skadnetwork</string>
  </dict>
  <dict>
    <key>SKAdNetworkIdentifier</key>
    <string>ecpz2srf59.skadnetwork</string>
  </dict>
  <dict>
    <key>SKAdNetworkIdentifier</key>
    <string>uw77j35x4d.skadnetwork</string>
  </dict>
  <dict>
    <key>SKAdNetworkIdentifier</key>
    <string>pwa73g5rt2.skadnetwork</string>
  </dict>
  <dict>
    <key>SKAdNetworkIdentifier</key>
    <string>mlmmfzh3r3.skadnetwork</string>
  </dict>
  <dict>
    <key>SKAdNetworkIdentifier</key>
    <string>578prtvx9j.skadnetwork</string>
  </dict>
  <dict>
    <key>SKAdNetworkIdentifier</key>
    <string>4dzt52r2t5.skadnetwork</string>
  </dict>
  <dict>
    <key>SKAdNetworkIdentifier</key>
    <string>e5fvkxwrpn.skadnetwork</string>
  </dict>
  <dict>
    <key>SKAdNetworkIdentifier</key>
    <string>8c4e2ghe7u.skadnetwork</string>
  </dict>
  <dict>
    <key>SKAdNetworkIdentifier</key>
    <string>zq492l623r.skadnetwork</string>
  </dict>
  <dict>
    <key>SKAdNetworkIdentifier</key>
    <string>3rd42ekr43.skadnetwork</string>
  </dict>
  <dict>
    <key>SKAdNetworkIdentifier</key>
    <string>3qcr597p9d.skadnetwork</string>
  </dict>
</array>
बेहतर इनीशियलाइज़ेशन परफ़ॉर्मेंस के लिए, अपने यील्ड ग्रुप को उन खास ऐप्लिकेशन से जोड़ना ज़रूरी है जिनमें उनका इस्तेमाल किया जाता है. आपके खाते के सभी iOS ऐप्लिकेशन को ऐसे यील्ड ग्रुप कॉन्फ़िगरेशन भेजे जाएंगे जो iOS को टारगेट करते हों और किसी खास ऐप्लिकेशन से जुड़े न हों. इससे, शुरू होने में ज़्यादा समय लग सकता है.
असली ऐप्लिकेशन में, सैंपल ऐप्लिकेशन आईडी को अपने असलAd Manager ऐप्लिकेशन आईडी से बदलें. अगर Hello World ऐप्लिकेशन में, SDK टूल के साथ प्रयोग किया जा रहा है, तो सैंपल आईडी का इस्तेमाल किया जा सकता है.
Mobile Ads SDK शुरू करें
विज्ञापन लोड करने से पहले, GADMobileAds.sharedInstance पर startWithCompletionHandler: तरीके को कॉल करें. इससे SDK टूल शुरू होता है और शुरू होने के बाद (या 30 सेकंड के टाइम आउट के बाद) पूरा होने वाले हैंडलर को वापस कॉल किया जाता है. यह काम सिर्फ़ एक बार करना होता है, आम तौर पर ऐप्लिकेशन लॉन्च करते समय. आपको startWithCompletionHandler: को जल्द से जल्द कॉल करना चाहिए.
यहां दिए गए उदाहरण में बताया गया है कि आपके AppDelegate में startWithCompletionHandler: वाले तरीके को कैसे कॉल किया जा सकता है:
उदाहरण के लिए AppDelegate (उदाहरण)
Swift
import GoogleMobileAds

@UIApplicationMain
class AppDelegate: UIResponder, UIApplicationDelegate {

  func application(_ application: UIApplication,
      didFinishLaunchingWithOptions launchOptions: [UIApplication.LaunchOptionsKey: Any]?) -> Bool {

    GADMobileAds.sharedInstance().start(completionHandler: nil)

    return true
  }
}
SwiftUI
import GoogleMobileAds

class AppDelegate: UIResponder, UIApplicationDelegate {

  func application(_ application: UIApplication,
      didFinishLaunchingWithOptions launchOptions: [UIApplication.LaunchOptionsKey: Any]?) -> Bool {

    GADMobileAds.sharedInstance().start(completionHandler: nil)

    return true
  }
}

@main
struct YourApp: App {
  // To handle app delegate callbacks in an app that uses the SwiftUI lifecycle,
  // you must create an application delegate and attach it to your `App` struct
  // using `UIApplicationDelegateAdaptor`.
  @UIApplicationDelegateAdaptor(AppDelegate.self) var appDelegate

  var body: some Scene {
    WindowGroup {
      NavigationView {
        ContentView()
      }
    }
  }
}
Objective-C
@import GoogleMobileAds;

@implementation AppDelegate

- (BOOL)application:(UIApplication *)application
    didFinishLaunchingWithOptions:(NSDictionary *)launchOptions {

  [GADMobileAds.sharedInstance startWithCompletionHandler:nil];
  return YES;
}

@end
कोई विज्ञापन फ़ॉर्मैट चुनें
मोबाइल विज्ञापन SDK टूल को अब इंपोर्ट और शुरू कर दिया गया है. अब आप विज्ञापन दिखाने के लिए तैयार हैं. Ad Manager इसमें कई अलग-अलग विज्ञापन फ़ॉर्मैट मौजूद हैं, ताकि आप अपने ऐप्लिकेशन के उपयोगकर्ता अनुभव के लिए, सबसे सही फ़ॉर्मैट चुन सकें.
SwiftUI डेवलपर के लिए, हमारी SwiftUI गाइड देखें.
बैनर

बैनर विज्ञापन यूनिट, आयताकार विज्ञापन दिखाती हैं. ये विज्ञापन किसी ऐप्लिकेशन के लेआउट का कुछ हिस्सा घेरते हैं. वे तय समय के बाद अपने-आप रीफ़्रेश हो सकते हैं. मतलब
मध्यवर्ती

पेज पर अचानक दिखने वाली विज्ञापन यूनिट आपके ऐप्लिकेशन में पूरे पेज के विज्ञापन दिखाती हैं. उन्हें अपने ऐप्लिकेशन के इंटरफ़ेस में स्वाभाविक ब्रेक और ट्रांज़िशन पर रखें, जैसे कि किसी गेमिंग ऐप्लिकेशन में लेवल पूरा होने के बाद.
अचानक दिखने वाले (इंटरस्टीशियल) विज्ञापन लागू करना
नेटिव लेआउट

नेटिव विज्ञापन ऐसे विज्ञापन होते हैं जहां आप अपने ऐप्लिकेशन में हेडलाइन और कॉल-टू-ऐक्शन जैसी एसेट को अपनी पसंद के मुताबिक दिखा सकते हैं. विज्ञापन की स्टाइल तय करके, नैचुरल और रुकावट न डालने वाला विज्ञापन प्रज़ेंटेशन बनाया जा सकता है. इससे आपको बेहतर उपयोगकर्ता अनुभव मिलेगा.
Google Ad Manager में नेटिव विज्ञापनों को लागू करने के दो तरीके हैं: नेटिव स्टाइल और कस्टम रेंडरिंग की मदद से स्टैंडर्ड नेटिव विज्ञापन.
नेटिव विज्ञापनों को नेटिव विज्ञापनों को आसानी से लागू करने के लिए डिज़ाइन किया गया है. अगर आपके लिए यह फ़ॉर्मैट नया है, तो आपके लिए यह एक बेहतरीन विकल्प है. कस्टम रेंडरिंग को इस तरह से डिज़ाइन किया गया है कि आपको अपना प्रज़ेंटेशन बनाने में ज़्यादा आसानी हो.
नेटिव स्टाइल लागू करें नेटिव विज्ञापन लागू करें (कस्टम रेंडरिंग)
इनाम दिया गया

इनाम वाली विज्ञापन यूनिट की मदद से उपयोगकर्ता गेम खेल सकते हैं, सर्वे में हिस्सा ले सकते हैं या वीडियो देखने की सुविधा से ऐप्लिकेशन में इनाम, जैसे कि सिक्के, खेलने के कुछ और मौके या पॉइंट पा सकते हैं. अलग-अलग विज्ञापन यूनिट के लिए अलग-अलग इनाम सेट किए जा सकते हैं. साथ ही, यह भी बताया जा सकता है कि इनाम की वैल्यू और उपयोगकर्ता को कितने आइटम मिले.
इनाम वाले इंटरस्टीशियल विज्ञापन

इनाम वाले इंटरस्टीशियल विज्ञापन, नई तरह का फ़ायदा देने वाला विज्ञापन फ़ॉर्मैट है. इसकी मदद से, ऐप्लिकेशन में ट्रांज़िशन के दौरान अपने-आप दिखने वाले विज्ञापनों के लिए, कॉइन या खेलने के कुछ और इनाम जैसे इनाम ऑफ़र किए जा सकते हैं.
इनाम वाले विज्ञापनों से अलग, उपयोगकर्ताओं को इनाम वाले इंटरस्टीशियल विज्ञापन देखने के लिए, ऑप्ट-इन करना ज़रूरी नहीं होता.
इनाम वाले विज्ञापनों में ऑप्ट-इन करने के लिए प्रॉम्प्ट के बजाय, इनाम वाले इंटरस्टीशियल विज्ञापनों को एक इंट्रो स्क्रीन की ज़रूरत होती है जो इनाम के बारे में बताती है. साथ ही, अगर उपयोगकर्ता ऐसा करना चाहती है, तो उसे ऑप्ट-आउट करने का विकल्प भी देती है.
इनाम वाले इंटरस्टीशियल विज्ञापन लागू करना
ऐप्लिकेशन खोलने पर दिखने वाला विज्ञापन

ऐप्लिकेशन खोलने पर दिखने वाला एक विज्ञापन फ़ॉर्मैट है, जो तब दिखता है, जब उपयोगकर्ता आपके ऐप्लिकेशन को खोलते हैं या उस पर वापस स्विच करते हैं. यह विज्ञापन, लोड होने वाली स्क्रीन को ओवरले करता है.