Google User Messaging Platform (UMP) SDK 是一款隐私权和消息工具,可帮助您管理隐私选项。如需了解详情,请参阅“隐私权和消息”页面简介。
创建消息类型
在 Ad Manager 账号的隐私权和消息标签页下,使用可用的用户消息类型之一创建用户消息。UMP SDK 会尝试显示根据项目中设置的 Ad Manager 应用 ID 创建的隐私权消息。
如需了解详情,请参阅隐私权和消息简介。
导入 SDK
CocoaPods(首选)
如要将该 SDK 导入 iOS 项目,最简便的方法就是使用 CocoaPods。请打开项目的 Podfile 并将下面这行代码添加到应用的目标中:
pod 'GoogleUserMessagingPlatform'
然后运行以下命令:
pod install --repo-update如果您刚开始接触 CocoaPods,请参阅如何使用 CocoaPods,详细了解如何创建和使用 Podfile。
Swift Package Manager
UMP SDK 还支持 Swift Package Manager。请按照以下步骤导入 Swift 软件包。
在 Xcode 中,依次前往“File”(文件)>“Add Packages…”(添加软件包…),安装 UMP SDK Swift 软件包。
在显示的提示中,搜索 UMP SDK Swift 软件包 GitHub 代码库:
https://github.com/googleads/swift-package-manager-google-user-messaging-platform.git选择要使用的 UMP SDK Swift 软件包版本。对于新项目,我们建议使用 Up to Next Major Version(更新至下一主要版本前的最新版)规则。
然后,Xcode 会解析您的软件包依赖项,并在后台下载它们。如需详细了解如何添加软件包依赖项,请参阅 Apple 的文章。
手动下载
另一种方法是手动导入 SDK。
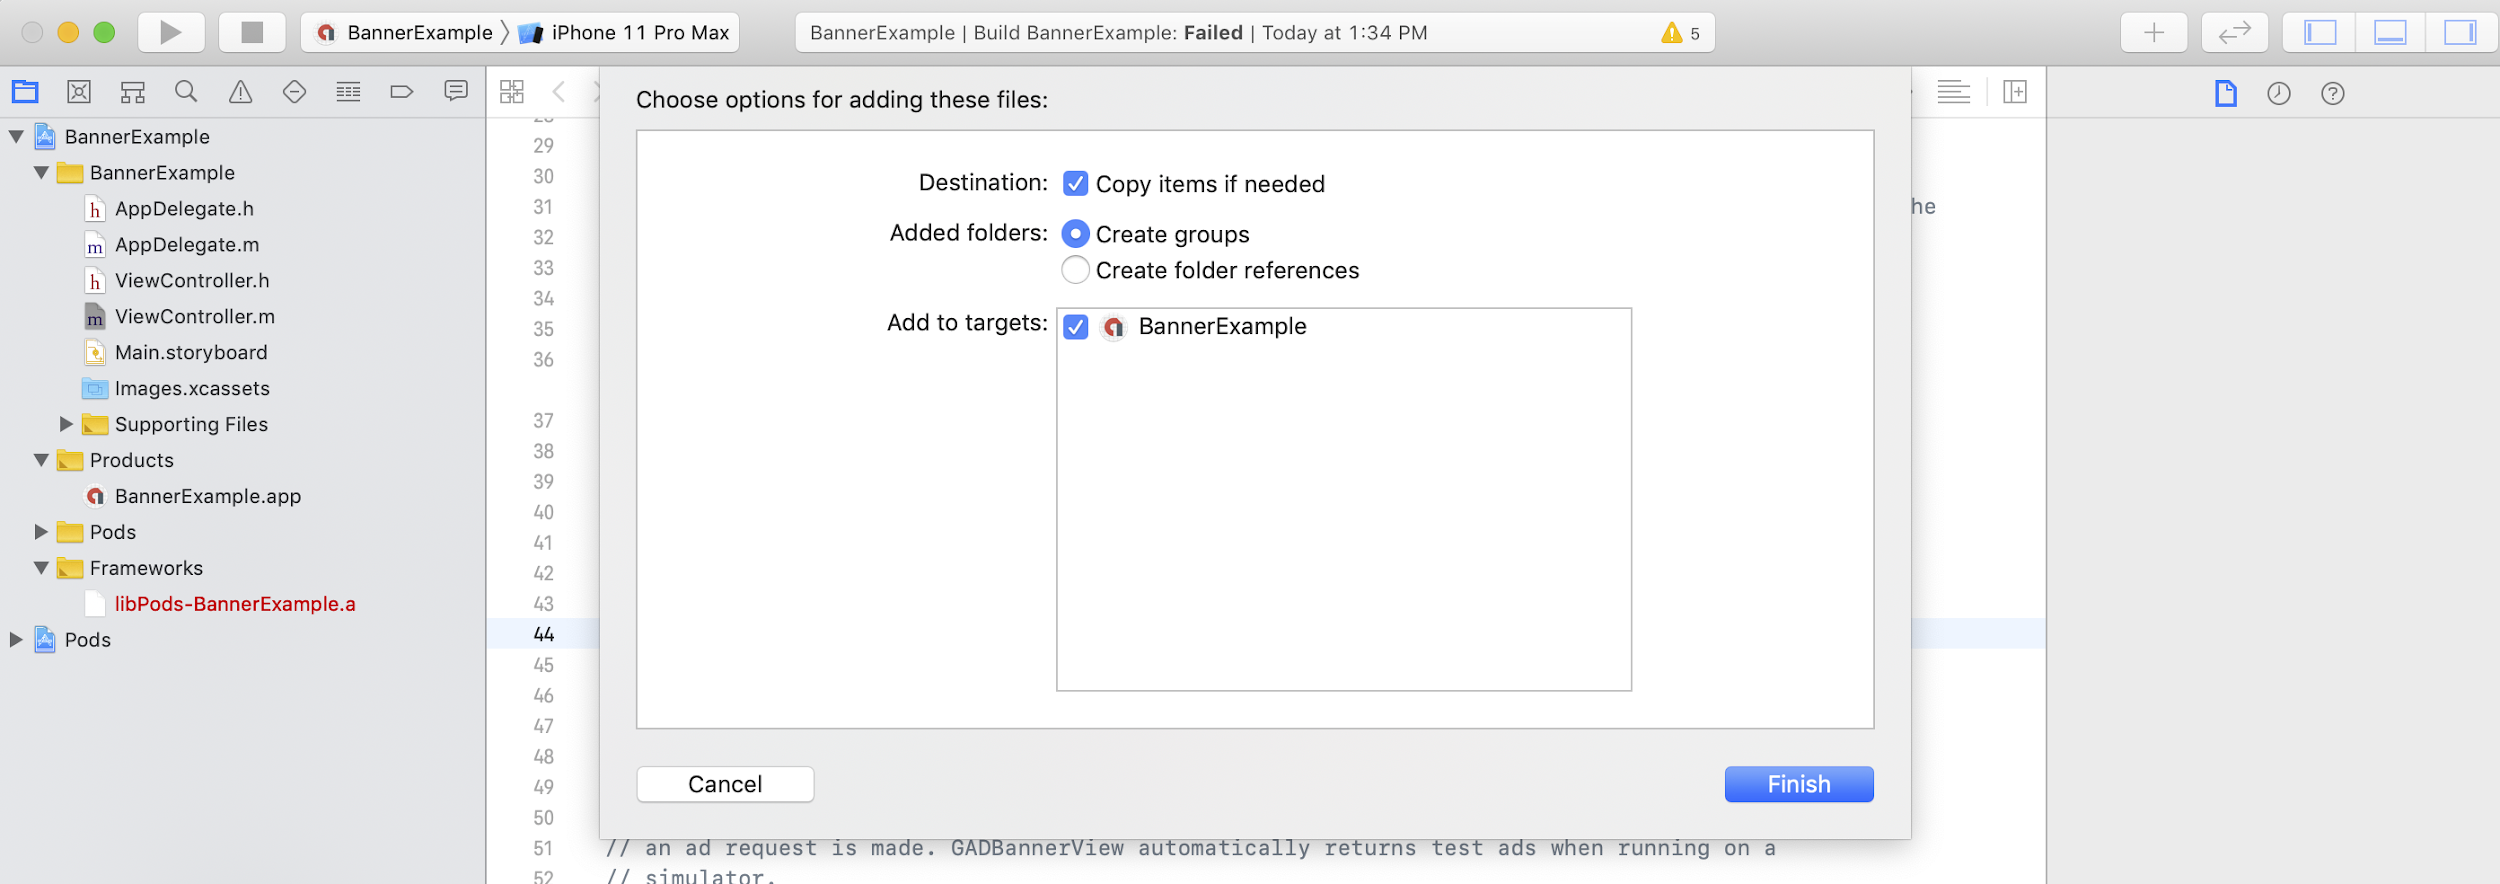
然后,将框架拖入您的 Xcode 项目中,确保已选中 Copy items if needed。

然后便可以将该框架包含在需要使用的任何文件中:
Swift
import UserMessagingPlatform
Objective-C
#include <UserMessagingPlatform/UserMessagingPlatform.h>
添加应用 ID
您可以在 Ad Manager 界面中找到您的应用 ID。
使用以下代码段将 ID 添加到您的 Info.plist:
<key>GADApplicationIdentifier</key>
<string>ca-app-pub-xxxxxxxxxxxxxxxx~yyyyyyyyyy</string>
获取用户的意见征求信息
每次启动应用时,您都应使用
requestConsentInfoUpdate(with:completionHandler:) 请求更新用户的意见征求信息。此请求会检查以下内容:
- 是否需要征得用户同意。例如,用户是首次需要提供意见征求结果,或者之前的意见征求结果已过期。
- 是否需要隐私设置选项入口点。某些隐私权消息要求应用允许用户随时修改其隐私权选项。
Swift
// Requesting an update to consent information should be called on every app launch.
ConsentInformation.shared.requestConsentInfoUpdate(with: parameters) {
requestConsentError in
// ...
}
SwiftUI
// Requesting an update to consent information should be called on every app launch.
ConsentInformation.shared.requestConsentInfoUpdate(with: parameters) {
requestConsentError in
// ...
}
Objective-C
// Requesting an update to consent information should be called on every app launch.
[UMPConsentInformation.sharedInstance
requestConsentInfoUpdateWithParameters:parameters
completionHandler:^(NSError *_Nullable requestConsentError) {
// ...
}];
加载并显示隐私权消息表单
在收到最新的用户同意情况后,请调用
loadAndPresentIfRequired(from:) 以加载收集用户同意情况所需的任何表单。加载后,表单会立即显示。
Swift
try await ConsentForm.loadAndPresentIfRequired(from: viewController)
SwiftUI
try await ConsentForm.loadAndPresentIfRequired(from: nil)
Objective-C
[UMPConsentForm
loadAndPresentIfRequiredFromViewController:viewController
completionHandler:^(NSError *_Nullable loadAndPresentError) {
// Consent gathering process is complete.
}];
隐私设置选项
某些隐私权消息表单是通过发布商呈现的隐私权选项入口点显示的,可让用户随时管理自己的隐私权选项。如需详细了解用户在隐私权选项入口点会看到哪种消息,请参阅可用的用户消息类型。
检查是否需要隐私设置选项入口点
调用
requestConsentInfoUpdate(with:completionHandler:) 后,请检查
UMPConsentInformation.sharedInstance.privacyOptionsRequirementStatus 以确定您的应用是否需要隐私选项入口点。如果需要入口点,请向应用添加一个可见且可互动的界面元素,用于显示隐私选项表单。如果不需要隐私权入口点,请将界面元素配置为不可见且可互动。
Swift
var isPrivacyOptionsRequired: Bool {
return ConsentInformation.shared.privacyOptionsRequirementStatus == .required
}
Objective-C
- (BOOL)isPrivacyOptionsRequired {
return UMPConsentInformation.sharedInstance.privacyOptionsRequirementStatus ==
UMPPrivacyOptionsRequirementStatusRequired;
}
如需查看隐私权选项要求状态的完整列表,请参阅
UMPPrivacyOptionsRequirementStatus。
显示隐私设置选项表单
当用户与您的元素互动时,显示隐私选项表单:
Swift
try await ConsentForm.presentPrivacyOptionsForm(from: viewController)
SwiftUI
try await ConsentForm.presentPrivacyOptionsForm(from: nil)
Objective-C
[UMPConsentForm presentPrivacyOptionsFormFromViewController:viewController
completionHandler:completionHandler];
征得用户同意后请求广告
在请求广告之前,请使用
UMPConsentInformation.sharedInstance.canRequestAds 检查您是否已征得用户同意:
Swift
ConsentInformation.shared.canRequestAds
Objective-C
UMPConsentInformation.sharedInstance.canRequestAds;
以下列出了在征得用户同意的同时,您可以检查是否可以请求广告的位置:
- 在 UMP SDK 在当前会话中征得用户同意后。
- 在您调用
requestConsentInfoUpdate(with:completionHandler:)后立即调用。UMP SDK 可能已在之前的应用会话中征得用户同意。
如果在征求用户同意的过程中发生错误,请检查您是否可以请求广告。UMP SDK 会使用上一个应用会话中的意见征求状态。
防止出现冗余的广告请求工作
在征得用户同意后以及在调用
requestConsentInfoUpdate(with:completionHandler:) 后检查
UMPConsentInformation.sharedInstance.canRequestAds 时,请确保您的逻辑可防止冗余的广告请求,因为这些请求可能会导致两次检查都返回 true。例如,使用布尔值变量。
测试
如果您希望在应用开发过程中测试集成,请按照以下步骤以编程方式注册您的测试设备。在发布应用之前,请务必移除用于设置这些测试设备 ID 的代码。
- 欢迎致电
requestConsentInfoUpdate(with:completionHandler:)。 检查日志输出,以查找类似于以下示例的消息,其中会显示您的设备 ID 以及如何将设备添加为测试设备:
<UMP SDK>To enable debug mode for this device, set: UMPDebugSettings.testDeviceIdentifiers = @[2077ef9a63d2b398840261c8221a0c9b]将测试设备 ID 复制到剪贴板。
修改代码,以便调用
UMPDebugSettings().testDeviceIdentifiers并传入您的测试设备 ID 列表。Swift
let parameters = RequestParameters()
let debugSettings = DebugSettings()

debugSettings.testDeviceIdentifiers = ["TEST-DEVICE-HASHED-ID"]
parameters.debugSettings = debugSettings

// Include the UMPRequestParameters in your consent request.
ConsentInformation.shared.requestConsentInfoUpdate(
    with: parameters,
    completionHandler: { error in
      // ...
    })
Objective-C
UMPRequestParameters *parameters = [[UMPRequestParameters alloc] init];
UMPDebugSettings *debugSettings = [[UMPDebugSettings alloc] init];

debugSettings.testDeviceIdentifiers = @[ @"TEST-DEVICE-HASHED-ID" ];
parameters.debugSettings = debugSettings;

// Include the UMPRequestParameters in your consent request.
[UMPConsentInformation.sharedInstance
    requestConsentInfoUpdateWithParameters:parameters
                        completionHandler:^(NSError *_Nullable error){
                          // ...
}];
强制调试地理位置
UMP SDK 提供了一种方法:使用
geography 测试您的应用行为,就像设备位于欧洲经济区 (EEA) 或英国等各种区域境内一样。请注意,调试设置仅适用于测试设备。
Swift
let parameters = RequestParameters()
let debugSettings = DebugSettings()

debugSettings.testDeviceIdentifiers = ["TEST-DEVICE-HASHED-ID"]
debugSettings.geography = .EEA
parameters.debugSettings = debugSettings

// Include the UMPRequestParameters in your consent request.
ConsentInformation.shared.requestConsentInfoUpdate(
    with: parameters,
    completionHandler: { error in
      // ...
    })
Objective-C
UMPRequestParameters *parameters = [[UMPRequestParameters alloc] init];
UMPDebugSettings *debugSettings = [[UMPDebugSettings alloc] init];

debugSettings.testDeviceIdentifiers = @[ @"TEST-DEVICE-HASHED-ID" ];
debugSettings.geography = UMPDebugGeographyEEA;
parameters.debugSettings = debugSettings;

// Include the UMPRequestParameters in your consent request.
[UMPConsentInformation.sharedInstance
    requestConsentInfoUpdateWithParameters:parameters
                         completionHandler:^(NSError *_Nullable error){
                           // ...
}];
重置用户同意情况
通过 UMP SDK 测试应用时,您可能会发现重置 SDK 的状态很实用,因为您可以模拟用户的首次安装体验。该 SDK 提供的 reset 方法可实现此目的。
Swift
ConsentInformation.shared.reset()
Objective-C
[UMPConsentInformation.sharedInstance reset];
GitHub 上的示例
如需查看本页中介绍的 UMP SDK 集成的完整示例,请参阅

