Depth API ช่วยให้กล้องของอุปกรณ์ทราบถึงขนาดและรูปร่างของวัตถุจริงในฉาก ด้วยการใช้กล้องเพื่อสร้างรูปภาพความลึกหรือแผนที่ที่มีความลึก ซึ่งจะช่วยเพิ่มความสมจริงของ AR อีกชั้นหนึ่งลงในแอป คุณสามารถใช้ข้อมูลที่ได้จากรูปภาพความลึกเพื่อทำให้วัตถุเสมือนปรากฏด้านหน้าหรือด้านหลังวัตถุในโลกจริงได้อย่างถูกต้อง ซึ่งช่วยให้เกิดประสบการณ์ของผู้ใช้ที่สมจริงและสมจริง
ข้อมูลความลึกคำนวณจากการเคลื่อนไหวและอาจรวมกับข้อมูลจากเซ็นเซอร์วัดความลึกของฮาร์ดแวร์ เช่น เซ็นเซอร์ตรวจจับช่วงเวลาการบิน (ToF) หากมี อุปกรณ์ไม่ต้องใช้เซ็นเซอร์ ToF เพื่อรองรับ Depth API
ข้อกำหนดเบื้องต้น
ตรวจสอบว่าคุณเข้าใจแนวคิด AR พื้นฐาน และวิธีกําหนดค่าเซสชัน ARCore ก่อนดำเนินการต่อ
จำกัดการเข้าถึงเฉพาะอุปกรณ์ที่รองรับความลึก
หากแอปของคุณต้องการการรองรับ Depth API ซึ่งอาจเป็นเพราะส่วนหลักของ
ประสบการณ์ AR ต้องอาศัยความลึก หรือเพราะไม่มีสิ่งสำรองที่สวยงามสำหรับ
ของแอปที่ใช้ความลึก คุณอาจเลือกจำกัดการเผยแพร่
ใน Google Play Store เพื่อ
อุปกรณ์ที่รองรับ Depth API ด้วยการเพิ่ม
บรรทัดต่อไปนี้ลงใน AndroidManifest.xml นอกเหนือจาก
การเปลี่ยนแปลง AndroidManifest.xml รายการที่อธิบายไว้ใน
คู่มือเปิดใช้ ARCore
<uses-feature android:name="com.google.ar.core.depth" />
เปิดใช้ความลึก
ในเซสชัน ARCore ใหม่ ให้ตรวจสอบว่าอุปกรณ์ของผู้ใช้รองรับความลึกหรือไม่ อุปกรณ์ที่เข้ากันได้กับ ARCore บางรุ่นอาจไม่รองรับ Depth API เนื่องจากข้อจำกัดด้านพลังงานในการประมวลผล เพื่อประหยัดทรัพยากร ระบบจะปิดใช้ความลึกใน ARCore ตามค่าเริ่มต้น เปิดใช้โหมดความลึกเพื่อให้แอปใช้ Depth API
// Check whether the user's device supports the Depth API.
int32_t is_depth_supported = 0;
ArSession_isDepthModeSupported(ar_session, AR_DEPTH_MODE_AUTOMATIC,
                               &is_depth_supported);

// Configure the session for AR_DEPTH_MODE_AUTOMATIC.
ArConfig* ar_config = NULL;
ArConfig_create(ar_session, &ar_config);
if (is_depth_supported) {
  ArConfig_setDepthMode(ar_session, ar_config, AR_DEPTH_MODE_AUTOMATIC);
}
CHECK(ArSession_configure(ar_session, ar_config) == AR_SUCCESS);
ArConfig_destroy(ar_config);
ได้รูปภาพความลึก
เรียก ArFrame_acquireDepthImage16Bits() เพื่อรับรูปภาพความลึกของเฟรมปัจจุบัน
// Retrieve the depth image for the current frame, if available.
ArImage* depth_image = NULL;
// If a depth image is available, use it here.
if (ArFrame_acquireDepthImage16Bits(ar_session, ar_frame, &depth_image) !=
    AR_SUCCESS) {
  // No depth image received for this frame.
  // This normally means that depth data is not available yet.
  // Depth data will not be available if there are no tracked
  // feature points. This can happen when there is no motion, or when the
  // camera loses its ability to track objects in the surrounding
  // environment.
  return;
}
รูปภาพที่ส่งคืนจะมีบัฟเฟอร์รูปภาพแบบ RAW ซึ่งสามารถส่งผ่านไปยังตัวปรับแสงเงา Fragment สำหรับการใช้งานบน GPU สำหรับวัตถุที่แสดงผลแต่ละอ็อบเจกต์ ซึ่งอยู่ใน AR_COORDINATES_2D_OPENGL_NORMALIZED_DEVICE_COORDINATES และจะเปลี่ยนเป็น AR_COORDINATES_2D_TEXTURE_NORMALIZED ได้โดยโทรไปที่ ArFrame_transformCoordinates2d() เมื่อเข้าถึงรูปภาพความลึกภายในเครื่องมือปรับแสงเงาวัตถุ การวัดความลึกเหล่านี้จะเข้าถึงการวัดความลึกเหล่านี้ได้โดยตรงสำหรับการจัดการการซ้อนทับ
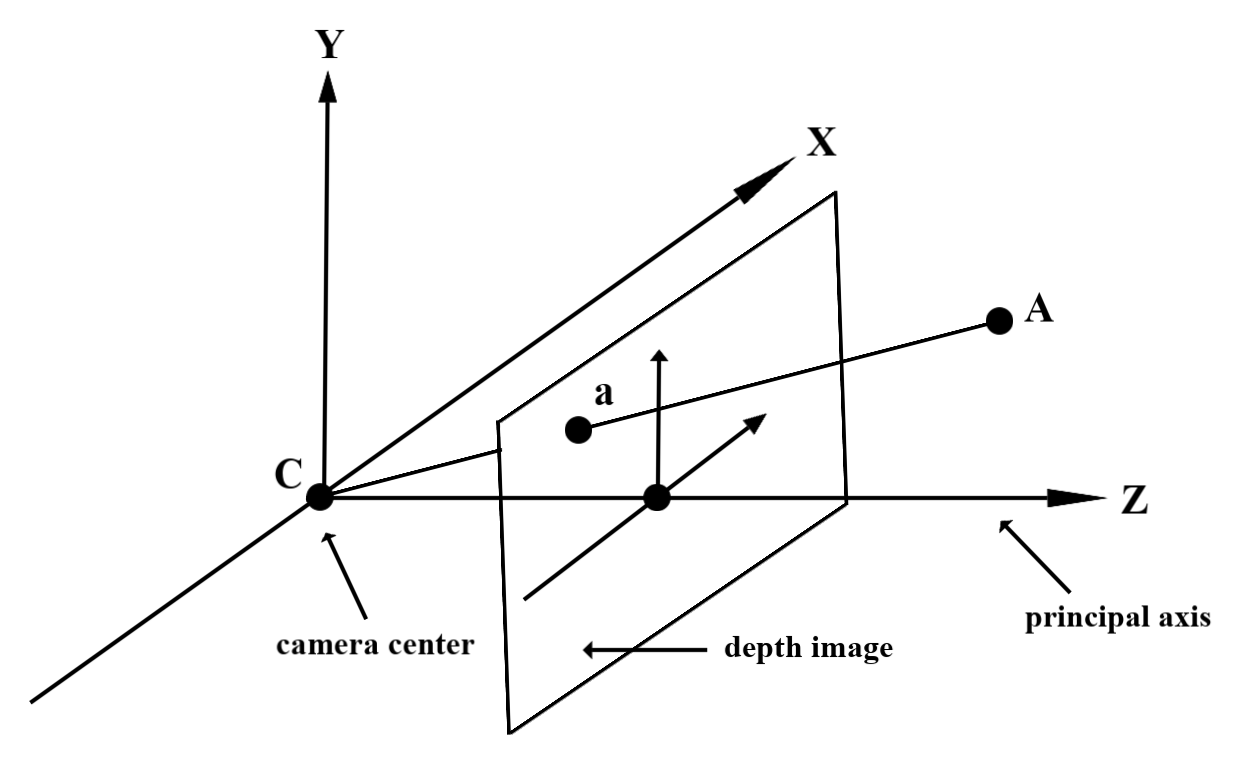
ทำความเข้าใจค่าความลึก
ได้จุด A บนรูปทรงเรขาคณิตที่พบได้จริงและจุด 2 มิติ a
แสดงจุดเดียวกันในรูปภาพความลึก ซึ่งเป็นค่าที่ระบุโดยความลึก
API ที่ a เท่ากับความยาวของ CA ที่คาดการณ์บนแกนหลัก
นี้อาจเรียกว่าพิกัด z ของ A ที่สัมพันธ์กับกล้อง
ต้นทาง C เมื่อทำงานกับ Depth API คุณควรเข้าใจว่า
ค่าความลึกไม่ใช่ความยาวของแสง CA เอง แต่เป็นเส้นโครง
จากส่วนนี้
ใช้ความลึกในตัวสร้างเฉดสี
แยกวิเคราะห์ข้อมูลความลึกสำหรับเฟรมปัจจุบัน
ใช้ฟังก์ชันตัวช่วย DepthGetMillimeters() และ DepthGetVisibility() ในตัวปรับแสงเงา Fragment เพื่อเข้าถึงข้อมูลความลึกสำหรับตำแหน่งปัจจุบันของหน้าจอ จากนั้นใช้ข้อมูลนี้เพื่อเลือกบางส่วนของออบเจ็กต์ที่แสดงผล
// Use DepthGetMillimeters() and DepthGetVisibility() to parse the depth image
// for a given pixel, and compare against the depth of the object to render.
float DepthGetMillimeters(in sampler2D depth_texture, in vec2 depth_uv) {
  // Depth is packed into the red and green components of its texture.
  // The texture is a normalized format, storing millimeters.
  vec3 packedDepthAndVisibility = texture2D(depth_texture, depth_uv).xyz;
  return dot(packedDepthAndVisibility.xy, vec2(255.0, 256.0 * 255.0));
}

// Return a value representing how visible or occluded a pixel is relative
// to the depth image. The range is 0.0 (not visible) to 1.0 (completely
// visible).
float DepthGetVisibility(in sampler2D depth_texture, in vec2 depth_uv,
                         in float asset_depth_mm) {
  float depth_mm = DepthGetMillimeters(depth_texture, depth_uv);

  // Instead of a hard Z-buffer test, allow the asset to fade into the
  // background along a 2 * kDepthTolerancePerMm * asset_depth_mm
  // range centered on the background depth.
  const float kDepthTolerancePerMm = 0.015f;
  float visibility_occlusion = clamp(0.5 * (depth_mm - asset_depth_mm) /
    (kDepthTolerancePerMm * asset_depth_mm) + 0.5, 0.0, 1.0);

 // Use visibility_depth_near to set the minimum depth value. If using
 // this value for occlusion, avoid setting it too close to zero. A depth value
 // of zero signifies that there is no depth data to be found.
  float visibility_depth_near = 1.0 - InverseLerp(
      depth_mm, /*min_depth_mm=*/150.0, /*max_depth_mm=*/200.0);

  // Use visibility_depth_far to set the maximum depth value. If the depth
  // value is too high (outside the range specified by visibility_depth_far),
  // the virtual object may get inaccurately occluded at further distances
  // due to too much noise.
  float visibility_depth_far = InverseLerp(
      depth_mm, /*min_depth_mm=*/7500.0, /*max_depth_mm=*/8000.0);

  const float kOcclusionAlpha = 0.0f;
  float visibility =
      max(max(visibility_occlusion, kOcclusionAlpha),
          max(visibility_depth_near, visibility_depth_far));

  return visibility;
}
แยกวัตถุเสมือนออก
แยกวัตถุเสมือนออกจากกันในส่วนเนื้อหาของเฉดสีแฟรกเมนต์ อัปเดตช่องอัลฟ่าของวัตถุตามความลึก วิธีนี้จะแสดงผลวัตถุที่ถูกปิดกั้น
// Occlude virtual objects by updating the object’s alpha channel based on its depth.
const float kMetersToMillimeters = 1000.0;

float asset_depth_mm = v_ViewPosition.z * kMetersToMillimeters * -1.;

// Compute the texture coordinates to sample from the depth image.
vec2 depth_uvs = (u_DepthUvTransform * vec3(v_ScreenSpacePosition.xy, 1)).xy;

gl_FragColor.a *= DepthGetVisibility(u_DepthTexture, depth_uvs, asset_depth_mm);
คุณแสดงผลการบังได้โดยใช้การแสดงผลแบบ 2 พาสหรือการแสดงผลต่อวัตถุ นั่นคือ การส่งการส่งต่อ ประสิทธิภาพของแต่ละวิธีขึ้นอยู่กับความซับซ้อนของสถานการณ์และข้อพิจารณาเฉพาะอื่นๆ ของแอป
การแสดงผลแบบ Forward Pass ต่อวัตถุ
การแสดงผลแบบส่งต่อต่อวัตถุจะเป็นตัวกำหนดการบดบังแต่ละพิกเซลของวัตถุในตัวปรับแสงเงาวัสดุ หากมองไม่เห็นพิกเซลก็จะถูกตัดออก โดยทั่วไปแล้วจะทำผ่านการผสานอัลฟ่า ซึ่งเป็นการจำลองการซ้อนทับบนอุปกรณ์ของผู้ใช้
การแสดงผลแบบ 2 บัตรผ่าน
ด้วยการแสดงผลแบบ 2 บัตรผ่าน การส่งครั้งแรกจะแสดงเนื้อหาเสมือนทั้งหมดลงในบัฟเฟอร์ตัวกลาง ส่วนที่สองจะผสานฉากเสมือนจริงลงบนพื้นหลัง โดยอิงตามความแตกต่างระหว่างความลึกในโลกแห่งความจริงกับความลึกของฉากเสมือนจริง วิธีนี้ไม่จำเป็นต้องใช้ตัวปรับแสงเงาเฉพาะออบเจ็กต์เพิ่มเติม และโดยทั่วไปแล้วจะให้ผลลัพธ์ที่ดูเป็นแบบเดียวกันมากกว่าวิธีส่งต่อผ่าน
การแปลงพิกัดระหว่างภาพจากกล้องกับภาพที่มีความลึก
รูปภาพที่ได้รับโดยใช้ ArFrame_acquireCameraImage() อาจมีสัดส่วนภาพต่างจากรูปภาพความลึก
ในกรณีนี้ รูปภาพที่มีความลึกเป็นการครอบตัดภาพจากกล้อง และพิกเซลบางพิกเซลในรูปภาพจากกล้องไม่ได้มีค่าประมาณความลึกที่ถูกต้องที่สอดคล้องกัน
วิธีรับพิกัดรูปภาพความลึกสำหรับพิกัดในอิมเมจ CPU
const float cpu_image_coordinates[] = {(float)cpu_coordinate_x,
                                 (float)cpu_coordinate_y};
float texture_coordinates[2];
ArFrame_transformCoordinates2d(
    ar_session, ar_frame, AR_COORDINATES_2D_IMAGE_PIXELS, 1,
    cpu_image_coordinates, AR_COORDINATES_2D_TEXTURE_NORMALIZED,
    texture_coordinates);
if (texture_coordinates[0] < 0 || texture_coordinates[1] < 0) {
  // There are no valid depth coordinates, because the coordinates in the CPU
  // image are in the cropped area of the depth image.
} else {
  int depth_image_width = 0;
  ArImage_getWidth(ar_session, depth_image, &depth_image_width);
  int depth_image_height = 0;
  ArImage_getHeight(ar_session, depth_image, &depth_image_height);

  int depth_coordinate_x = (int)(texture_coordinates[0] * depth_image_width);
  int depth_coordinate_y = (int)(texture_coordinates[1] * depth_image_height);
}
วิธีรับพิกัดรูปภาพ CPU สำหรับพิกัดรูปภาพความลึก
int depth_image_width = 0;
ArImage_getWidth(ar_session, depth_image, &depth_image_width);
int depth_image_height = 0;
ArImage_getHeight(ar_session, depth_image, &depth_image_height);

float texture_coordinates[] = {
    (float)depth_coordinate_x / (float)depth_image_width,
    (float)depth_coordinate_y / (float)depth_image_height};
float cpu_image_coordinates[2];
ArFrame_transformCoordinates2d(
    ar_session, ar_frame, AR_COORDINATES_2D_TEXTURE_NORMALIZED, 1,
    texture_coordinates, AR_COORDINATES_2D_IMAGE_PIXELS,
    cpu_image_coordinates);

int cpu_image_coordinate_x = (int)cpu_image_coordinates[0];
int cpu_image_coordinate_y = (int)cpu_image_coordinates[1];
การทดสอบความลึก
การทดสอบ Hit ช่วยให้ผู้ใช้วางวัตถุในตำแหน่งจริงของฉากได้ ก่อนหน้านี้ การทดสอบการชนจะทำได้บนเครื่องบินที่ตรวจพบเท่านั้น โดยจำกัดตำแหน่งไว้สำหรับพื้นราบที่มีขนาดใหญ่ เช่น ผลลัพธ์ที่แสดงโดย Android สีเขียว การทดสอบการเจาะลึกใช้ประโยชน์จากทั้งข้อมูลความลึกแบบเรียบๆ และแบบดิบ เพื่อให้ได้ผลลัพธ์ที่แม่นยำมากขึ้น แม้จะเป็นพื้นผิวที่ไม่ใช่ระนาบและมีพื้นผิวต่ำ ซึ่งจะแสดงพร้อมกับ Android สีแดง
หากต้องการใช้การทดสอบ Hit ที่เปิดใช้ความลึก ให้โทรหา ArFrame_hitTest() แล้วตรวจสอบ AR_TRACKABLE_DEPTH_POINT ในรายการการคืนสินค้า
// Create a hit test using the Depth API.
ArHitResultList* hit_result_list = NULL;
ArHitResultList_create(ar_session, &hit_result_list);
ArFrame_hitTest(ar_session, ar_frame, hit_x, hit_y, hit_result_list);

int32_t hit_result_list_size = 0;
ArHitResultList_getSize(ar_session, hit_result_list, &hit_result_list_size);

ArHitResult* ar_hit_result = NULL;
for (int32_t i = 0; i < hit_result_list_size; ++i) {
  ArHitResult* ar_hit = NULL;
  ArHitResult_create(ar_session, &ar_hit);
  ArHitResultList_getItem(ar_session, hit_result_list, i, ar_hit);

  ArTrackable* ar_trackable = NULL;
  ArHitResult_acquireTrackable(ar_session, ar_hit, &ar_trackable);
  ArTrackableType ar_trackable_type = AR_TRACKABLE_NOT_VALID;
  ArTrackable_getType(ar_session, ar_trackable, &ar_trackable_type);
  // Creates an anchor if a plane or an oriented point was hit.
  if (AR_TRACKABLE_DEPTH_POINT == ar_trackable_type) {
    // Do something with the hit result.
  }
  ArTrackable_release(ar_trackable);
  ArHitResult_destroy(ar_hit);
}

ArHitResultList_destroy(hit_result_list);
สิ่งที่จะเกิดขึ้นหลังจากนี้
- เปิดใช้การตรวจหาที่แม่นยำยิ่งขึ้นด้วย Raw Depth API
- ลองดู ARCore Depth Lab ซึ่งสาธิตวิธีต่างๆ ในการเข้าถึงข้อมูลความลึก