Depth API 可帮助设备的相机了解场景中真实对象的大小和形状。它使用相机来创建深度图像或深度图,从而为您的应用增添一层 AR 真实感。您可以使用深度图像提供的信息让虚拟对象准确显示在真实对象的前方或后方,从而实现沉浸式真实用户体验。
深度信息通过运动计算,可与来自硬件深度传感器(例如飞行时间 (ToF) 传感器(如有))的信息结合使用。设备不需要 ToF 传感器即可支持 Depth API。
前提条件
确保您了解 AR 基础概念 以及如何在继续之前配置 ARCore 现场录像。
仅限支持 Depth 的设备访问
如果您的应用需要 Depth API 支持,可能是因为
AR 体验依赖于深度,或者是因为没有完美的
应用中采用深度深度的版块,您可以选择限制
安装您的应用
支持 Depth API 的设备
除了AndroidManifest.xml
AndroidManifest.xml
启用 ARCore 指南:
<uses-feature android:name="com.google.ar.core.depth" />
启用景深数据
在新的 ARCore 会话中,检查用户的设备是否支持深度。由于处理能力限制,并非所有与 ARCore 兼容的设备都支持 Depth API。为节省资源,ARCore 默认停用深度。启用深度模式,让应用使用 Depth API。
Java
Config config = session.getConfig();

// Check whether the user's device supports the Depth API.
boolean isDepthSupported = session.isDepthModeSupported(Config.DepthMode.AUTOMATIC);
if (isDepthSupported) {
  config.setDepthMode(Config.DepthMode.AUTOMATIC);
}
session.configure(config);
Kotlin
val config = session.config

// Check whether the user's device supports the Depth API.
val isDepthSupported = session.isDepthModeSupported(Config.DepthMode.AUTOMATIC)
if (isDepthSupported) {
  config.depthMode = Config.DepthMode.AUTOMATIC
}
session.configure(config)
获取深度图像
调用 Frame.acquireDepthImage16Bits() 以获取当前帧的深度图像。
Java
// Retrieve the depth image for the current frame, if available.
Image depthImage = null;
try {
  depthImage = frame.acquireDepthImage16Bits();
  // Use the depth image here.
} catch (NotYetAvailableException e) {
  // This means that depth data is not available yet.
  // Depth data will not be available if there are no tracked
  // feature points. This can happen when there is no motion, or when the
  // camera loses its ability to track objects in the surrounding
  // environment.
} finally {
  if (depthImage != null) {
    depthImage.close();
  }
}
Kotlin
// Retrieve the depth image for the current frame, if available.
try {
  frame.acquireDepthImage16Bits().use { depthImage ->
    // Use the depth image here.
  }
} catch (e: NotYetAvailableException) {
  // This means that depth data is not available yet.
  // Depth data will not be available if there are no tracked
  // feature points. This can happen when there is no motion, or when the
  // camera loses its ability to track objects in the surrounding
  // environment.
}
返回的图像会提供原始图像缓冲区,您可以将其传递给片段着色器,以便在 GPU 上使用每个要被遮挡的渲染对象。它面向 OPENGL_NORMALIZED_DEVICE_COORDINATES,可通过调用 Frame.transformCoordinates2d() 更改为 TEXTURE_NORMALIZED。一旦可在对象着色器中访问深度图像,即可直接访问这些深度测量结果,以进行遮挡处理。
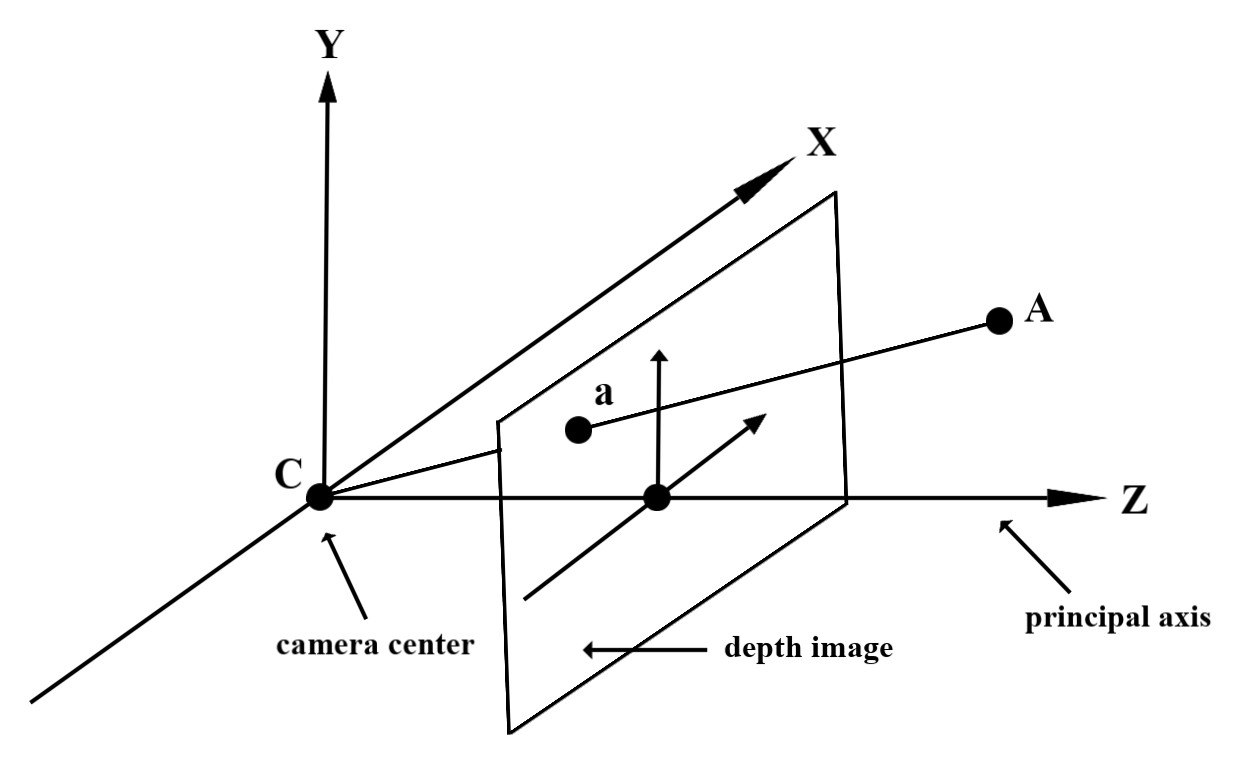
了解深度值
在观测到的真实几何图形上给定点 A 和 2D 点 a
深度图像中的相同点,深度值
a 处的 API 等于投影到主轴上的 CA 的长度。
这也可称为 A 相对于镜头的 z 坐标
来源:C。使用 Depth API 时,请务必了解
深度值不是光线 CA 本身的长度,而是投影
。
在着色器中使用深度
解析当前帧的深度信息
在 fragment 着色器中使用辅助函数 DepthGetMillimeters() 和 DepthGetVisibility() 来获取当前屏幕位置的深度信息。然后,使用此信息有选择地遮盖所渲染对象的某些部分。
// Use DepthGetMillimeters() and DepthGetVisibility() to parse the depth image
// for a given pixel, and compare against the depth of the object to render.
float DepthGetMillimeters(in sampler2D depth_texture, in vec2 depth_uv) {
  // Depth is packed into the red and green components of its texture.
  // The texture is a normalized format, storing millimeters.
  vec3 packedDepthAndVisibility = texture2D(depth_texture, depth_uv).xyz;
  return dot(packedDepthAndVisibility.xy, vec2(255.0, 256.0 * 255.0));
}

// Return a value representing how visible or occluded a pixel is relative
// to the depth image. The range is 0.0 (not visible) to 1.0 (completely
// visible).
float DepthGetVisibility(in sampler2D depth_texture, in vec2 depth_uv,
                         in float asset_depth_mm) {
  float depth_mm = DepthGetMillimeters(depth_texture, depth_uv);

  // Instead of a hard Z-buffer test, allow the asset to fade into the
  // background along a 2 * kDepthTolerancePerMm * asset_depth_mm
  // range centered on the background depth.
  const float kDepthTolerancePerMm = 0.015f;
  float visibility_occlusion = clamp(0.5 * (depth_mm - asset_depth_mm) /
    (kDepthTolerancePerMm * asset_depth_mm) + 0.5, 0.0, 1.0);

 // Use visibility_depth_near to set the minimum depth value. If using
 // this value for occlusion, avoid setting it too close to zero. A depth value
 // of zero signifies that there is no depth data to be found.
  float visibility_depth_near = 1.0 - InverseLerp(
      depth_mm, /*min_depth_mm=*/150.0, /*max_depth_mm=*/200.0);

  // Use visibility_depth_far to set the maximum depth value. If the depth
  // value is too high (outside the range specified by visibility_depth_far),
  // the virtual object may get inaccurately occluded at further distances
  // due to too much noise.
  float visibility_depth_far = InverseLerp(
      depth_mm, /*min_depth_mm=*/7500.0, /*max_depth_mm=*/8000.0);

  const float kOcclusionAlpha = 0.0f;
  float visibility =
      max(max(visibility_occlusion, kOcclusionAlpha),
          max(visibility_depth_near, visibility_depth_far));

  return visibility;
}
遮挡虚拟对象
遮盖 fragment 着色器正文中的虚拟对象。根据对象的深度更新其 Alpha 通道。这样会渲染一个被遮挡的对象。
// Occlude virtual objects by updating the object’s alpha channel based on its depth.
const float kMetersToMillimeters = 1000.0;

float asset_depth_mm = v_ViewPosition.z * kMetersToMillimeters * -1.;

// Compute the texture coordinates to sample from the depth image.
vec2 depth_uvs = (u_DepthUvTransform * vec3(v_ScreenSpacePosition.xy, 1)).xy;

gl_FragColor.a *= DepthGetVisibility(u_DepthTexture, depth_uvs, asset_depth_mm);
您可以使用双通道渲染或按对象正向渲染来渲染遮挡。每种方法的效率取决于场景的复杂性和其他特定于应用的注意事项。
按对象正向渲染
按对象正向渲染可确定对象在其材料着色器中每个像素的遮挡。如果像素不可见,则通常会通过 alpha 混合来裁剪它们,从而模拟用户设备上的遮挡。
两步渲染
使用双通道渲染时,第一通道会将所有虚拟内容渲染到中间缓冲区。第二步则根据现实世界深度与虚拟场景深度之间的差异,将虚拟场景与背景混合。此方法不需要额外的特定于对象的着色器工作,并且通常比前向传播方法生成的结果更一致。
从深度图像中提取距离
如需将 Depth API 用于遮挡虚拟对象或直观呈现深度数据以外的目的,请从深度图像中提取信息。
Java
/** Obtain the depth in millimeters for depthImage at coordinates (x, y). */
public int getMillimetersDepth(Image depthImage, int x, int y) {
  // The depth image has a single plane, which stores depth for each
  // pixel as 16-bit unsigned integers.
  Image.Plane plane = depthImage.getPlanes()[0];
  int byteIndex = x * plane.getPixelStride() + y * plane.getRowStride();
  ByteBuffer buffer = plane.getBuffer().order(ByteOrder.nativeOrder());
  return Short.toUnsignedInt(buffer.getShort(byteIndex));
}
Kotlin
/** Obtain the depth in millimeters for [depthImage] at coordinates ([x], [y]). */
fun getMillimetersDepth(depthImage: Image, x: Int, y: Int): UInt {
  // The depth image has a single plane, which stores depth for each
  // pixel as 16-bit unsigned integers.
  val plane = depthImage.planes[0]
  val byteIndex = x * plane.pixelStride + y * plane.rowStride
  val buffer = plane.buffer.order(ByteOrder.nativeOrder())
  val depthSample = buffer.getShort(byteIndex)
  return depthSample.toUInt()
}
转换相机图像和深度图像之间的坐标
使用 getCameraImage() 获取的图片与深度图片可能具有不同的宽高比。
在这种情况下,深度图像是相机图像的剪裁,并非所有相机图像都有相应的有效深度估算值。
如需获取 CPU 图片上坐标的深度图片坐标,请执行以下操作:
Java
float[] cpuCoordinates = new float[] {cpuCoordinateX, cpuCoordinateY};
float[] textureCoordinates = new float[2];
frame.transformCoordinates2d(
    Coordinates2d.IMAGE_PIXELS,
    cpuCoordinates,
    Coordinates2d.TEXTURE_NORMALIZED,
    textureCoordinates);
if (textureCoordinates[0] < 0 || textureCoordinates[1] < 0) {
  // There are no valid depth coordinates, because the coordinates in the CPU image are in the
  // cropped area of the depth image.
  return null;
}
return new Pair<>(
    (int) (textureCoordinates[0] * depthImage.getWidth()),
    (int) (textureCoordinates[1] * depthImage.getHeight()));
Kotlin
val cpuCoordinates = floatArrayOf(cpuCoordinateX.toFloat(), cpuCoordinateY.toFloat())
val textureCoordinates = FloatArray(2)
frame.transformCoordinates2d(
  Coordinates2d.IMAGE_PIXELS,
  cpuCoordinates,
  Coordinates2d.TEXTURE_NORMALIZED,
  textureCoordinates,
)
if (textureCoordinates[0] < 0 || textureCoordinates[1] < 0) {
  // There are no valid depth coordinates, because the coordinates in the CPU image are in the
  // cropped area of the depth image.
  return null
}
return (textureCoordinates[0] * depthImage.width).toInt() to
  (textureCoordinates[1] * depthImage.height).toInt()
如需获取深度图像坐标的 CPU 图像坐标,请执行以下操作:
Java
float[] textureCoordinates =
    new float[] {
      (float) depthCoordinateX / (float) depthImage.getWidth(),
      (float) depthCoordinateY / (float) depthImage.getHeight()
    };
float[] cpuCoordinates = new float[2];
frame.transformCoordinates2d(
    Coordinates2d.TEXTURE_NORMALIZED,
    textureCoordinates,
    Coordinates2d.IMAGE_PIXELS,
    cpuCoordinates);
return new Pair<>((int) cpuCoordinates[0], (int) cpuCoordinates[1]);
Kotlin
val textureCoordinates =
  floatArrayOf(
    depthCoordinatesX.toFloat() / depthImage.width.toFloat(),
    depthCoordinatesY.toFloat() / depthImage.height.toFloat(),
  )
val cpuCoordinates = FloatArray(2)
frame.transformCoordinates2d(
  Coordinates2d.TEXTURE_NORMALIZED,
  textureCoordinates,
  Coordinates2d.IMAGE_PIXELS,
  cpuCoordinates,
)
return cpuCoordinates[0].toInt() to cpuCoordinates[1].toInt()
深度点击测试
点击测试可让用户将对象放置在场景中的实际位置。以前,点击测试只能在检测到的飞机上进行,因此测试位置仅限于较大的平坦表面,例如绿色 Android 系统显示的结果。深度点击测试利用平滑深度信息和原始深度信息来提供更准确的点击结果,即使在非平面和低纹理表面上也是如此。这与红色 Android 设备一起显示。
<ph type="x-smartling-placeholder">
如需使用支持深度的点击测试,请调用 hitTest() 并检查返回列表中是否包含 DepthPoints。
Java
// Create a hit test using the Depth API.
List<HitResult> hitResultList = frame.hitTest(tap);
for (HitResult hit : hitResultList) {
  Trackable trackable = hit.getTrackable();
  if (trackable instanceof Plane
      || trackable instanceof Point
      || trackable instanceof DepthPoint) {
    useHitResult(hit);
    break;
  }
}
Kotlin
// Create a hit test using the Depth API.
val hitResult =
  frame
    .hitTest(tap)
    .filter {
      val trackable = it.trackable
      trackable is Plane || trackable is Point || trackable is DepthPoint
    }
    .firstOrNull()
useHitResult(hitResult)
后续步骤
- 利用 Raw Depth API 实现更准确的传感。
- 请查看 ARCore 深度实验室,其中介绍了获取深度数据的不同方法。