Depth API를 사용하면 기기의 카메라가 장면에 있는 실제 객체의 크기와 모양을 이해할 수 있습니다. 카메라를 사용해 깊이 이미지, 즉 깊이 맵을 만들어 앱에 AR 리얼리즘 레이어를 추가합니다. 깊이 이미지에서 제공하는 정보를 사용하여 가상 객체가 실제 객체의 앞이나 뒤에 정확하게 표시되도록 하여 몰입도 높고 현실적인 사용자 환경을 제공할 수 있습니다.
심도 정보는 움직임으로부터 계산되며, 가능한 경우 ToF (Time-of-F) 센서와 같은 하드웨어 깊이 센서의 정보와 결합할 수 있습니다. 기기는 Depth API를 지원하기 위해 ToF 센서가 필요하지 않습니다.
기본 요건
기본 AR 개념을 이해합니다. ARCore 세션을 구성하는 방법을 알아보세요.
심도 지원 기기에 대한 액세스 제한
앱의 핵심 부분 중 하나 때문에 Depth API 지원이 필요한 경우
AR 환경은 깊이를 사용하거나
앱에서 심도 있는 정보를 사용하는 경우 콘텐츠의 배포를 제한할 수 있습니다.
Play 스토어에서 앱을 다운로드하여
Depth API를 지원하는 기기에
AndroidManifest.xml에 다음 줄을 추가합니다.
변경사항 AndroidManifest.xml개(
ARCore 사용 설정 가이드:
<uses-feature android:name="com.google.ar.core.depth" />
깊이 사용 설정
새 ARCore 세션에서 사용자 기기가 깊이를 지원하는지 확인합니다. 일부 ARCore 호환 기기는 처리 전력 제약으로 인해 Depth API를 지원하지 않습니다. 리소스를 저장하기 위해 ARCore에서는 깊이가 기본적으로 사용 중지됩니다. 앱이 Depth API를 사용하도록 하려면 깊이 모드를 사용 설정하세요.
자바
Config config = session.getConfig();

// Check whether the user's device supports the Depth API.
boolean isDepthSupported = session.isDepthModeSupported(Config.DepthMode.AUTOMATIC);
if (isDepthSupported) {
  config.setDepthMode(Config.DepthMode.AUTOMATIC);
}
session.configure(config);
Kotlin
val config = session.config

// Check whether the user's device supports the Depth API.
val isDepthSupported = session.isDepthModeSupported(Config.DepthMode.AUTOMATIC)
if (isDepthSupported) {
  config.depthMode = Config.DepthMode.AUTOMATIC
}
session.configure(config)
깊이 이미지 획득
Frame.acquireDepthImage16Bits()를 호출하여 현재 프레임의 깊이 이미지를 가져옵니다.
자바
// Retrieve the depth image for the current frame, if available.
Image depthImage = null;
try {
  depthImage = frame.acquireDepthImage16Bits();
  // Use the depth image here.
} catch (NotYetAvailableException e) {
  // This means that depth data is not available yet.
  // Depth data will not be available if there are no tracked
  // feature points. This can happen when there is no motion, or when the
  // camera loses its ability to track objects in the surrounding
  // environment.
} finally {
  if (depthImage != null) {
    depthImage.close();
  }
}
Kotlin
// Retrieve the depth image for the current frame, if available.
try {
  frame.acquireDepthImage16Bits().use { depthImage ->
    // Use the depth image here.
  }
} catch (e: NotYetAvailableException) {
  // This means that depth data is not available yet.
  // Depth data will not be available if there are no tracked
  // feature points. This can happen when there is no motion, or when the
  // camera loses its ability to track objects in the surrounding
  // environment.
}
반환된 이미지는 원시 이미지 버퍼를 제공하며, 이 버퍼는 프래그먼트 셰이더에 전달되어 가려질 렌더링된 각 객체의 GPU에서 사용할 수 있습니다. OPENGL_NORMALIZED_DEVICE_COORDINATES를 기준으로 하며 Frame.transformCoordinates2d()를 호출하여 TEXTURE_NORMALIZED로 변경할 수 있습니다. 객체 셰이더 내에서 깊이 이미지에 액세스할 수 있게 되면 오클루전 처리를 위해 이러한 깊이 측정에 직접 액세스할 수 있습니다.
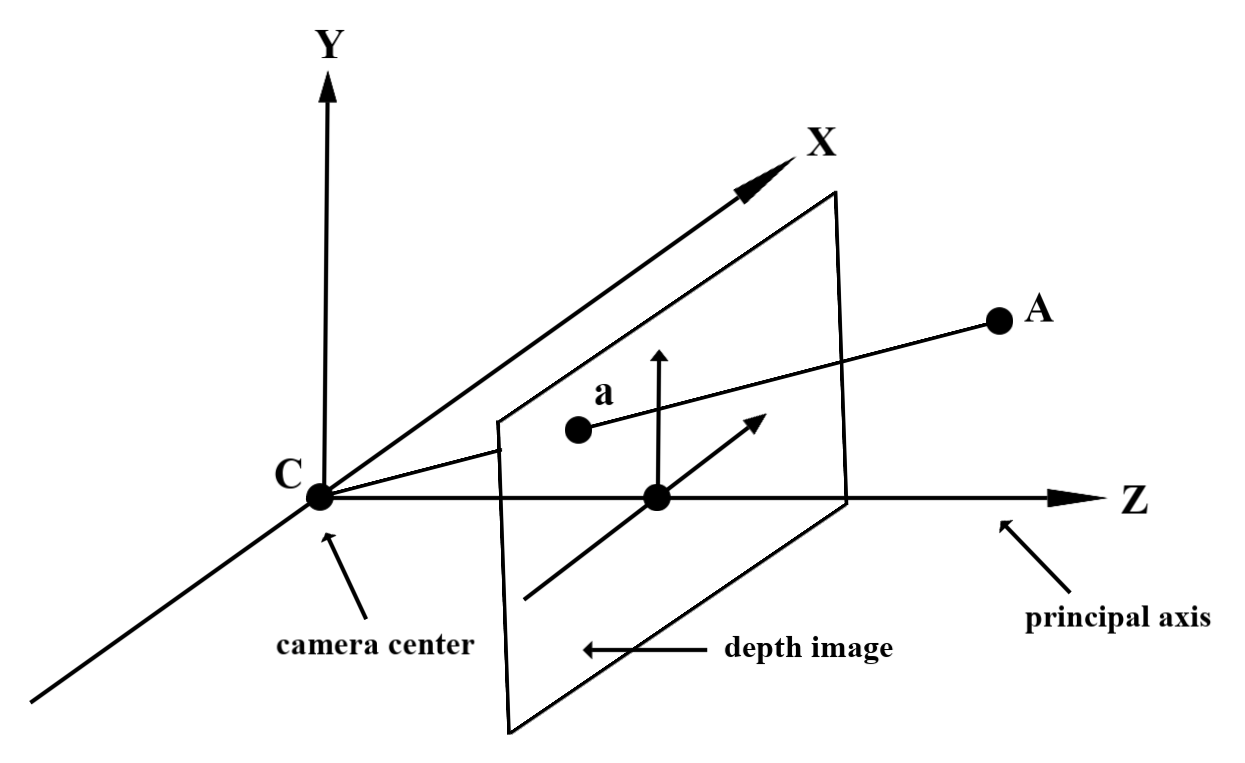
깊이 값 이해하기
관찰된 실제 도형의 지정된 점 A 및 2D 점 a
깊이 이미지에서 동일한 지점을 나타내며 깊이로 주어진 값
a의 API는 주축에 투영된 CA의 길이와 같습니다.
카메라를 기준으로 한 A의 z 좌표라고도 합니다.
출처 C. Depth API를 사용할 때는
깊이 값은 광선 CA 자체의 길이가 아니라 투영입니다.
있습니다.
셰이더의 깊이 사용
현재 프레임의 깊이 정보 파싱
프래그먼트 셰이더에서 도우미 함수 DepthGetMillimeters() 및 DepthGetVisibility()를 사용하여 현재 화면 위치의 깊이 정보에 액세스합니다. 그런 다음 이 정보를 사용하여 렌더링된 객체의 일부를 선택적으로 가립니다.
// Use DepthGetMillimeters() and DepthGetVisibility() to parse the depth image
// for a given pixel, and compare against the depth of the object to render.
float DepthGetMillimeters(in sampler2D depth_texture, in vec2 depth_uv) {
  // Depth is packed into the red and green components of its texture.
  // The texture is a normalized format, storing millimeters.
  vec3 packedDepthAndVisibility = texture2D(depth_texture, depth_uv).xyz;
  return dot(packedDepthAndVisibility.xy, vec2(255.0, 256.0 * 255.0));
}

// Return a value representing how visible or occluded a pixel is relative
// to the depth image. The range is 0.0 (not visible) to 1.0 (completely
// visible).
float DepthGetVisibility(in sampler2D depth_texture, in vec2 depth_uv,
                         in float asset_depth_mm) {
  float depth_mm = DepthGetMillimeters(depth_texture, depth_uv);

  // Instead of a hard Z-buffer test, allow the asset to fade into the
  // background along a 2 * kDepthTolerancePerMm * asset_depth_mm
  // range centered on the background depth.
  const float kDepthTolerancePerMm = 0.015f;
  float visibility_occlusion = clamp(0.5 * (depth_mm - asset_depth_mm) /
    (kDepthTolerancePerMm * asset_depth_mm) + 0.5, 0.0, 1.0);

 // Use visibility_depth_near to set the minimum depth value. If using
 // this value for occlusion, avoid setting it too close to zero. A depth value
 // of zero signifies that there is no depth data to be found.
  float visibility_depth_near = 1.0 - InverseLerp(
      depth_mm, /*min_depth_mm=*/150.0, /*max_depth_mm=*/200.0);

  // Use visibility_depth_far to set the maximum depth value. If the depth
  // value is too high (outside the range specified by visibility_depth_far),
  // the virtual object may get inaccurately occluded at further distances
  // due to too much noise.
  float visibility_depth_far = InverseLerp(
      depth_mm, /*min_depth_mm=*/7500.0, /*max_depth_mm=*/8000.0);

  const float kOcclusionAlpha = 0.0f;
  float visibility =
      max(max(visibility_occlusion, kOcclusionAlpha),
          max(visibility_depth_near, visibility_depth_far));

  return visibility;
}
가상 객체 숨기기
프래그먼트 셰이더의 본문에서 가상 객체를 숨깁니다. 깊이에 따라 객체의 알파 채널을 업데이트합니다. 이렇게 하면 가려진 객체가 렌더링됩니다.
// Occlude virtual objects by updating the object’s alpha channel based on its depth.
const float kMetersToMillimeters = 1000.0;

float asset_depth_mm = v_ViewPosition.z * kMetersToMillimeters * -1.;

// Compute the texture coordinates to sample from the depth image.
vec2 depth_uvs = (u_DepthUvTransform * vec3(v_ScreenSpacePosition.xy, 1)).xy;

gl_FragColor.a *= DepthGetVisibility(u_DepthTexture, depth_uvs, asset_depth_mm);
두 패스 렌더링 또는 객체당 정방향 패스 렌더링을 사용하여 오클루전을 렌더링할 수 있습니다. 각 접근 방식의 효율성은 장면의 복잡성과 기타 앱 관련 고려사항에 따라 다릅니다.
객체별, 정방향 패스 렌더링
객체별, 정방향 전달 렌더링은 머티리얼 셰이더에서 객체의 각 픽셀 오클루전을 결정합니다. 픽셀이 보이지 않는 경우 일반적으로 알파 블렌딩을 통해 클립되므로 사용자 기기에서 오클루전이 시뮬레이션됩니다.
이중 패스 렌더링
2 패스 렌더링의 경우 첫 번째 패스는 모든 가상 콘텐츠를 중간 버퍼로 렌더링합니다. 두 번째 패스에서는 실제 깊이와 가상 장면 깊이의 차이에 따라 가상 장면을 배경에 블렌딩합니다. 이 접근 방식에는 객체별 셰이더 작업이 추가로 필요하지 않으며 일반적으로 정방향 전달 메서드보다 더 균일한 결과를 생성합니다.
깊이 이미지에서 거리 추출
가상 객체를 가리거나 깊이 데이터를 시각화하는 것 이외의 목적으로 Depth API를 사용하려면 깊이 이미지에서 정보를 추출하세요.
자바
/** Obtain the depth in millimeters for depthImage at coordinates (x, y). */
public int getMillimetersDepth(Image depthImage, int x, int y) {
  // The depth image has a single plane, which stores depth for each
  // pixel as 16-bit unsigned integers.
  Image.Plane plane = depthImage.getPlanes()[0];
  int byteIndex = x * plane.getPixelStride() + y * plane.getRowStride();
  ByteBuffer buffer = plane.getBuffer().order(ByteOrder.nativeOrder());
  return Short.toUnsignedInt(buffer.getShort(byteIndex));
}
Kotlin
/** Obtain the depth in millimeters for [depthImage] at coordinates ([x], [y]). */
fun getMillimetersDepth(depthImage: Image, x: Int, y: Int): UInt {
  // The depth image has a single plane, which stores depth for each
  // pixel as 16-bit unsigned integers.
  val plane = depthImage.planes[0]
  val byteIndex = x * plane.pixelStride + y * plane.rowStride
  val buffer = plane.buffer.order(ByteOrder.nativeOrder())
  val depthSample = buffer.getShort(byteIndex)
  return depthSample.toUInt()
}
카메라 이미지와 깊이 이미지 간의 좌표 변환
getCameraImage()를 사용하여 얻은 이미지는 깊이 이미지와 가로세로 비율이 다를 수 있습니다.
여기서 심도 이미지는 카메라 이미지에서 잘라낸 이미지이며, 카메라 이미지의 모든 픽셀에 상응하는 유효한 깊이 추정치가 있는 것은 아닙니다.
CPU 이미지에서 좌표의 깊이 이미지 좌표를 구하는 방법은 다음과 같습니다.
자바
float[] cpuCoordinates = new float[] {cpuCoordinateX, cpuCoordinateY};
float[] textureCoordinates = new float[2];
frame.transformCoordinates2d(
    Coordinates2d.IMAGE_PIXELS,
    cpuCoordinates,
    Coordinates2d.TEXTURE_NORMALIZED,
    textureCoordinates);
if (textureCoordinates[0] < 0 || textureCoordinates[1] < 0) {
  // There are no valid depth coordinates, because the coordinates in the CPU image are in the
  // cropped area of the depth image.
  return null;
}
return new Pair<>(
    (int) (textureCoordinates[0] * depthImage.getWidth()),
    (int) (textureCoordinates[1] * depthImage.getHeight()));
Kotlin
val cpuCoordinates = floatArrayOf(cpuCoordinateX.toFloat(), cpuCoordinateY.toFloat())
val textureCoordinates = FloatArray(2)
frame.transformCoordinates2d(
  Coordinates2d.IMAGE_PIXELS,
  cpuCoordinates,
  Coordinates2d.TEXTURE_NORMALIZED,
  textureCoordinates,
)
if (textureCoordinates[0] < 0 || textureCoordinates[1] < 0) {
  // There are no valid depth coordinates, because the coordinates in the CPU image are in the
  // cropped area of the depth image.
  return null
}
return (textureCoordinates[0] * depthImage.width).toInt() to
  (textureCoordinates[1] * depthImage.height).toInt()
깊이 이미지 좌표의 CPU 이미지 좌표를 구하는 방법은 다음과 같습니다.
자바
float[] textureCoordinates =
    new float[] {
      (float) depthCoordinateX / (float) depthImage.getWidth(),
      (float) depthCoordinateY / (float) depthImage.getHeight()
    };
float[] cpuCoordinates = new float[2];
frame.transformCoordinates2d(
    Coordinates2d.TEXTURE_NORMALIZED,
    textureCoordinates,
    Coordinates2d.IMAGE_PIXELS,
    cpuCoordinates);
return new Pair<>((int) cpuCoordinates[0], (int) cpuCoordinates[1]);
Kotlin
val textureCoordinates =
  floatArrayOf(
    depthCoordinatesX.toFloat() / depthImage.width.toFloat(),
    depthCoordinatesY.toFloat() / depthImage.height.toFloat(),
  )
val cpuCoordinates = FloatArray(2)
frame.transformCoordinates2d(
  Coordinates2d.TEXTURE_NORMALIZED,
  textureCoordinates,
  Coordinates2d.IMAGE_PIXELS,
  cpuCoordinates,
)
return cpuCoordinates[0].toInt() to cpuCoordinates[1].toInt()
심도 히트 테스트
히트 테스트를 사용하면 사용자가 장면의 실제 위치에 객체를 배치할 수 있습니다. 이전에는 탐지된 평면에서만 히트 테스트를 실행할 수 있었기 때문에 초록색 Android로 표시된 결과와 같이 크고 평평한 표면으로 위치를 제한했습니다. 깊이 히트 테스트는 매끄러운 정보와 원시 깊이 정보를 모두 활용하여 평면이 아니고 질감이 낮은 표면에서도 더 정확한 히트 결과를 제공합니다. 빨간색 Android로 표시됩니다.
<ph type="x-smartling-placeholder">
깊이 지원 조회 테스트를 사용하려면 hitTest()를 호출하고 반환 목록에서 DepthPoints를 확인합니다.
자바
// Create a hit test using the Depth API.
List<HitResult> hitResultList = frame.hitTest(tap);
for (HitResult hit : hitResultList) {
  Trackable trackable = hit.getTrackable();
  if (trackable instanceof Plane
      || trackable instanceof Point
      || trackable instanceof DepthPoint) {
    useHitResult(hit);
    break;
  }
}
Kotlin
// Create a hit test using the Depth API.
val hitResult =
  frame
    .hitTest(tap)
    .filter {
      val trackable = it.trackable
      trackable is Plane || trackable is Point || trackable is DepthPoint
    }
    .firstOrNull()
useHitResult(hitResult)
다음 단계
- Raw Depth API를 사용하여 더 정확한 감지를 지원하세요.
- 깊이 데이터에 액세스하는 다양한 방법을 보여주는 ARCore Depth Lab을 확인하세요.