Depth API 可協助裝置的相機瞭解場景中真實物體的大小和形狀。這項功能會使用相機拍攝深度圖片或深度地圖,為應用程式增添 AR 寫實感。您可以運用深度圖片提供的資訊,讓虛擬物件準確出現在現實世界中或物件後方,帶來身歷其境且逼真的使用者體驗。
深度資訊是根據動作計算得出,可能會與硬體深度感應器的資訊結合,例如飛行時間 (ToF) 感應器 (如有)。裝置不需要 ToF 感應器即可支援 Depth API。
必要條件
請務必瞭解基本 AR 概念 以及如何在繼續操作前設定 ARCore 工作階段。
限制存取深度支援裝置
如果您的應用程式需要 Depth API 支援,原因可能是
AR 體驗需要深度,或是缺乏流暢的備用選項
您可以選擇限制應用程式發行範圍
請前往 Google Play 商店
支援 Depth API 的裝置 (方法是在
除了
AndroidManifest.xml
《AndroidManifest.xml》
「啟用 ARCore」指南:
<uses-feature android:name="com.google.ar.core.depth" />
啟用深度
在新的 ARCore 工作階段中,檢查使用者的裝置是否支援深度。基於處理電源限制,並非所有與 ARCore 相容的裝置都支援 Depth API。為節省資源,ARCore 預設會停用深度功能。啟用深度模式,讓應用程式使用 Depth API。
Java
Config config = session.getConfig();

// Check whether the user's device supports the Depth API.
boolean isDepthSupported = session.isDepthModeSupported(Config.DepthMode.AUTOMATIC);
if (isDepthSupported) {
  config.setDepthMode(Config.DepthMode.AUTOMATIC);
}
session.configure(config);
Kotlin
val config = session.config

// Check whether the user's device supports the Depth API.
val isDepthSupported = session.isDepthModeSupported(Config.DepthMode.AUTOMATIC)
if (isDepthSupported) {
  config.depthMode = Config.DepthMode.AUTOMATIC
}
session.configure(config)
取得深度圖片
呼叫 Frame.acquireDepthImage16Bits() 即可取得目前影格的深度圖片。
Java
// Retrieve the depth image for the current frame, if available.
Image depthImage = null;
try {
  depthImage = frame.acquireDepthImage16Bits();
  // Use the depth image here.
} catch (NotYetAvailableException e) {
  // This means that depth data is not available yet.
  // Depth data will not be available if there are no tracked
  // feature points. This can happen when there is no motion, or when the
  // camera loses its ability to track objects in the surrounding
  // environment.
} finally {
  if (depthImage != null) {
    depthImage.close();
  }
}
Kotlin
// Retrieve the depth image for the current frame, if available.
try {
  frame.acquireDepthImage16Bits().use { depthImage ->
    // Use the depth image here.
  }
} catch (e: NotYetAvailableException) {
  // This means that depth data is not available yet.
  // Depth data will not be available if there are no tracked
  // feature points. This can happen when there is no motion, or when the
  // camera loses its ability to track objects in the surrounding
  // environment.
}
傳回的圖片會提供原始圖片緩衝區,這個緩衝區可傳遞到片段著色器,讓 GPU 上的每個算繪物件被遮蔽。此 API 使用 OPENGL_NORMALIZED_DEVICE_COORDINATES,並可透過呼叫 Frame.transformCoordinates2d() 變更為 TEXTURE_NORMALIZED。可在物件著色器中存取深度圖片後,可直接存取這些深度測量結果進行遮蔽處理。
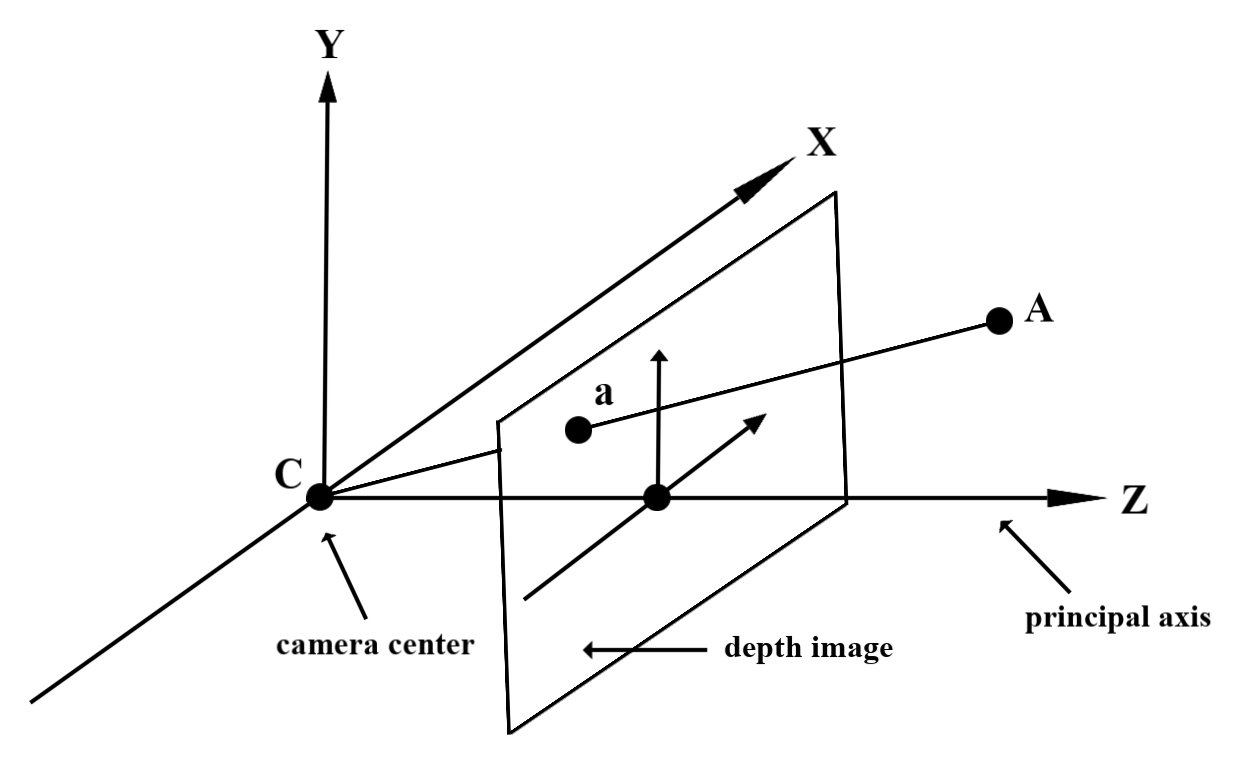
瞭解深度值
觀察到的實際幾何圖形和 2D 點 a 上的已知點 A
代表深度圖片中的相同點,也就是深度圖片提供的值
a 處的 API 等於投影到主要軸的 CA 長度。
這也稱為相機相對於 A 的 z 座標
來源:C。使用 Depth API 時,請務必瞭解
深度值不是灰色 CA 本身的長度,而是 投影
我們很快就會深入探討
所以目前先概略介紹
使用深度著色器
剖析目前影格的深度資訊
在片段著色器中使用輔助函式 DepthGetMillimeters() 和 DepthGetVisibility(),存取目前畫面位置的深度資訊。然後使用這項資訊,選擇性地遮蔽算繪物件的部分。
// Use DepthGetMillimeters() and DepthGetVisibility() to parse the depth image
// for a given pixel, and compare against the depth of the object to render.
float DepthGetMillimeters(in sampler2D depth_texture, in vec2 depth_uv) {
  // Depth is packed into the red and green components of its texture.
  // The texture is a normalized format, storing millimeters.
  vec3 packedDepthAndVisibility = texture2D(depth_texture, depth_uv).xyz;
  return dot(packedDepthAndVisibility.xy, vec2(255.0, 256.0 * 255.0));
}

// Return a value representing how visible or occluded a pixel is relative
// to the depth image. The range is 0.0 (not visible) to 1.0 (completely
// visible).
float DepthGetVisibility(in sampler2D depth_texture, in vec2 depth_uv,
                         in float asset_depth_mm) {
  float depth_mm = DepthGetMillimeters(depth_texture, depth_uv);

  // Instead of a hard Z-buffer test, allow the asset to fade into the
  // background along a 2 * kDepthTolerancePerMm * asset_depth_mm
  // range centered on the background depth.
  const float kDepthTolerancePerMm = 0.015f;
  float visibility_occlusion = clamp(0.5 * (depth_mm - asset_depth_mm) /
    (kDepthTolerancePerMm * asset_depth_mm) + 0.5, 0.0, 1.0);

 // Use visibility_depth_near to set the minimum depth value. If using
 // this value for occlusion, avoid setting it too close to zero. A depth value
 // of zero signifies that there is no depth data to be found.
  float visibility_depth_near = 1.0 - InverseLerp(
      depth_mm, /*min_depth_mm=*/150.0, /*max_depth_mm=*/200.0);

  // Use visibility_depth_far to set the maximum depth value. If the depth
  // value is too high (outside the range specified by visibility_depth_far),
  // the virtual object may get inaccurately occluded at further distances
  // due to too much noise.
  float visibility_depth_far = InverseLerp(
      depth_mm, /*min_depth_mm=*/7500.0, /*max_depth_mm=*/8000.0);

  const float kOcclusionAlpha = 0.0f;
  float visibility =
      max(max(visibility_occlusion, kOcclusionAlpha),
          max(visibility_depth_near, visibility_depth_far));

  return visibility;
}
省略虛擬物件
在片段著色器的主體中省略虛擬物件。根據物件的深度更新物件的 Alpha 通道。這會顯示遭遮蔽的物件。
// Occlude virtual objects by updating the object’s alpha channel based on its depth.
const float kMetersToMillimeters = 1000.0;

float asset_depth_mm = v_ViewPosition.z * kMetersToMillimeters * -1.;

// Compute the texture coordinates to sample from the depth image.
vec2 depth_uvs = (u_DepthUvTransform * vec3(v_ScreenSpacePosition.xy, 1)).xy;

gl_FragColor.a *= DepthGetVisibility(u_DepthTexture, depth_uvs, asset_depth_mm);
您可以使用兩道算繪或個別物件的正向傳遞算繪,算繪遮蔽情形。每個方法的效率都取決於場景的複雜程度,以及其他應用程式特有的考量因素。
每個物件的正向傳遞轉譯
個別物件的正向循環算繪會決定該物件在其 Material 著色器中每個像素的遮蔽情形。如果像素看不見,就會遭到裁剪 (通常是透過 Alpha 混合),進而模擬使用者裝置上的遮蔽情形。
雙通道算繪
透過雙傳遞算繪,第一個傳遞會將所有虛擬內容算繪到中介緩衝區。第二張票證根據實際深度與虛擬場景深度之間的差異,將虛擬場景融入背景。這種方法不需要其他物件專屬的著色器工作,而且通常會產生比轉寄傳遞方法更加統一的結果。
擷取深度圖片的距離
如要將 Depth API 用於遮蔽虛擬物件或以視覺化方式呈現深度資料,請擷取深度圖片中的資訊,
Java
/** Obtain the depth in millimeters for depthImage at coordinates (x, y). */
public int getMillimetersDepth(Image depthImage, int x, int y) {
  // The depth image has a single plane, which stores depth for each
  // pixel as 16-bit unsigned integers.
  Image.Plane plane = depthImage.getPlanes()[0];
  int byteIndex = x * plane.getPixelStride() + y * plane.getRowStride();
  ByteBuffer buffer = plane.getBuffer().order(ByteOrder.nativeOrder());
  return Short.toUnsignedInt(buffer.getShort(byteIndex));
}
Kotlin
/** Obtain the depth in millimeters for [depthImage] at coordinates ([x], [y]). */
fun getMillimetersDepth(depthImage: Image, x: Int, y: Int): UInt {
  // The depth image has a single plane, which stores depth for each
  // pixel as 16-bit unsigned integers.
  val plane = depthImage.planes[0]
  val byteIndex = x * plane.pixelStride + y * plane.rowStride
  val buffer = plane.buffer.order(ByteOrder.nativeOrder())
  val depthSample = buffer.getShort(byteIndex)
  return depthSample.toUInt()
}
轉換相機圖像和深度圖片之間的座標
相較於深度圖片,使用 getCameraImage() 取得的圖片可能會有不同的顯示比例。
在這種情況下,縱深圖片是相機圖片的裁剪,因此相機影像中並非所有像素都有相應的有效深度估計值。
如要取得 CPU 圖像座標的深度圖片座標:
Java
float[] cpuCoordinates = new float[] {cpuCoordinateX, cpuCoordinateY};
float[] textureCoordinates = new float[2];
frame.transformCoordinates2d(
    Coordinates2d.IMAGE_PIXELS,
    cpuCoordinates,
    Coordinates2d.TEXTURE_NORMALIZED,
    textureCoordinates);
if (textureCoordinates[0] < 0 || textureCoordinates[1] < 0) {
  // There are no valid depth coordinates, because the coordinates in the CPU image are in the
  // cropped area of the depth image.
  return null;
}
return new Pair<>(
    (int) (textureCoordinates[0] * depthImage.getWidth()),
    (int) (textureCoordinates[1] * depthImage.getHeight()));
Kotlin
val cpuCoordinates = floatArrayOf(cpuCoordinateX.toFloat(), cpuCoordinateY.toFloat())
val textureCoordinates = FloatArray(2)
frame.transformCoordinates2d(
  Coordinates2d.IMAGE_PIXELS,
  cpuCoordinates,
  Coordinates2d.TEXTURE_NORMALIZED,
  textureCoordinates,
)
if (textureCoordinates[0] < 0 || textureCoordinates[1] < 0) {
  // There are no valid depth coordinates, because the coordinates in the CPU image are in the
  // cropped area of the depth image.
  return null
}
return (textureCoordinates[0] * depthImage.width).toInt() to
  (textureCoordinates[1] * depthImage.height).toInt()
如何取得深度圖片座標的 CPU 圖片座標:
Java
float[] textureCoordinates =
    new float[] {
      (float) depthCoordinateX / (float) depthImage.getWidth(),
      (float) depthCoordinateY / (float) depthImage.getHeight()
    };
float[] cpuCoordinates = new float[2];
frame.transformCoordinates2d(
    Coordinates2d.TEXTURE_NORMALIZED,
    textureCoordinates,
    Coordinates2d.IMAGE_PIXELS,
    cpuCoordinates);
return new Pair<>((int) cpuCoordinates[0], (int) cpuCoordinates[1]);
Kotlin
val textureCoordinates =
  floatArrayOf(
    depthCoordinatesX.toFloat() / depthImage.width.toFloat(),
    depthCoordinatesY.toFloat() / depthImage.height.toFloat(),
  )
val cpuCoordinates = FloatArray(2)
frame.transformCoordinates2d(
  Coordinates2d.TEXTURE_NORMALIZED,
  textureCoordinates,
  Coordinates2d.IMAGE_PIXELS,
  cpuCoordinates,
)
return cpuCoordinates[0].toInt() to cpuCoordinates[1].toInt()
深度命中測試
命中測試可讓使用者將物件放置在場景中的實際位置。先前您只能在偵測到的平面上進行命中測試,將地區範圍限制在大型平坦的表面內,例如綠色 Android 顯示的結果。深度命中測試利用流暢與原始的深度資訊,提供更精確的命中結果,即使在非平面和低紋理表面上也一樣。如紅色 Android 所示。
如要使用啟用深度測試的命中測試,請呼叫 hitTest(),並在傳回清單中尋找 DepthPoints。
Java
// Create a hit test using the Depth API.
List<HitResult> hitResultList = frame.hitTest(tap);
for (HitResult hit : hitResultList) {
  Trackable trackable = hit.getTrackable();
  if (trackable instanceof Plane
      || trackable instanceof Point
      || trackable instanceof DepthPoint) {
    useHitResult(hit);
    break;
  }
}
Kotlin
// Create a hit test using the Depth API.
val hitResult =
  frame
    .hitTest(tap)
    .filter {
      val trackable = it.trackable
      trackable is Plane || trackable is Point || trackable is DepthPoint
    }
    .firstOrNull()
useHitResult(hitResult)
後續步驟
- 使用 Raw Depth API 啟用更準確的感應功能。
- 歡迎查看 ARCore Depth Lab,瞭解存取深度資料的各種方式。