בעזרת Depth API, מצלמת המכשיר יכולה להבין את הגודל והצורה של העצמים האמיתיים בסצנה. הטכנולוגיה הזו משתמשת במצלמה כדי ליצור תמונות עומק או מפות עומק, וכך מוסיפה לאפליקציות שלכם שכבה של ריאליזם ב-AR. אתם יכולים להשתמש במידע שמתקבל מתמונת עומק כדי להציג אובייקטים וירטואליים בצורה מדויקת לפני או מאחורי אובייקטים בעולם האמיתי, וכך לספק חוויית משתמש סוחפת ומציאותית.
מידע על העומק מחושב מתנועה, ואפשר לשלב אותו עם מידע מחיישן עומק פיזי, כמו חיישן זמן טיסה (ToF), אם הוא זמין. אין צורך בחיישן ToF במכשיר כדי לתמוך ב-Depth API.
דרישות מוקדמות
חשוב לוודא שאתם מבינים את המושגים הבסיסיים של AR ואיך להגדיר סשן ARCore לפני שממשיכים.
הגבלת הגישה למכשירים עם תמיכה בעומק
אם לאפליקציה שלכם נדרשת תמיכה ב-Depth API, כי זה חלק מרכזי
חוויית ה-AR מסתמכת על עומק, או כי אין חזרה חיננית
לחלקים באפליקציה שנעשה בהם שימוש בעומק, אפשר לבחור להגביל את ההפצה של
את האפליקציה בחנות Google Play כדי
מכשירים שתומכים ב-Depth API על ידי הוספת
את השורה הבאה ב-AndroidManifest.xml, בנוסף ל-
AndroidManifest.xml שינויים שמתוארים
מדריך הפעלת ARCore:
<uses-feature android:name="com.google.ar.core.depth" />
הפעלת העומק
בסשן ARCore חדש, בודקים אם המכשיר של המשתמש תומך ב'עומק'. חלק מהמכשירים שתואמים ל-ARCore לא תומכים ב-Depth API בגלל מגבלות כוח העיבוד. כדי לחסוך במשאבים, תכונת העומק מושבתת כברירת מחדל ב-ARCore. כדי שהאפליקציה תשתמש ב-Depth API, צריך להפעיל את מצב העומק.
Java
Config config = session.getConfig();

// Check whether the user's device supports the Depth API.
boolean isDepthSupported = session.isDepthModeSupported(Config.DepthMode.AUTOMATIC);
if (isDepthSupported) {
  config.setDepthMode(Config.DepthMode.AUTOMATIC);
}
session.configure(config);
Kotlin
val config = session.config

// Check whether the user's device supports the Depth API.
val isDepthSupported = session.isDepthModeSupported(Config.DepthMode.AUTOMATIC)
if (isDepthSupported) {
  config.depthMode = Config.DepthMode.AUTOMATIC
}
session.configure(config)
איתור תמונות עומק
קוראים לפונקציה Frame.acquireDepthImage16Bits() כדי לקבל את תמונת העומק של המסגרת הנוכחית.
Java
// Retrieve the depth image for the current frame, if available.
Image depthImage = null;
try {
  depthImage = frame.acquireDepthImage16Bits();
  // Use the depth image here.
} catch (NotYetAvailableException e) {
  // This means that depth data is not available yet.
  // Depth data will not be available if there are no tracked
  // feature points. This can happen when there is no motion, or when the
  // camera loses its ability to track objects in the surrounding
  // environment.
} finally {
  if (depthImage != null) {
    depthImage.close();
  }
}
Kotlin
// Retrieve the depth image for the current frame, if available.
try {
  frame.acquireDepthImage16Bits().use { depthImage ->
    // Use the depth image here.
  }
} catch (e: NotYetAvailableException) {
  // This means that depth data is not available yet.
  // Depth data will not be available if there are no tracked
  // feature points. This can happen when there is no motion, or when the
  // camera loses its ability to track objects in the surrounding
  // environment.
}
התמונה שמוחזרים מספקת את מאגר הנתונים הגולמי של התמונה, שניתן להעביר לרכיב הצללה של מקטעים כדי להשתמש ב-GPU עבור כל אובייקט שעבר עיבוד שייחסם. היא מיועדת לOPENGL_NORMALIZED_DEVICE_COORDINATES ואפשר לשנות אותה לTEXTURE_NORMALIZED בהתקשרות אל Frame.transformCoordinates2d(). לאחר שניתן לגשת לתמונת העומק באמצעות כלי להצללה של אובייקט, ניתן לגשת למדידות העומק האלה ישירות לטיפול בהסתרה.
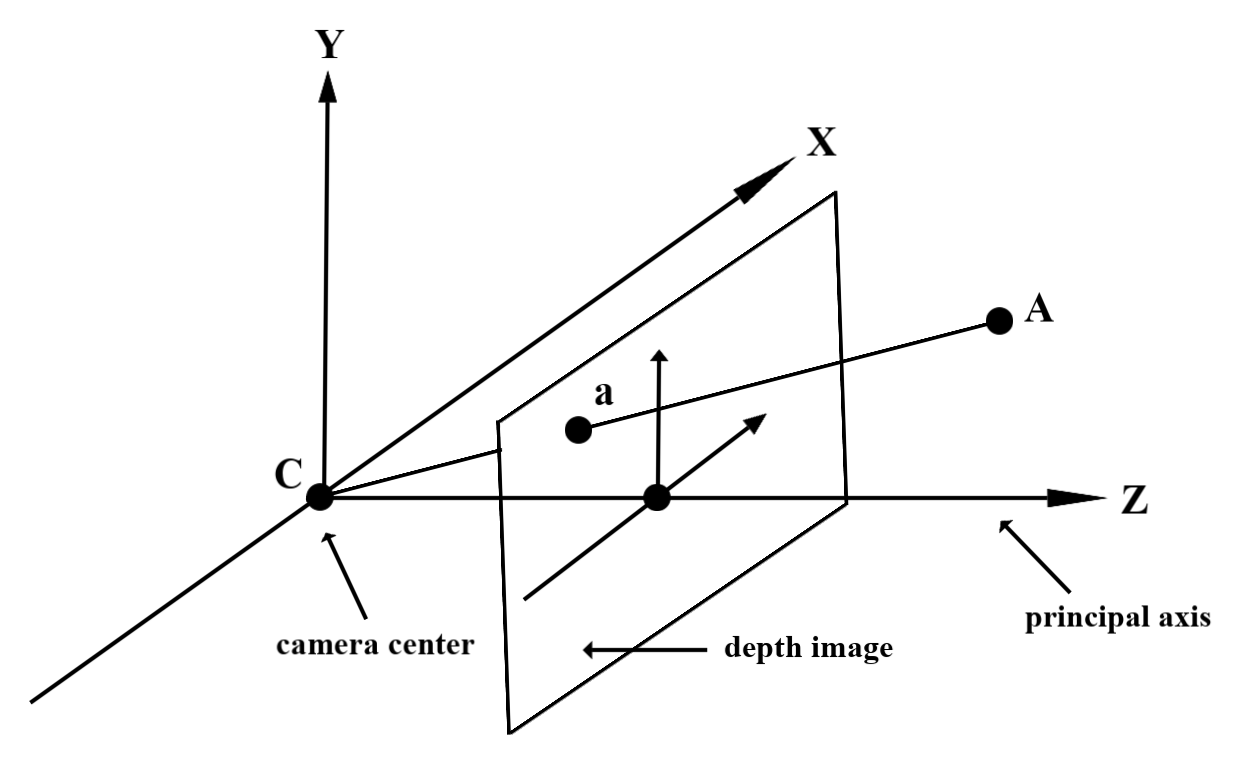
הסבר על ערכי עומק
נקודה נתון A על הגיאומטריה שנמדדה בעולם האמיתי ונקודה דו-ממדית a
שמייצג את אותה נקודה בתמונת העומק, הערך שניתן בשדה העומק
API ב-a שווה לאורך של CA הצפוי לציר הראשי.
אפשר להתייחס אליו גם כקואורדינטת z של A ביחס למצלמה
מקור C. כשעובדים עם Depth API, חשוב להבין
ערכי העומק הם לא האורך של הקרן CA עצמה, אלא של ההיטל
מתוכו.
שימוש בכלי להצללה בעומק
ניתוח פרטי העומק של המסגרת הנוכחית
כדי לקבל גישה למידע על העומק של מיקום המסך הנוכחי, משתמשים בפונקציות העזרה DepthGetMillimeters() ו-DepthGetVisibility() בכלי להצללה של מקטעים. לאחר מכן אפשר להשתמש במידע הזה כדי לסמן באופן סלקטיבי חלקים של האובייקט המעובד.
// Use DepthGetMillimeters() and DepthGetVisibility() to parse the depth image
// for a given pixel, and compare against the depth of the object to render.
float DepthGetMillimeters(in sampler2D depth_texture, in vec2 depth_uv) {
  // Depth is packed into the red and green components of its texture.
  // The texture is a normalized format, storing millimeters.
  vec3 packedDepthAndVisibility = texture2D(depth_texture, depth_uv).xyz;
  return dot(packedDepthAndVisibility.xy, vec2(255.0, 256.0 * 255.0));
}

// Return a value representing how visible or occluded a pixel is relative
// to the depth image. The range is 0.0 (not visible) to 1.0 (completely
// visible).
float DepthGetVisibility(in sampler2D depth_texture, in vec2 depth_uv,
                         in float asset_depth_mm) {
  float depth_mm = DepthGetMillimeters(depth_texture, depth_uv);

  // Instead of a hard Z-buffer test, allow the asset to fade into the
  // background along a 2 * kDepthTolerancePerMm * asset_depth_mm
  // range centered on the background depth.
  const float kDepthTolerancePerMm = 0.015f;
  float visibility_occlusion = clamp(0.5 * (depth_mm - asset_depth_mm) /
    (kDepthTolerancePerMm * asset_depth_mm) + 0.5, 0.0, 1.0);

 // Use visibility_depth_near to set the minimum depth value. If using
 // this value for occlusion, avoid setting it too close to zero. A depth value
 // of zero signifies that there is no depth data to be found.
  float visibility_depth_near = 1.0 - InverseLerp(
      depth_mm, /*min_depth_mm=*/150.0, /*max_depth_mm=*/200.0);

  // Use visibility_depth_far to set the maximum depth value. If the depth
  // value is too high (outside the range specified by visibility_depth_far),
  // the virtual object may get inaccurately occluded at further distances
  // due to too much noise.
  float visibility_depth_far = InverseLerp(
      depth_mm, /*min_depth_mm=*/7500.0, /*max_depth_mm=*/8000.0);

  const float kOcclusionAlpha = 0.0f;
  float visibility =
      max(max(visibility_occlusion, kOcclusionAlpha),
          max(visibility_depth_near, visibility_depth_far));

  return visibility;
}
הסתרה של אובייקטים וירטואליים
הסתרה של אובייקטים וירטואליים בגוף של תוכנת ההצללה למקטעים. עדכון ערוץ האלפא של האובייקט על סמך העומק שלו. הפעולה הזו תפיק אובייקט חסום.
// Occlude virtual objects by updating the object’s alpha channel based on its depth.
const float kMetersToMillimeters = 1000.0;

float asset_depth_mm = v_ViewPosition.z * kMetersToMillimeters * -1.;

// Compute the texture coordinates to sample from the depth image.
vec2 depth_uvs = (u_DepthUvTransform * vec3(v_ScreenSpacePosition.xy, 1)).xy;

gl_FragColor.a *= DepthGetVisibility(u_DepthTexture, depth_uvs, asset_depth_mm);
ניתן ליצור הסתרה באמצעות עיבוד בשני מעברים או רינדור קדימה לכל אובייקט. היעילות של כל גישה תלויה במורכבות הסצנה ובשיקולים אחרים שספציפיים לאפליקציה.
עיבוד מעבר לאובייקט, העברה קדימה
לפי אובייקט, עיבוד העברה קדימה קובע את הסגירה של כל פיקסל של האובייקט בכלי ההצללה של החומר. אם הפיקסלים לא גלויים, הם נחתכים, בדרך כלל באמצעות מיזוג אלפא, וכך מדמה את החסימה במכשיר של המשתמש.
רינדור בשני מעברים
בעיבוד של שני מעברים, הכרטיס הראשון הופך את כל התוכן הווירטואלי למאגר נתונים זמני מתווכים. הכרטיס השני ממזג את הסצנה הווירטואלית עם הרקע בהתבסס על ההבדל בין העומק בעולם האמיתי לבין עומק הסצנה הווירטואלית. הגישה הזו לא דורשת עבודה נוספת של תוכנת ההצללה (shader) שהיא ספציפית לאובייקט, ולרוב מפיקה תוצאות אחידות יותר מאשר שיטת המעבר קדימה.
חילוץ מרחק מתמונת עומק
כדי להשתמש ב-Depth API למטרות שאינן הסתרה של אובייקטים וירטואליים או הצגה חזותית של נתוני עומק, צריך לחלץ מידע מתמונת העומק.
Java
/** Obtain the depth in millimeters for depthImage at coordinates (x, y). */
public int getMillimetersDepth(Image depthImage, int x, int y) {
  // The depth image has a single plane, which stores depth for each
  // pixel as 16-bit unsigned integers.
  Image.Plane plane = depthImage.getPlanes()[0];
  int byteIndex = x * plane.getPixelStride() + y * plane.getRowStride();
  ByteBuffer buffer = plane.getBuffer().order(ByteOrder.nativeOrder());
  return Short.toUnsignedInt(buffer.getShort(byteIndex));
}
Kotlin
/** Obtain the depth in millimeters for [depthImage] at coordinates ([x], [y]). */
fun getMillimetersDepth(depthImage: Image, x: Int, y: Int): UInt {
  // The depth image has a single plane, which stores depth for each
  // pixel as 16-bit unsigned integers.
  val plane = depthImage.planes[0]
  val byteIndex = x * plane.pixelStride + y * plane.rowStride
  val buffer = plane.buffer.order(ByteOrder.nativeOrder())
  val depthSample = buffer.getShort(byteIndex)
  return depthSample.toUInt()
}
המרת קואורדינטות בין תמונות מצלמה לתמונות עומק
יחס הגובה-רוחב של תמונות שהתקבלו באמצעות getCameraImage() עשוי להיות שונה מזה של תמונות העומק.
במקרה כזה, תמונת העומק היא חיתוך של תמונת המצלמה, ולא לכל הפיקסלים בתמונת המצלמה יש אומדן עומק חוקי.
כדי לקבל קואורדינטות של עומק בתמונה של המעבד (CPU):
Java
float[] cpuCoordinates = new float[] {cpuCoordinateX, cpuCoordinateY};
float[] textureCoordinates = new float[2];
frame.transformCoordinates2d(
    Coordinates2d.IMAGE_PIXELS,
    cpuCoordinates,
    Coordinates2d.TEXTURE_NORMALIZED,
    textureCoordinates);
if (textureCoordinates[0] < 0 || textureCoordinates[1] < 0) {
  // There are no valid depth coordinates, because the coordinates in the CPU image are in the
  // cropped area of the depth image.
  return null;
}
return new Pair<>(
    (int) (textureCoordinates[0] * depthImage.getWidth()),
    (int) (textureCoordinates[1] * depthImage.getHeight()));
Kotlin
val cpuCoordinates = floatArrayOf(cpuCoordinateX.toFloat(), cpuCoordinateY.toFloat())
val textureCoordinates = FloatArray(2)
frame.transformCoordinates2d(
  Coordinates2d.IMAGE_PIXELS,
  cpuCoordinates,
  Coordinates2d.TEXTURE_NORMALIZED,
  textureCoordinates,
)
if (textureCoordinates[0] < 0 || textureCoordinates[1] < 0) {
  // There are no valid depth coordinates, because the coordinates in the CPU image are in the
  // cropped area of the depth image.
  return null
}
return (textureCoordinates[0] * depthImage.width).toInt() to
  (textureCoordinates[1] * depthImage.height).toInt()
כדי לקבל קואורדינטות של תמונה מהמעבד (CPU) לקואורדינטות של תמונת העומק:
Java
float[] textureCoordinates =
    new float[] {
      (float) depthCoordinateX / (float) depthImage.getWidth(),
      (float) depthCoordinateY / (float) depthImage.getHeight()
    };
float[] cpuCoordinates = new float[2];
frame.transformCoordinates2d(
    Coordinates2d.TEXTURE_NORMALIZED,
    textureCoordinates,
    Coordinates2d.IMAGE_PIXELS,
    cpuCoordinates);
return new Pair<>((int) cpuCoordinates[0], (int) cpuCoordinates[1]);
Kotlin
val textureCoordinates =
  floatArrayOf(
    depthCoordinatesX.toFloat() / depthImage.width.toFloat(),
    depthCoordinatesY.toFloat() / depthImage.height.toFloat(),
  )
val cpuCoordinates = FloatArray(2)
frame.transformCoordinates2d(
  Coordinates2d.TEXTURE_NORMALIZED,
  textureCoordinates,
  Coordinates2d.IMAGE_PIXELS,
  cpuCoordinates,
)
return cpuCoordinates[0].toInt() to cpuCoordinates[1].toInt()
בדיקת עומק
בדיקות ההיט מאפשרות למשתמשים להציב אובייקטים במיקום אמיתי בסצנה. בעבר, ניתן היה לבצע בדיקות התאמה רק במטוסים שזוהו, תוך הגבלה של המיקומים למשטחים גדולים ושטוחים, כמו התוצאות שהוצגו על ידי מכשירי Android הירוקים. בדיקות עומק מנצלות גם את נתוני העומק החלקיים וגם את נתוני העומק הגולמיים כדי לספק תוצאות מדויקות יותר, גם על משטחים שאינם מישוריים ועם מרקם נמוך. התווית הזו מוצגת עם מכשירי ה-Android האדומים.
כדי להשתמש בבדיקות היטים עם הפעלת עומק, צריך להפעיל את השירות hitTest() ולחפש את DepthPoints ברשימת ההחזרות.
Java
// Create a hit test using the Depth API.
List<HitResult> hitResultList = frame.hitTest(tap);
for (HitResult hit : hitResultList) {
  Trackable trackable = hit.getTrackable();
  if (trackable instanceof Plane
      || trackable instanceof Point
      || trackable instanceof DepthPoint) {
    useHitResult(hit);
    break;
  }
}
Kotlin
// Create a hit test using the Depth API.
val hitResult =
  frame
    .hitTest(tap)
    .filter {
      val trackable = it.trackable
      trackable is Plane || trackable is Point || trackable is DepthPoint
    }
    .firstOrNull()
useHitResult(hitResult)
מה השלב הבא?
- הפעלת חישה מדויקת יותר באמצעות Raw Depth API
- כדאי לנסות את ARCore Depth Lab, שמדגים דרכים שונות לגשת לנתוני עומק.