इस पेज पर, WebXR का इस्तेमाल करके इमर्सिव एआर ऐप्लिकेशन बनाने का तरीका बताया गया है.
शुरू करने के लिए, आपके पास WebXR के साथ काम करने वाला डेवलपमेंट इनवायरनमेंट होना चाहिए.
एचटीएमएल पेज बनाना
WebXR सेशन शुरू करने के लिए, उपयोगकर्ता के इंटरैक्शन की ज़रूरत होती है.
activateXR() को कॉल करने वाला बटन बनाएं. पेज लोड होने के बाद, उपयोगकर्ता इस बटन का इस्तेमाल करके एआर अनुभव शुरू कर सकता है.
index.html नाम की एक नई फ़ाइल बनाएं और इसमें यह एचटीएमएल कोड जोड़ें:
<!doctype html>
<html>
<head>
  <meta charset="UTF-8">
  <meta name="viewport"
        content="width=device-width, user-scalable=no, initial-scale=1.0, maximum-scale=1.0, minimum-scale=1.0">
  <title>Hello WebXR!</title>

  <!-- three.js -->
  <script src="https://unpkg.com/three@0.126.0/build/three.js"></script>
</head>
<body>

<!-- Starting an immersive WebXR session requires user interaction.
    We start this one with a simple button. -->
<button onclick="activateXR()">Start Hello WebXR</button>
<script>
async function activateXR() {
  // Add a canvas element and initialize a WebGL context that is compatible with WebXR.
  const canvas = document.createElement("canvas");
  document.body.appendChild(canvas);
  const gl = canvas.getContext("webgl", {xrCompatible: true});

  // To be continued in upcoming steps.
}
</script>
</body>
</html>
three.js को शुरू करना
'शुरू करें' बटन दबाने पर, कुछ खास नहीं होगा. 3D एनवायरमेंट सेट अप करने के लिए, सीन दिखाने के लिए रेंडरिंग लाइब्रेरी का इस्तेमाल किया जा सकता है.
इस उदाहरण में, आपको three.js का इस्तेमाल करना होगा. यह एक JavaScript 3D रेंडरिंग लाइब्रेरी है, जो WebGL रेंडरर उपलब्ध कराती है. Three.js, रेंडरिंग, कैमरे, और सीन ग्राफ़ को मैनेज करता है. इससे वेब पर 3D कॉन्टेंट को आसानी से दिखाया जा सकता है.
सीन बनाना
आम तौर पर, 3D एनवायरमेंट को सीन के तौर पर मॉडल किया जाता है. एआर एलिमेंट वाला THREE.Scene बनाएं.
नीचे दिए गए कोड की मदद से, एआर में रंगीन बॉक्स को बिना रोशनी के देखा जा सकता है.
activateXR() फ़ंक्शन के नीचे यह कोड जोड़ें:
const scene = new THREE.Scene();

// The cube will have a different color on each side.
const materials = [
  new THREE.MeshBasicMaterial({color: 0xff0000}),
  new THREE.MeshBasicMaterial({color: 0x0000ff}),
  new THREE.MeshBasicMaterial({color: 0x00ff00}),
  new THREE.MeshBasicMaterial({color: 0xff00ff}),
  new THREE.MeshBasicMaterial({color: 0x00ffff}),
  new THREE.MeshBasicMaterial({color: 0xffff00})
];

// Create the cube and add it to the demo scene.
const cube = new THREE.Mesh(new THREE.BoxBufferGeometry(0.2, 0.2, 0.2), materials);
cube.position.set(1, 1, 1);
scene.add(cube);
three.js का इस्तेमाल करके रेंडरिंग सेट अप करना
इस सीन को एआर में देखने के लिए, आपको रेंडरर और कैमरा की ज़रूरत होगी. रेंडरर, स्क्रीन पर आपका सीन दिखाने के लिए WebGL का इस्तेमाल करता है. कैमरा उस व्यूपोर्ट के बारे में बताता है जिससे सीन देखा जाता है.
activateXR() फ़ंक्शन के नीचे यह कोड जोड़ें:
// Set up the WebGLRenderer, which handles rendering to the session's base layer.
const renderer = new THREE.WebGLRenderer({
  alpha: true,
  preserveDrawingBuffer: true,
  canvas: canvas,
  context: gl
});
renderer.autoClear = false;

// The API directly updates the camera matrices.
// Disable matrix auto updates so three.js doesn't attempt
// to handle the matrices independently.
const camera = new THREE.PerspectiveCamera();
camera.matrixAutoUpdate = false;
XRSession बनाना
WebXR का एंट्रीपॉइंट XRSystem.requestSession() है. रेंडर किए गए कॉन्टेंट को असल दुनिया के माहौल में देखने के लिए, immersive-ar मोड का इस्तेमाल करें.
XRReferenceSpace, वर्चुअल वर्ल्ड में ऑब्जेक्ट के लिए इस्तेमाल किए जाने वाले कोऑर्डिनेट सिस्टम के बारे में बताता है.
'local' मोड, एआर अनुभव के लिए सबसे सही है. इसमें रेफ़रंस स्पेस, दर्शक के आस-पास होता है और ट्रैकिंग स्थिर होती है.
XRSession और XRReferenceSpace बनाने के लिए, activateXR() फ़ंक्शन के नीचे यह कोड जोड़ें:
// Initialize a WebXR session using "immersive-ar".
const session = await navigator.xr.requestSession("immersive-ar");
session.updateRenderState({
  baseLayer: new XRWebGLLayer(session, gl)
});

// A 'local' reference space has a native origin that is located
// near the viewer's position at the time the session was created.
const referenceSpace = await session.requestReferenceSpace('local');
सीन को रेंडर करना
अब सीन को रेंडर किया जा सकता है. XRSession.requestAnimationFrame()
एक कॉलबैक शेड्यूल करता है, जो तब लागू होता है, जब ब्राउज़र फ़्रेम को ड्रॉ करने के लिए तैयार हो.
एनिमेशन फ़्रेम कॉलबैक के दौरान, दर्शक के पोज़ को लोकल कोऑर्डिनेट स्पेस के हिसाब से पाने के लिए, XRFrame.getViewerPose() को कॉल करें.
इसका इस्तेमाल, सीन में मौजूद कैमरे को अपडेट करने के लिए किया जाता है. इससे, रेंडरर के अपडेट किए गए कैमरे का इस्तेमाल करके सीन को ड्रॉ करने से पहले, उपयोगकर्ता के वर्चुअल वर्ल्ड को देखने के तरीके में बदलाव होता है.
activateXR() फ़ंक्शन के नीचे यह कोड जोड़ें:
// Create a render loop that allows us to draw on the AR view.
const onXRFrame = (time, frame) => {
  // Queue up the next draw request.
  session.requestAnimationFrame(onXRFrame);

  // Bind the graphics framebuffer to the baseLayer's framebuffer
  gl.bindFramebuffer(gl.FRAMEBUFFER, session.renderState.baseLayer.framebuffer)

  // Retrieve the pose of the device.
  // XRFrame.getViewerPose can return null while the session attempts to establish tracking.
  const pose = frame.getViewerPose(referenceSpace);
  if (pose) {
    // In mobile AR, we only have one view.
    const view = pose.views[0];

    const viewport = session.renderState.baseLayer.getViewport(view);
    renderer.setSize(viewport.width, viewport.height)

    // Use the view's transform matrix and projection matrix to configure the THREE.camera.
    camera.matrix.fromArray(view.transform.matrix)
    camera.projectionMatrix.fromArray(view.projectionMatrix);
    camera.updateMatrixWorld(true);

    // Render the scene with THREE.WebGLRenderer.
    renderer.render(scene, camera)
  }
}
session.requestAnimationFrame(onXRFrame);
Hello WebXR चलाना
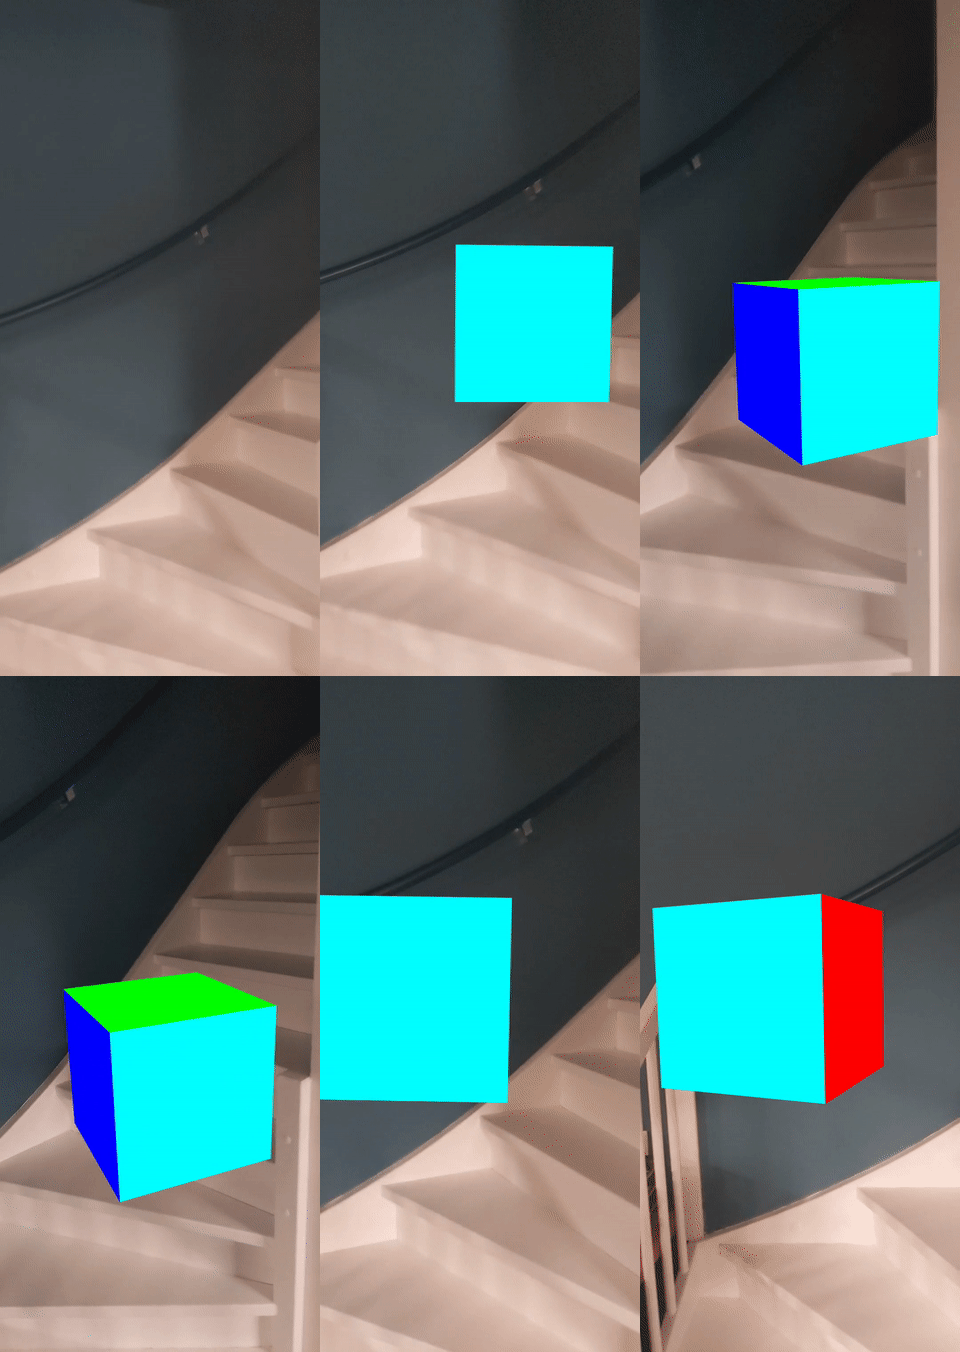
अपने डिवाइस पर WebXR फ़ाइल पर जाएं. आपको चारों तरफ़ से रंगीन क्यूब दिखना चाहिए.
हिट टेस्ट जोड़ना
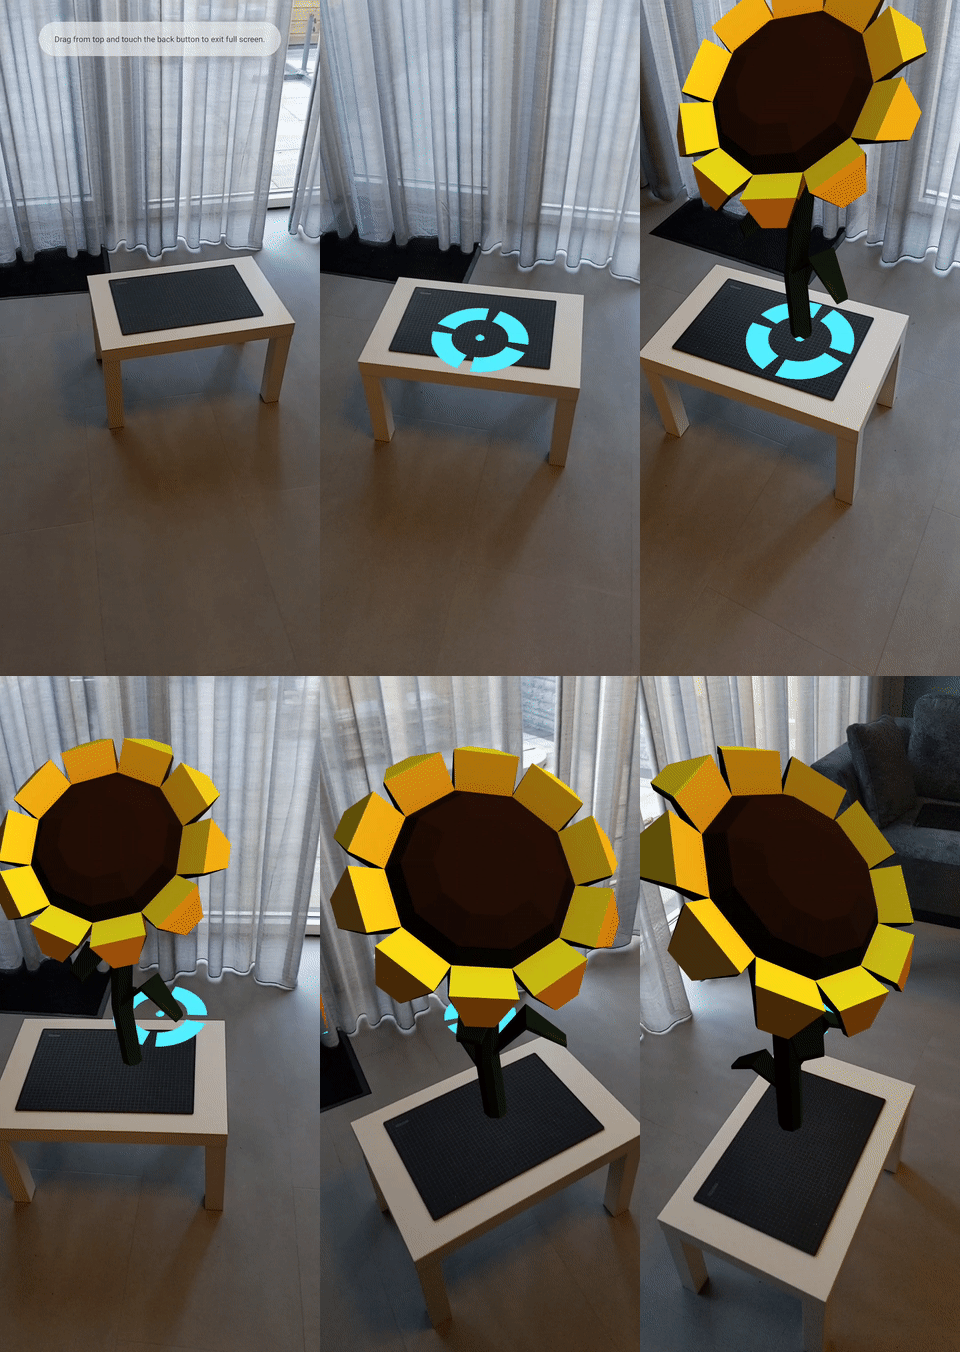
एआर वर्ल्ड के साथ इंटरैक्ट करने का एक सामान्य तरीका, हिट टेस्ट है. इससे रे और असल दुनिया की ज्यामिति के बीच का इंटरसेक्शन पता चलता है. Hello WebXR में, आपको वर्चुअल दुनिया में सूरजमुखी लगाने के लिए, हिट टेस्ट का इस्तेमाल करना होगा.
डेमो क्यूब हटाना
बिना रोशनी वाला क्यूब हटाएं और उसे रोशनी वाले सीन से बदलें:
const scene = new THREE.Scene();

const directionalLight = new THREE.DirectionalLight(0xffffff, 0.3);
directionalLight.position.set(10, 15, 10);
scene.add(directionalLight);
hit-test सुविधा का इस्तेमाल करना
हिट टेस्ट की सुविधा शुरू करने के लिए, hit-test सुविधा के साथ सेशन का अनुरोध करें. पिछला requestSession() फ़्रैगमेंट ढूंढें और उसमें hit-test जोड़ें:
const session = await navigator.xr.requestSession("immersive-ar", {requiredFeatures: ['hit-test']});
मॉडल लोडर जोड़ना
फ़िलहाल, सीन में सिर्फ़ रंगीन क्यूब है. इस अनुभव को ज़्यादा दिलचस्प बनाने के लिए, एक मॉडल लोडर जोड़ें. इससे GLTF मॉडल लोड किए जा सकते हैं.
अपने दस्तावेज़ के <head> टैग में, three.js' GLTFLoader जोड़ें.
<!-- three.js -->
<script src="https://unpkg.com/three@0.126.0/build/three.js"></script>

<script src="https://unpkg.com/three@0.126.0/examples/js/loaders/GLTFLoader.js"></script>
GLTF मॉडल लोड करना
वेब से टारगेटिंग रेटिकल और सूरजमुखी लोड करने के लिए, पिछले चरण में दिए गए मॉडल लोडर का इस्तेमाल करें.
onXRFrame के ऊपर यह कोड जोड़ें:
const loader = new THREE.GLTFLoader();
let reticle;
loader.load("https://immersive-web.github.io/webxr-samples/media/gltf/reticle/reticle.gltf", function(gltf) {
  reticle = gltf.scene;
  reticle.visible = false;
  scene.add(reticle);
})

let flower;
loader.load("https://immersive-web.github.io/webxr-samples/media/gltf/sunflower/sunflower.gltf", function(gltf) {
  flower = gltf.scene;
});

// Create a render loop that allows us to draw on the AR view.
const onXRFrame = (time, frame) => {
हिट टेस्ट सोर्स बनाना
असल दुनिया के ऑब्जेक्ट के इंटरसेक्शन का हिसाब लगाने के लिए, XRSession.requestHitTestSource() का इस्तेमाल करके XRHitTestSource बनाएं.
हिट टेस्टिंग के लिए इस्तेमाल की जाने वाली किरण में, viewer रेफ़रंस स्पेस को ऑरिजिन के तौर पर इस्तेमाल किया जाता है. इसका मतलब है कि हिट टेस्ट, व्यूपोर्ट के बीच से किया जाता है.
हिट टेस्ट सोर्स बनाने के लिए, local रेफ़रंस स्पेस बनाने के बाद यह कोड जोड़ें:
// A 'local' reference space has a native origin that is located
// near the viewer's position at the time the session was created.
const referenceSpace = await session.requestReferenceSpace('local');

// Create another XRReferenceSpace that has the viewer as the origin.
const viewerSpace = await session.requestReferenceSpace('viewer');
// Perform hit testing using the viewer as origin.
const hitTestSource = await session.requestHitTestSource({ space: viewerSpace });
टारगेटिंग रेटिकल बनाना
यह साफ़ तौर पर बताने के लिए कि सूरजमुखी कहां रखा जाएगा, सीन में टारगेटिंग रेटिकल जोड़ें. यह रेटिकल, रीयल-लाइफ़ के प्लैटफ़ॉर्म पर चिपकता हुआ दिखेगा. इससे यह पता चलेगा कि सूरजमुखी को कहां ऐंकर किया जाएगा.
XRFrame.getHitTestResults, XRHitTestResult का ऐरे दिखाता है और असल दुनिया की ज्यामिति के साथ इंटरसेक्शन दिखाता है.
हर फ़्रेम पर टारगेटिंग रेटिकल को पोज़िशन करने के लिए, इन इंटरसेक्शन का इस्तेमाल करें.
camera.projectionMatrix.fromArray(view.projectionMatrix);
camera.updateMatrixWorld(true);

const hitTestResults = frame.getHitTestResults(hitTestSource);
if (hitTestResults.length > 0 && reticle) {
  const hitPose = hitTestResults[0].getPose(referenceSpace);
  reticle.visible = true;
  reticle.position.set(hitPose.transform.position.x, hitPose.transform.position.y, hitPose.transform.position.z)
  reticle.updateMatrixWorld(true);
}
टैप करने पर इंटरैक्शन जोड़ना
जब कोई उपयोगकर्ता प्राइमरी ऐक्शन पूरा करता है, तो XRSession को select इवेंट मिलते हैं.
एआर सेशन में, यह स्क्रीन पर टैप करने के बराबर होता है.
जब कोई उपयोगकर्ता स्क्रीन पर टैप करे, तो एक नया सूरजमुखी दिखाने के लिए, शुरू करने के दौरान यह कोड जोड़ें:
let flower;
loader.load("https://immersive-web.github.io/webxr-samples/media/gltf/sunflower/sunflower.gltf", function(gltf) {
  flower = gltf.scene;
});

session.addEventListener("select", (event) => {
  if (flower) {
    const clone = flower.clone();
    clone.position.copy(reticle.position);
    scene.add(clone);
  }
});
हिट टेस्ट की जांच करना
पेज पर जाने के लिए, अपने मोबाइल डिवाइस का इस्तेमाल करें. WebXR के आस-पास के माहौल को समझने के बाद, रीटिकल असल दुनिया की सतहों पर दिखना चाहिए. सूरजमुखी लगाने के लिए, स्क्रीन पर टैप करें. इसे सभी तरफ़ से देखा जा सकता है.


