Depth API 可協助裝置的相機瞭解場景中真實物體的大小和形狀。這個 API 會使用相機建立深度圖片或深度地圖,進而在應用程式中加入 AR 擬真效果。您可以利用深度圖像提供的資訊,讓虛擬物體準確顯示在真實物體前方或後方,打造身歷其境的逼真使用者體驗。
深度資訊是根據動作計算而得,並可與硬體深度感應器 (例如飛行時間 (ToF) 感應器,如有) 的資訊結合。裝置不必具備 ToF 感應器即可支援 Depth API。
必要條件
請務必先瞭解基本 AR 概念,並瞭解如何設定 ARCore 工作階段,再繼續操作。
將應用程式設為 Depth Required 或 Depth Optional (僅限 Android)
如果您的應用程式需要Depth API 支援功能 (因為 AR 體驗的核心部分需要深度,或是應用程式中使用深度的部分沒有妥善的備用方案),您可以選擇將應用程式僅發行給支援 Depth API 的裝置。
製作應用程式 Depth Required
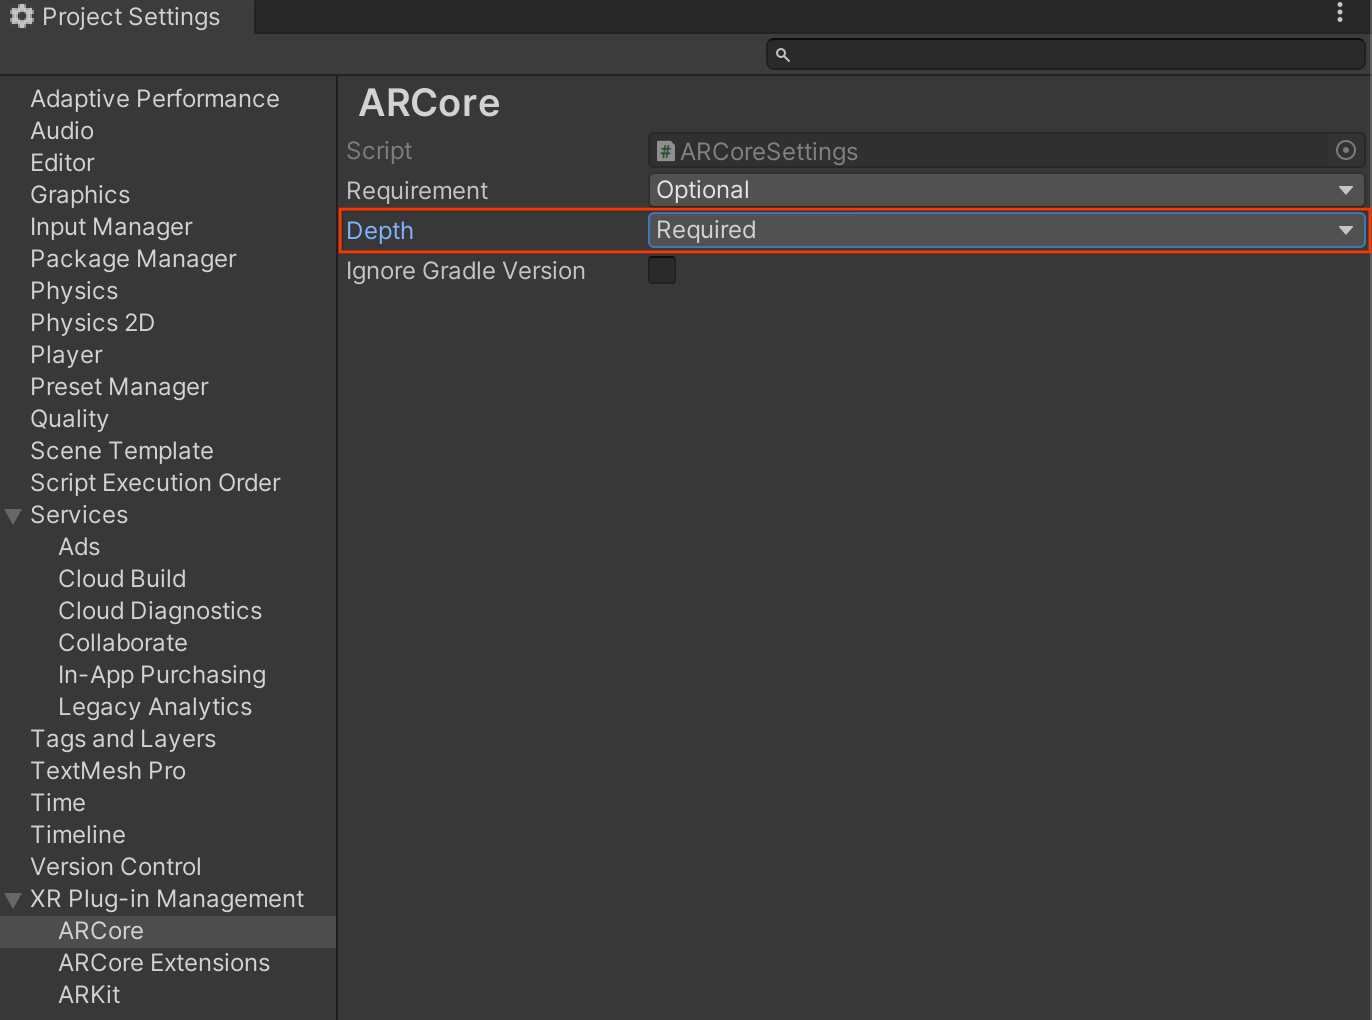
前往 Edit > Project Settings > XR Plug-in Management > ARCore。
Depth 預設為 Required。

製作應用程式 Depth Optional
前往 Edit > Project Settings > XR Plug-in Management > ARCore。
在 Depth 下拉式選單中,選取 Optional 將應用程式設為選用深度。

啟用深度
為了節省資源,ARCore 預設不會啟用 Depth API。如要在支援的裝置上使用深度功能,您必須使用 Camera 和 ARCameraBackground 元件,手動將 AROcclusionManager 元件新增至 AR 相機遊戲物件。詳情請參閱 Unity 說明文件中的「自動遮蔽」一節。
在新的 ARCore 工作階段中,檢查使用者的裝置是否支援深度和 Depth API,如下所示:
// Reference to AROcclusionManager that should be added to the AR Camera
// game object that contains the Camera and ARCameraBackground components.
var occlusionManager = …

// Check whether the user's device supports the Depth API.
if (occlusionManager.descriptor?.supportsEnvironmentDepthImage)
{
    // If depth mode is available on the user's device, perform
    // the steps you want here.
}
取得深度圖片
從 AROcclusionManager 取得最新的環境深度影像。
// Reference to AROcclusionManager that should be added to the AR Camera
// game object that contains the Camera and ARCameraBackground components.
var occlusionManager = …

if (occlusionManager.TryAcquireEnvironmentDepthCpuImage(out XRCpuImage image))
{
    using (image)
    {
        // Use the texture.
    }
}
您可以將原始 CPU 映像檔轉換為 RawImage,以便享有更大的彈性。如需相關範例,請參閱 Unity 的 ARFoundation 範例。
瞭解深度值
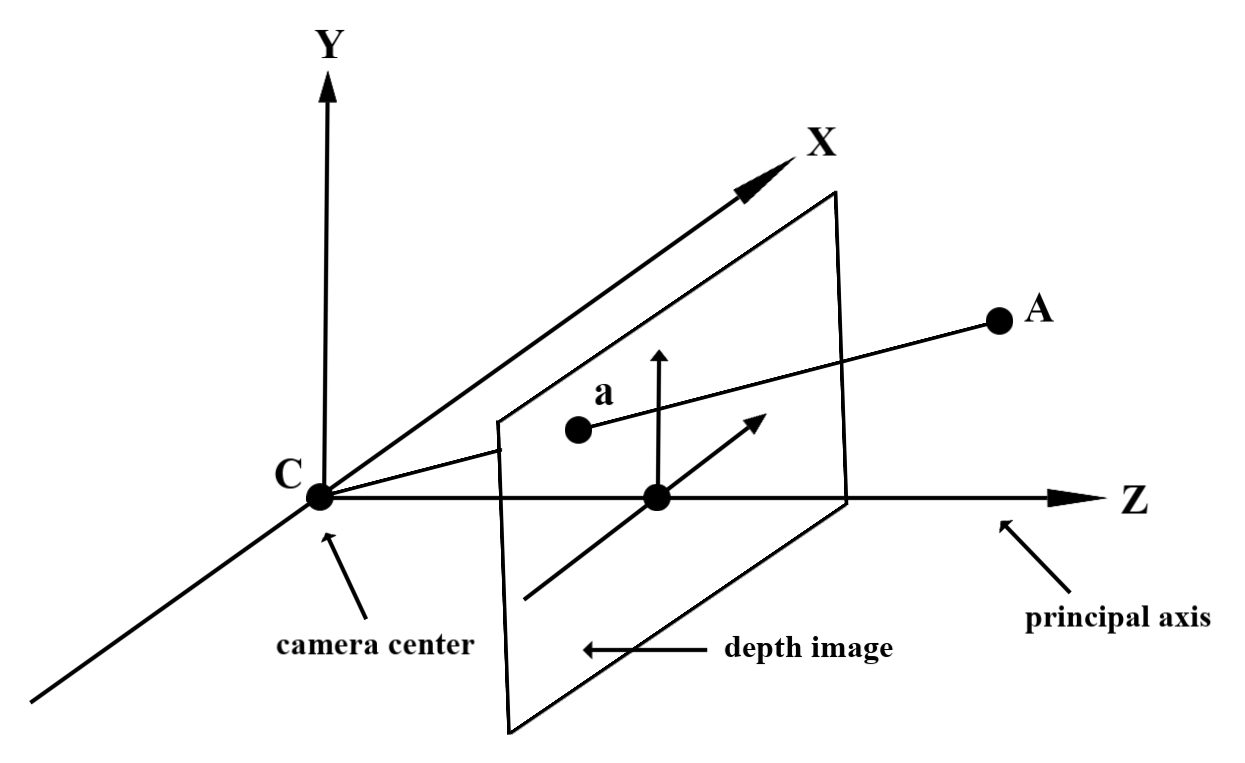
在觀察到的實際幾何圖形上指定點 A 和 2D 點 a 代表深度圖中的相同點,Depth API 在 a 處提供的值等於投射到主軸上的 CA 長度。這也可以稱為 A 相對於攝影機原點 C 的 z 座標。使用 Depth API 時,請務必瞭解深度值並非光線 CA 本身的長度,而是投影。

遮蔽虛擬物件並以圖表呈現深度資料
請參閱 Unity 的網誌文章,概略瞭解深度資料,以及如何使用深度資料遮蔽虛擬圖像。此外,Unity 的 ARFoundation 範例會示範遮蔽虛擬圖像,以及將深度資料轉換為視覺化資料。
您可以使用兩次掃描算繪或個別物件前向掃描算繪,呈現遮蔽效果。每種方法的效率取決於場景的複雜度和其他應用程式專屬考量。
個別物件前向算繪
每個物件的正向傳遞算繪會在材質著色器中判斷物件每個像素的遮蔽率。如果像素無法顯示,系統會進行裁剪,通常是透過 Alpha 混合,藉此模擬使用者裝置上的遮蔽效果。
兩次渲染
在雙重轉譯的情況下,第一個轉譯作業會將所有虛擬內容轉譯至中介緩衝區。第二次處理時,系統會根據實際深度與虛擬場景深度的差異,將虛擬場景與背景混合。這種方法不需要額外的物件專屬著色器作業,而且通常會比前向傳遞方法產生更一致的結果。
從深度圖中擷取距離
如要將 Depth API 用於遮蔽虛擬物件或檢視深度資料以外的用途,請從深度影像中擷取資訊。
Texture2D _depthTexture;
short[] _depthArray;

void UpdateEnvironmentDepthImage()
{
  if (_occlusionManager &&
        _occlusionManager.TryAcquireEnvironmentDepthCpuImage(out XRCpuImage image))
    {
        using (image)
        {
            UpdateRawImage(ref _depthTexture, image, TextureFormat.R16);
            _depthWidth = image.width;
            _depthHeight = image.height;
        }
    }
  var byteBuffer = _depthTexture.GetRawTextureData();
  Buffer.BlockCopy(byteBuffer, 0, _depthArray, 0, byteBuffer.Length);
}

// Obtain the depth value in meters at a normalized screen point.
public static float GetDepthFromUV(Vector2 uv, short[] depthArray)
{
    int depthX = (int)(uv.x * (DepthWidth - 1));
    int depthY = (int)(uv.y * (DepthHeight - 1));

    return GetDepthFromXY(depthX, depthY, depthArray);
}

// Obtain the depth value in meters at the specified x, y location.
public static float GetDepthFromXY(int x, int y, short[] depthArray)
{
    if (!Initialized)
    {
        return InvalidDepthValue;
    }

    if (x >= DepthWidth || x < 0 || y >= DepthHeight || y < 0)
    {
        return InvalidDepthValue;
    }

    var depthIndex = (y * DepthWidth) + x;
    var depthInShort = depthArray[depthIndex];
    var depthInMeters = depthInShort * MillimeterToMeter;
    return depthInMeters;
}
後續步驟
- 使用 Raw Depth API 可提高感測準確度。
- 請參閱 ARCore Depth Lab,瞭解存取深度資料的不同方式。
