
Page Summary
-
You can preset the state of blocks in a toolbox by setting field values, connecting blocks, and adding comments, among other configurations.
-
Preset blocks can have fields with default values or be preconnected to other blocks.
-
Shadow blocks can be used to indicate default values, allow direct value typing, and show the expected value type for parent blocks.
-
You can disable individual blocks in the toolbox so they cannot be dragged out.
You can configure (preset) the state of blocks in a toolbox. For example, you can set a field to a default value or connect two blocks together. You can also create shadow blocks, which serve as defaults for child blocks.
Examples
Here are some examples of preset blocks.
Block with a preset field value
Here is a math_number block whose field displays the number 42 instead of the
default of 0:

And here is a toolbox that sets this field:
JSON
{
 "kind": "flyoutToolbox",
 "contents": [
   {
     "kind": "block",
     "type": "math_number",
     "fields": {
       "NUM": 42
     }
   },
 ]
}
XML
<xml id="toolbox" style="display: none">
 <block type="math_number">
   <field name="NUM">42</field>
 </block>
</xml>
Preconnected blocks
Here is a controls_for block that has three math_number blocks connected to
it:
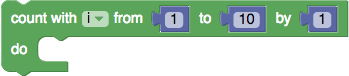
And here is a toolbox that preconnects these blocks:
JSON
{
 "kind": "flyoutToolbox",
 "contents": [
   {
     "kind": "block",
     "type": "controls_for",
     "inputs": {
       "FROM": {
         "block": {
           "type": "math_number",
           "fields": {
             "NUM": 1
           }
         }
       },
       "TO": {
         "block": {
           "type": "math_number",
           "fields": {
             "NUM": 10
           }
         }
       },
       "BY": {
         "block": {
           "type": "math_number",
           "fields": {
             "NUM": 1
           }
         }
       },
     }
   },
 ]
}
XML
<xml id="toolbox" style="display: none">
 <block type="controls_for">
   <value name="FROM">
     <block type="math_number">
       <field name="NUM">1</field>
     </block>
   </value>
   <value name="TO">
     <block type="math_number">
       <field name="NUM">10</field>
     </block>
   </value>
   <value name="BY">
     <block type="math_number">
       <field name="NUM">1</field>
     </block>
   </value>
 </block>
</xml>
Disabled blocks
Disabled blocks cannot be dragged from the toolbox. Blocks can be individually
disabled using the optional disabled property.
JSON
{
 "kind": "flyoutToolbox",
 "contents": [
   {
     "kind": "block",
     "type":"math_number"
   },
   {
     "kind": "block",
     "type": "math_arithmetic"
   },
   {
     "kind": "block",
     "type": "math_single",
     "disabled": "true"
   }
 ]
}
XML
<xml id="toolbox" style="display: none">
 <block type="math_number"></block>
 <block type="math_arithmetic"></block>
 <block type="math_single" disabled="true"></block>
</xml>
You can also programmatically disable or enable a block by using
setDisabledReason.
Configure your blocks
You can configure a block in a toolbox in any way that you can configure it in a workspace. For example, you can set field values, connect blocks to value or statement inputs, add comments, and collapse or disable blocks. This is possible because toolboxes use the same code to configure blocks that workspaces use to serialize them.
It also means that it is easy to create a block configuration. Just load your block into a workspace, configure it how you want, and serialize it by running the following code in the console.
JSON
console.log(Blockly.serialization.workspaces.save(Blockly.getMainWorkspace()));
XML
console.log(Blockly.Xml.workspaceToDom(Blockly.getMainWorkspace()));
You can then copy the configuration code and paste it into your toolbox. Be sure
to remove the x, y and id properties, which are ignored by the toolbox.
Variable fields
Variable fields may need to be specified differently when they are in a toolbox versus when they are serialized.
In particular, when variable fields are normally serialized to JSON, they only contain the ID of the variable they represent, because the variable's name and type are serialized separately. However, toolboxes do not contain that information, so it needs to be included in the variable field directly.
{
  "kind": "flyoutToolbox",
  "content": [
    {
      "kind": "block",
      "type": "controls_for",
      "fields": {
        "VAR": {
          "name": "index",
          "type": "Number"
        }
      }
    }
  ]
}
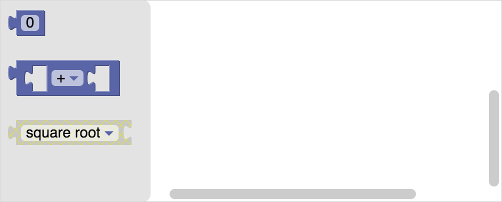
Shadow blocks
Shadow blocks are placeholder blocks that perform several functions:
- They indicate the default values for their parent block.
- They allow users to type values directly without needing to fetch a number or string block.
- Unlike a regular block, they get replaced if the user drops a block on top of them.
- They inform the user of the type of value expected.
To create a shadow block, use shadow property (JSON) or the <shadow> tag
(XML) instead of the block property or the <block> tag. For example, here is
a math_arithmetic block that has two math_number shadow blocks connected to
it:

And here is a toolbox that uses these shadow blocks:
JSON
{
 "kind": "flyoutToolbox",
 "contents": [
   {
     "kind": "block",
     "type": "math_arithmetic",
     "fields": {
       "OP": "ADD"
     },
     "inputs": {
       "A": {
         "shadow": {
           "type": "math_number",
           "fields": {
             "NUM": 1
           }
         }
       },
       "B": {
         "shadow": {
           "type": "math_number",
           "fields": {
             "NUM": 1
           }
         }
       }
     }
   },
 ]
}
XML
<xml id="toolbox" style="display: none">
 <block type="math_arithmetic">
   <field name="OP">ADD</field>
   <value name="A">
     <shadow type="math_number">
       <field name="NUM">1</field>
     </shadow>
   </value>
   <value name="B">
     <shadow type="math_number">
       <field name="NUM">1</field>
     </shadow>
   </value>
 </block>
</xml>