
多年来,Blockly 团队设计了许多自己的块,并帮助他人设计了块。以下是他们学到的一些经验教训。
首选高级块
应尽可能采用更高级别的方法,即使这会降低执行性能或灵活性。请考虑以下 Apps 脚本表达式:
SpreadsheetApp.getActiveSheet().getDataRange().getValues()
在保留所有潜在功能的 1:1 映射下,上述表达式将使用四个块构建。但 Blockly 的目标是更高级别,它会提供一个封装整个表达式的代码块。目标是为 95% 的用例进行优化,即使这会使剩余的 5% 用例变得更难处理。Blockly 不打算取代基于文本的语言,而是旨在帮助用户度过初始学习阶段,以便他们能够使用基于文本的语言。
建议:请勿盲目地将整个 API 转换为块。
考虑用户输入选项

您可以通过以下三种方式从用户获取参数。下拉菜单限制最为严格,适合简单的教程和练习。输入字段可让用户拥有更大的自由度,适合进行更具创意的活动。值块输入(通常包含阴影块)提供了计算值(例如随机生成器)的机会,而不仅仅是静态值。
建议:选择适合用户的输入法。
使用单独的条件块和循环块
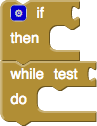
对新用户来说,最难理解的代码块是条件语句和循环。许多基于块的环境会将这两个块都归入同一“控件”类别,并且这两个块具有相同的形状和颜色。这往往会导致新用户将这两个块混淆,从而感到沮丧。Blockly 建议将条件语句和循环分别移至“逻辑”和“循环”类别,每个类别使用不同的颜色。这清楚地表明,尽管这两种想法具有类似的形状,但行为方式却截然不同。
建议:将条件和循环分开。
处理可变数量的输入
某些代码块可能需要可变数量的输入。例如,用于对一组任意数字求和的加法块,或包含一组任意 elseif 子句的 if/elseif/else 块,或包含任意数量初始化元素的列表构造函数。有几种策略,每种策略都有其优点和缺点。
a) 最简单的方法是让用户使用较小的块组合成大块。例如,通过嵌套两个包含两个数字的加法块来加三位数。再举一个例子,仅提供 if/else 块,并让用户嵌套这些块以创建 elseif 条件。

这种方法的优势在于初始简单(对用户和开发者而言)。缺点是,如果嵌套很多,代码会变得非常繁琐,用户难以阅读和维护。
b) 另一种方法是动态扩展该块,以便末尾始终有一个空闲输入。同样,如果末尾有两个空闲输入,该块会删除最后一个输入。这是 App Inventor 第一版所采用的方法。

自动展开的块不受 App Inventor 用户的喜爱,原因有几个。首先,始终有一个自由输入,并且程序永远不会“完成”。其次,在堆栈中间插入元素非常令人沮丧,因为这涉及断开编辑下方所有元素的连接,然后重新连接这些元素。不过,如果顺序不重要,并且用户可以接受节目中出现空档,那么这种方式非常方便。
c) 为了解决空洞问题,一些开发者会在手动添加或移除输入的块中添加 +/- 按钮。Open Roberta 使用两个这样的按钮从底部添加或移除输入。其他开发者会在每行添加两个按钮,以便从堆叠中间插入和删除内容。其他应用会在每行添加两个上/下按钮,以便对堆叠进行重新排序。
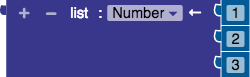
此策略包含一系列选项,从每个分块仅包含两个按钮,到每行包含四个按钮。一方面,用户可能无法执行所需的操作;另一方面,界面上充斥着按钮,看起来就像星际飞船企业号的桥梁。
d) 最灵活的方法是向块添加更改器气泡。这表示为该代码块打开配置对话框的单个按钮。您可以随意添加、删除或重新排列元素。
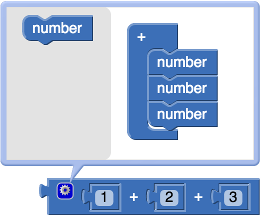
此方法的缺点是,对于新手用户而言,其更改器并不直观。引入更改器需要某种形式的说明。面向年幼儿童的基于 Blockly 的应用不应使用更改器。 不过,一旦掌握这些技巧,高级用户将会受益匪浅。
建议:每种策略都有优缺点,请选择最适合您的用户的策略。