
Introducción
En este instructivo, se muestra cómo agregar un mapa de Google Maps con un marcador a una página web con HTML, CSS y JavaScript. También se muestra cómo configurar las opciones del mapa y cómo usar el control de ranuras para agregar una etiqueta al mapa.
A continuación, se muestra el mapa que crearás con este instructivo. El marcador se ubica en Uluru (también conocido como Ayers Rock) en el Parque Nacional Uluru-Kata Tjuta.
Cómo comenzar
Para crear un mapa de Google Maps con un marcador en tu página web, sigue estos tres pasos:
Necesitas un navegador web. De la lista de navegadores compatibles , elige uno conocido, como Google Chrome (recomendado), Firefox, Safari o Edge, según la plataforma que utilices.
Paso 1: Obtén una clave de API
En esta sección se explica cómo autenticar tu app en la API de Maps JavaScript con tu propia clave de API.
Sigue estos pasos para obtener una clave de API:
Ve a la consola de Google Cloud.
Crea o selecciona un proyecto.
Haz clic en Continuar para habilitar la API y los servicios relacionados.
En la página Credenciales, obtén una clave de API (y configura sus restricciones). Si ya tienes una clave de API sin restricciones o una clave con restricciones de navegador, puedes usarla.
Para evitar el robo de cuota y proteger tu clave de API, consulta Cómo usar las claves de API.
Habilita la facturación. Consulta Uso y facturación para obtener más información.
Una vez que hayas obtenido una clave de API, agrégala al siguiente fragmento haciendo clic en "YOUR_API_KEY". Copia y pega la etiqueta de secuencia de comandos de arranque para usarla en tu propia página web.
<script>
  (g=>{var h,a,k,p="The Google Maps JavaScript API",c="google",l="importLibrary",q="__ib__",m=document,b=window;b=b[c]||(b[c]={});var d=b.maps||(b.maps={}),r=new Set,e=new URLSearchParams,u=()=>h||(h=new Promise(async(f,n)=>{await (a=m.createElement("script"));e.set("libraries",[...r]+"");for(k in g)e.set(k.replace(/[A-Z]/g,t=>"_"+t[0].toLowerCase()),g[k]);e.set("callback",c+".maps."+q);a.src=`https://maps.${c}apis.com/maps/api/js?`+e;d[q]=f;a.onerror=()=>h=n(Error(p+" could not load."));a.nonce=m.querySelector("script[nonce]")?.nonce||"";m.head.append(a)}));d[l]?console.warn(p+" only loads once. Ignoring:",g):d[l]=(f,...n)=>r.add(f)&&u().then(()=>d[l](f,...n))})({
    key: "YOUR_API_KEY",
    v: "weekly",
    // Use the 'v' parameter to indicate the version to use (weekly, beta, alpha, etc.).
    // Add other bootstrap parameters as needed, using camel case.
  });
</script>
Paso 2: Crea una página HTML
Este es el código para una página web HTML básica:
<!DOCTYPE html>
<!--
 @license
 Copyright 2025 Google LLC. All Rights Reserved.
 SPDX-License-Identifier: Apache-2.0
-->

<html>
  <head>
    <title>Add a Map</title>

    <link rel="stylesheet" type="text/css" href="./style.css" />
    <script type="module" src="./index.js"></script>
    <!-- prettier-ignore -->
    <script>(g=>{var h,a,k,p="The Google Maps JavaScript API",c="google",l="importLibrary",q="__ib__",m=document,b=window;b=b[c]||(b[c]={});var d=b.maps||(b.maps={}),r=new Set,e=new URLSearchParams,u=()=>h||(h=new Promise(async(f,n)=>{await (a=m.createElement("script"));e.set("libraries",[...r]+"");for(k in g)e.set(k.replace(/[A-Z]/g,t=>"_"+t[0].toLowerCase()),g[k]);e.set("callback",c+".maps."+q);a.src=`https://maps.${c}apis.com/maps/api/js?`+e;d[q]=f;a.onerror=()=>h=n(Error(p+" could not load."));a.nonce=m.querySelector("script[nonce]")?.nonce||"";m.head.append(a)}));d[l]?console.warn(p+" only loads once. Ignoring:",g):d[l]=(f,...n)=>r.add(f)&&u().then(()=>d[l](f,...n))})
        ({key: "YOUR_API_KEY", v: "weekly"});</script>
  </head>
  <body>

    <!-- The map, centered at Uluru, Australia. -->
    <gmp-map center="-25.344,131.031" zoom="4" map-id="DEMO_MAP_ID">
    </gmp-map>

  </body>
</html>
Esta es una página HTML muy básica que usa un
gmp-map elemento para
mostrar un mapa en la página. El mapa estará en blanco, ya que aún no agregamos ningún código JavaScript.
Comprende el código
En esta etapa del ejemplo, tenemos lo siguiente:
- Se declaró la aplicación como HTML5 con la declaración
!DOCTYPE html. - Se cargó la API de Maps JavaScript con el cargador de arranque.
- Se creó un elemento
gmp-mappara que contenga el mapa.
Declara tu aplicación como HTML5
Te recomendamos que declares un DOCTYPE verdadero en tu aplicación web.
En estos ejemplos, declaramos nuestras aplicaciones como HTML5 con la declaración DOCTYPE HTML5, como se muestra a continuación:
<!DOCTYPE html>
La mayoría de los navegadores actuales renderizarán el contenido declarado con este DOCTYPE en el "modo estándar", lo que significa que tu aplicación tendrá una mayor compatibilidad en varios navegadores. El DOCTYPE también está diseñado para degradarse gradualmente. Los navegadores que no lo comprendan lo ignorarán y usarán el "modo no estándar" para mostrar su contenido.
Ten en cuenta que parte del código CSS que funciona en el modo no estándar no es válido en el modo estándar. En términos específicos, todos los tamaños basados en porcentajes deben heredar sus valores de elementos de bloque primarios y, si cualquiera de estos elementos principales no especifica un tamaño, se supondrá que tienen un tamaño de 0 x 0 píxeles. Por ese motivo, incluimos la siguiente declaración style:
<style>
  gmp-map {
    height: 100%;
  }
  html, body {
    height: 100%;
    margin: 0;
    padding: 0;
  }
</style>
Carga la API de Maps JavaScript
El cargador de arranque prepara la API de Maps JavaScript para la carga (no se cargarán bibliotecas hasta que se llame a importLibrary()).
<script>
  (g=>{var h,a,k,p="The Google Maps JavaScript API",c="google",l="importLibrary",q="__ib__",m=document,b=window;b=b[c]||(b[c]={});var d=b.maps||(b.maps={}),r=new Set,e=new URLSearchParams,u=()=>h||(h=new Promise(async(f,n)=>{await (a=m.createElement("script"));e.set("libraries",[...r]+"");for(k in g)e.set(k.replace(/[A-Z]/g,t=>"_"+t[0].toLowerCase()),g[k]);e.set("callback",c+".maps."+q);a.src=`https://maps.${c}apis.com/maps/api/js?`+e;d[q]=f;a.onerror=()=>h=n(Error(p+" could not load."));a.nonce=m.querySelector("script[nonce]")?.nonce||"";m.head.append(a)}));d[l]?console.warn(p+" only loads once. Ignoring:",g):d[l]=(f,...n)=>r.add(f)&&u().then(()=>d[l](f,...n))})({
    key: "YOUR_API_KEY",
    v: "weekly",
    // Use the 'v' parameter to indicate the version to use (weekly, beta, alpha, etc.).
    // Add other bootstrap parameters as needed, using camel case.
  });
</script>
Consulta el Paso 3: Obtén una clave de API para ver instrucciones sobre cómo obtener tu propia clave.
En esta etapa del instructivo, aparece una ventana en blanco que solo muestra el texto de la etiqueta sin formato. Esto se debe a que aún no agregamos ningún código JavaScript.
Crea un elemento gmp-map
A fin de que el mapa aparezca en una página web, se debe reservar un lugar para él. Por lo general, se crea un elemento gmp-map y se obtiene una referencia a este elemento en el modelo de objetos del documento (DOM) del navegador. También puedes usar un
div elemento para hacerlo (obtén más información),
pero se recomienda usar el gmp-map elemento.
En el siguiente código, se define el elemento gmp-map y se establecen los parámetros center, zoom y map-id.
<gmp-map center="-25.344,131.031" zoom="4" map-id="DEMO_MAP_ID">
</gmp-map>
Las opciones center y zoom siempre son obligatorias. En el código anterior, la propiedad center le indica a la API dónde debe centrar el mapa, y la propiedad zoom especifica el nivel de zoom del mapa. 0 es el valor de zoom más bajo y muestra todo el planeta. Define un valor de zoom más alto para acercarte en el globo con resoluciones más altas.
Niveles de zoom
Para ofrecer un mapa de toda la Tierra en una sola imagen, se necesitaría un mapa enorme o un mapa muy pequeño con una resolución muy baja. Es por eso que las imágenes de mapas en Google Maps y la API de Maps JavaScript se dividen en "mosaicos" de mapas y "niveles de zoom". En los niveles de zoom bajos, un conjunto reducido de mosaicos de mapas abarca un área amplia. En los niveles de zoom superiores, los mosaicos tienen una resolución más alta y abarcan un área más reducida. En la siguiente lista, se muestra el nivel aproximado de detalle que puedes esperar ver en cada nivel de zoom:
- 1: Mundo
- 5: Tierra firme o continente
- 10: Ciudad
- 15: Calles
- 20: Edificios
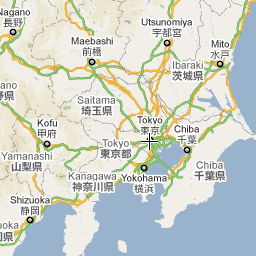
Las tres imágenes que se incluyen a continuación reflejan la misma ubicación de Tokio con niveles de zoom 0, 7 y 18.


En el siguiente código, se describe el CSS que establece el tamaño del elemento gmp-map.
/* Set the size of the gmp-map element that contains the map */
gmp-map {
    height: 400px; /* The height is 400 pixels */
    width: 100%; /* The width is the width of the web page */
}
En el código anterior, el elemento style establece el tamaño de gmp-map. Configura el ancho y la altura de en más de 0 px para que el mapa sea visible. En este caso, se configura el gmp-map con una altura de 400 píxeles y un ancho del 100% para que se muestre a lo ancho de la página web. Se recomienda establecer siempre de forma explícita los estilos de altura y ancho.
Control de ranuras
Puedes usar el control de ranuras para agregar controles de formularios HTML a tu mapa. Una
ranura es una
posición predefinida en el mapa. Usa el atributo slot para establecer la
posición necesaria para un elemento y anida elementos dentro del elemento gmp-map. En el siguiente fragmento, se muestra cómo agregar una etiqueta HTML a la esquina superior izquierda del mapa.