Restez organisé à l'aide des collections
Enregistrez et classez les contenus selon vos préférences.
Les fonctionnalités utilisant WebGL pour l'API Maps JavaScript vous permettent de contrôler l'inclinaison et la rotation de la carte, d'y ajouter directement des objets 3D et plus encore. Les fonctionnalités suivantes sont incluses :
La vue en superposition WebGL vous permet d'ajouter des graphiques et des animations 2D et 3D personnalisées à vos cartes.
L'inclinaison et la direction peuvent désormais être ajustées de manière programmatique, ainsi qu'à l'aide de gestes de souris et de clavier.
map.moveCamera() vous permet de modifier plusieurs propriétés de caméra en même temps.
L'option renderingType remplace tous les paramètres de type de rendu définis lors de la configuration d'un ID de carte.
Pour activer l'inclinaison et la rotation, définissez l'option de carte tiltInteractionEnabled sur "true" ou appelez map.setTiltInteractionEnabled.
Pour activer le déplacement, définissez l'option de carte headingInteractionEnabled sur true ou appelez map.setHeadingInteractionEnabled.
Utiliser un ID de carte pour définir le type de rendu
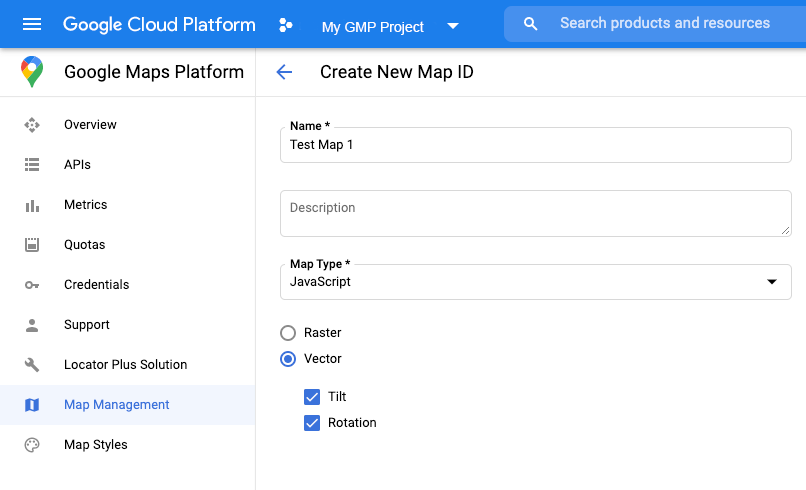
Vous pouvez également spécifier le type de rendu à l'aide d'un ID de carte. Pour créer un ID de carte, suivez la procédure décrite dans Utiliser les styles de cartes basés dans le cloud : obtenir un ID de carte.
Veillez à définir le type de carte sur JavaScript et à sélectionner l'option Vecteur. Cochez Inclinaison ou Rotation pour activer l'inclinaison et la rotation sur la carte. Cela vous permet d'ajuster ces valeurs de manière programmatique, et permet aux utilisateurs d'ajuster l'inclinaison et la direction directement sur la carte. Si incliner ou faire tourner la carte affecte négativement votre application, décochez Inclinaison et Rotation pour que les utilisateurs ne puissent pas ajuster ces éléments.
Ensuite, mettez à jour le code d'initialisation de votre carte avec l'ID de carte que vous avez créé. Vous trouverez vos ID de carte sur la page Gestion des cartes. Indiquez un ID de carte lorsque vous instanciez la carte à l'aide de la propriété mapId, comme indiqué ci-dessous :
Les cartes vectorielles, l'inclinaison et l'orientation sont activées par défaut lorsque vous utilisez l'élément <gmp-map>, qui vous permet d'ajouter une carte à votre page à l'aide d'HTML. En savoir plus
Exemples
Des exemples ont été fournis pour illustrer ces fonctionnalités :
Sauf indication contraire, le contenu de cette page est régi par une licence Creative Commons Attribution 4.0, et les échantillons de code sont régis par une licence Apache 2.0. Pour en savoir plus, consultez les Règles du site Google Developers. Java est une marque déposée d'Oracle et/ou de ses sociétés affiliées.
Dernière mise à jour le 2025/08/31 (UTC).
[null,null,["Dernière mise à jour le 2025/08/31 (UTC)."],[[["\u003cp\u003eWebGL-powered features for Maps JavaScript API enable control over tilt and rotation, addition of 3D objects, and custom 2D/3D graphics with WebGL Overlay View.\u003c/p\u003e\n"],["\u003cp\u003eTo utilize WebGL features, use a vector map by specifying \u003ccode\u003erenderingType: RenderingType.VECTOR\u003c/code\u003e during map initialization or by using a map ID with the vector option enabled.\u003c/p\u003e\n"],["\u003cp\u003eTilt and rotation can be controlled programmatically or through user interaction by enabling \u003ccode\u003etiltInteractionEnabled\u003c/code\u003e and \u003ccode\u003eheadingInteractionEnabled\u003c/code\u003e map options.\u003c/p\u003e\n"],["\u003cp\u003eThe \u003ccode\u003e<gmp-map>\u003c/code\u003e element automatically enables vector maps, tilt, and heading by default, simplifying integration.\u003c/p\u003e\n"],["\u003cp\u003eSeveral examples and demos are available to explore the capabilities and implementation of WebGL features in Maps JavaScript API.\u003c/p\u003e\n"]]],[],null,["\u003cbr /\u003e\n\nWebGL-powered features for Maps JavaScript API let you\ncontrol tilt and rotation, add 3D objects directly to the map, and more. The\nfollowing features are included:\n\n- [WebGL Overlay View](/maps/documentation/javascript/webgl/webgl-overlay-view) lets you add custom 2D and 3D graphics and animated content to your maps.\n- [Tilt and heading](/maps/documentation/javascript/vector-map#tilt-rotation) can now be adjusted programmatically, and by using mouse and keyboard gestures.\n- [map.moveCamera()](/maps/documentation/javascript/vector-map#control-camera) lets you simultaneously change multiple camera properties.\n- Zoom now supports [fractional values](/maps/documentation/javascript/vector-map#fractional-zoom).\n\nGet started\n\nIn order to use the new WebGL features, you must use a vector map. This section\nshows you how.\n\nSpecify the `renderingType` option\n\nUse the `renderingType` option to specify either the raster or vector\nrendering type for your map (no map ID required):\n\n1. Load the `RenderingType` library; this can be done when loading the Maps\n library:\n\n const { Map, RenderingType } = await google.maps.importLibrary(\"maps\") as google.maps.MapsLibrary;\n\n2. When initializing the map, use the `renderingType` option to specify either\n `RenderingType.VECTOR` or `RenderingType.RASTER`:\n\n map = new Map(\n document.getElementById('map') as HTMLElement,\n {\n zoom: 4,\n center: position,\n renderingType: RenderingType.VECTOR,\n }\n );\n\nThe `renderingType` option overrides any rendering type settings made by\nconfiguring a map ID.\n\n- To enable tilt and rotation, set the `tiltInteractionEnabled` map option to true or call `map.setTiltInteractionEnabled`.\n- To enable panning, set the `headingInteractionEnabled` map option to `true` or call `map.setHeadingInteractionEnabled`.\n\nUse a map ID to set rendering type\n\nYou can also specify the rendering type by using a map ID. To create a new map\nID, follow the steps in [Using Cloud-based Map Styling - Get a map ID](/maps/documentation/javascript/styling#creating-map-ids).\nBe sure to set the Map type to **JavaScript** , and select the **Vector**\noption. Check **Tilt** or **Rotation** to enable tilt and rotation on the\nmap. Doing so lets you programmatically adjust these values, and also\nlets users adjust tilt and heading directly on the map. If the use of tilt or\nheading will adversely affect your app, leave **Tilt** and **Rotation** un-\nchecked so users cannot adjust tilt and rotation.\n\nNext, update your map initialization code with the map ID you created. You can\nfind your map IDs on the\n[Maps\nManagement](https://console.cloud.google.com/google/maps-apis/studio/maps) page. Provide a map ID when you instantiate the map using the\n`mapId` property as shown here: \n\n```javascript\nmap = new google.maps.Map(document.getElementById('map'), {\n center: {lat: -34.397, lng: 150.644},\n zoom: 8,\n mapId: '\u003cvar translate=\"no\"\u003eMAP_ID\u003c/var\u003e'\n});\n```\n| **Important:** It is recommended to associate your map ID and API key with the same Google Cloud console project.\n\nUse the `\u003cgmp-map\u003e` element\n\nVector maps, tilt, and heading are enabled by default when using he `\u003cgmp-map\u003e`\nelement, which lets you add a map to your page using HTML. [Learn more](/maps/documentation/javascript/add-google-map-wc-tut).\n\nExamples\n\nExamples have been provided to demonstrate these features:\n\n- [WebGL Overlay View](/maps/documentation/javascript/examples/webgl/webgl-overlay-simple)\n- [WebGL Tilt and Rotation](/maps/documentation/javascript/examples/webgl/webgl-tilt-rotation)\n- [WebGL Feature Tour](https://goo.gle/maps-platform-webgl-tour)\n- [WebGL Travel App Demo](https://goo.gle/maps-platform-webgl-travel-demo)"]]