
Un ID mappa è un identificatore univoco che rappresenta le impostazioni di configurazione e di stile di Google Maps archiviate in Google Cloud. Utilizza gli ID mappa per attivare le funzionalità o gestire o applicare stili alle mappe sui tuoi siti web e nelle tue applicazioni. Puoi creare ID mappa per ogni piattaforma di cui hai bisogno (JavaScript, Android, iOS o Static Maps) nel progetto della console Google Cloud nella pagina Gestione mappa.
Per maggiori dettagli e funzionalità che utilizzano gli ID mappa, consulta la panoramica degli ID mappa.
Autorizzazioni obbligatorie
Per creare o gestire gli ID mappa nel tuo progetto, devi utilizzare un'entità con le autorizzazioni a livello di ruolo appropriate, Editor o Proprietario, nella pagina IAM della console Cloud per il progetto. Per maggiori dettagli, consulta il riferimento ai ruoli di base e predefiniti di IAM.
Creare ID mappa
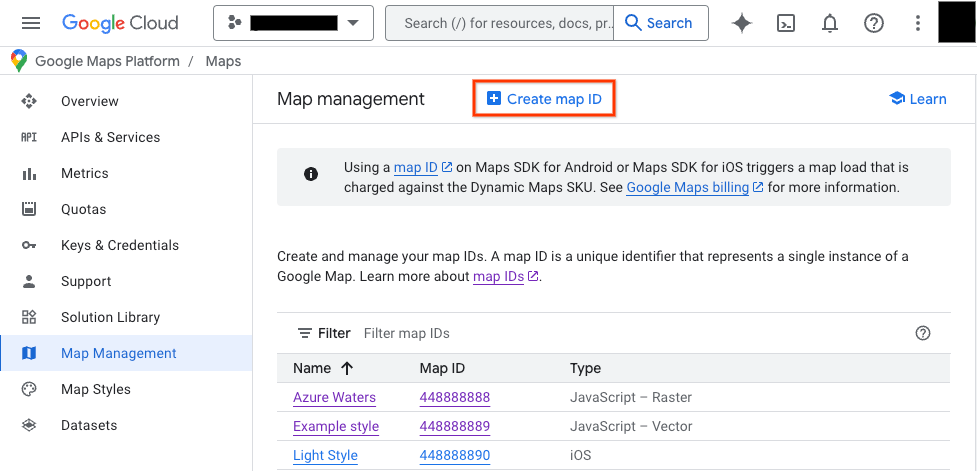
Per creare ID mappa nella console Cloud, segui questi passaggi:
Accedi a un progetto della console Cloud con le autorizzazioni richieste e aprilo.
Nella console Cloud, vai alla pagina Gestione mappa.
Fai clic su Crea ID mappa.
Nella pagina Crea nuovo ID mappa, segui questi passaggi:
- In Nome, assegna un nome all'ID mappa.
- Facoltativo: in Descrizione, descrivi lo scopo dell'ID mappa.
- In Tipo di mappa, seleziona la piattaforma su cui prevedi di utilizzare l'ID mappa. Se scegli JavaScript, scegli anche un tipo di mappa Raster (impostazione predefinita) o Vettoriale. Per saperne di più sulle mappe vettoriali, consulta Mappe vettoriali.
- Fai clic su Salva per visualizzare il nuovo ID mappa.
Associare un ID mappa a uno stile di mappa
Se utilizzi la personalizzazione delle mappe basata su cloud, associa uno stile di mappa al tuo ID mappa. Per maggiori dettagli, consulta Associare lo stile a un ID mappa.
Aggiungere l'ID mappa all'app
Android
Aggiungi l'ID mappa tramite un elemento <fragment> nel
file di layout dell'attività, utilizzando la classe MapView o a livello di programmazione
utilizzando la classe GoogleMapOptions.
Ad esempio, supponiamo di aver creato un ID mappa archiviato come valore stringa denominato map_id in res/values/strings.xml:
<?xml version="1.0" encoding="utf-8"?>
<resources>
<string name="map_id">MAP_ID</string>
</resources>
Per le mappe aggiunte tramite un <fragment> elemento nel file di layout dell'attività,
tutti i frammenti di mappa che devono avere lo stile personalizzato devono specificare l'
ID mappa nell'attributo map:mapId:
<fragment xmlns:map="http://schemas.android.com/apk/res-auto"
    map:name="com.google.android.gms.maps.SupportMapFragment"
    …
    map:mapId="@string/map_id" />
Puoi anche utilizzare l'attributo map:mapId della classe MapView per specificare un ID mappa:
<com.google.android.gms.maps.MapView
    xmlns:map="http://schemas.android.com/apk/res-auto"
    ....
    map:mapId="@string/map_id" />
Per specificare un ID mappa a livello di programmazione, passalo a un'istanza MapFragment utilizzando la classe GoogleMapOptions:
Java
 MapFragment mapFragment = MapFragment.newInstance(
     new GoogleMapOptions()
         .mapId(getResources().getString(R.string.map_id)));
Kotlin
 val mapFragment = MapFragment.newInstance(
     GoogleMapOptions()
         .mapId(resources.getString(R.string.map_id))
 )
In Android Studio, crea ed esegui l'app come faresti normalmente. Gli stili personalizzati configurati nel primo passaggio vengono applicati a tutte le mappe con l'ID mappa specificato.
iOS
Per creare un'istanza di una mappa utilizzando un ID mappa:
- Crea un
GMSMapIDcon la stringa dell'ID mappa dalla console Cloud. - Crea un
GMSMapViewspecificando l'ID mappa appena creato.
Swift
let camera = GMSCameraPosition(latitude: 47.0169, longitude: -122.336471, zoom: 12)
let mapID = GMSMapID(identifier: "MAP_ID")
let mapView = GMSMapView(frame: .zero, mapID: mapID, camera: camera)
self.view = mapView
Objective-C
GMSCameraPosition *camera = [GMSCameraPosition cameraWithLatitude:47.0169
                                                        longitude:-122.336471
                                                             zoom:12];
GMSMapID *mapID = [GMSMapID mapIDWithIdentifier:@"MAP_ID"];
GMSMapView *mapView = [GMSMapView mapWithFrame:CGRectZero mapID:mapID camera:camera];
self.view = mapView;
Se utilizzi il tuo ID mappa, puoi impostarlo nella console Cloud in modo che abbia un nuovo stile in qualsiasi momento e questo stile verrà applicato automaticamente alla visualizzazione della mappa per te e gli utenti entro circa sei ore.
Se vuoi visualizzare immediatamente le modifiche, puoi chiudere e riavviare l'app uscendone, forzando la chiusura dell'app dall'elenco delle app utilizzate di recente e poi riaprendola. La mappa aggiornata sarà quindi visibile.
JavaScript
Per creare una mappa con un ID mappa nel codice dell'applicazione:
Se stai già personalizzando la mappa con il codice JSON incorporato, rimuovi la
stylesproprietà dall'oggettoMapOptions; in caso contrario, salta questo passaggio.Aggiungi un ID mappa alla mappa utilizzando la proprietà
mapId. Ad esempio:
map = new google.maps.Map(document.getElementById('map'), {
center: {lat: -34.397, lng: 150.644},
zoom: 8,
mapId: 'MAP_ID'
});
Maps Static
Per aggiungere un ID mappa a una mappa nuova o esistente che utilizza una delle nostre API del servizio web, aggiungi il parametro URL map_id e impostalo sull'ID mappa. Questo esempio mostra come aggiungere un ID mappa a una mappa utilizzando l'API Maps Static.
<img src="https://maps.googleapis.com/maps/api/staticmap?center=Brooklyn+Bridge,New+York,NY&zoom=13&size=600x300&maptype=roadmap&markers=color:blue%7Clabel:S%7C40.702147,-74.015794&markers=color:green%7Clabel:G%7C40.711614,-74.012318&markers=color:red%7Clabel:C%7C40.718217,-73.998284&key=YOUR_API_KEY&map_id=MAP_ID&signature=YOUR_SIGNATURE" />