애플리케이션에서 Business Profile API로 전송하는 모든 요청에는 승인 토큰이 포함되어야 합니다. 승인 토큰은 Google에서 Business Profile API에 대한 액세스를 허용할 수 있도록 사용자 또는 애플리케이션을 나타냅니다. 요청을 승인하려면 애플리케이션에서 OAuth 2.0 프로토콜을 사용해야 합니다.
이 가이드에서는 플랫폼에 OAuth 2.0을 구현하는 데 사용할 수 있는 다양한 방법을 설명합니다. Google Identity Platform은 이 가이드 전체에서 사용되는 Google 로그인 및 OAuth 기능을 제공합니다.
웹 서버 애플리케이션용 Oauth 2.0을 사용하는 방법을 자세히 알아보려면 이 가이드를 참고하세요.
OAuth 2.0을 구현하면 다음과 같은 이점이 있습니다.
- 비즈니스 소유자 데이터에 대한 액세스를 보호합니다.
- 비즈니스 소유자가 Google 계정에 로그인할 때 비즈니스 소유자의 ID를 설정합니다.
- 파트너 플랫폼 또는 애플리케이션에서 비즈니스 소유자의 명시적인 동의를 받아 위치 데이터를 액세스하고 수정할 수 있도록 합니다. 소유자는 나중에 이 액세스 권한을 취소할 수 있습니다.
- 파트너 플랫폼의 ID를 설정합니다.
- 파트너 플랫폼에서 비즈니스 소유자를 대신하여 온라인 또는 오프라인 작업을 실행할 수 있습니다. 여기에는 리뷰에 대한 응답, 게시물 작성, 메뉴 항목 업데이트가 포함됩니다.
OAuth 2.0으로 API 액세스
시작하기 전에 Google Cloud 프로젝트를 구성하고 Business Profile API를 사용 설정해야 합니다. 자세한 내용은 기본 설정 문서를 참고하세요.
OAuth 및 동의 화면 구성
사용자 인증 정보와 동의 화면을 만들려면 다음 단계를 따르세요.
- API 콘솔의 사용자 인증 정보 페이지에서 사용자 인증 정보 만들기를 클릭하고 드롭다운 목록에서 'OAuth 클라이언트 ID'를 선택합니다.
- 애플리케이션 유형을 선택하고 관련 정보를 입력한 다음 만들기를 클릭합니다.
- 저장을 클릭합니다.
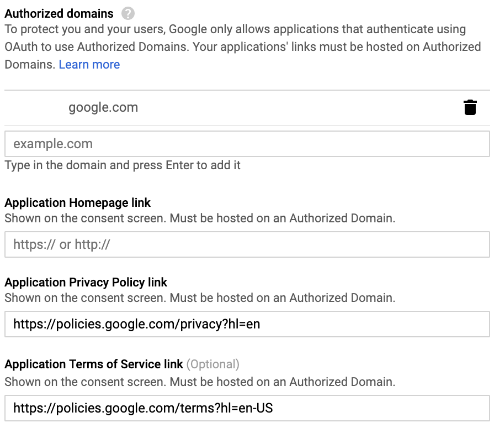
- OAuth 동의 화면 설정을 업데이트합니다. 여기에서 애플리케이션 이름과 로고를 업데이트하고 서비스 약관 및 개인정보처리방침 링크를 포함할 수 있습니다.
다음 이미지는 OAuth 동의 화면의 애플리케이션 이름과 로고 필드를 보여줍니다.

다음 이미지는 OAuth 동의 화면에 표시되는 추가 필드를 보여줍니다.

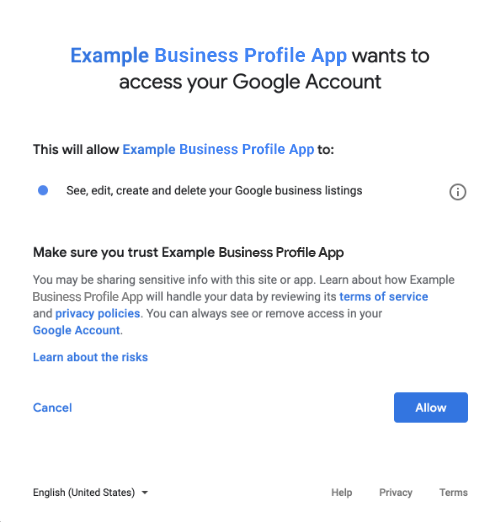
다음 이미지는 사용자가 동의하기 전에 사용자에게 표시되는 화면의 예입니다.

OAuth 2.0을 통합하는 방법
다음과 같은 방법으로 OAuth 2.0을 구현할 수 있습니다.
다음 콘텐츠에서는 OAuth 2.0을 애플리케이션에 통합하는 이러한 방법에 대한 정보를 제공합니다.
승인 범위
다음 OAuth 범위 중 하나가 필요합니다.
- https://www.googleapis.com/auth/business.manage
- https://www.googleapis.com/auth/plus.business.manage
plus.business.manage 범위는 더 이상 지원되지 않으며, 기존 구현에서 하위 호환성을 유지하는 데 사용됩니다.
클라이언트 라이브러리
이 페이지의 언어별 예에서는 Google API 클라이언트 라이브러리를 사용하여 OAuth 2.0 승인을 구현합니다. 코드 샘플을 실행하려면 먼저 해당 언어용 클라이언트 라이브러리를 설치해야 합니다.
다음 언어의 경우 클라이언트 라이브러리를 사용할 수 있습니다.
Google 로그인
Google 로그인은 OAuth를 플랫폼에 통합하는 가장 빠른 방법입니다. Android, iOS, 웹 등에서 사용할 수 있습니다.

Google 로그인은 사용자가 다른 Google 서비스에 로그인할 때 사용하는 계정과 동일한 Google 계정으로 로그인할 수 있도록 하는 보안 인증 시스템입니다. 사용자는 로그인한 후 애플리케이션에서 Business Profile API를 호출할 수 있도록 동의하고 갱신 및 액세스 토큰을 얻는 데 사용되는 승인 코드를 교환할 수 있습니다.
오프라인 액세스
사용자가 오프라인 상태인 경우에 사용자를 대신하여 Business Profile API를 호출해야 할 수도 있습니다. 사용자가 로그인하여 동의한 후 언제든지 비즈니스 정보를 수정, 조회, 관리할 수 있으므로 플랫폼에서 이 기능을 통합하는 것이 좋습니다.
Google에서는 사용자가 이미 Google 계정으로 로그인하고 애플리케이션에서 Business Profile API를 호출할 수 있도록 동의하고 갱신 토큰 및 액세스 토큰을 얻는 데 사용되는 승인 코드를 교환했다고 가정합니다. 사용자는 갱신 토큰을 안전하게 저장하고 나중에 이 토큰을 사용하여 언제든지 새 액세스 토큰을 얻을 수 있습니다. 자세한 내용은 서버 측 앱용 Google 로그인을 참고하세요.
다음 코드 스니펫은 애플리케이션에서 오프라인 액세스를 구현하는 방법을 보여줍니다. 이 코드를 실행하려면 샘플 실행을 참고하세요.
<!-- The top of file index.html -->
<html itemscope itemtype="http://schema.org/Article">
<head>
  <!-- BEGIN Pre-requisites -->
  <script src="https://ajax.googleapis.com/ajax/libs/jquery/1.8.2/jquery.min.js">
  </script>
  <script src="https://apis.google.com/js/client:platform.js?onload=start" async defer>
  </script>
  <!-- END Pre-requisites -->
<!-- Continuing the <head> section -->
  <script>
    function start() {
      gapi.load('auth2', function() {
        auth2 = gapi.auth2.init({
          client_id: 'YOUR_CLIENT_ID.apps.googleusercontent.com',
          // Scopes to request in addition to 'profile' and 'email'
          scope: 'https://www.googleapis.com/auth/business.manage',
          immediate: true
        });
      });
    }
  </script>
</head>
<body>
  <!-- Add where you want your sign-in button to render -->
<!-- Use an image that follows the branding guidelines in a real app, more info here:
 https://developers.google.com/identity/branding-guidelines
-->
<h1>Business Profile Offline Access Demo</h1>

<p> This demo demonstrates the use of Google Identity Services and OAuth to gain authorization to call the Business Profile APIs on behalf of the user, even when the user is offline.

When a refresh token is acquired, store this token securely on your database. You will then be able to use this token to refresh the OAuth credentials and make offline API calls on behalf of the user.

The user may revoke access at any time from the <a href='https://myaccount.google.com/permissions'>Account Settings</a> page.
</p>

<button id="signinButton">Sign in with Google</button><br>
<input id="authorizationCode" type="text" placeholder="Authorization Code" style="width: 60%"><button id="accessTokenButton" disabled>Retrieve Access/Refresh Token</button><br>
 <input id="refreshToken" type="text" placeholder="Refresh Token, never expires unless revoked" style="width: 60%"><button id="refreshSubmit">Refresh Access Token</button><br>
 <input id="accessToken" type="text" placeholder="Access Token" style="width: 60%"><button id="gmbAccounts">Get Business Profile Accounts</button><br>
 <p>API Responses:</p>
<script>
    //Will be populated after sign in.
    var authCode;
  $('#signinButton').click(function() {
    // signInCallback
    auth2.grantOfflineAccess().then(signInCallback);
  });

  $('#accessTokenButton').click(function() {
    // signInCallback defined in step 6.
    retrieveAccessTokenAndRefreshToken(authCode);
  });

  $('#refreshSubmit').click(function() {
    // signInCallback defined in step 6.
    retrieveAccessTokenFromRefreshToken($('#refreshToken').val());
  });

   $('#gmbAccounts').click(function() {
    // signInCallback defined in step 6.
    retrieveGoogleMyBusinessAccounts($('#accessToken').val());
  });


function signInCallback(authResult) {
    //the 'code' field from the response, used to retrieve access token and bearer token
  if (authResult['code']) {
    // Hide the sign-in button now that the user is authorized, for example:
    $('#signinButton').attr('style', 'display: none');
    authCode = authResult['code'];

    $("#accessTokenButton").attr( "disabled", false );

    //Pretty print response
    var e = document.createElement("pre")
    e.innerHTML = JSON.stringify(authResult, undefined, 2);
    document.body.appendChild(e);

    //autofill authorization code input
    $('#authorizationCode').val(authResult['code'])


  } else {
    // There was an error.
  }
}

//WARNING: THIS FUNCTION IS DISPLAYED FOR DEMONSTRATION PURPOSES ONLY. YOUR CLIENT_SECRET SHOULD NEVER BE EXPOSED ON THE CLIENT SIDE!!!!
function retrieveAccessTokenAndRefreshToken(code) {
      $.post('https://www.googleapis.com/oauth2/v4/token',
      { //the headers passed in the request
        'code' : code,
        'client_id' : 'YOUR_CLIENT_ID.apps.googleusercontent.com',
        'client_secret' : 'YOUR_CLIENT_SECRET',
        'redirect_uri' : 'http://localhost:8000',
        'grant_type' : 'authorization_code'
      },
      function(returnedData) {
        console.log(returnedData);
        //pretty print JSON response
        var e = document.createElement("pre")
        e.innerHTML = JSON.stringify(returnedData, undefined, 2);
        document.body.appendChild(e);
        $('#refreshToken').val(returnedData['refresh_token'])
      });
}

//WARNING: THIS FUNCTION IS DISPLAYED FOR DEMONSTRATION PURPOSES ONLY. YOUR CLIENT_SECRET SHOULD NEVER BE EXPOSED ON THE CLIENT SIDE!!!!
function retrieveAccessTokenFromRefreshToken(refreshToken) {
    $.post('https://www.googleapis.com/oauth2/v4/token',
        { // the headers passed in the request
        'refresh_token' : refreshToken,
        'client_id' : 'YOUR_CLIENT_ID.apps.googleusercontent.com',
        'client_secret' : 'YOUR_CLIENT_SECRET',
        'redirect_uri' : 'http://localhost:8000',
        'grant_type' : 'refresh_token'
      },
      function(returnedData) {
        var e = document.createElement("pre")
        e.innerHTML = JSON.stringify(returnedData, undefined, 2);
        document.body.appendChild(e);
        $('#accessToken').val(returnedData['access_token'])
      });
}

function retrieveGoogleMyBusinessAccounts(accessToken) {
    $.ajax({
        type: 'GET',
        url: 'https://mybusinessaccountmanagement.googleapis.com/v1/accounts',
        headers: {
            'Authorization' : 'Bearer ' + accessToken
        },
        success: function(returnedData) {
            var e = document.createElement("pre")
            e.innerHTML = JSON.stringify(returnedData, undefined, 2);
            document.body.appendChild(e);
        }
    });
}
</script>
</body>
</html>
온라인 액세스 전용
쉽게 구현하기 위해 사용자 갱신 토큰을 캐시하지 않고 Business Profile API에서 호출하는 경우도 있습니다. 하지만 플랫폼에서 사용자로서 API를 호출하려면 사용자가 로그인해야 합니다.
다음 코드 스니펫은 Google 로그인 절차의 구현 및 사용자별 API 호출 방법을 보여줍니다. 사용자가 Google 계정으로 로그인하고 애플리케이션에 동의하면 액세스 토큰이 부여됩니다. 이 액세스 토큰은 사용자를 나타내며 Business Profile API 요청에서 헤더로 전달되어야 합니다.
이 코드를 실행하려면 샘플 실행을 참고하세요.
<!-- The top of file index.html -->
<html lang="en">
  <head>
    <meta name="google-signin-scope" content="profile email https://www.googleapis.com/auth/business.manage">
    <meta name="google-signin-client_id" content="YOUR_CLIENT_ID.apps.googleusercontent.com">
    <script src="https://apis.google.com/js/platform.js" async defer></script>
  </head>
  <body>
    <div class="g-signin2" data-onsuccess="onSignIn" data-theme="dark"></div>
    <script>
      var gmb_api_version = 'https://mybusinessaccountmanagement.googleapis.com/v1';
      function onSignIn(googleUser) {
        // Useful data for your client-side scripts:
        var profile = googleUser.getBasicProfile();
        console.log('Full Name: ' + profile.getName());
        console.log("Email: " + profile.getEmail());
        var access_token = googleUser.getAuthResponse().access_token;

        //Using the sign in data to make a Business Profile APIs call
        var req = gmb_api_version + '/accounts';
        var xhr = new XMLHttpRequest();
        xhr.open('GET', req);
        xhr.setRequestHeader('Authorization', 'Bearer ' + access_token);

        //Displaying the API response
        xhr.onload = function () {
          document.body.appendChild(document.createTextNode(xhr.responseText));
        }
        xhr.send();
      }
    </script>
  </body>
</html>
샘플 실행
제공된 샘플 코드를 실행하려면 다음 단계를 따르세요.
- 코드 스니펫을
index.html파일에 저장합니다. 파일에 클라이언트 ID가 설정되어 있는지 확인합니다. 작업 디렉터리에서 다음 명령어를 사용하여 웹 서버를 시작합니다.
Python 2.X
python -m SimpleHTTPServer 8000
Python 3.X
python -m http.server 8000
API 콘솔의 사용자 인증 정보 페이지에서 사용된 클라이언트 ID를 선택합니다.
승인된 JavaScript 원본 필드에 웹사이트 URL을 입력합니다. 이 가이드의 샘플 코드를 실행하려면
http://localhost:8000도 추가해야 합니다.브라우저에 다음 URL을 로드합니다.
http://localhost:8000/index.html