ב-31 ביולי 2024 נוציא משימוש את Google Business Messages. מידע נוסף זמין
כאן.
בוט העזרה של Business Messages
קל לארגן דפים בעזרת אוספים
אפשר לשמור ולסווג תוכן על סמך ההעדפות שלך.
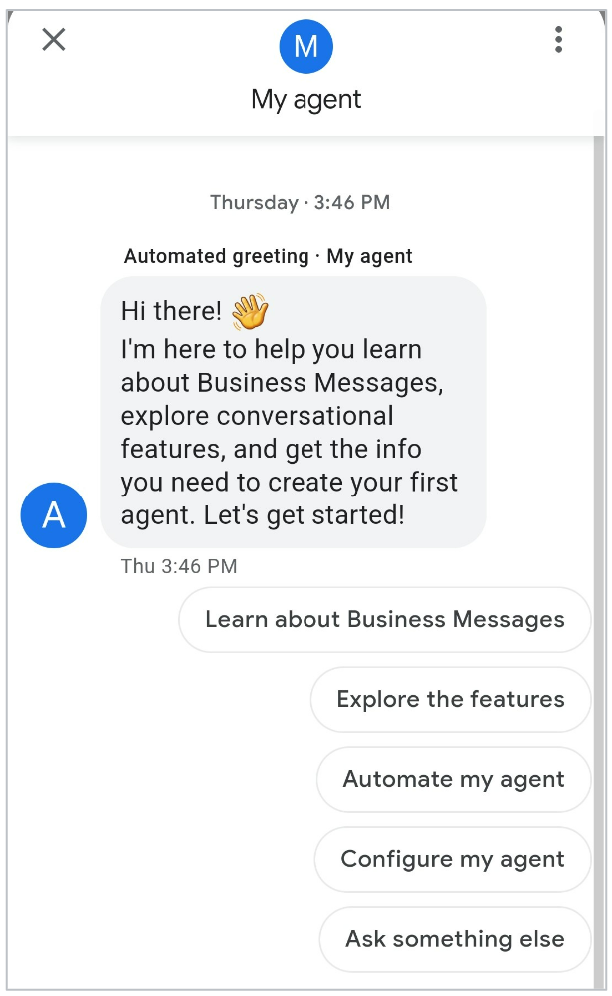
באמצעות בוט העזרה של Business Messages אפשר להתחיל בקלות שיחה עם הנציג, כדי לבדוק את האפשרויות השונות. הפעלת ה-Helper Bot היא אופציונלית, אבל מומלצת מאוד כשיוצרים את הנציג הראשון.
בעזרת Helper Bot תוכלו:
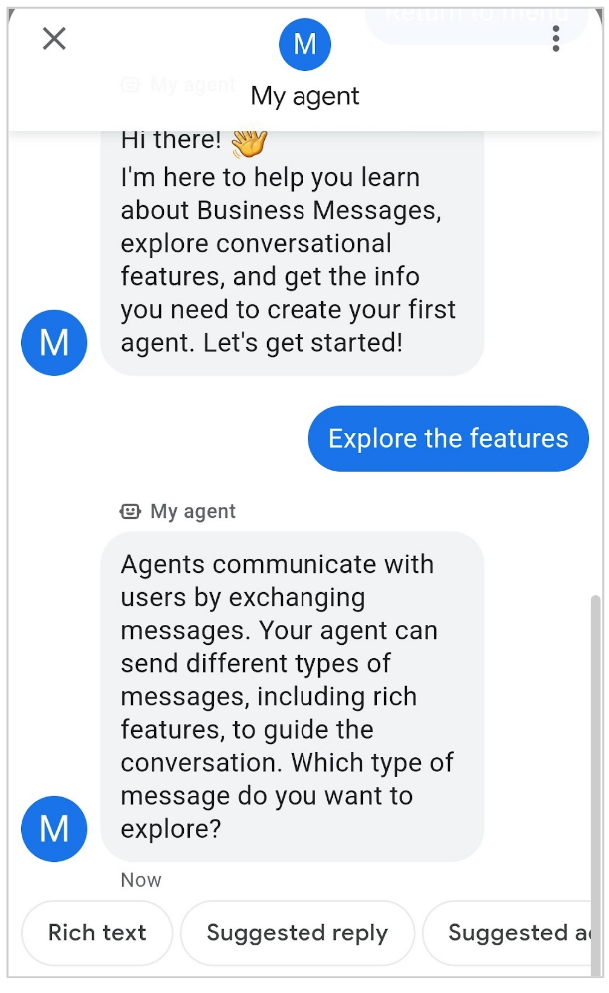
- תכונות עשירות
- איך מטמיעים תכונות
- משאבים להגדרת סוכן
כשבוט העזרה פועל, הוא שולח ומקבל הודעות בשם הנציג, ללא צורך ב-webhook.
בוט העזרה מטפל בתהליך שליחת ההודעות, ולכן צריך להשבית אותו כדי לבצע את הפעולות הבאות:
הפעלת בוט העזרה
אפשר להפעיל את בוט העזרה של Business Messages במהלך יצירת הנציג או אחריה.
בוט העזרה מופעל כברירת מחדל כשיוצרים את הנציג הראשון.
כדי להפעיל את בוט העזרה במהלך יצירת הנציג, אפשר לעיין במאמר יצירת הנציג.
כדי להפעיל את Helper Bot אחרי יצירת הנציג, פועלים לפי השלבים הבאים:
- פותחים את מסוף הפיתוח של Business Communications.
- בוחרים את הנציג.
- בתפריט הניווט הימני, לוחצים על Integrations (שילובים).
- לצד בוט העזרה, לוחצים על הפעלה.
התחלת שיחה עם בוט העזרה
אחרי שמפעילים את בוט העזרה של Business Messages עבור הנציג, אפשר לנהל איתו שיחה.
- אם הפעלתם את בוט העזרה אחרי יצירת הנציג, עליכם לפעול לפי השלבים המפורטים בקטע בדיקת נציג.
- אם הפעלתם את בוט העזרה במהלך יצירת הנציג, תיפתח תיבת דו-שיח מיד כדי לעזור לכם להתחיל את השיחה. מבצעים את הפעולות הבאות בתיבת הדו-שיח הזו:
לגשת לכתובות ה-URL לבדיקה של הסוכן. יש כמה דרכים לעשות זאת:
- לוחצים על הלחצן Android או על הלחצן iOS. לאחר מכן, סורקים את קוד ה-QR באמצעות המכשיר הנייד המתאים ולוחצים על הפעלה.
לחלופין, לוחצים על העתקת כתובת ה-URL ל-Android או על העתקת כתובת ה-URL ל-iOS כדי להעתיק את כתובת ה-URL לבדיקה של הסוכן.
- לוחצים על שליחה כדי לשלוח את כתובות ה-URL לכתובת האימייל שלכם.
פותחים את כתובת ה-URL במכשיר הנייד. (במכשירי iOS נדרשת אפליקציית מפות Google).
השבתת בוט העזרה
כדי להתאים אישית את הנציג כך שאפשר יהיה לאמת אותו ולהפעיל אותו, קודם צריך להשבית את בוט העזרה של Business Messages.
כדי להשבית את בוט העזרה:
- פותחים את מסוף הפיתוח של Business Communications.
- בוחרים את הנציג.
- בתפריט הניווט הימני, לוחצים על Integrations (שילובים).
- בקטע בוט העזרה, לוחצים על השבתה.
כשבוט העזרה מושבת, הודעות של משתמשים נשלחות מ-Business Messages אל webhook שלכם.
השלבים הבאים
אחרי שבדקתם את התכונות של Business Messages, תוכלו להתחיל לפתח את הנציג.
אלא אם צוין אחרת, התוכן של דף זה הוא ברישיון Creative Commons Attribution 4.0 ודוגמאות הקוד הן ברישיון Apache 2.0. לפרטים, ניתן לעיין במדיניות האתר Google Developers. Java הוא סימן מסחרי רשום של חברת Oracle ו/או של השותפים העצמאיים שלה.
עדכון אחרון: 2024-12-21 (שעון UTC).
[null,null,["עדכון אחרון: 2024-12-21 (שעון UTC)."],[[["\u003cp\u003eThe Business Messages Helper Bot allows you to quickly experience the platform's features and learn implementation without needing a webhook.\u003c/p\u003e\n"],["\u003cp\u003eIt provides a guided exploration of rich features, implementation techniques, and helpful resources for agent setup.\u003c/p\u003e\n"],["\u003cp\u003eBefore launching your agent, the Helper Bot must be disabled to enable webhook integration, Dialogflow handling, and agent verification.\u003c/p\u003e\n"],["\u003cp\u003eYou can enable or disable the Helper Bot through the Business Communications Developer Console within your agent's integration settings.\u003c/p\u003e\n"],["\u003cp\u003eOnce you've explored the features, you can proceed to set up a webhook and customize your agent for launch.\u003c/p\u003e\n"]]],[],null,["# The Business Messages Helper Bot lets you quickly start a conversation with your\nagent so you can experience what the platform has to offer. Enabling the Helper\nBot is optional but highly recommended when creating your first agent.\n\nThe Helper Bot allows you to do the following:\n\n- Explore rich features\n- Learn how to implement features\n- Find resources for agent setup\n\n\nWhen the Helper Bot is enabled, it sends and receives messages for your agent;\nno webhook is required.\n\nSince the Helper Bot handles the messaging flow, it must be [disabled](/business-communications/business-messages/guides/how-to/agents/helper-bot#disable_the_helper_bot)\nbefore you can do any of the following:\n\n- [Set a webhook](/business-communications/business-messages/guides/how-to/agents?method=console#webhook)\n- [Use Dialogflow](/business-communications/business-messages/guides/how-to/integrate/dialogflow) to handle user messages\n- [Verify](/business-communications/business-messages/guides/how-to/verify) your agent\n- [Launch](/business-communications/business-messages/guides/how-to/launch/agents) your agent\n\nEnable the Helper Bot\n---------------------\n\nYou can enable the Business Messages Helper Bot during or after agent creation.\nThe Helper Bot is enabled by default when [creating your first agent](/business-communications/business-messages/guides/quickstarts/echo-agent#create_a_brand_and_an_agent).\n| **Caution:** If you already set up a [welcome message](/business-communications/business-messages/guides/how-to/agents/begin-conversation#welcome-message) or [conversation starters](/business-communications/business-messages/guides/how-to/agents/begin-conversation#conversation_starters) for your agent, the Business Messages Helper Bot will overwrite them.\n\nTo enable the Helper Bot during agent creation, see [Create the agent](/business-communications/business-messages/guides/how-to/agents?method=console#create_the_agent).\n\nTo enable the Helper Bot after agent creation, follow these steps:\n\n1. Open the [Business Communications Developer\n Console](https://business-communications.cloud.google.com?utm_source=/business-communications/business-messages/guides/how-to/agents/helper-bot&utm_medium=devsite&utm_campaign=business-messages).\n2. Select your agent.\n3. In the left navigation, click **Integrations**.\n4. For **Helper Bot** , click **Enable**.\n\nStart a conversation with the Helper Bot\n----------------------------------------\n\nOnce you've enabled the Business Messages Helper Bot for your agent, you can\nhave a conversation with it.\n\n- If you enabled the Helper Bot after agent creation, follow the steps in [Test an agent](/business-communications/business-messages/guides/how-to/agents?method=console#test-agent).\n- If you enabled the Helper Bot during agent creation, a dialog opens immediately to help you start the conversation. Take the following steps from this dialog:\n\n1. Access the agent's test URLs. There are a few ways you can do this:\n\n - Click the **Android** button or **iOS** button. Then scan the QR code with the corresponding mobile device and click **Launch** . Alternatively, click **Copy Android URL** or **Copy iOS URL** to copy the agent's test URL.\n - Click **Send** to send the URLs to your email address.\n2. Open the URL in your mobile device. (iOS devices require the\n [Google Maps](https://apps.apple.com/us/app/google-maps-transit-food/id585027354)\n app.)\n\nDisable the Helper Bot\n----------------------\n\nTo customize your agent so it can be [verified](/business-communications/business-messages/guides/how-to/verify)\nand [launched](/business-communications/business-messages/guides/how-to/launch/agents),\nyou need to disable the Business Messages Helper Bot first.\n\nTo disable the Helper Bot,\n\n1. Open the [Business Communications Developer\n Console](https://business-communications.cloud.google.com?utm_source=/business-communications/business-messages/guides/how-to/agents/helper-bot&utm_medium=devsite&utm_campaign=business-messages).\n2. Select your agent.\n3. In the left navigation, click **Integrations**.\n4. For **Helper Bot** , click **Disable**.\n\nWhen the Helper Bot is disabled, Business Messages sends user messages to your\n[webhook](/business-communications/business-messages/guides/concepts/webhook).\n\nNext steps\n----------\n\nNow that you've explored the Business Messages features, you can start\ndeveloping your agent.\n\n- [Set a webhook](/business-communications/business-messages/guides/how-to/agents#webhook) so your agent can send and receive messages.\n- [Customize your agent information](/business-communications/business-messages/guides/how-to/agents#update-agent)."]]