如要瞭解如何匯出至其他格式,包括圖片、影片和表格 (向量資料),請參閱「匯出資料」。
總覽
如要在線上地圖上顯示圖片資料 (光柵資料),您可以使用 Export.map.toCloudStorage() 匯出地圖圖塊。這個函式會將地圖圖塊金字塔匯出至 Cloud Storage 值區,以便公開或私人提供服務。當圖片資料太大,無法以單一圖片疊加時,這項功能就非常實用。這些圖塊會使用 Google 地圖圖塊座標,並適合透過 Google 地圖平台 (Maps API)、Google Earth for web 和其他地圖平台進行顯示。您可以使用匯出作業提供的 HTML 檔案,輕鬆在 Google 地圖或 Google 地球中預覽圖塊。
匯出作業有許多設定和步驟,視您要如何使用或發布圖塊而定,這些設定和步驟可能有用,也可能用不上。部分地圖平台要求資訊方塊必須公開,而其他平台則可使用私人資訊方塊。如果您使用其中一個 Google 地圖 API,可能需要具備 Google 地圖平台 API 金鑰。如果您要為 Google 地球或其他地圖平台提供圖塊,則可能需要根據您要使用的圖塊類型,設定適當的存取層級和 JS 存取 (CORS) 選項。如要瞭解必要設定,請參閱下方的平台專屬指南。
將地圖圖塊匯出至 Cloud Storage
以下範例會從加州某區域的 Landsat 圖像匯出圖塊。
程式碼編輯器 (JavaScript)
// --- Example Export Map Tiles - basic ---
// Specify area to clip/export, setup image and preview on map.
var exportRegion = ee.Geometry.BBox(-122.9, 37.1, -121.2, 38.2);
var landsatImage = ee.Image('LANDSAT/LC09/C02/T1_TOA/LC09_044034_20220111')
  .select(['B4', 'B3', 'B2'])
  .visualize({min: 0.02, max: 0.4, gamma: 1.2})
  .clip(exportRegion);
Map.addLayer(landsatImage, {}, 'landsatImage');
Map.centerObject(exportRegion);

// Set up Export task.
Export.map.toCloudStorage({
  image: landsatImage,
  description: 'mapTilesForEE',
  bucket: 'yourBucketName',  // replace with your GCS bucket name
  fileFormat: 'auto',
  maxZoom: 13,
  region: exportRegion,
  writePublicTiles: true
});
import ee
import geemap.core as geemap
Colab (Python)
# --- Example Export Map Tiles - basic ---
# Specify area to clip/export, setup image and preview on map.
export_region = ee.Geometry.BBox(-122.9, 37.1, -121.2, 38.2)
landsat_image = (
    ee.Image('LANDSAT/LC09/C02/T1_TOA/LC09_044034_20220111')
    .select(['B4', 'B3', 'B2'])
    .visualize(min=0.02, max=0.4, gamma=1.2)
    .clip(export_region)
)
m = geemap.Map()
m.add_layer(landsat_image, {}, 'landsatImage')
m.center_object(export_region)
display(m)

# Set up Export task.
task = ee.batch.Export.map.toCloudStorage(
    image=landsat_image,
    description='mapTilesForEE',
    bucket='yourBucketName',  # replace with your GCS bucket name
    fileFormat='auto',
    maxZoom=13,
    region=export_region,
    writePublicTiles=True,
)
task.start()
請注意,這會在指定的 Cloud Storage 值區中建立新目錄,並根據 description 參數預設命名。您可以使用 path 參數變更目錄名稱,或指定子目錄。您可以使用輸出目錄中的 index.html 和 earth.html 檔案,在 Google 地圖或 Google 地球中預覽圖塊。
ACL 和 CORS 選項
上例會設定圖塊的 ACL (存取控制清單),讓使用者可透過直接要求存取這些圖塊,但不會設定值區的 JS 存取權 (CORS 設定),讓網路應用程式存取這些圖塊。也就是說,這些匯出的圖塊可以在地圖和 Google 地球預覽畫面中查看,但無法用於需要 JS Access 的其他平台。系統會假設您是輸出儲存桶的擁有者。
如果您是指定輸出值區的寫入者 (但不是擁有者),請將 writePublicTiles 設為 false,以便使用輸出值區的預設物件 ACL。
如果您想讓所有網站應用程式都能公開存取資訊方塊,請將 bucketCorsUris: ['*'] 新增至工作參數。請注意,如果有第三方使用您的資訊方塊並產生雲端費用的風險,則不建議使用完整的公開 JS 存取權。如要限制這項功能,您可以將 JS Access 限制為僅適用於特定網域或網址的網頁應用程式。請注意,JS Access (CORS) 設定會套用至整個值區層級,而非資料夾或物件層級。
您可以分別使用 writePublicTiles 和 bucketCorsUris 參數,或從匯出工作對話方塊設定 ACL 和 CORS,如下所示:
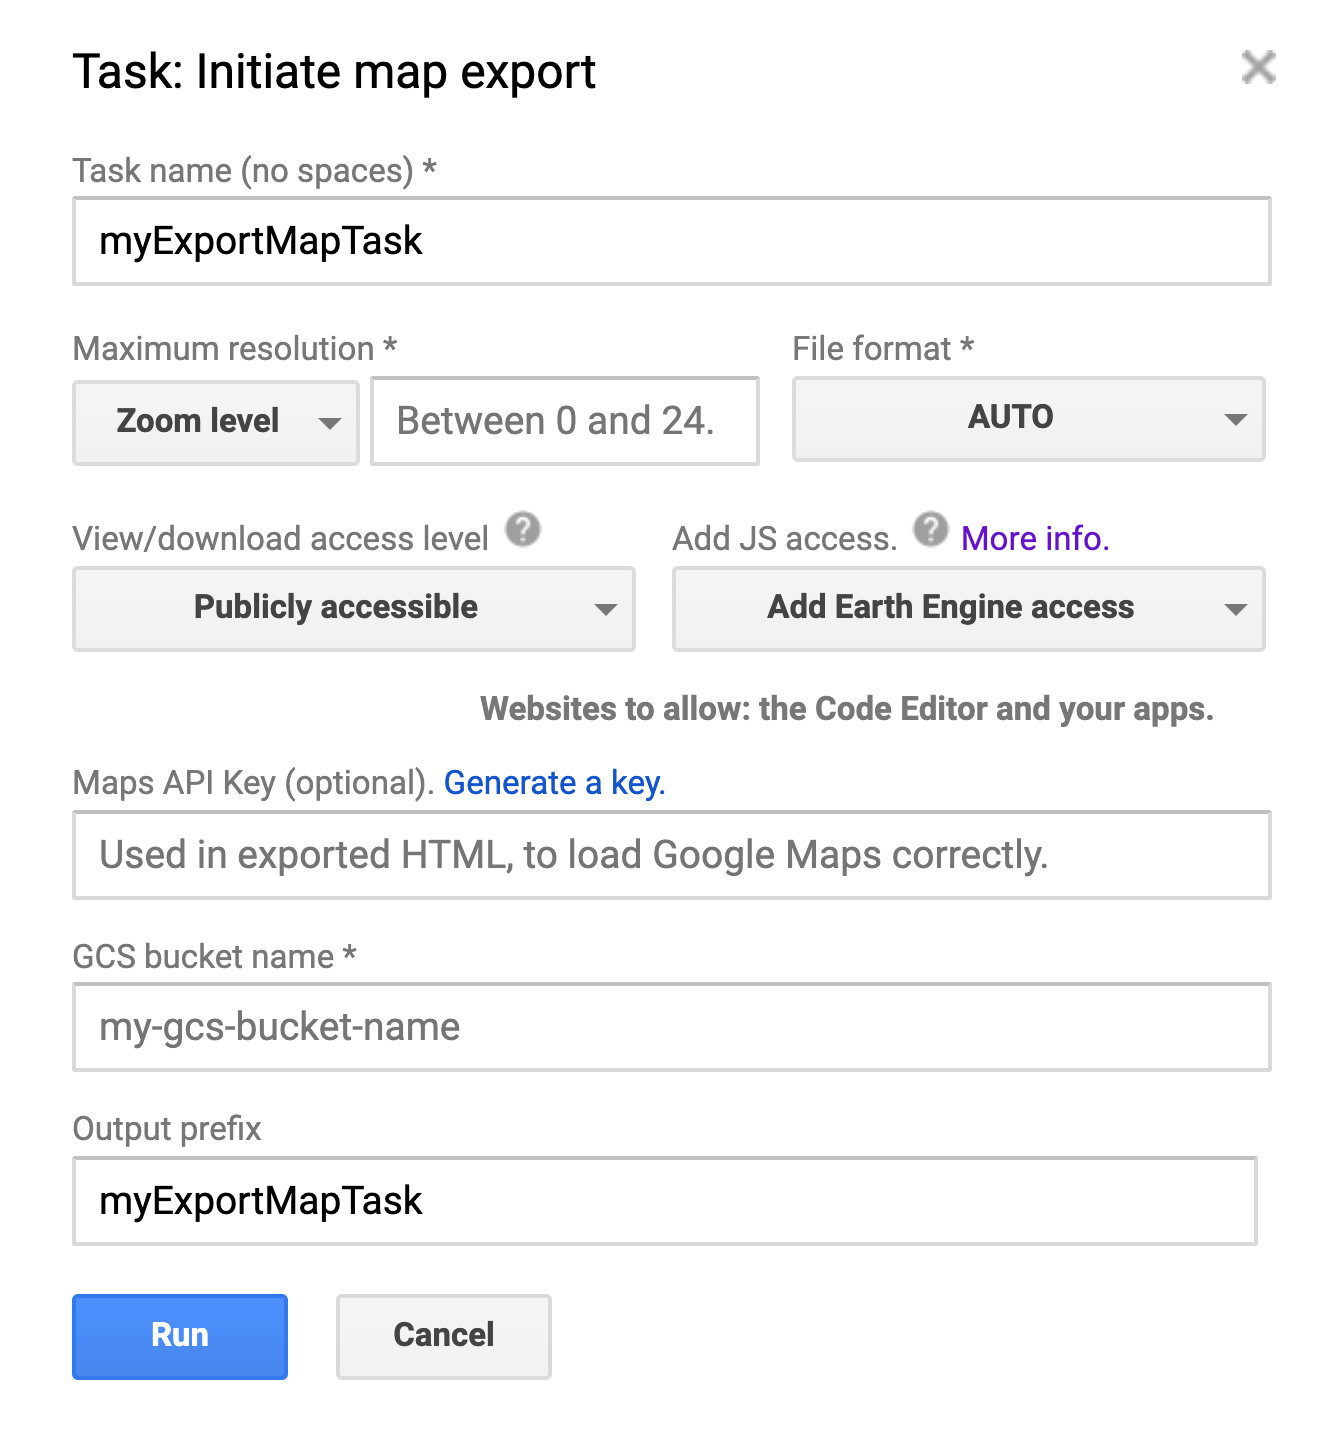
Export.map.toCloudStorage() 工作對話方塊。
- 查看/下載存取權。如果您想存取所有資訊 (例如透過程式碼編輯器或 Earth Engine 應用程式),就必須將圖塊設為「可公開存取」。
- JS 存取權。如果您希望程式碼編輯器、Earth Engine 應用程式或其他網頁應用程式能夠存取圖塊,則匯出地圖的儲存桶必須允許讀取。這些跨來源要求設定 (CORS) 必須在值區層級設定。為方便起見,Earth Engine 匯出對話方塊可讓您在匯出時為值區設定 CORS。
- 注意:JS Access / CORS 設定會套用至值區層級,而非資料夾或物件層級,因此變更設定後,會更新值區中所有資料夾和物件的設定。如需進一步瞭解,請參閱 Cloud Storage CORS 說明文件,包括如何查看值區目前的 CORS 設定。
參數清單
以下是地圖圖塊匯出工作所需的所有參數清單,其中列出程式碼中的參數 (引數) 名稱,以及工作對話方塊中的對應欄位 (如適用)。請注意,部分欄位互斥 (例如 maxzoom 和 scale)。詳情請參閱 Export.map 說明文件 。
| 程式碼中的引數 | 工作對話方塊中的欄位 | 附註 |
|---|---|---|
| 圖片 | 不適用 | 要匯出為圖塊的圖片。必須是圖片,而非圖片集合。 |
| 說明 | 工作名稱 | 任務的使用者可讀名稱。預設為「myExportMapTask」。如果未指定「path」(輸出前置字串) 參數,這個名稱也會用來做為圖塊的資料夾名稱。 |
| 值區 | GCS 值區名稱 | 要寫入的目的值區。 |
| fileFormat | 檔案格式 | 地圖圖塊的檔案格式,可選「auto」、「png」或「jpg」。 預設為「auto」,表示不透明的圖塊會編碼為「jpg」,含有透明度的圖塊則會編碼為「png」。 |
| 路徑 | 輸出內容前置字串 | 做為輸出路徑的字串。結尾的「/」為選用項目。預設為工作說明 (工作名稱) |
| writePublicTiles | 查看/下載存取層級 | 是否要寫入公開圖塊,而非使用值區的預設物件 ACL。預設值為 true,且叫用者為 bucket 的擁有者。 |
| maxZoom | 最大解析度和最大縮放比例 | 要匯出的地圖圖塊的最大縮放等級。 |
| 的保護 | 最大解析度和最大縮放比例 | 圖片的最大解析度,以每像素公尺為單位,可做為「maxZoom」的替代值。比例會轉換為赤道上最適合的最大縮放等級。 |
| minZoom | 最大解析度和最小縮放比例 | 要匯出的地圖圖塊可選的最小縮放等級。預設值為零。 |
| 區域 | 不適用 | 代表要匯出區域的線性環、多邊形或座標。詳情請參閱說明文件。 |
| skipEmptyTiles | 不適用 | 如果為 true,則略過寫入空白 (即完全透明) 地圖圖塊。預設值為 false。 |
| mapsApiKey | Maps API 金鑰 | 用於在 index.html 中初始化 Google 地圖 API。這麼做會從地圖中移除「僅供開發用途」訊息。 |
| bucketCorsUris | 新增 JS 存取權 (以及允許的網站) | 允許透過 JavaScript (CORS) 擷取匯出的圖塊的網域清單 (例如 https://code.earthengine.google.com)。 |
縮放
在上述範例中,maxZoom 設為 13。縮放等級會對應至不同大小的像素格線,用於顯示全球地圖。(詳情請參閱
像素座標參考資料
)。由於地球是圓形,因此在特定縮放等級下,像素的解析度會因緯度而異。具體來說,每個像素的距離會以 cos(latitude) 為因數遞減。下表列出 Google 墨卡托投影法在赤道 的每個縮放等級的每個像素對應的米數:
| 縮放級別 | 像素大小 (赤道) | 縮放級別 | 像素大小 (赤道) |
|---|---|---|---|
| 0 | 156 公里 | 10 | 152 公尺 |
| 1 | 78 公里 | 11 | 76 公尺 |
| 2 | 39 公里 | 12 | 38 公尺 |
| 3 | 20 公里 | 13 | 19 分鐘 |
| 4 | 10 公里 | 14 | 9.6 公尺 |
| 5 | 4.9 公里 | 15 | 4.8 公尺 |
| 6 | 2.4 公里 | 16 | 2.4 公尺 |
| 7 | 1.2 公里 | 17 | 1.2 公尺 |
| 8 | 611 公尺 | 18 | 0.6 公尺 |
| 9 | 305 公尺 | 19 | 0.3 公尺 |
| 20 | 0.15 公尺 |
從上表可知,範例中設定的 maxZoom 對應於赤道 19 公尺,在較高緯度則會縮小。這低於輸入圖片的每像素 30 角秒解析度。因此,在輸出
index.html
時顯示的地圖,可以放大至原始解析度。如要將地圖顯示畫面限制為原生像素解析度,請將 maxZoom 設為與原生解析度相符或更低的值。
平台專屬規範
以下是您可能想查看及使用地圖圖塊的平台。每個部分都會指出資訊方塊需要哪些設定才能與該平台搭配運作,以及範例程式碼的副本,其中包含必要的參數。
在 Earth Engine 中使用地圖圖塊 (程式碼編輯器或 EE 應用程式)
如果您只想將地圖圖塊匯出,以便在 Google Earth Engine 或 EE 應用程式中重複使用,請將「存取層級」設為「公開存取」,並將「JS 存取層級」(在工作對話方塊中) 設為「新增 Earth Engine 存取權」或「新增公開存取權」。或者,您也可以在程式碼中設定這些參數:
writePublicTiles: true,
bucketCorsUris: ['https://code.earthengine.google.com','https://*.earthengine.app']
匯出圖塊後,即可在 Earth Engine 中存取。
程式碼編輯器 (JavaScript)
// --- Export Map Tiles for use in EE ---
// Use image setup code from example at top of the page.
// Set up Export task.
Export.map.toCloudStorage({
  image: landsatImage,
  description: 'mapTilesForEE',
  bucket: 'yourBucketName',  // replace with your GCS bucket name
  fileFormat: 'auto',
  maxZoom: 13,
  region: exportRegion,
  writePublicTiles: true,
  bucketCorsUris: ['https://code.earthengine.google.com','https://*.earthengine.app']
});
import ee
import geemap.core as geemap
Colab (Python)
# --- Export Map Tiles for use in EE ---
# Use image setup code from example at top of the page.
# Set up Export task.
task = ee.batch.Export.map.toCloudStorage(
    image=landsat_image,
    description='mapTilesForEE',
    bucket='yourBucketName',  # replace with your GCS bucket name
    fileFormat='auto',
    maxZoom=13,
    region=export_region,
    writePublicTiles=True,
    bucketCorsUris=[
        'https://code.earthengine.google.com',
        'https://*.earthengine.app',
    ],
)
task.start()
查看 Google 地圖預覽畫面
如要在 Google 地圖上預覽地圖圖塊,請前往 Google Cloud Storage 中的輸出資料夾,然後在瀏覽器中開啟「index.html」檔案。這會開啟全頁地圖,使用 Google 地圖平台 Javascript API 在 Google 地圖上顯示您的圖塊,例如: index.html。基本匯出作業會導致底圖圖塊顯示為灰色,並加上「僅供開發使用」浮水印。如要避免這種情況並顯示標準 Google 底圖圖塊,請產生 API 金鑰,並將其納入匯出設定。
如果您在匯出時提供 API 金鑰,這個預覽頁面就會公開顯示,且可嵌入其他網頁,觀看者也不必是註冊 Earth Engine 使用者。
程式碼編輯器 (JavaScript)
// --- Export Map Tiles for use with Map Preview ---
// Use image setup code from example at top of the page.
// Set up Export task.
Export.map.toCloudStorage({
  image: landsatImage,
  description: 'mapTilesForMapPreview',
  bucket: 'yourBucketName',  // replace with your GCS bucket name
  fileFormat: 'auto',
  maxZoom: 13,
  region: exportRegion,
  writePublicTiles: true,
  mapsApiKey: 'fakeMapsApiKey012345' // replace with a valid API Key
});
import ee
import geemap.core as geemap
Colab (Python)
# --- Export Map Tiles for use with Map Preview ---
# Use image setup code from example at top of the page.
# Set up Export task.
task = ee.batch.Export.map.toCloudStorage(
    image=landsat_image,
    description='mapTilesForMapPreview',
    bucket='yourBucketName',  # replace with your GCS bucket name
    fileFormat='auto',
    maxZoom=13,
    region=export_region,
    writePublicTiles=True,
    mapsApiKey='fakeMapsApiKey012345',  # replace with a valid API Key
)
task.start()
查看 Google 地球預覽畫面
如要在 Google 地球網站上預覽地圖圖塊,請務必將圖塊的存取層級設為「公開存取」。接著前往 Google Cloud Storage 中的輸出資料夾,在瀏覽器中開啟「earth.html」檔案,例如: earth.html ,然後按一下畫面上顯示的「在 Google 地球中開啟」按鈕。這麼做會開啟 Google 地球,並在 3D 地圖上顯示圖塊。最佳做法是將「JS Access」層級設為「Publicly Accessible」,這樣您就能在 Google 地球中使用圖塊,而無需預覽檔案 (如果圖塊沒有必要的 JS Access/CORS 設定,就會使用 Proxy 伺服器)。
如要下載含有資料連結的 KML 檔案,請按一下 Google 地球中的 3 點圖示選單,然後選取「匯出為 KML 檔案」。注意:以這種方式產生的 KML 檔案與 Google 地球專業版 (Google 地球電腦版) 不相容。
程式碼編輯器 (JavaScript)
// --- Export Map Tiles for use with Earth Preview ---
// Use image setup code from example at top of the page.
// Set up Export task.
Export.map.toCloudStorage({
  image: landsatImage,
  description: 'mapTilesForEarthPreview',
  bucket: 'yourBucketName',  // replace with your GCS bucket name
  fileFormat: 'auto',
  maxZoom: 13,
  region: exportRegion,
  writePublicTiles: true,
  bucketCorsUris: []  // leaving blank is ok for Earth Preview only
  // for direct use in Earth, set to: ['https://earth.google.com']
  // or set to public: ['*'] (risk of misuse)
});
import ee
import geemap.core as geemap
Colab (Python)
# --- Export Map Tiles for use with Earth Preview ---
# Use image setup code from example at top of the page.
# Set up Export task.
task = ee.batch.Export.map.toCloudStorage(
    image=landsat_image,
    description='mapTilesForEarthPreview',
    bucket='yourBucketName',  # replace with your GCS bucket name
    fileFormat='auto',
    maxZoom=13,
    region=export_region,
    writePublicTiles=True,
    bucketCorsUris=[],  # leaving blank is ok for Earth Preview only
    # for direct use in Earth, set to: ['https://earth.google.com']
    # or set to public: ['*'] (risk of misuse)
)
task.start()
使用 Google 地圖平台 (Maps API) 發布
如要建立一組地圖圖塊,以便透過 Google 地圖平台公開發布,您必須擁有或建立 API 金鑰,並確認「存取層級」設為「公開可存取」。視 Maps API 應用程式存取圖塊的方式而定,您可能還需要為網站設定適當的「JS 存取層級」。匯出圖塊後,程式碼編輯器的「Task」分頁會提供圖塊的網址,其中包含可與 Google 地圖 API 搭配使用的適當變數,例如:
https://storage.googleapis.com/my_bucket/my_test_tiles/{Z}/{X}/{Y}
程式碼編輯器 (JavaScript)
// --- Export Map Tiles for use with Maps Platform APIs ---
// Use image setup code from example at top of the page.
// Set up Export task.
Export.map.toCloudStorage({
  image: landsatImage,
  description: 'mapTilesForMapsPlatform',
  bucket: 'yourBucketName',  // replace with your GCS bucket name
  fileFormat: 'auto',
  maxZoom: 13,
  region: exportRegion,
  writePublicTiles: true,
  bucketCorsUris: ['*'],  // '*' = All domains = risk of misuse
  // For better protection, specify the domain(s) where the
  // tiles will be used, eg: ['https://mysite.mydomain.com']
  mapsApiKey: 'fakeMapsApiKey012345' // replace with a valid API Key
});
import ee
import geemap.core as geemap
Colab (Python)
# --- Export Map Tiles for use with Maps Platform APIs ---
# Use image setup code from example at top of the page.
# Set up Export task.
task = ee.batch.Export.map.toCloudStorage(
    image=landsat_image,
    description='mapTilesForMapsPlatform',
    bucket='yourBucketName',  # replace with your GCS bucket name
    fileFormat='auto',
    maxZoom=13,
    region=export_region,
    writePublicTiles=True,
    bucketCorsUris=['*'],  # '*' = All domains = risk of misuse
    # For better protection, specify the domain(s) where the
    # tiles will be used, eg: ['https://mysite.mydomain.com']
    mapsApiKey='fakeMapsApiKey012345',  # replace with a valid API Key
)
task.start()
發布至 Google 地球 (網路版)
如要建立一組地圖圖塊,以便透過 Google 地球公開發布,您必須將存取層級設為「可公開存取」,並將 JS 存取層級設為允許「https://earth.google.com」(或「可公開存取」)。匯出後,您可以使用匯出目錄中的 earth.html 檔案,在 Google 地球中預覽這些檔案 (請參閱上方說明)。
程式碼編輯器 (JavaScript)
// --- Export Map Tiles for use with Google Earth web ---
// Use image setup code from example at top of the page.
// Set up Export task.
Export.map.toCloudStorage({
  image: landsatImage,
  description: 'mapTilesForEarthWeb',
  bucket: 'yourBucketName',  // replace with your GCS bucket name
  fileFormat: 'auto',
  maxZoom: 13,
  region: exportRegion,
  writePublicTiles: true,
  bucketCorsUris: ['https://earth.google.com']
  // ['*'] will also work, but risks misuse
});
import ee
import geemap.core as geemap
Colab (Python)
# --- Export Map Tiles for use with Google Earth web ---
# Use image setup code from example at top of the page.
# Set up Export task.
task = ee.batch.Export.map.toCloudStorage(
    image=landsat_image,
    description='mapTilesForEarthWeb',
    bucket='yourBucketName',  # replace with your GCS bucket name
    fileFormat='auto',
    maxZoom=13,
    region=export_region,
    writePublicTiles=True,
    bucketCorsUris=['https://earth.google.com'],
    # ['*'] will also work, but risks misuse
)
task.start()
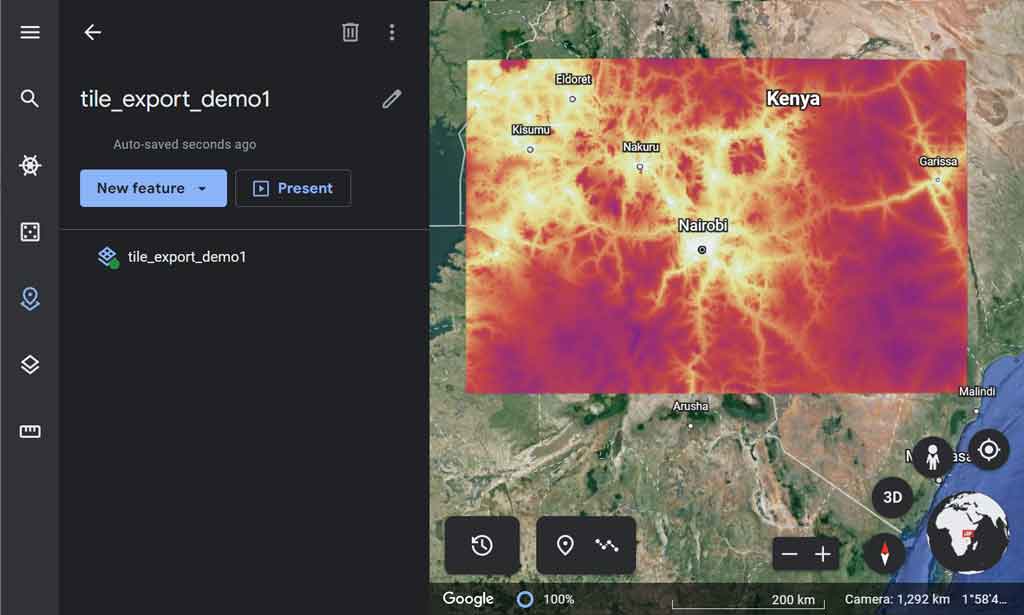
匯出圖塊後,您可以將圖塊新增至 Google 地球網頁版的專案中。程式碼編輯器「工作」分頁中的輸出內容 (如下圖所示) 會提供圖塊的網址,以及在 Google 地球中使用的適當變數,例如:
https://storage.googleapis.com/my_bucket/my_test_tiles/$[level]/$[x]/$[y]

如要在 Earth 網頁中使用這個功能,請建立 圖塊覆蓋圖層地圖項目,然後將這個網址設為「覆蓋圖層網址」。如果您的資料集不是全域資料集,且您想避免出現不存在的圖塊要求錯誤,請務必開啟「重疊選項」部分,並調整四個「圖塊涵蓋範圍」參數,使其與匯出的圖塊範圍相符。
發布至其他地圖平台
當您匯出資訊方塊供其他平台或應用程式使用時,必要的設定取決於這些平台或應用程式存取資訊方塊的方式。如要讓圖塊的存取權限盡可能廣泛,請將存取層級設為「公開存取」,並將 JS 存取層級設為「公開存取」。
產生 Google 地圖平台 API 金鑰
如果您打算將地圖圖塊與 Google 地圖平台搭配使用,或是想在 Google 地圖上預覽地圖圖塊,但不使用開發人員限制的底圖,則必須擁有或產生 Google 地圖平台 API 金鑰 ,並將其納入匯出設定,或稍後將其新增至網站。不過,如果要與 Google 地球搭配使用,則不需要執行這項操作。
從 Earth Engine 匯出地圖圖塊時,我們會產生範例 HTML 頁面,並儲存在輸出目錄中,方便您使用 Google 地圖平台 JavaScript API 預覽圖塊。您可以選擇在匯出時提供 Google 地圖平台 API 金鑰,這將用於範例檢視器的 API 呼叫。
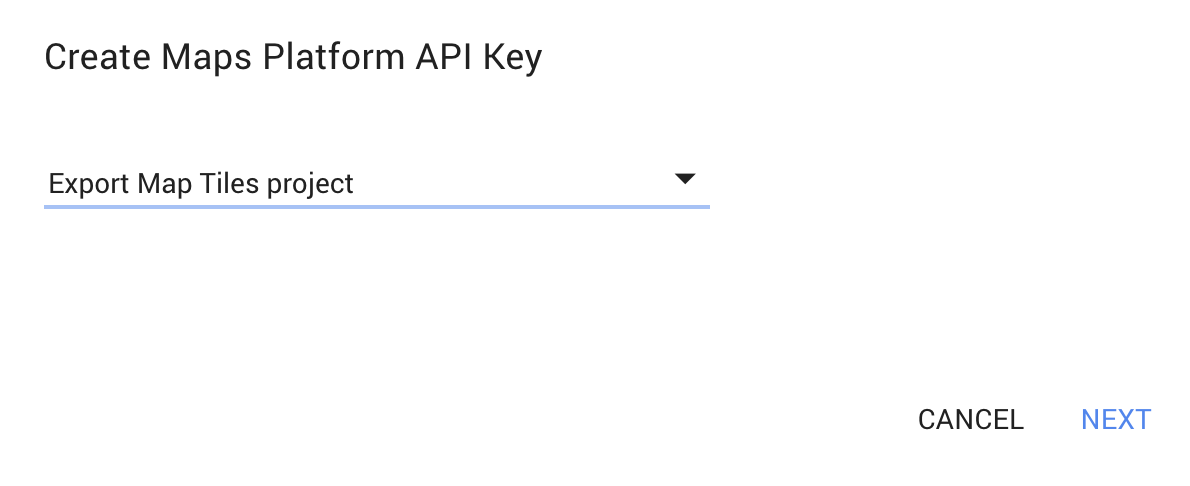
如要立即產生 Google 地圖平台 API 金鑰,請按照下列四個步驟操作:
- 點選下方的「建立 Maps Platform API 金鑰」按鈕。
- 選取 API 金鑰的 Cloud 專案,然後按一下「NEXT」。
- 按一下 複製新的鍵,然後貼到 Code Editor 中的「Export map」對話方塊。
- (建議) 按一下新金鑰下方的 API 控制台連結,設定參照網址限制。詳情請參閱參照網址和應用程式限制。

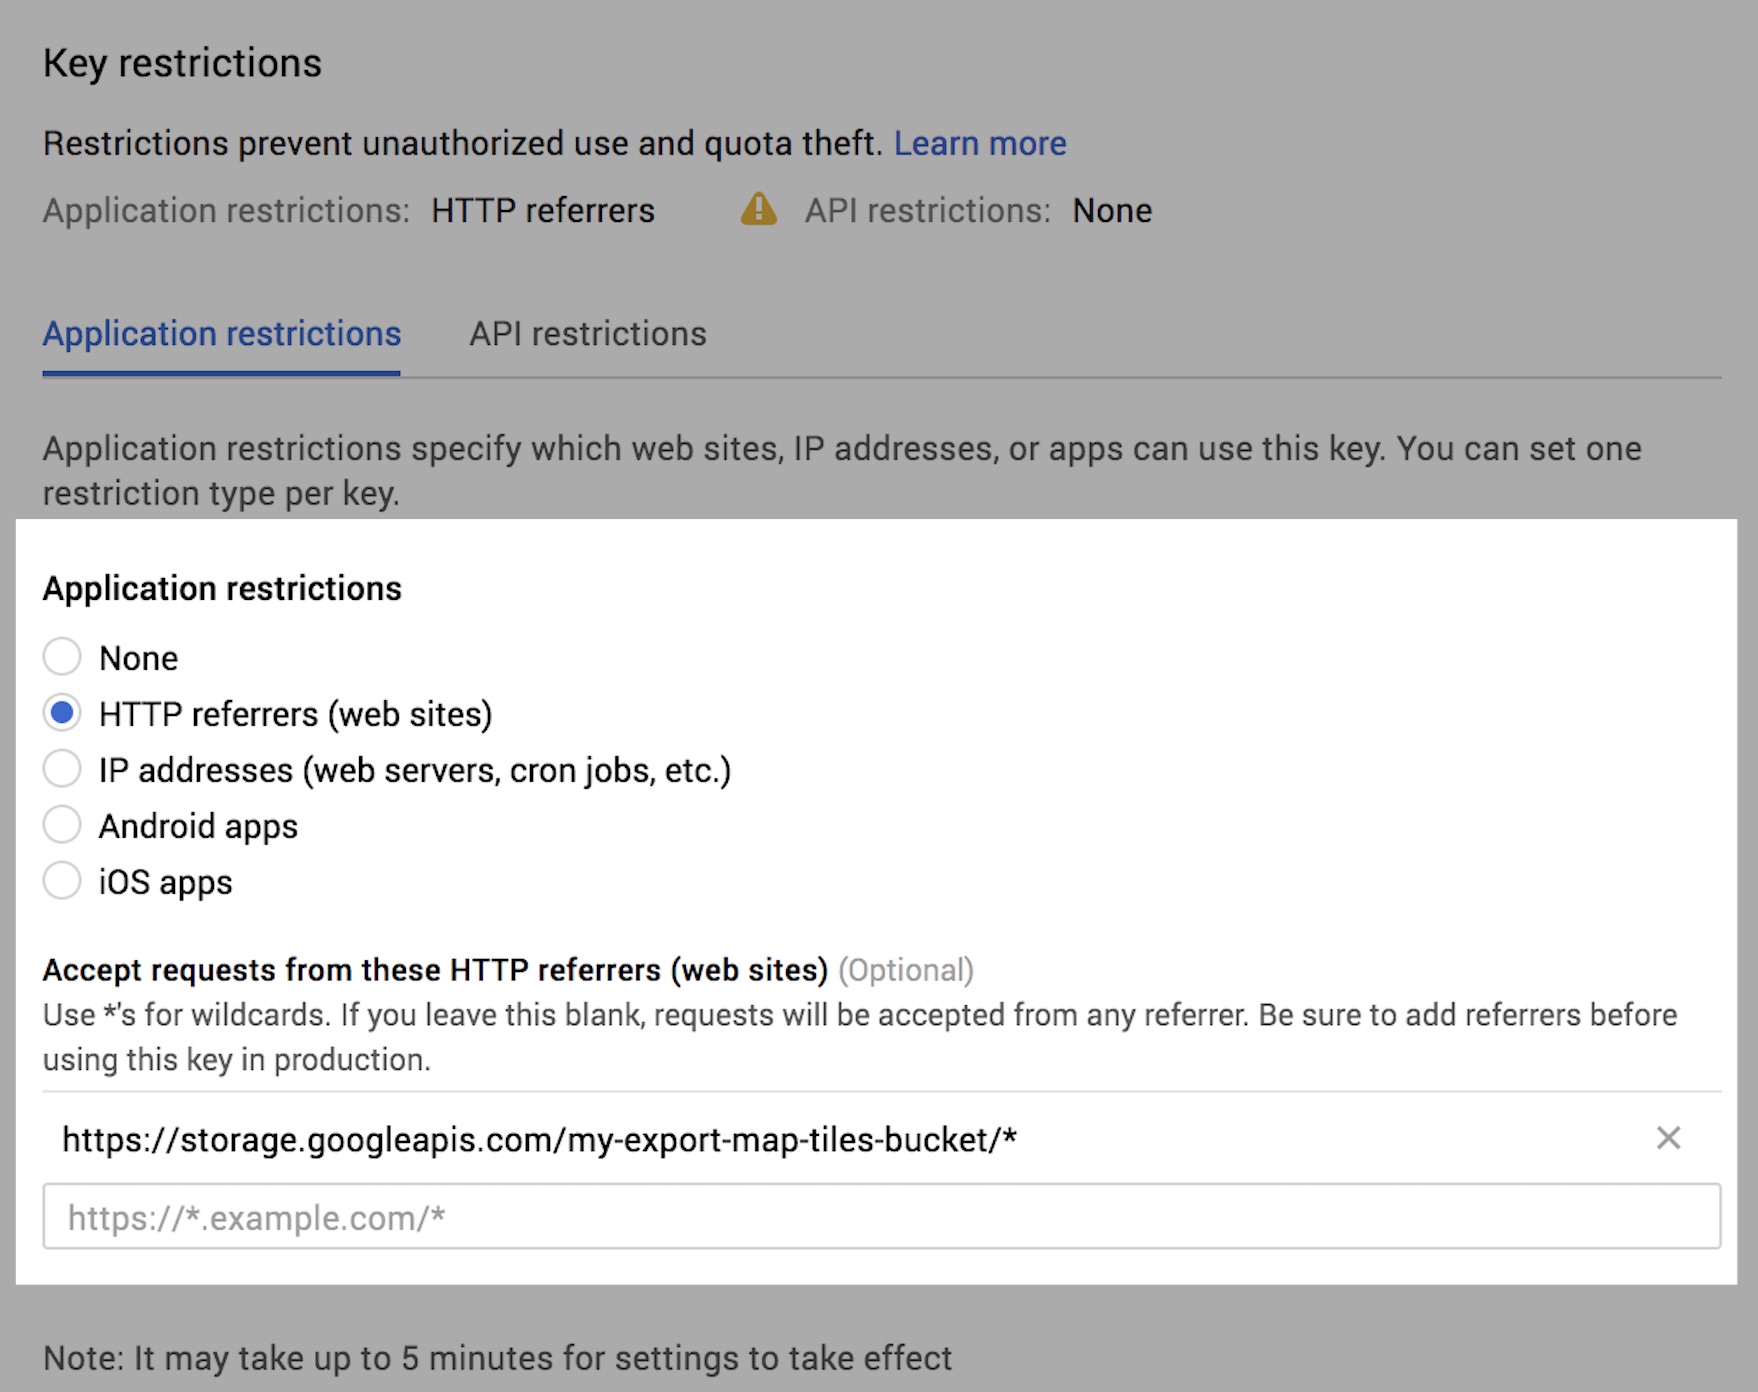
為 API 金鑰新增參照網址限制
新增 API 金鑰時,參照網址限制可確保只有指定的應用程式可以使用您的金鑰。您隨時可以前往 Cloud 控制台的「憑證」頁面,並按照下列步驟設定或編輯參照網址限制:
- 請確認您已在畫面頂端的下拉式選單中選取正確的專案名稱。
- 按一下上方產生的 Maps Platform API 金鑰,即可查看金鑰詳細資料。
-
選取「HTTP 參照網址 (網站)」,然後使用下列範本指定
Export.map.toCloudStorage中指定的 Cloud Storage 值區:https://storage.googleapis.com/{bucket}/* - 按一下「儲存」。畫面上應會顯示「儲存中...」指標。