面板
ui.Panel 是用於排列小工具的上層 UI 容器。每個 ui.Panel 都有一個 ui.Panel.Layout 物件,用於控制小工具在螢幕上的排列方式。詳情請參閱「版面配置」一節。面板也會維護已新增至其中的小工具清單 (可包含其他面板)。如要管理面板中的小工具,請從面板中add()或remove()小工具,或是在面板上呼叫 widgets() 來擷取小工具清單。小工具清單是 ui.data.ActiveList 的例項,也就是說,您可以透過操控清單和其中的小工具來設定面板。
ui.root
ui.root 是 ui.Panel 的固定例項,適用於水平列下方程式碼編輯器中的所有內容。根據預設,這個畫面只包含一個小工具:預設地圖。具體來說,ui.root.widgets().get(0) 中的項目是 Map 物件 (預設在程式碼編輯器中顯示的 ui.Map 例項)。除了 Map 別名之外,預設地圖的另一個特殊之處是內含幾何圖形編輯工具。如要取得可用於建構 UI 的空白畫布,請從 ui.root clear() 取得預設對應:
程式碼編輯器 (JavaScript)
ui.root.clear();
或者,您也可以在根面板中新增小工具,修改預設地圖。具體來說,您可以將地圖視為具有絕對版面配置的面板 (詳情請參閱「版面配置」一節)。以下範例說明如何修改預設地圖:
程式碼編輯器 (JavaScript)
// Load a VIIRS surface reflectance image and display on the map.
var image = ee.Image('NOAA/VIIRS/001/VNP09GA/2022_06_05').select('M.*');
Map.addLayer(image, {bands: ['M5', 'M4', 'M3'], min: 0, max: 4e3, gamma: 1.5});

// Create the title label.
var title = ui.Label('Click to inspect');
title.style().set('position', 'top-center');
Map.add(title);

// Create a panel to hold the chart.
var panel = ui.Panel();
panel.style().set({
  width: '400px',
  position: 'bottom-right'
});
Map.add(panel);

// Register a function to draw a chart when a user clicks on the map.
Map.style().set('cursor', 'crosshair');
Map.onClick(function(coords) {
  panel.clear();
  var point = ee.Geometry.Point(coords.lon, coords.lat);
  var chart = ui.Chart.image.regions(image, point, null, 30);
  chart.setOptions({title: 'Band values'});
  panel.add(chart);
});
請注意,這個範例會將預設地圖 (Map) 視為面板,並在其中新增小工具,藉此修改地圖。由於地圖有絕對版面配置,因此小工具在地圖上的顯示位置是由小工具 style 屬性的 position 屬性決定。詳情請參閱「絕對版面配置」一節。
當您與其他使用者分享 Code Editor 連結時,根據預設,ui.root 會佔用大部分視窗,而文字編輯器、文件面板和控制台則會隱藏。您可以控制 ui.root 版面配置,藉此控管其他使用者如何體驗您的指令碼。
版面配置
版面配置可控管面板中小工具的排列方式。有兩種版面配置選項,如下所述:流動版面配置和絕對版面配置。版面配置會使用 ui.Panel.Layout 類別指定。您可以在建構函式或 setLayout() 中設定面板的版面配置。新增小工具的順序會決定小工具在流程版面配置中如何排列。每個小工具的 position 屬性 style 會決定小工具如何在面板中以絕對版面配置排列。如果小工具的樣式與放置小工具的版面配置無關,系統會忽略該樣式。
流程
流程版面配置會以一列 ('horizontal') 或一欄 ('vertical') 的形式顯示小工具。小工具會依據加入面板的順序排列。舉例來說,請考慮將下列按鈕新增至面板:
程式碼編輯器 (JavaScript)
// Create a panel with vertical flow layout.
var panel = ui.Panel({
  layout: ui.Panel.Layout.flow('vertical'),
  style: {width: '300px'}
});

// Add a bunch of buttons.
for (var i = 0; i < 30; i++) {
  panel.add(ui.Button({label: 'Button ' + i, style: {stretch: 'horizontal'}}));
}

ui.root.clear();
ui.root.add(panel);
垂直版面配置應如下所示:

請注意,面板的 width 已設為 300 像素,而 stretch 則已設為 'horizontal',並使用 style 屬性。stretch 樣式屬性會套用至面板中具有流動版面配置的小工具。舉例來說,{stretch: 'horizontal'} 表示小工具會展開,填滿面板內的可用水平空間。在上述範例中,請將流程版面配置類型變更為 'horizontal',即可看到按鈕以一列而非一欄的方式排列。
在水平流程面板中,水平拉伸的小工具會在其他小工具占用其自然寬度後,展開填滿可用的空間。如果有多個小工具在水平方向上拉伸,可用的水平空間會平均分配給這些小工具。縱向拉伸的小工具會展開,填滿面板的高度。
在垂直流量面板中,垂直拉伸的小工具會在其他小工具占用其自然高度後,展開填滿可用的空間。如果有多個小工具以垂直方式延伸,可用的垂直空間會平均分配給這些小工具。水平拉伸的小工具會展開,填滿面板的寬度。
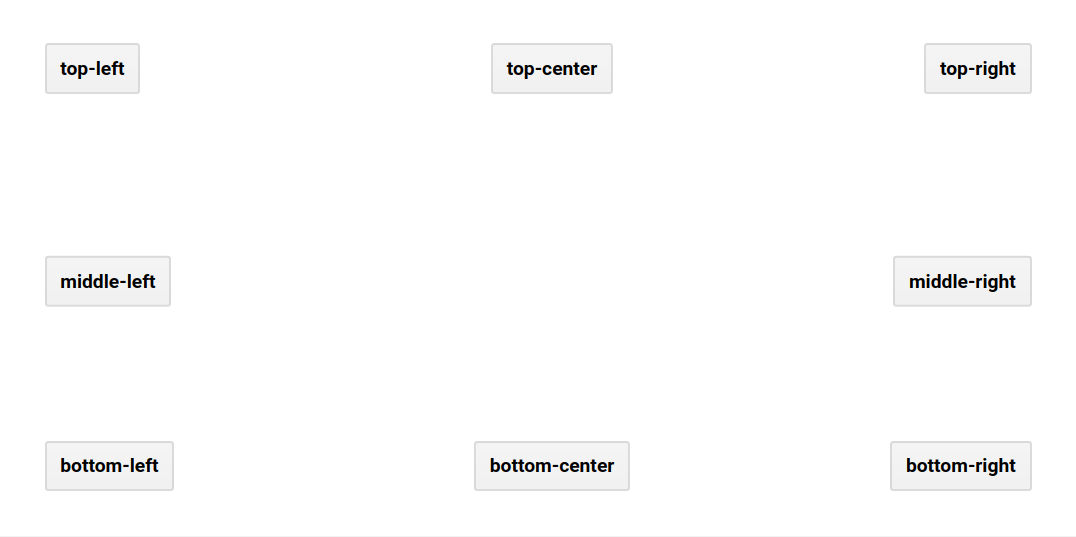
絕對值
絕對版面配置會根據面板中的定位,為小工具安排位置。與流程版面配置不同,小工具的位置是由小工具 style 屬性的 position 屬性決定,而非加入面板的順序。以下範例示範如何使用 root.ui 面板搭配絕對版面配置 (根面板的版面配置預設為水平流程,但可透過 ui.root.setLayout() 設定):
程式碼編輯器 (JavaScript)
ui.root.clear();
ui.root.setLayout(ui.Panel.Layout.absolute());

// A function to make buttons labeled by position.
function makeButton(position) {
  return ui.Button({
    label: position,
    style: {position: position}
  });
}

// Add labeled buttons to the panel.
ui.root.add(makeButton('top-left'));
ui.root.add(makeButton('top-center'));
ui.root.add(makeButton('top-right'));
ui.root.add(makeButton('middle-left'));
ui.root.add(makeButton('middle-right'));
ui.root.add(makeButton('bottom-left'));
ui.root.add(makeButton('bottom-center'));
ui.root.add(makeButton('bottom-right'));
絕對版面配置面板應如下所示:
widgets()
將小工具新增至資訊主頁時,系統會將小工具新增至資訊主頁的小工具清單。在面板上呼叫 widgets() 會傳回 ui.data.ActiveList,您可以使用該值來操作面板中的小工具。請參考以下範例,該範例會將小工具新增至面板,將面板新增至根面板,然後在使用者按下地圖時更新圖表:
程式碼編輯器 (JavaScript)
// Load and display NDVI data.
var ndvi = ee.ImageCollection('NOAA/VIIRS/001/VNP13A1')
    .filterDate('2021-01-01', '2022-01-01').select('NDVI');
Map.addLayer(
  ndvi.median(), {min: 0, max: 10000, palette: ['99c199', '006400']}, 'NDVI');

// Configure the map.
Map.setCenter(-94.84497, 39.01918, 8);
Map.style().set('cursor', 'crosshair');

// Create an empty panel in which to arrange widgets.
// The layout is vertical flow by default.
var panel = ui.Panel({style: {width: '400px'}})
    .add(ui.Label('Click on the map'));

// Set a callback function for when the user clicks the map.
Map.onClick(function(coords) {
  // Create or update the location label (the second widget in the panel)
  var location = 'lon: ' + coords.lon.toFixed(2) + ' ' +
                 'lat: ' + coords.lat.toFixed(2);
  panel.widgets().set(1, ui.Label(location));

  // Add a red dot to the map where the user clicked.
  var point = ee.Geometry.Point(coords.lon, coords.lat);
  Map.layers().set(1, ui.Map.Layer(point, {color: 'FF0000'}));

  // Create a chart of NDVI over time.
  var chart = ui.Chart.image.series(ndvi, point, ee.Reducer.mean(), 200)
      .setOptions({
        title: 'NDVI Over Time',
        vAxis: {title: 'NDVI'},
        lineWidth: 1,
        pointSize: 3,
      });

  // Add (or replace) the third widget in the panel by
  // manipulating the widgets list.
  panel.widgets().set(2, chart);
});

// Add the panel to the ui.root.
ui.root.add(panel);
在本範例中,請先觀察使用 add() 將小工具新增至面板。在註冊至對應點擊事件的回呼函式中,panel 的小工具清單會改為修改。具體來說,第三個小工具 (可能存在,也可能不存在) 會設為顯示 NDVI 隨時間變化的新圖表。如要進一步瞭解事件處理函式,請參閱「事件」頁面。